

authenticated role and sets the user’s token claims. Policies that use auth.uid() therefore work the same way as for requests from the Supabase client SDKs.
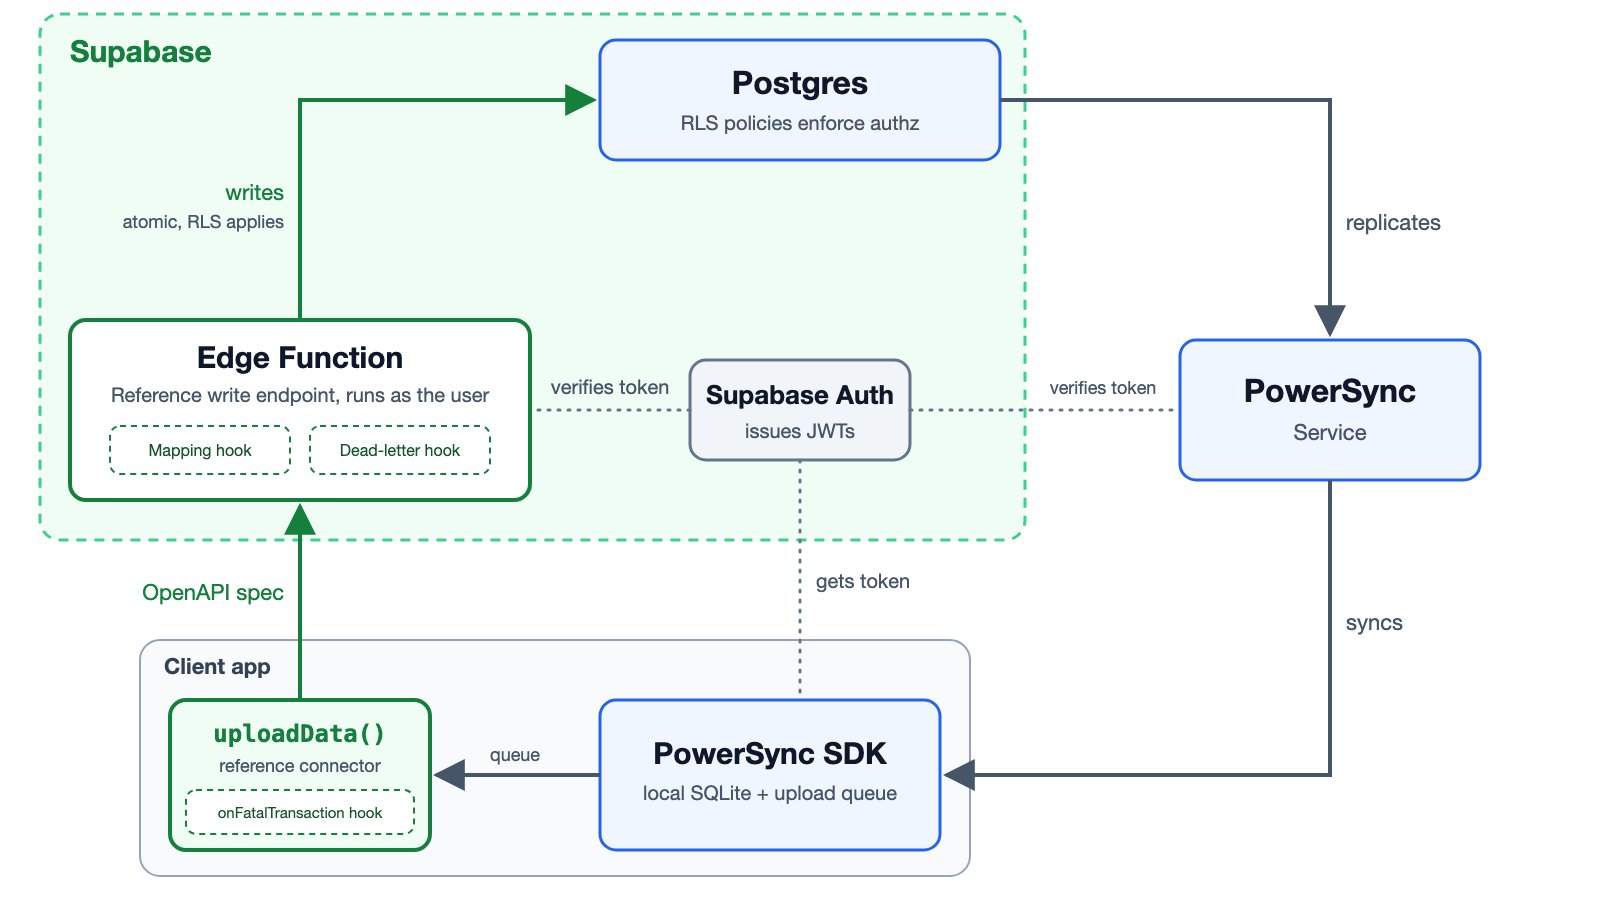
The Edge Function runs inside your Supabase project. Supabase Auth issues the tokens, and RLS policies authorize each write.
Before You Start
- PowerSync connected to your Supabase project and configured for Supabase Auth. See the Supabase guide.
- Your Supabase project signs tokens with asymmetric JWT signing keys, the default for new projects. Projects that use the legacy JWT secret must migrate first.
- Each table that your app writes to has an
idprimary key or unique column that holds the client’s row ID. - An app that signs users in with Supabase Auth.
- The Supabase CLI.
Set Up
1
Add Grants and RLS Policies
Grant the
authenticated role access to every table that your app writes to, enable RLS on each one, and add a policy for each operation that your app uploads:- A
PUTis an upsert, so it needsINSERTandUPDATEpolicies, and the existing row must be visible to the user. - A
PATCHneeds anUPDATEpolicy, and aDELETEneeds aDELETEpolicy.
WITH CHECK so that users can’t assign rows to someone else. For example:2
Deploy the Function
Clone powersync-reference-write-implementation. From its If Docker isn’t running, add To deploy from your own repository instead, see the repository’s Supabase Edge Function guide.
backend folder, link your project and deploy the function:--use-api to the deploy command.The function connects to your project’s database directly. Each function worker keeps up to three connections, and they all count against your database’s connection limit. If many workers run at once, set the function to use the transaction pooler. To configure it, copy the pooler connection string from Connect > Transaction pooler in the Supabase dashboard. URL-encode any special characters in the password and add sslmode=verify-full:3
Check the Deployment
401.4
Connect Your App
Copy the reference connector for your SDK into your app and pass it to The function accepts only a signed-in user’s access token. It rejects API keys, anon tokens, and service-role tokens.
connect(), as described in the reference write implementation’s Connect Your App step. Then make these changes to your copy:- Set the write endpoint URL to
https://<project-ref>.supabase.co/functions/v1/powersync-write. Your PowerSync instance URL doesn’t change. - Replace
fetchAuthToken()with code that returns the access token of the current Supabase session. ThefetchCredentials()in the Supabase example for your SDK shows how to read it. - Stop caching the token: return
fetchAuthToken()directly fromgetAuthToken(), as the comments in the example describe. The Supabase client SDK refreshes the session itself. The connector clears its cache only after a write request fails authentication, so while the cache is in place, sync keeps sending an expired token.
How Failures Are Handled
A policy can also hide a row from the user. A
PATCH or DELETE on a hidden row succeeds without changing anything. The app’s local change reverts after the next sync.
Because an RLS denial is retried, a mistake in a policy shows up as a growing upload queue and repeated uploadError values in the sync status. To stop one denied write from holding up the queue, add a retry limit to your copy of the connector. When a transaction reaches the limit, drop it or store it.
Customization
Edit these files inbackend/supabase/functions/powersync-write/, then deploy again:
Before Production
Before you deploy the function for real users, review the production checklist. It covers authorization, demo authentication, and how failed writes are recovered.Related Pages
- Reference Write Implementation: how uploads are applied, batching, and conflict behavior.
- Write Path Concepts: what happens when a write fails.
- Supabase guide: set up Supabase and PowerSync.