

- The reference write endpoint: a Node.js (Express) server that receives uploaded transactions and applies them to your source database. It supports Postgres, MongoDB, MySQL, and SQL Server.
- The reference connector: a backend connector with an
uploadData()that calls the reference write endpoint. There is one for each SDK in Backend Connector Examples. You copy it into your app.
authenticated role, so the grants and RLS policies that you set up for signed-in users don’t apply to its writes.
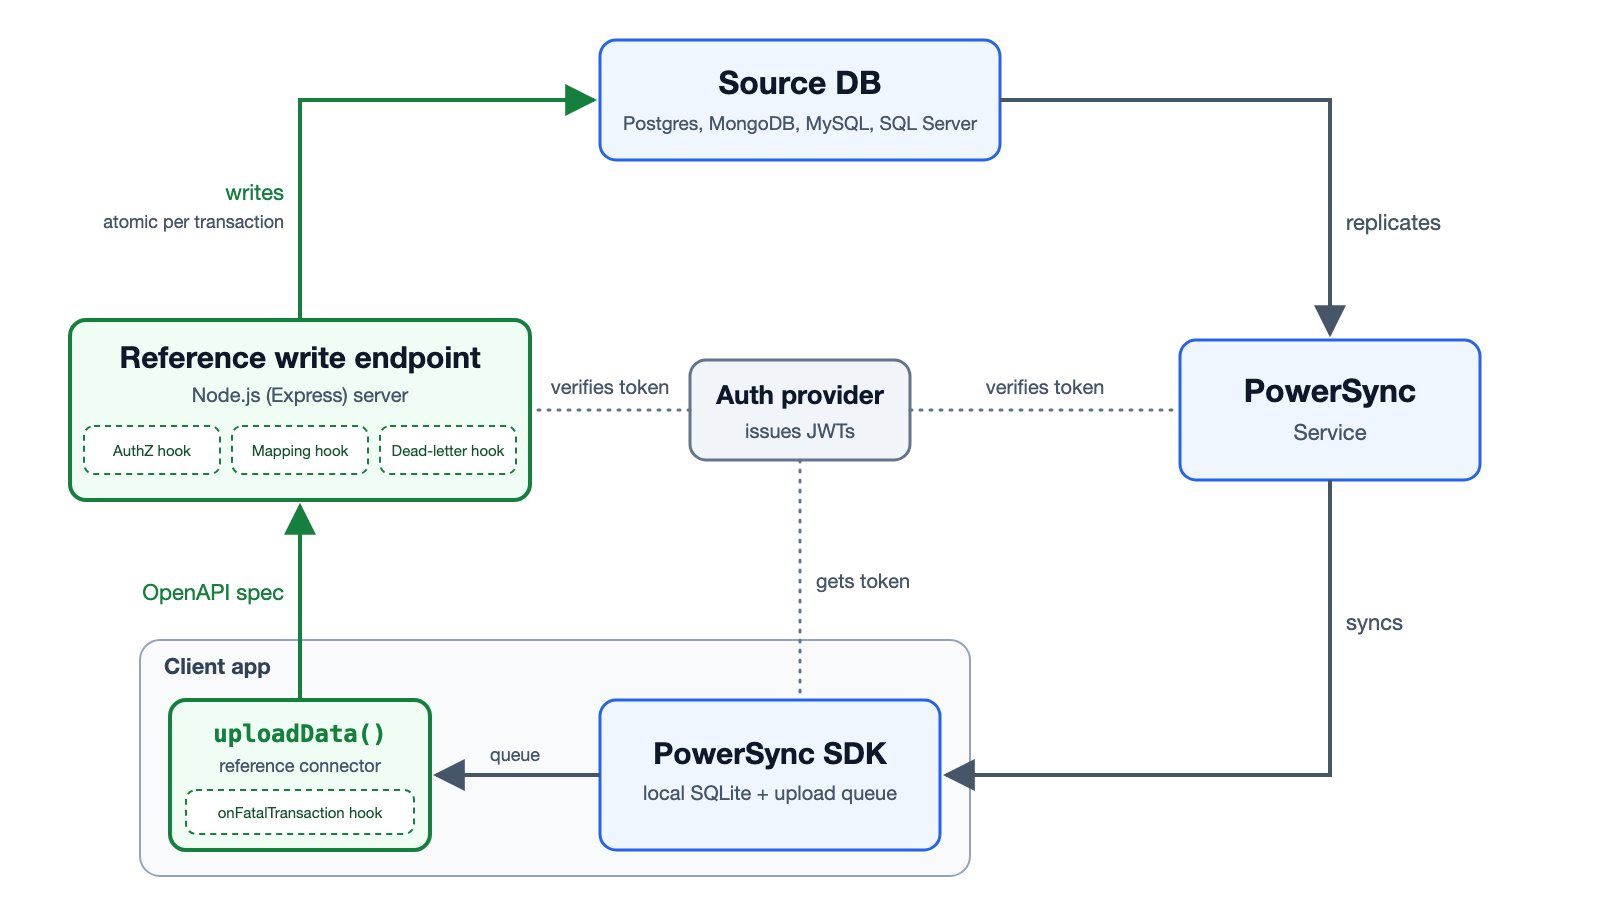
The reference connector sends queued transactions to the reference write endpoint, which applies each one to the source database.
Before You Start
- A PowerSync instance that replicates your source database.
- A PowerSync app.
- Each table that your app writes to has an
idprimary key or unique column that holds the client’s row ID. On MongoDB, each collection also needs a$jsonSchemavalidator that declares_idwith onebsonType:string,objectId,int, orlong. The reference write endpoint converts each row ID to that type. - Docker, or Node.js 24 and pnpm 9.
Set Up
1
Clone the Repository and Configure the Database
Clone powersync-reference-write-implementation. In a
.env.local file at the repository root, set:DATABASE_TYPE:postgres(the default),mongodb,mysql, ormssql.DATABASE_URI: the connection string for the database that your PowerSync instance replicates.
2
Configure Authentication
The reference write endpoint verifies the same JWTs as your PowerSync instance, so your app can use one token for syncing and for writes. It accepts only tokens signed with asymmetric keys. It reads its settings in one of two modes:
- File mode (the default): reads your PowerSync config. For PowerSync Cloud, export it with the PowerSync CLI:
Also set
AUTH_ISSUERto your auth provider’s issuer, unless you use Supabase Auth on a standard Supabase domain. For a non-Supabase Cloud export, setAUTH_INSTANCE_URLto your PowerSync instance URL, or setAUTH_AUDIENCEto the complete accepted audience list. See the authentication variables. - Env mode: set
AUTH_MODE=env,AUTH_ISSUER,AUTH_AUDIENCE, andAUTH_JWKS_URI. Use this for providers such as Clerk and Auth0, and for development tokens when you don’t have an auth provider yet.
3
Start the Write Endpoint
- Docker
- Node.js
From the repository root:
http://localhost:6060. At startup, it checks its settings and connects to the database. If a setting is invalid, it stops with an error that names the setting. While it runs, GET / returns 200, or 503 if it can’t reach the database.4
Connect Your App
Copy the reference connector for your SDK, the Custom Backend example in Backend Connector Examples, into your app. If your app already has a
fetchCredentials(), keep it, and copy only uploadData() and the code it uses.In your copy:- Set the write endpoint URL at the top of the file. Use a URL that the device can reach:
localhoston a phone refers to the phone. - Replace
[Your PowerSync instance URL or self-hosted endpoint]with your PowerSync instance URL. - Replace the placeholder
fetchAuthToken()with code that gets the current token from your auth provider. The connector caches the token until the write endpoint rejects it, so sync can keep sending an expired token after your provider refreshes the session. If your provider’s SDK refreshes sessions itself, return its current token directly instead of caching it, as the comments in the example describe.
connect() in place of your current connector. The Rust example has a connect() function that does this.The reference connector sends one transaction per request. For JavaScript and React Native apps, the repository’s example-client has a TypeScript connector that can also send several transactions per request and wait for the retry delay that the write endpoint suggests. See its README.5
Add Authorization
Add your checks to the
authorize() function in backend/standalone/src/auth/authorizer.ts. It receives the transaction’s operations and the verified token’s sub and claims, and returns false to reject the transaction. By default, it allows every write and logs an error for each transaction until you replace it. See the repository’s authorization guide.On Postgres, the reference write endpoint also sets request.jwt.claims for each transaction, which RLS policies can read. Postgres skips RLS for table owners, superusers, and roles with BYPASSRLS, so policies only apply if DATABASE_URI connects as a role without those rights. A policy can also make an UPDATE or DELETE change nothing instead of failing. Don’t rely on RLS alone unless you’ve checked both.How Uploads Are Applied
The reference connector sends transactions to a single endpoint,POST /api/data. The reference write endpoint applies each transaction in its own database transaction, so either all of its changes are stored or none are. It returns one result per transaction, in the order they were sent.
The reference connector sends one transaction per request. The TypeScript connector in the repository’s example-client can send up to 50 transactions in one request: set its maximum batch size. It never splits a transaction across requests.
The reference write endpoint has no conflict detection. Writes are applied in the order they arrive, so the last write to a column wins. A PATCH to a deleted row changes nothing, and a PUT with the ID of a deleted row creates the row again. See the repository’s conflict resolution notes and Handling Update Conflicts.
How Failures Are Handled
The reference write endpoint classifies each failed transaction, and the reference connector acts on the result:
To resolve a blocked transaction, override
onFatalTransaction() in your copy of the connector. Return 'complete' to drop the transaction, or 'retain' to keep it. The default keeps it.
The default dead-letter hook doesn’t store anything. To keep rejected writes, replace onDeadLetter() in backend/standalone/src/fatal-error-handler.ts with code that writes them to your own storage. See the repository’s error handling guide.
Customization
Before Production
Before you deploy the reference write endpoint for real users, review the following defaults. The reference repository README has the same checklist.- Configure write authorization. The standalone write endpoint allows every write from an authenticated user by default. Add your checks to
authorize()(step 5 in Set Up) or use Postgres RLS. See Authorization. For the Supabase Edge Function, check that your grants and RLS policies cover every table and operation that your app writes to. - Replace placeholder authentication. The reference connector returns a placeholder token. Use your auth provider’s session and token refresh instead, as described in Connect Your App.
- Decide how to recover rejected writes. By default, the write endpoint logs rejected writes, and the connector removes them from the upload queue. The dead-letter hook does not store them or guarantee delivery. Replace
onDeadLetter()with recovery that suits your app. See Error handling. - Handle blocked transactions. A blocked transaction stays in the upload queue and holds back every later write. Override
onFatalTransaction()in your connector to show the problem to the user. Also review the authorization failure defaults: the Supabase Edge Function retries RLS errors, but removes transactions that its optionalauthorize()check denies. - Validate your data and mapping. Review which tables and fields users can write, who owns each row, and how values are validated. The default mapping does not validate data for your app.
- Review conflict and retry behavior. Check that the conflict resolution behavior suits your app. Make custom writes and side effects safe to repeat, because the connector can send an upload more than once.
Related Pages
- Write Path Concepts: authentication and what happens when a write fails.
- Build Your Own Write Endpoint: implement the same API contract in another backend stack.
- Client-Side Integration: the backend connector, and when the SDK calls
uploadData().