PowerSync needs to connect to your source database (Postgres, MongoDB, MySQL or SQL Server) to replicate data. Before setting up PowerSync, you need to configure your database with the appropriate permissions and replication settings.
Using the PowerSync CLI and want an automatically integrated Postgres instance for local development? You can skip to Step 2 and set one up with the CLI (Self-Hosted) tab.
Postgres
MongoDB Atlas
MySQL (beta)
SQL Server (Beta)
Configuring Postgres for PowerSync involves three main tasks:
Enable logical replication: PowerSync reads the Postgres WAL using logical replication. Set wal_level = logical in your Postgres configuration.
Create a PowerSync database user: Create a role with replication privileges and read-only access to your tables.
Create a powersync publication: Create a logical replication publication named powersync to specify which tables to replicate.
Copy
-- 1. Enable logical replication (requires restart)ALTER SYSTEM SET wal_level = logical;-- 2. Create PowerSync database user/role with replication privileges and read-only access to your tablesCREATE ROLE powersync_role WITH REPLICATION BYPASSRLS LOGIN PASSWORD 'myhighlyrandompassword';-- Set up permissions for the newly created role-- Read-only (SELECT) access is requiredGRANT SELECT ON ALL TABLES IN SCHEMA public TO powersync_role;-- Optionally, grant SELECT on all future tables (to cater for schema additions)ALTER DEFAULT PRIVILEGES IN SCHEMA public GRANT SELECT ON TABLES TO powersync_role;-- 3. Create a publication to replicate tables. The publication must be named "powersync"CREATE PUBLICATION powersync FOR ALL TABLES;
Version compatibility: PowerSync requires Postgres version 11 or greater.
Learn More
For more details on Postgres setup, including provider-specific guides (Supabase, AWS RDS, etc.), see Source Database Setup.
Self-hosting PowerSync? See the Self-Host-Demo App for a complete working example of connecting a Postgres source database to PowerSync.
For MongoDB Atlas databases, the minimum permissions when using built-in roles are:
To allow PowerSync to automatically enable changeStreamPreAndPostImages on replicated collections (optional, but recommended), additionally add:
Copy
dbAdmin@<your_database>
Version compatibility: PowerSync requires MongoDB version 6.0 or greater.
Learn More
For more details including instructions for self-hosted MongoDB, or for custom roles on MongoDB Atlas, see Source Database Setup.
Self-hosting PowerSync? See the Self-Host-Demo App for a complete working example of connecting a MongoDB source database to PowerSync.
For MySQL, you need to configure binary logging and create a user with replication privileges:
Copy
  -- Configure binary logging
  -- Add to MySQL option file (my.cnf or my.ini):
  server_id=<Unique Integer Value>
  log_bin=ON
  enforce_gtid_consistency=ON
  gtid_mode=ON
  binlog_format=ROW

  -- Create a user with necessary privileges
  CREATE USER 'repl_user'@'%' IDENTIFIED BY '<password>';

  -- Grant replication client privilege
  GRANT REPLICATION SLAVE, REPLICATION CLIENT ON *.* TO 'repl_user'@'%';

  -- Grant select access to the specific database
  GRANT SELECT ON <source_database>.* TO 'repl_user'@'%';

  -- Apply changes
  FLUSH PRIVILEGES;
Version compatibility: PowerSync requires MySQL version 5.7 or greater.
Self-hosting PowerSync? See the Self-Host-Demo App for a complete working example of connecting a MySQL source database to PowerSync.
Refer to these instructions.Self-hosting PowerSync? See the Self-Host-Demo App for a complete working example of connecting a SQL Server source database to PowerSync.
PowerSync is available as a cloud-hosted service (PowerSync Cloud) or can be self-hosted (PowerSync Open Edition or PowerSync Enterprise Self-Hosted Edition).
Dashboard (Cloud)
CLI (Cloud)
CLI (Self-Hosted)
Manual (Self-Hosted)
If you haven’t yet, sign up for a free PowerSync Cloud account here.After signing up, you will be taken to the PowerSync Dashboard.Here, create a new project. Development and Production instances of the PowerSync Service will be created by default in the project.
If you haven’t yet, sign up for a free PowerSync Cloud account here.Install the PowerSync CLI (requires Node.js/npm), then log in and scaffold the config directory:
This creates a powersync/ directory with service.yaml (instance name, region, connection, auth) and sync-config.yaml (sync config). Edit powersync/service.yaml to set your instance name and region — you’ll configure the database connection in the next step.Then create the Cloud instance:
Copy
powersync link cloud --create --project-id=<project-id>
Find your project ID in the PowerSync Dashboard URL, or run powersync fetch instances after logging in.
Recommended for getting started: the CLI scaffolds your config directory and generates the Docker Compose stack (including a Postgres instance for the source database and storage) so you can run PowerSync locally with minimal setup. For custom setups use the Manual (Self-Hosted) tab. Install the PowerSync CLI (requires Node.js/npm); alternative installation options (e.g. installers via GitHub releases) will be available in the near future. Then run:
Docker sets up Postgres for both the source database and bucket storage and creates powersync/docker/docker-compose.yaml. Other databases are supported as well, you will learn more about this in the next step. Before starting, replace powersync/sync-config.yaml with this minimal sync config:
Copy
config: edition: 2streams: todos: # Streams without parameters sync the same data to all users auto_subscribe: true query: "SELECT * FROM todos"
You’ll update this with your actual tables/collections in a later step.The Docker Postgres instance runs init scripts only on first start. Create your specific tables before running powersync docker start for the first time. See the Docker usage docs in the PowerSync CLI repository for more details.Then start the PowerSync Service:
Self-hosted PowerSync runs via Docker. The commands below illustrate the basic PowerSync Service requirements.Below is a minimal example using Postgres for bucket storage. MongoDB is also supported as bucket storage. The source database connection is configured in the next step — you can use the Docker-managed Postgres from Step 1 or point to an external database instead.
Copy
# 1. Create a directory for your configmkdir powersync-service && cd powersync-service# 2. Set up bucket storage (Postgres and MongoDB are supported)docker run -d \ --name powersync-postgres-storage \ --network powersync-network \ -p 5433:5432 \ -e POSTGRES_PASSWORD="my_secure_storage_password" \ -e POSTGRES_DB=powersync_storage \ postgres:18## Set up Postgres storage userdocker exec -it powersync-postgres-storage psql -U postgres -d powersync_storage -c "CREATE USER powersync_storage_user WITH PASSWORD 'my_secure_user_password';GRANT CREATE ON DATABASE powersync_storage TO powersync_storage_user;"# 3. Create service.yaml (see below)# 4. Run PowerSync Service# The Service config can be specified as an environment variable (shown below), as a filepath, or as a command line parameter# See these docs for more details: https://docs.powersync.com/configuration/powersync-service/self-hosted-instancesdocker run -d \ --name powersync \ --network powersync-network \ -p 8080:8080 \ -e POWERSYNC_CONFIG_B64="$(base64 -i ./service.yaml)" \ journeyapps/powersync-service:latest
Basic service.yaml structure:
Copy
# Source database connection (see the next step for more details)replication: connections: - type: postgresql # or mongodb, mysql, mssql uri: postgresql://powersync_role:myhighlyrandompassword@powersync-postgres:5432/postgres sslmode: disable # Only for local/private networks# Connection settings for bucket storage (Postgres and MongoDB are supported)storage: type: postgresql uri: postgresql://powersync_storage_user:my_secure_user_password@powersync-postgres-storage:5432/powersync_storage sslmode: disable # Use 'disable' only for local/private networks# Sync Streams config (defined in a later step)sync_config: content: | config: edition: 3 streams: shared_data: auto_subscribe: true queries: - SELECT * FROM lists - SELECT * FROM todos
Note: This example assumes you’ve configured your source database with the required user and publication (see the previous step)
and are running it via Docker in the ‘powersync-network’ network.If you are not using Docker, you will need to specify the connection details in the service.yaml file manually (see next step for more details).
The next step is to connect your PowerSync Service instance to your source database.
Dashboard (Cloud)
CLI (Cloud)
CLI (Self-Hosted)
Manual (Self-Hosted)
In the PowerSync Dashboard, select your project and instance, then go to Database Connections:
Click Connect to Source Database
Select the appropriate database type tab (Postgres, MongoDB, MySQL or SQL Server)
Fill in your connection details:
Note: Use the username (e.g., powersync_role) and password you created in Step 1: Configure your Source Database.
Postgres: Host, Port (5432), Database name, Username, Password, SSL Mode
MongoDB: Connection URI (e.g., mongodb+srv://user:pass@cluster.mongodb.net/database)
MySQL: Host, Port (3306), Database name, Username, Password
SQL Server: Name, Host, Port (1433), Database name, Username, Password
Click Test Connection to verify
Click Save Connection
PowerSync will now deploy and configure an isolated cloud environment, which can take a few minutes.
Learn MoreFor more details on database connections, including provider-specific connection details (Supabase, AWS RDS, MongoDB Atlas, etc.), see Source Database Connection.
Edit powersync/service.yaml (created in the previous step) with your connection details. Use !env for secrets:
Note: Use the username (e.g., powersync_role) and password you created in Step 1: Configure your Source Database.
Copy
replication:
  connections:
    - type: postgresql
      uri: postgresql://powersync_role:myhighlyrandompassword@host:5432/postgres
      sslmode: disable # 'verify-full' (default) or 'verify-ca' or 'disable'
      # Note: 'disable' is only suitable for local/private networks
You will run powersync deploy in a later step to deploy your config to the PowerSync Cloud instance.
Learn MoreFor more details on database connections, including provider-specific connection details (Supabase, AWS RDS, MongoDB Atlas, etc.), see Source Database Connection.
If you used Docker in the previous step, the source database connection is already configured. service.yaml reads the connection URI from !env PS_DATA_SOURCE_URI. The Docker-managed Postgres (pg-db) was also pre-configured with wal_level=logical and a powersync publication by the init scripts.If you want to use an external database instead, update PS_DATA_SOURCE_URI in powersync/docker/.env with your connection details, then restart:
Copy
powersync docker reset
You’ll also need to complete the source database setup from Step 1 (replication user, publication) on your external database before this will work.
Configure the source database connection in your service.yaml file (as you did in the previous step). Examples for the different database types are below.
Note: Use the username (e.g., powersync_role) and password you created in Step 1: Configure your Source Database.
Copy
replication:
  connections:
    - type: postgresql
      uri: postgresql://powersync_role:myhighlyrandompassword@powersync-postgres:5432/postgres
      sslmode: disable # 'verify-full' (default) or 'verify-ca' or 'disable'
      # Note: 'disable' is only suitable for local/private networks, not for public networks
Learn MoreSee the self-host-demo app for complete working examples of the different database types.
PowerSync uses either Sync Streams (or legacy Sync Rules) to control which data gets synced to which users/devices. Both use SQL-like queries defined in YAML format.
Sync Streams (Recommended)
Sync Rules (Legacy)
Sync Streams are now in beta and production-ready. We recommend Sync Streams for new projects — they offer a simpler syntax and support on-demand syncing for web apps.Start with simple auto-subscribed streams that sync data to all users by default:
Copy
config: edition: 3streams: shared_data: auto_subscribe: true queries: - SELECT * FROM todos - SELECT * FROM lists WHERE NOT archived
Go to the Sync Streams or Sync Rules view (depending on which you’re using)
Edit the YAML directly in the dashboard
Click Deploy to validate and deploy your Sync Rules
Edit powersync/sync-config.yaml with your sync config, then validate and deploy to the linked Cloud instance:
Copy
powersync validatepowersync deploy
This deploys your full config (connection, auth, and sync config). For subsequent sync-only changes, use powersync deploy sync-config instead.
Edit powersync/sync-config.yaml with your sync config. The default file has a placeholder (SELECT * FROM todos) — replace it with your actual table/collection names. Then apply the changes:
Copy
powersync validatepowersync docker reset
Add a sync_config section to your service.yaml. Using a separate file (recommended) keeps the main config tidy:Recommended — reference a separate file:
service.yaml
Copy
sync_config:
  path: sync-config.yaml
Put your streams or rules in sync-config.yaml (see Self-Hosted Instance Configuration for full examples). Alternatively, you can use inline content: | with the YAML nested under sync_config.
Table/collection names in your configuration must match the table names defined in your client-side schema (defined in a later step below).
For quick development and testing, you can generate a temporary development token instead of implementing full authentication.You’ll use this token for two purposes:
Testing with the Sync Diagnostics Client (in the next step) to verify your setup and Sync Streams (or legacy Sync Rules)
Connecting your app (in a later step) to test the client SDK integration
Check the Development tokens setting and save your changes
Click the Connect button in the top bar
Enter token subject: Since you’re starting with simple streams or buckets that sync all data to all users (as we recommended in the previous step), you can just put something like test-user as the token subject (which would normally be the user ID you want to test with).
Click Generate token and copy the token
Development tokens expire after 12 hours.
Generate a development token with:
Copy
powersync generate token --subject=test-user
Replace test-user with a user ID of your choice (this would normally be the user ID you want to test with).Requires allow_temporary_tokens to be enabled on the instance. Add it to powersync/service.yaml if you haven’t already, then redeploy:
Copy
client_auth:
  allow_temporary_tokens: true
Copy
powersync deploy
Development tokens expire after 12 hours.
Follow the steps below. Steps 1 and 2 configure signing keys and your PowerSync config; in Step 3 you can use the CLI (recommended) or the test-client to generate the token.
1
Step 1: Generate signing keys
Generate a temporary private/public key-pair (RS256) or shared key (HS256) for JWT signing and verification.
RS256
HS256
Use an online JWK generator like mkjwk.org (select RSA, 2048 bits, Signature use, RS256 algorithm).Or generate locally with Node.js:
Copy
# Install pem-jwk if needednpm install -g pem-jwk# Generate private keyopenssl genrsa -out private-key.pem 2048# Convert public key to JWK formatopenssl rsa -in private-key.pem -pubout | pem-jwk
Use an online JWK generator like mkjwk.org (select oct, 256 bits, Signature use, HS256 algorithm) - this outputs base64url directly.Or generate and convert using OpenSSL:
Copy
# Generate and convert to base64urlopenssl rand -base64 32 | tr '+/' '-_' | tr -d '='
For production environments, shared secrets (HS256) are not recommended.
2
Step 2: Update your config
Add the client_auth parameter to your PowerSync config (e.g. service.yaml):
RS256
HS256
Copy the JWK values from mkjwk.org or the pem-jwk output, then add to your config:
service.yaml
Copy
# Client (application end user) authentication settingsclient_auth: # static collection of public keys for JWT verification jwks: keys: - kty: 'RSA' n: '[rsa-modulus]' e: '[rsa-exponent]' alg: 'RS256' kid: 'dev-key-1'
Copy the k value from mkjwk.org or the OpenSSL output, then add to your config:
service.yaml
Copy
# Client (application end user) authentication settingsclient_auth: audience: ['http://localhost:8080', 'http://127.0.0.1:8080'] # static collection of public keys for JWT verification jwks: keys: - kty: oct alg: 'HS256' k: '[base64url-encoded-shared-secret]' kid: 'dev-key-1'
These examples use static jwks: keys: for simplicity. For production, we recommend using jwks_uri to point to a JWKS endpoint instead. See Custom Authentication for more details.
3
Step 3: Generate a development token
Choose either the PowerSync CLI (recommended) or the test-client:
CLI (recommended)
test-client
Apply your config changes (e.g. restart your PowerSync Service or run powersync docker reset if running locally with Docker), then run:
Copy
powersync generate token --subject=test-user
Replace test-user with the user ID you want to authenticate:
If your Sync Streams/Rules data isn’t filtered by user (same data syncs to all users), you can use any value (e.g., test-user).
If your data is filtered by , use a user ID that matches a user in your database. PowerSync uses this (e.g. auth.user_id() in Sync Streams or request.user_id() in Sync Rules) to determine what to sync.
6. [Optional] Test Sync with the Sync Diagnostics Client
Before implementing the PowerSync Client SDK in your app, you can validate that syncing is working correctly using our Sync Diagnostics Client (this hosted version works with both PowerSync Cloud and self-hosted setups).Use the development token you generated in the previous step to connect and verify your setup:
Enter your PowerSync Service endpoint at PowerSync Endpoint (the URL where your self-hosted service is running, e.g. http://localhost:8080 if running locally)
Click Proceed
The Sync Diagnostics Client can also be run as a local standalone web app — see the README for instructions.
The Sync Diagnostics Client will connect to your PowerSync Service instance and display information about the synced data, and allow you to query the client-side SQLite database.
Checkpoint:Inspect your synced tables in the Sync Diagnostics Client — these should match the Sync Streams/Sync Rules you defined previously. This confirms your setup is working correctly before integrating the client SDK into your app.
Now it’s time to integrate PowerSync into your app. This involves installing the Client SDK, defining your client-side schema, instantiating the database, connecting to your PowerSync Service instance, and reading/writing data.
The @journeyapps/react-native-quick-sqlite package is the original database adapter for React Native and therefore more battle-tested in production environments.
iOS with use_frameworks!If your iOS project uses use_frameworks!, add the react-native-quick-sqlite plugin to your app.json or app.config.js and configure the staticLibrary option:
This plugin automatically configures the necessary build settings for react-native-quick-sqlite to work with use_frameworks!.
Using Expo Go? Our native database adapters listed below (OP-SQLite and React Native Quick SQLite) are not compatible with Expo Go’s sandbox environment. To run PowerSync with Expo Go install our JavaScript-based adapter @powersync/adapter-sql-js instead. See details here.
Polyfills and additional notes:
For async iterator support with watched queries, additional polyfills are required. See the Babel plugins section in the README.
When using the OP-SQLite package, we recommend adding this metro config
to avoid build issues.
Install Peer DependenciesThe PowerSync SDK for Node.js supports multiple drivers. More details are available under Encryption and Custom SQLite Drivers. We currently recommend the better-sqlite3 package for most users:
npm
yarn
pnpm
Copy
npm install better-sqlite3
Copy
yarn add better-sqlite3
Copy
pnpm install better-sqlite3
Previous versions of the PowerSync SDK for Node.js used the @powersync/better-sqlite3 fork as a
required peer dependency.
This is no longer recommended. After upgrading to @powersync/node version 0.12.0 or later, ensure
the old package is no longer installed by running npm uninstall @powersync/better-sqlite3
Common Installation IssuesThe better-sqlite3 package requires native compilation, which depends on certain system tools.
Prebuilt assets are available and used by default, but a custom compilation may be started depending on the Node.js
or Electron version used.
This compilation process is handled by node-gyp and may fail if required dependencies are missing or misconfigured.Refer to the PowerSync Node package README for more details.
Add the PowerSync SDK to your project by adding the following to your build.gradle.kts file:
With Version catalog
Direct dependency
gradle/libs.versions.toml
Copy
[versions]# Please check the latest version at https://github.com/powersync-ja/powersync-kotlin/releases/powersync = "1.10.0"[libraries]powersync-core = { module = "com.powersync:core", version.ref = "powersync" }powersync-integration-supabase = { module = "com.powersync:connector-supabase", version.ref = "powersync" }
build.gradle.kts
Copy
kotlin { //... sourceSets { commonMain.dependencies { implementation(libs.powersync.core) // If you want to use the Supabase Connector, also add the following: implementation(libs.powersync.integration.supabase) } //... }}
build.gradle.kts
Copy
kotlin { //... sourceSets { commonMain.dependencies { implementation("com.powersync:core:$powersyncVersion") // If you want to use the Supabase Connector, also add the following: implementation("com.powersync:connector-supabase:$powersyncVersion") } //... }}
In a Kotlin-Multiplatform project targeting iOS, macOS, tvOS or watchOS, you also need to
install the PowerSync SQLite extension.
The best way to do that depends on how you integrate Kotlin into the XCode project.
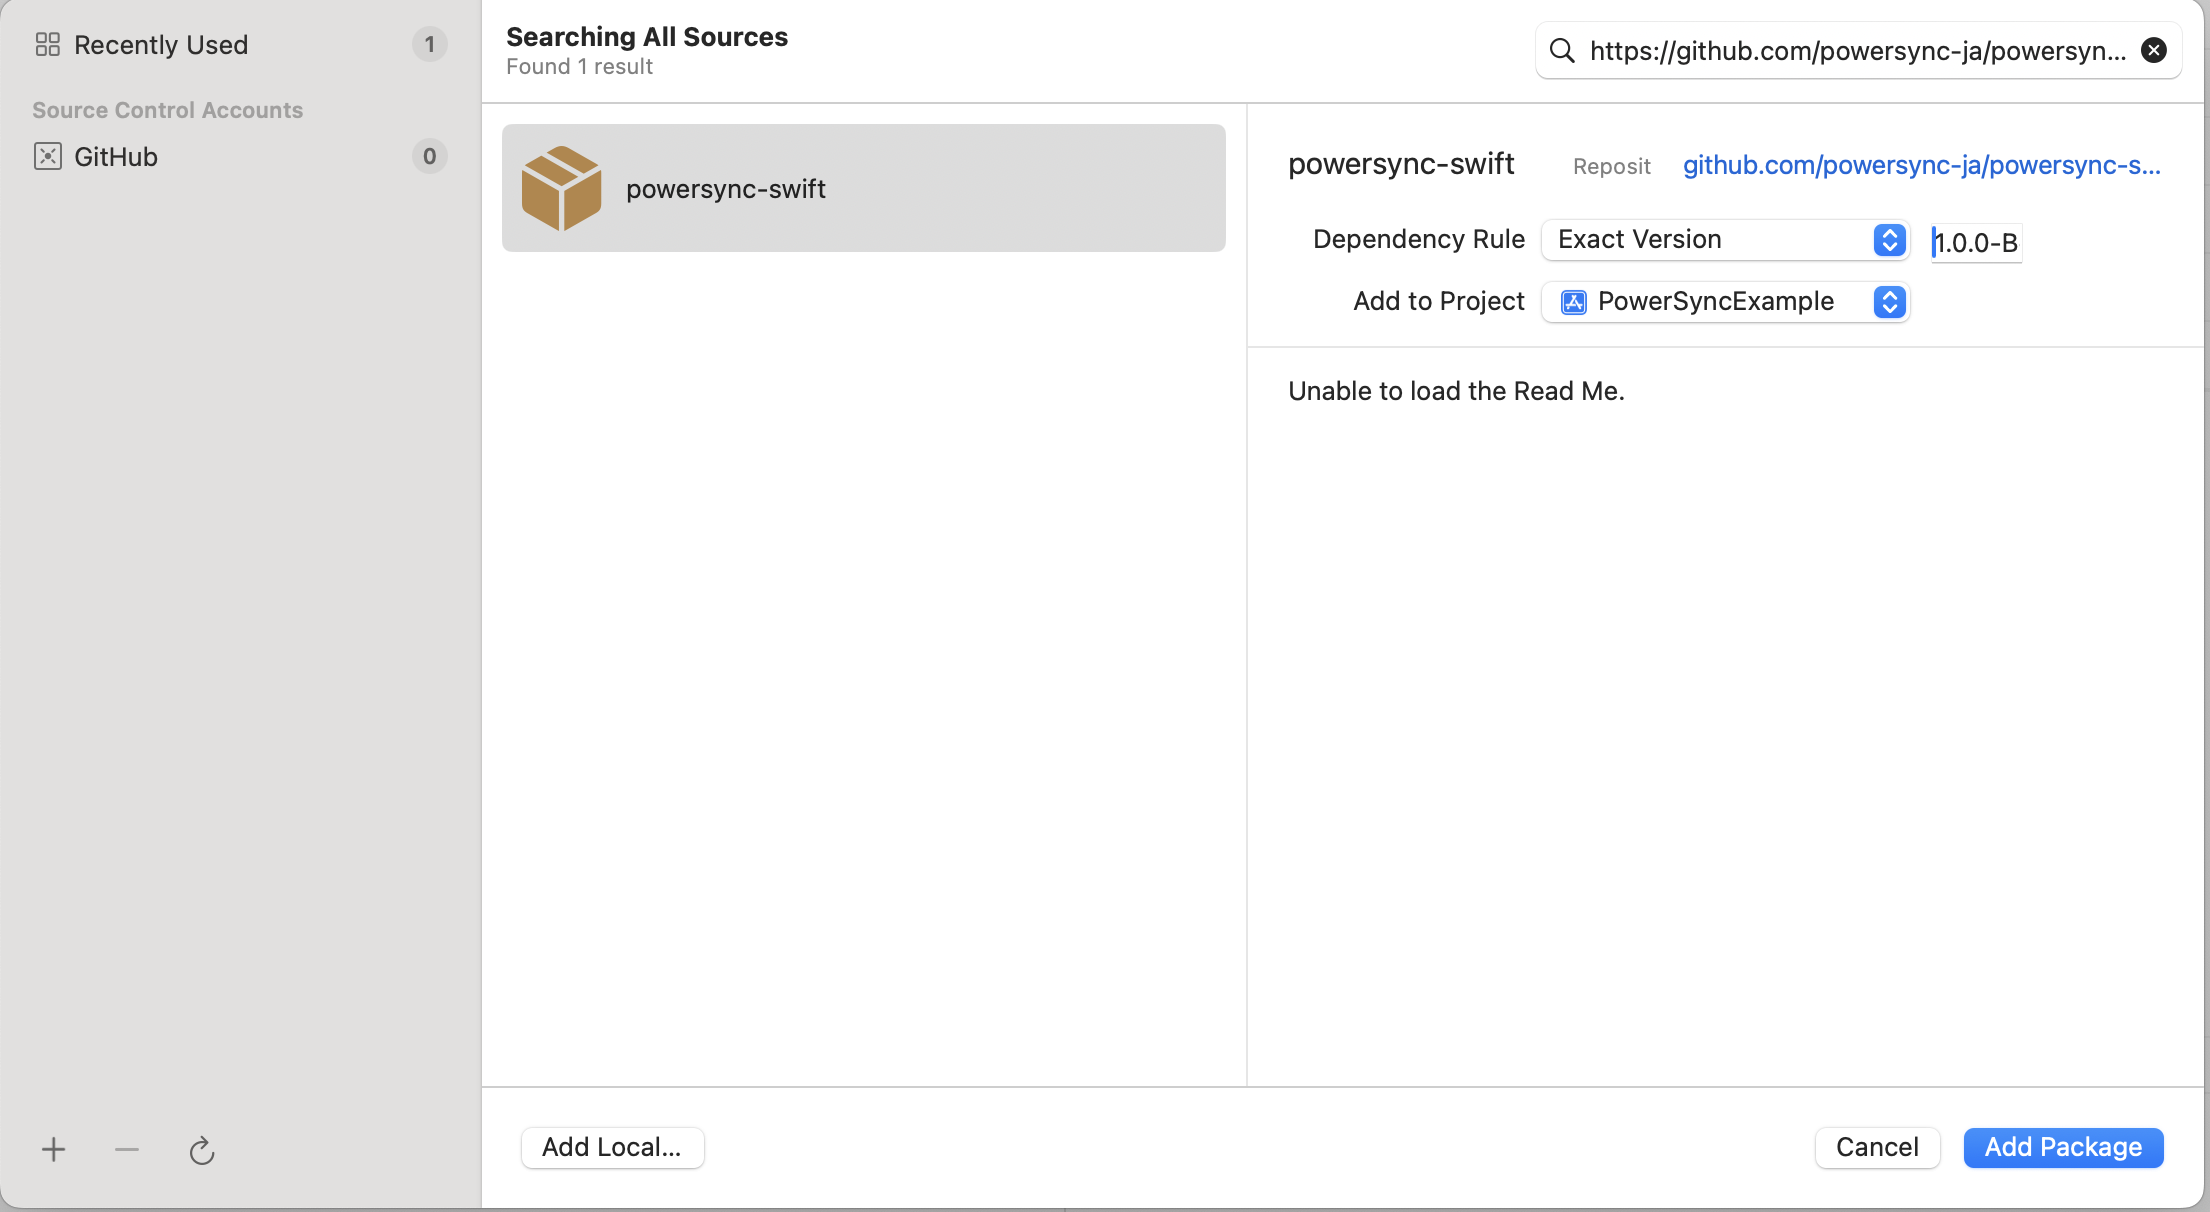
Direct integration
Integration with SPM
CocoaPods (deprecated)
PowerSync works with the direct integration, you can add the SQLite extension as a dependency
in XCode. In your XCode project settings, under “Package Dependencies”, add a package and use
https://github.com/powersync-ja/powersync-sqlite-core-swift.git as a package URL.
Use a version dependency and start with the latest version to get started.
If you have an existing Package.swift file, depend on the SQLite extension like this:
Package.swift
Copy
  dependencies: [
      .package(
          url: "https://github.com/powersync-ja/powersync-sqlite-core-swift.git",
          // Refer to github.com/powersync-ja/powersync-sqlite-core-swift/releases for the latest version.
          exact: "0.4.11",
      )
  ]
Note that CocoaPods will become read-only in late 2026, and we won’t be able to update the
SQLite extension through CocoaPods afterwards.Add the following to the cocoapods config in your build.gradle.kts:
Add --prerelease while this package is in alpha. To install a specific version, use --version instead: dotnet add package PowerSync.Common --version 0.0.6-alpha.1
Add the PowerSync SDK to your project by adding the following to your Cargo.toml file:
This refers to the for the managed SQLite database exposed by the PowerSync Client SDKs, that your app can read from and write to. The schema is applied when the database is instantiated (as we’ll show in the next step) — .PowerSync Cloud: The easiest way to generate your schema is using the PowerSync Dashboard. Click the Connect button in the top bar to generate the client-side schema based on your Sync Streams/Sync Rules in your preferred language.Here’s an example schema for a simple todos table:
Note: The schema does not explicitly specify an id column, since PowerSync automatically creates an id column of type text. PowerSync recommends using UUIDs.
Learn MoreThe client-side schema uses three column types: text, integer, and real. These map directly to values from your Sync Streams/Sync Rules and are automatically cast if needed. For details on how backend database types map to SQLite types, see Types.
Now that you have your client-side schema defined, instantiate the PowerSync database in your app. This creates the client-side SQLite database that will be kept in sync with your source database based on your Sync Streams/Sync Rules.
Copy
import { PowerSyncDatabase } from '@powersync/react-native';import { AppSchema } from './Schema';export const db = new PowerSyncDatabase({ schema: AppSchema, database: { dbFilename: 'powersync.db' }});
Connect your client-side PowerSync database to the PowerSync Service instance you created in step 2 by defining a backend connector and calling connect(). The backend connector handles authentication and uploading mutations to your backend.
Note: This section assumes you want to use PowerSync to sync your backend source database with SQLite in your app. If you only want to use PowerSync to manage your local SQLite database without sync, instantiate the PowerSync database without calling connect() and refer to our Local-Only guide.
You don’t have to worry about the backend connector implementation details right now — you can leave the boilerplate as-is and come back to it later.
For development, you can use the development token you generated in the Generate a Development Token step above. For production, you’ll implement proper JWT authentication as we’ll explain further below.
Copy
import { AbstractPowerSyncDatabase, PowerSyncBackendConnector, PowerSyncCredentials } from '@powersync/react-native';import { db } from './Database';class Connector implements PowerSyncBackendConnector { async fetchCredentials(): Promise<PowerSyncCredentials> { // for development: use development token return { endpoint: 'https://your-instance.powersync.com', token: 'your-development-token-here' }; } async uploadData(database: AbstractPowerSyncDatabase) { const transaction = await database.getNextCrudTransaction(); if (!transaction) return; for (const op of transaction.crud) { const record = { ...op.opData, id: op.id }; // upload to your backend API } await transaction.complete(); }}// connect the database to PowerSync Serviceconst connector = new Connector();await db.connect(connector);
Once connected, you can read from and write to the client-side SQLite database. Changes from your source database will be automatically synced down into the SQLite database. For client-side mutations to be uploaded back to your source database, you need to complete the backend integration as we’ll explain below.
Read data using SQL queries. The data comes from your client-side SQLite database:
Copy
// Get all todosconst todos = await db.getAll('SELECT * FROM todos');// Get a single todoconst todo = await db.get('SELECT * FROM todos WHERE id = ?', [todoId]);// Watch for changes (reactive query)const stream = db.watch('SELECT * FROM todos WHERE list_id = ?', [listId]);for await (const todos of stream) { // Update UI when data changes console.log(todos);}// Note: The above example requires async iterator support in React Native. // If you encounter issues, use one of these callback-based APIs instead:// Option 1: Using onResult callback// const abortController = new AbortController();// db.watch(// 'SELECT * FROM todos WHERE list_id = ?',// [listId],// {// onResult: (todos) => {// // Update UI when data changes// console.log(todos);// }// },// { signal: abortController.signal }// );// Option 2: Using the query builder API// const query = db// .query({// sql: 'SELECT * FROM todos WHERE list_id = ?',// parameters: [listId]// })// .watch();// query.registerListener({// onData: (todos) => {// // Update UI when data changes// console.log(todos);// }// });
Write data using SQL INSERT, UPDATE, or DELETE statements. PowerSync automatically queues these mutations and uploads them to your backend via the uploadData() function, once you’ve fully implemented your backend connector (as we’ll talk about below).
Copy
// Insert a new todoawait db.execute( 'INSERT INTO todos (id, created_at, list_id, description) VALUES (uuid(), date(), ?, ?)', [listId, 'Buy groceries']);// Update a todoawait db.execute( 'UPDATE todos SET completed = 1, completed_at = date() WHERE id = ?', [todoId]);// Delete a todoawait db.execute('DELETE FROM todos WHERE id = ?', [todoId]);
Best practice: Use UUIDs when inserting new rows on the client side. UUIDs can be generated offline/locally, allowing for unique identification of records created in the client database before they are synced to the server. See Client ID for more details.
Learn MoreFor more details, see the Writing Data page.
Implement Authentication: Replace development tokens with proper JWT-based authentication. PowerSync supports various authentication providers including Supabase, Firebase Auth, Auth0, Clerk, and custom JWT implementations.
Configure & Integrate Your Backend Application: Set up your backend to handle mutations uploaded from clients.
Try “Ask AI” on this site which is trained on all our documentation, repositories and Discord discussions. Also join us on our community Discord server where you can browse topics from the PowerSync community and chat with our team.