Introduction
The
@powersync/attachments package (JavaScript/TypeScript) and powersync_attachments_helper package (Flutter/Dart) are deprecated. Attachment functionality is now built-in to the PowerSync SDKs. Please use the built-in attachment helpers instead, and see the migration notes.- Optimal performance - Database stays small and fast
- Automatic queue management - Background uploads/downloads with retry logic
- Offline-first support - Local files available immediately, sync happens in background
- Cache management - Automatic cleanup of unused files
- Platform flexibility - Works across web, mobile, and desktop
SDK & Demo Reference
We provide attachment helpers for multiple platforms:| SDK | Package | Min. SDK version | Demo App |
|---|---|---|---|
| JavaScript/TypeScript | Built-in attachments (alpha) | Web v1.33.0, React Native v1.30.0, Node.js v0.17.0 | React Native Todo |
| Flutter | Built-in attachments (alpha) | v1.16.0 | Flutter Todo |
| Swift | Built-in attachments (alpha) | v1.0.0 | iOS Demo |
| Kotlin | Built-in attachments (alpha) | v1.0.0 | Android Todo |
| .NET | Built-in attachments (alpha) | v0.1.2 | MAUI Todo |
Most demo applications use Supabase Storage as the storage provider, but the patterns are adaptable to any storage system.
How It Works
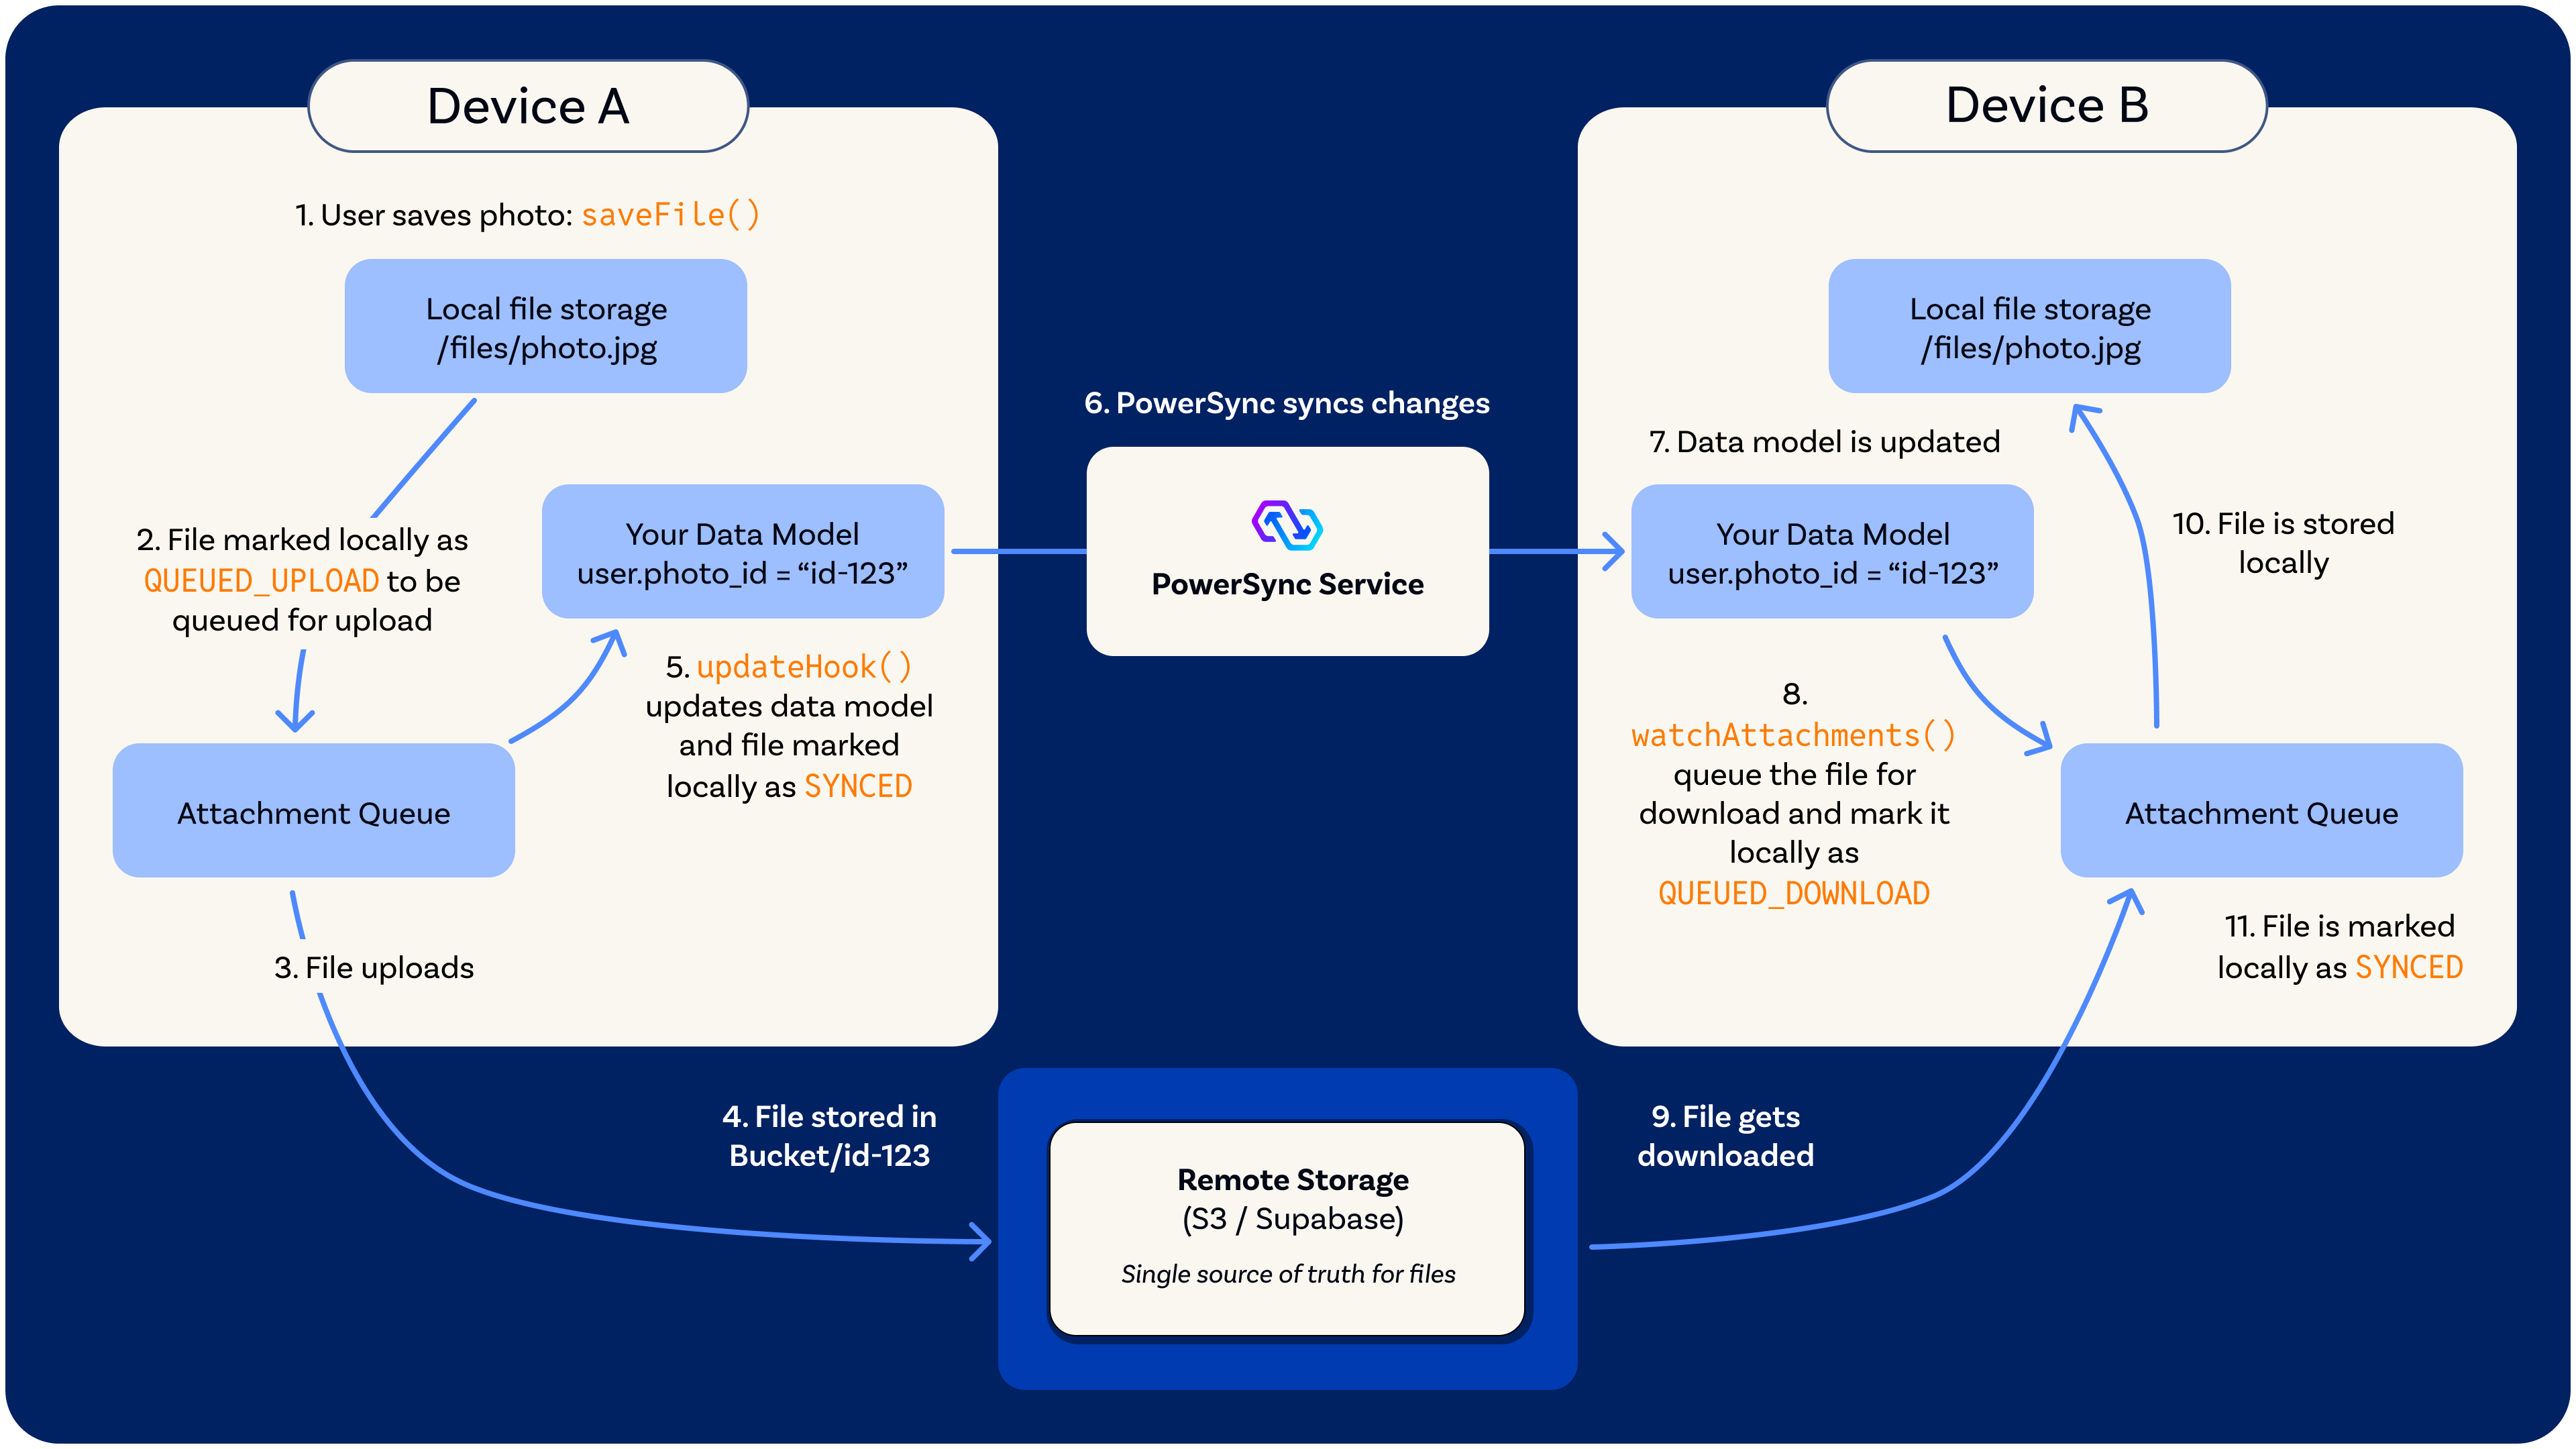
PowerSync attachments flow & architecture
Workflow
- Save file - Your app calls
saveFile()with file data and anupdateHookto handle linking the attachment to your data model - Queue for upload - File is saved locally and a record is created in the attachments table with state
QUEUED_UPLOAD - Background upload - The attachment queue automatically uploads file to remote storage (S3/Supabase/etc.)
- Remote storage - File is stored in remote storage with the attachment ID
- State update - The
updateHookruns, updating your data model with the attachment ID and marking the file locally asSYNCED - Cross-device sync - PowerSync syncs the data model changes to other clients
- Data model updated - Other clients receive the updated data model with the new attachment reference (e.g.,
user.photo_id = "id-123") - Watch detects attachment - Other clients’
watchAttachments()callback detects the new attachment reference and creates a record in the attachments table with stateQUEUED_DOWNLOAD - File download - The attachment queue automatically downloads the file from remote storage
- Local storage - File is saved to local storage on the other client
- State update - File is marked locally as
SYNCEDand ready for use
Attachment States
| State | Description |
|---|---|
QUEUED_UPLOAD | File saved locally, waiting to upload to remote storage |
QUEUED_DOWNLOAD | Data model synced from another device, file needs to be downloaded |
SYNCED | File exists both locally and in remote storage, fully synced |
QUEUED_DELETE | Marked for deletion from both local and remote storage |
ARCHIVED | No longer referenced in your data model, candidate for cleanup |
Core Components
Attachment Table
The Attachment Table is a local-only table that stores metadata about each file. It’s not synced through PowerSync’s Sync Streams/Rules - instead, it’s managed entirely by the attachment queue on each device. Metadata stored:id- Unique attachment identifier (UUID)filename- File name with extension (e.g.,photo-123.jpg)localUri- Path to file in local storagesize- File size in bytesmediaType- MIME type (e.g.,image/jpeg)state- Current sync state (see states above)hasSynced- Boolean indicating if file has ever been uploadedtimestamp- Last update timemetaData- Optional JSON string for custom data
- Local-only - Each device maintains its own attachment table
- Automatic management - Queue handles all inserts/updates
- Cross-client coordination - Your data model (e.g.,
users.photo_id) tells each client which files it needs
Remote Storage Adapter
The Remote Storage Adapter is an interface you implement to connect PowerSync with your cloud storage provider. It’s completely platform-agnostic - Implementations can use S3, Supabase Storage, Cloudflare R2, Azure Blob, or even IPFS. Interface methods:uploadFile(fileData, attachment)- Upload file to cloud storagedownloadFile(attachment)- Download file from cloud storagedeleteFile(attachment)- Delete file from cloud storage
- Request a signed upload/download URL from your backend
- Your backend validates permissions and generates a temporary URL
- Client uploads/downloads directly to storage using the signed URL
- Never expose storage credentials to clients
Local Storage Adapter
The Local Storage Adapter handles file persistence on the device. PowerSync provides implementations for common platforms and allows you to create custom adapters. Interface methods:initialize()- Set up storage (create directories, etc.)saveFile(path, data)- Write file to storagereadFile(path)- Read file from storagedeleteFile(path)- Remove file from storagefileExists(path)- Check if file existsgetLocalUri(filename)- Get full path for a filename
- IndexedDB - For web browsers (
IndexDBFileSystemStorageAdapter) - Node.js Filesystem - For Node/Electron (
NodeFileSystemAdapter) - React Native - For React Native with Expo or bare React Native we have a dedicated package (
@powersync/attachments-storage-react-native) - Native mobile storage - For Flutter, Kotlin, Swift
The React Native local storage adapter requires Expo 54 or later.
Attachment Queue
The Attachment Queue is the orchestrator that manages the entire attachment lifecycle. It:- Watches your data model - You pass a
watchAttachmentsfunction as a parameter that monitors which files your app references - Manages state transitions - Automatically moves files through states (upload/download → synced → archive → delete)
- Handles retries - Failed operations are retried on the next sync interval
- Performs cleanup - Removes archived files that are no longer needed
- Verifies integrity - Checks local files exist and repairs inconsistencies
watchAttachments function you provide monitors your data model and returns a list of attachment IDs that your app references. The queue compares this list with its internal attachment table to determine:
- New attachments - Download them
- Missing attachments - Upload them
- Removed attachments - Archive them
watchAttachments queries are reactive and execute whenever the watched tables change, keeping the attachment queue in sync with your data model.
There are a few scenarios you might encounter:
Single Attachment Type
For a single attachment type, you watch one table. For example, if users have profile photos:
SELECT photo_id FROM users WHERE photo_id IS NOT NULL
UNION or UNION ALL. This allows you to monitor attachments across different tables (e.g., users.photo_id, documents.document_id, videos.video_id) in one queue. Each attachment type may have different file extensions, which can be handled in the query by selecting the extension from your data model or using type-specific defaults.
For example:
SELECT photo_id as id, photo_file_extension as file_extension
FROM users
WHERE photo_id IS NOT NULL

UNION ALL

SELECT document_id as id, document_file_extension as file_extension
FROM documents
WHERE document_id IS NOT NULL

UNION ALL

SELECT video_id as id, video_file_extension as file_extension
FROM videos
WHERE video_id IS NOT NULL
UNION ALL when you want to include all rows (including duplicates), or UNION when you want to automatically deduplicate results. For attachment watching, UNION ALL is typically preferred since attachment IDs should already be unique.
The UNION query executes whenever any of the watched tables change, which may have higher database overhead compared to watching a single table. Implementation examples are shown in the Initialize Attachment Queue section below.
Multiple queues may use more memory, but each queue watches simpler queries. Implementation examples are shown in the Initialize Attachment Queue section below.
Implementation Guide
Installation
# Built into @powersync/web, @powersync/node, and @powersync/react-native.
# React Native requires an additional storage adapter:
# npm install @powersync/attachments-storage-react-native

# Expo projects (v54+) also require:
# npm install expo-file-system

# Bare React Native projects also require:
# npm install @dr.pogodin/react-native-fs
# Built into the powersync package (v1.16.0+). No additional installation needed.
// Built into the PowerSync Swift SDK (v1.0.0+). No additional installation needed.
// Built into the PowerSync Kotlin SDK (v1.0.0+). No additional installation needed.
# Built into PowerSync.Common (v0.1.2+). No additional installation needed.
Setup: Add Attachment Table to Schema
import { Schema, Table, column, AttachmentTable } from '@powersync/web';

const appSchema = new Schema({
  users: new Table({
    name: column.text,
    email: column.text,
    photo_id: column.text  // References attachment ID
  }),
  // Add the attachment table
  attachments: new AttachmentTable()
});
import 'package:powersync/powersync.dart';
import 'package:powersync_core/attachments/attachments.dart';

final schema = Schema([
  Table('users', [
    Column.text('name'),
    Column.text('email'),
    Column.text('photo_id'),  // References attachment ID
  ]),
  AttachmentsQueueTable(),
]);
import PowerSync

let users = Table(
    name: "users",
    columns: [
        Column.text("name"),
        Column.text("email"),
        Column.text("photo_id"),  // References attachment ID
    ]
)

let schema = Schema(
    tables: [
        users,
        // Add the local-only table which stores attachment states
        createAttachmentTable(name: "attachments")
    ]
)
import com.powersync.attachments.createAttachmentsTable
import com.powersync.db.schema.Column
import com.powersync.db.schema.Schema
import com.powersync.db.schema.Table

val users = Table(
    name = "users",
    columns = listOf(
        Column.text("name"),
        Column.text("email"),
        Column.text("photo_id")  // References attachment ID
    )
)

val schema = Schema(
    users,
    // Add the local-only table which stores attachment states
    createAttachmentsTable("attachments")
)
using PowerSync.Common.Attachments;
using PowerSync.Common.DB.Schema;

var users = new Table(
    "users",
    new Dictionary<string, ColumnType>
    {
        ["name"] = ColumnType.Text,
        ["email"] = ColumnType.Text,
        ["photo_id"] = ColumnType.Text,  // References attachment ID
    });

// new Table(typeof(Attachment)) uses the [Table("attachments", LocalOnly = true)] attribute
var schema = new Schema(users, new Table(typeof(Attachment)));
Configure Storage Adapters
// For web browsers (IndexedDB)
import { IndexDBFileSystemStorageAdapter } from '@powersync/web';
const localStorage = new IndexDBFileSystemStorageAdapter('my-app-files');

// For Node.js/Electron (filesystem)
// import { NodeFileSystemAdapter } from '@powersync/node';
// const localStorage = new NodeFileSystemAdapter('./user-attachments');

// For React Native (Expo or bare React Native)
// Need to install @powersync/attachments-storage-react-native
//
// For Expo projects, also install expo-file-system
// import { ExpoFileSystemStorageAdapter } from '@powersync/attachments-storage-react-native';
// const localStorage = new ExpoFileSystemStorageAdapter();
//
// For bare React Native, also install @dr.pogodin/react-native-fs
// import { ReactNativeFileSystemStorageAdapter } from '@powersync/attachments-storage-react-native';
// const localStorage = new ReactNativeFileSystemStorageAdapter();

// Remote storage adapter (example with signed URLs)
const remoteStorage = {
  async uploadFile(fileData: ArrayBuffer, attachment: AttachmentRecord) {
    // Request signed upload URL from your backend
    const { uploadUrl } = await fetch('/api/attachments/upload-url', {
      method: 'POST',
      headers: { 'Content-Type': 'application/json' },
      body: JSON.stringify({
        filename: attachment.filename,
        contentType: attachment.mediaType
      })
    }).then(r => r.json());

    // Upload to cloud storage using signed URL
    await fetch(uploadUrl, {
      method: 'PUT',
      body: fileData,
      headers: {
        'Content-Type': attachment.mediaType || 'application/octet-stream'
      }
    });
  },

  async downloadFile(attachment: AttachmentRecord): Promise<ArrayBuffer> {
    // Request signed download URL from your backend
    const { downloadUrl } = await fetch(
      `/api/attachments/${attachment.id}/download-url`
    ).then(r => r.json());

    // Download from cloud storage
    const response = await fetch(downloadUrl);
    return response.arrayBuffer();
  },

  async deleteFile(attachment: AttachmentRecord) {
    // Delete via your backend
    await fetch(`/api/attachments/${attachment.id}`, {
      method: 'DELETE'
    });
  }
};
import 'dart:io';
import 'dart:typed_data';
import 'package:path_provider/path_provider.dart';
import 'package:powersync_core/attachments/attachments.dart';
import 'package:powersync_core/attachments/io.dart';
import 'package:http/http.dart' as http;

// For Flutter (native platforms)
Future<LocalStorage> getLocalStorage() async {
  final appDocDir = await getApplicationDocumentsDirectory();
  final attachmentsDir = Directory('${appDocDir.path}/attachments');
  return IOLocalStorage(attachmentsDir);
}

// Remote storage adapter (example with signed URLs)
class SignedUrlStorageAdapter implements RemoteStorage {
  @override
  Future<void> uploadFile(
    Stream<List<int>> fileData,
    Attachment attachment,
  ) async {
    // Request signed upload URL from your backend
    final response = await http.post(
      Uri.parse('/api/attachments/upload-url'),
      headers: {'Content-Type': 'application/json'},
      body: jsonEncode({
        'filename': attachment.filename,
        'contentType': attachment.mediaType,
      }),
    );

    final uploadUrl = jsonDecode(response.body)['uploadUrl'] as String;

    // Collect stream data
    final bytes = <int>[];
    await for (final chunk in fileData) {
      bytes.addAll(chunk);
    }

    // Upload to cloud storage using signed URL
    await http.put(
      Uri.parse(uploadUrl),
      body: Uint8List.fromList(bytes),
      headers: {
        'Content-Type': attachment.mediaType ?? 'application/octet-stream',
      },
    );
  }

  @override
  Future<Stream<List<int>>> downloadFile(Attachment attachment) async {
    // Request signed download URL from your backend
    final response = await http.get(
      Uri.parse('/api/attachments/${attachment.id}/download-url'),
    );

    final downloadUrl = jsonDecode(response.body)['downloadUrl'] as String;

    // Download from cloud storage
    final httpResponse = await http.get(Uri.parse(downloadUrl));
    return Stream.value(httpResponse.bodyBytes);
  }

  @override
  Future<void> deleteFile(Attachment attachment) async {
    // Delete via your backend
    await http.delete(
      Uri.parse('/api/attachments/${attachment.id}'),
    );
  }
}
import Foundation
import PowerSync

// For iOS/macOS (FileManager)
func getAttachmentsDirectoryPath() throws -> String {
    guard let documentsURL = FileManager.default.urls(
        for: .documentDirectory,
        in: .userDomainMask
    ).first else {
        throw PowerSyncAttachmentError.attachmentError("Could not determine attachments directory path")
    }
    return documentsURL.appendingPathComponent("attachments").path
}

let localStorage = FileManagerStorageAdapter()

// Remote storage adapter (example with signed URLs)
class SignedUrlStorageAdapter: RemoteStorageAdapter {
    func uploadFile(fileData: Data, attachment: Attachment) async throws {
        // Request signed upload URL from your backend
        struct UploadUrlResponse: Codable {
            let uploadUrl: String
        }

        let requestBody = [
            "filename": attachment.filename,
            "contentType": attachment.mediaType ?? "application/octet-stream"
        ]

        var request = URLRequest(url: URL(string: "/api/attachments/upload-url")!)
        request.httpMethod = "POST"
        request.setValue("application/json", forHTTPHeaderField: "Content-Type")
        request.httpBody = try JSONSerialization.data(withJSONObject: requestBody)

        let (data, _) = try await URLSession.shared.data(for: request)
        let response = try JSONDecoder().decode(UploadUrlResponse.self, from: data)

        // Upload to cloud storage using signed URL
        var uploadRequest = URLRequest(url: URL(string: response.uploadUrl)!)
        uploadRequest.httpMethod = "PUT"
        uploadRequest.setValue(attachment.mediaType ?? "application/octet-stream", forHTTPHeaderField: "Content-Type")
        uploadRequest.httpBody = fileData

        let (_, uploadResponse) = try await URLSession.shared.data(for: uploadRequest)
        guard let httpResponse = uploadResponse as? HTTPURLResponse,
              (200...299).contains(httpResponse.statusCode) else {
            throw PowerSyncAttachmentError.generalError("Upload failed")
        }
    }

    func downloadFile(attachment: Attachment) async throws -> Data {
        // Request signed download URL from your backend
        struct DownloadUrlResponse: Codable {
            let downloadUrl: String
        }

        let request = URLRequest(url: URL(string: "/api/attachments/\(attachment.id)/download-url")!)
        let (data, _) = try await URLSession.shared.data(for: request)
        let response = try JSONDecoder().decode(DownloadUrlResponse.self, from: data)

        // Download from cloud storage
        let downloadRequest = URLRequest(url: URL(string: response.downloadUrl)!)
        let (fileData, _) = try await URLSession.shared.data(for: downloadRequest)
        return fileData
    }

    func deleteFile(attachment: Attachment) async throws {
        // Delete via your backend
        var request = URLRequest(url: URL(string: "/api/attachments/\(attachment.id)")!)
        request.httpMethod = "DELETE"
        let (_, response) = try await URLSession.shared.data(for: request)
        guard let httpResponse = response as? HTTPURLResponse,
              (200...299).contains(httpResponse.statusCode) else {
            throw PowerSyncAttachmentError.generalError("Delete failed")
        }
    }
}

let remoteStorage = SignedUrlStorageAdapter()
import com.powersync.attachments.LocalStorage
import com.powersync.attachments.RemoteStorage
import com.powersync.attachments.Attachment
import com.powersync.attachments.storage.IOLocalStorageAdapter
import kotlinx.coroutines.flow.Flow
import kotlinx.coroutines.flow.flowOf
import kotlinx.io.files.Path

// For local storage (uses IOLocalStorageAdapter by default)
// On Android: "${applicationContext.filesDir.canonicalPath}/attachments"
val attachmentsDirectory = Path("attachments").toString()
val localStorage: LocalStorage = IOLocalStorageAdapter()

// Remote storage adapter (example with signed URLs)
val remoteStorage = object : RemoteStorage {
    override suspend fun uploadFile(
        fileData: Flow<ByteArray>,
        attachment: Attachment
    ) {
        // Request signed upload URL from your backend
        val uploadUrl = // ... fetch from your API

        // Upload to cloud storage using signed URL
        // Collect the flow and upload
        val bytes = mutableListOf<ByteArray>()
        fileData.collect { bytes.add(it) }
        val allBytes = bytes.flatMap { it.toList() }.toByteArray()

        // Upload allBytes to uploadUrl
        // ... your HTTP upload implementation
    }

    override suspend fun downloadFile(attachment: Attachment): Flow<ByteArray> {
        // Request signed download URL from your backend
        val downloadUrl = // ... fetch from your API

        // Download from cloud storage
        val response = // ... your HTTP download implementation
        return flowOf(response) // or convert your ByteArray to Flow
    }

    override suspend fun deleteFile(attachment: Attachment) {
        // Delete via your backend
        // ... your HTTP delete implementation
    }
}
using PowerSync.Common.Attachments;

// Local storage backed by System.IO.File — works on Windows, macOS, Linux, iOS, and Android
var localStorage = new FileManagerLocalStorage(
    Path.Combine(Environment.GetFolderPath(Environment.SpecialFolder.ApplicationData), "myapp", "attachments"));

// Remote storage adapter (example with signed URLs)
public sealed class MyRemoteStorage(HttpClient http) : IRemoteStorageAdapter
{
    public async Task UploadFileAsync(Stream fileData, Attachment attachment)
    {
        // Request a signed upload URL from your backend
        var resp = await http.PostAsJsonAsync("/api/attachments/upload-url",
            new { filename = attachment.Filename });
        var body = await resp.Content.ReadFromJsonAsync<UploadUrlResponse>()
            ?? throw new InvalidOperationException("missing body");

        // Upload directly to cloud storage using the signed URL
        using var content = new StreamContent(fileData);
        content.Headers.ContentType = new(attachment.MediaType ?? "application/octet-stream");
        (await http.PutAsync(body.UploadUrl, content)).EnsureSuccessStatusCode();
    }

    public async Task<Stream> DownloadFileAsync(Attachment attachment)
    {
        // Request a signed download URL from your backend
        var url = await http.GetStringAsync($"/api/attachments/download-url/{attachment.Id}");
        return await http.GetStreamAsync(url);
    }

    public async Task DeleteFileAsync(Attachment attachment)
    {
        // Delete via your backend; 404 is treated as success (file already gone)
        var resp = await http.DeleteAsync($"/api/attachments/{attachment.Id}");
        if (resp.StatusCode != HttpStatusCode.NotFound)
            resp.EnsureSuccessStatusCode();
    }

    private sealed record UploadUrlResponse(string UploadUrl);
}
Security Best Practice: Always use your backend to generate signed URLs and validate permissions. Never expose storage credentials directly to clients.
Initialize Attachment Queue
import { AttachmentQueue } from '@powersync/web';

const attachmentQueue = new AttachmentQueue({
  db: db,  // PowerSync database instance
  localStorage,
  remoteStorage,

  // Define which attachments exist in your data model
  watchAttachments: (onUpdate) => {
    db.watch(
      `SELECT photo_id FROM users WHERE photo_id IS NOT NULL`,
      [],
      {
        onResult: async (result) => {
          const attachments = result.rows?._array.map(row => ({
            id: row.photo_id,
            // Names the file in local storage (<id>.jpg). Either fileExtension or filename is required
            fileExtension: 'jpg',
            // MIME type for remote transfer (the Content-Type). Optional, never inferred
            // from fileExtension, and preserved on the downloaded record (JS SDK only)
            mediaType: 'image/jpeg'
          })) ?? [];
          await onUpdate(attachments);
        }
      }
    );
  },

  // Optional configuration
  syncIntervalMs: 30000,      // Sync every 30 seconds
  downloadAttachments: true,  // Auto-download referenced files
  archivedCacheLimit: 100     // Keep 100 archived files before cleanup
});

// Start the sync process
await attachmentQueue.startSync();
import 'package:logging/logging.dart';
import 'package:powersync/powersync.dart';
import 'package:powersync_core/attachments/attachments.dart';

final logger = Logger('AttachmentQueue');
late AttachmentQueue attachmentQueue;

Future<void> initializeAttachmentQueue(PowerSyncDatabase db) async {
  attachmentQueue = AttachmentQueue(
    db: db,
    remoteStorage: SignedUrlStorageAdapter(),
    localStorage: await getLocalStorage(),

    // Define which attachments exist in your data model
    watchAttachments: () => db.watch('''
      SELECT photo_id as id
      FROM users
      WHERE photo_id IS NOT NULL
    ''').map(
      (results) => [
        for (final row in results)
          WatchedAttachmentItem(
            id: row['id'] as String,
            fileExtension: 'jpg',
          )
      ],
    ),

    // Optional configuration
    syncInterval: const Duration(seconds: 30),  // Sync every 30 seconds
    downloadAttachments: true,  // Auto-download referenced files
    archivedCacheLimit: 100,  // Keep 100 archived files before cleanup
    logger: logger,
  );

  // Start the sync process
  await attachmentQueue.startSync();
}
let attachmentQueue = AttachmentQueue(
    db: db,  // PowerSync database instance
    remoteStorage: remoteStorage,
    attachmentsDirectory: try getAttachmentsDirectoryPath(),

    // Define which attachments exist in your data model
    watchAttachments: {
        try db.watch(
            sql: """
                SELECT photo_id
                FROM users
                WHERE photo_id IS NOT NULL
            """,
            parameters: [],
            mapper: { cursor in
                try WatchedAttachmentItem(
                    id: cursor.getString(name: "photo_id"),
                    fileExtension: "jpg"
                )
            }
        )
    },

    // Optional configuration
    syncInterval: 30.0,      // Sync every 30 seconds
    downloadAttachments: true,  // Auto-download referenced files
    archivedCacheLimit: 100     // Keep 100 archived files before cleanup
)

// Start the sync process
try await attachmentQueue.startSync()
import com.powersync.attachments.AttachmentQueue
import com.powersync.attachments.WatchedAttachmentItem
import com.powersync.db.getString
import kotlinx.coroutines.flow.Flow
import kotlin.time.Duration.Companion.seconds

val attachmentQueue = AttachmentQueue(
    db = db,  // PowerSync database instance
    remoteStorage = remoteStorage,
    attachmentsDirectory = attachmentsDirectory,
    localStorage = localStorage,  // Optional, defaults to IOLocalStorageAdapter()

    // Define which attachments exist in your data model
    watchAttachments = {
        db.watch(
            sql = """
                SELECT photo_id
                FROM users
                WHERE photo_id IS NOT NULL
            """,
            parameters = null
        ) { cursor ->
            WatchedAttachmentItem(
                id = cursor.getString("photo_id"),
                fileExtension = "jpg"
            )
        }
    },

    // Optional configuration
    syncInterval = 30.seconds,      // Sync every 30 seconds
    downloadAttachments = true,      // Auto-download referenced files
    archivedCacheLimit = 100        // Keep 100 archived files before cleanup
)

// Start the sync process
attachmentQueue.startSync()
using PowerSync.Common.Attachments;

var queue = new AttachmentQueue(new AttachmentQueueOptions
{
    Db = powersync,
    LocalStorage = localStorage,
    RemoteStorage = remoteStorage,

    // Define which attachments exist in your data model
    WatchAttachments = ct => WatchProfilePhotos(powersync, ct),

    // Optional configuration
    SyncInterval = TimeSpan.FromSeconds(30),  // Retry failed transfers every 30 seconds
    DownloadAttachments = true,               // Auto-download referenced files
    ArchivedCacheLimit = 100,                 // Keep 100 archived files before cleanup
});

// Start automatic syncing
await queue.StartSyncAsync();

static async IAsyncEnumerable<WatchedAttachmentItem[]> WatchProfilePhotos(
    PowerSyncDatabase db,
    [EnumeratorCancellation] CancellationToken ct)
{
    var stream = db.Watch<UserPhotoRow>(
        "SELECT photo_id FROM users WHERE photo_id IS NOT NULL",
        null,
        new SQLWatchOptions { TriggerImmediately = true, Signal = ct });

    await foreach (var rows in stream.WithCancellation(ct))
        yield return [.. rows.Select(r => new WatchedAttachmentItem(r.photo_id, fileExtension: "jpg"))];
}

internal sealed class UserPhotoRow { public string photo_id { get; set; } = ""; }
The
watchAttachments callback is crucial - it tells the queue which files your app needs based on your data model. The queue uses this to automatically download, upload, or archive files.Watching Multiple Attachment Types
When watching multiple attachment types, you need to provide thefileExtension for each attachment. You can store this in your data model tables or derive it from other fields. Here are examples for both patterns:
Pattern 2: Single Queue with UNION
// Example: Watching users.photo_id, documents.document_id, and videos.video_id
// Assuming your tables store file extensions
const attachmentQueue = new AttachmentQueue({
  db: db,
  localStorage,
  remoteStorage,

  watchAttachments: (onUpdate) => {
    db.watch(
      `SELECT photo_id as id, photo_file_extension as file_extension
       FROM users
       WHERE photo_id IS NOT NULL

       UNION ALL

       SELECT document_id as id, document_file_extension as file_extension
       FROM documents
       WHERE document_id IS NOT NULL

       UNION ALL

       SELECT video_id as id, video_file_extension as file_extension
       FROM videos
       WHERE video_id IS NOT NULL`,
      [],
      {
        onResult: async (result) => {
          const attachments = result.rows?._array.map(row => ({
            id: row.id,
            fileExtension: row.file_extension
          })) ?? [];
          await onUpdate(attachments);
        }
      }
    );
  },

  // ... other options
});

await attachmentQueue.startSync();
// Example: Watching users.photo_id, documents.document_id, and videos.video_id
// Assuming your tables store file extensions
attachmentQueue = AttachmentQueue(
  db: db,
  remoteStorage: SignedUrlStorageAdapter(),
  localStorage: await getLocalStorage(),

  watchAttachments: () => db.watch('''
    SELECT photo_id as id, photo_file_extension as file_extension
    FROM users
    WHERE photo_id IS NOT NULL

    UNION ALL

    SELECT document_id as id, document_file_extension as file_extension
    FROM documents
    WHERE document_id IS NOT NULL

    UNION ALL

    SELECT video_id as id, video_file_extension as file_extension
    FROM videos
    WHERE video_id IS NOT NULL
  ''').map(
    (results) => [
      for (final row in results)
        WatchedAttachmentItem(
          id: row['id'] as String,
          fileExtension: row['file_extension'] as String,
        )
    ],
  ),

  // ... other options
);

await attachmentQueue.startSync();
// Example: Watching users.photo_id, documents.document_id, and videos.video_id
// Assuming your tables store file extensions
let attachmentQueue = AttachmentQueue(
    db: db,
    remoteStorage: remoteStorage,
    attachmentsDirectory: try getAttachmentsDirectoryPath(),

    watchAttachments: {
        try db.watch(
            sql: """
                SELECT photo_id as id, photo_file_extension as file_extension
                FROM users
                WHERE photo_id IS NOT NULL

                UNION ALL

                SELECT document_id as id, document_file_extension as file_extension
                FROM documents
                WHERE document_id IS NOT NULL

                UNION ALL

                SELECT video_id as id, video_file_extension as file_extension
                FROM videos
                WHERE video_id IS NOT NULL
            """,
            parameters: [],
            mapper: { cursor in
                try WatchedAttachmentItem(
                    id: cursor.getString(name: "id"),
                    fileExtension: cursor.getString(name: "file_extension")
                )
            }
        )
    },

    // ... other options
)

try await attachmentQueue.startSync()
// Example: Watching users.photo_id, documents.document_id, and videos.video_id
// Assuming your tables store file extensions
val attachmentQueue = AttachmentQueue(
    db = db,
    remoteStorage = remoteStorage,
    attachmentsDirectory = attachmentsDirectory,
    localStorage = localStorage,

    watchAttachments = {
        db.watch(
            sql = """
                SELECT photo_id as id, photo_file_extension as file_extension
                FROM users
                WHERE photo_id IS NOT NULL

                UNION ALL

                SELECT document_id as id, document_file_extension as file_extension
                FROM documents
                WHERE document_id IS NOT NULL

                UNION ALL

                SELECT video_id as id, video_file_extension as file_extension
                FROM videos
                WHERE video_id IS NOT NULL
            """,
            parameters = null
        ) { cursor ->
            WatchedAttachmentItem(
                id = cursor.getString("id"),
                fileExtension = cursor.getString("file_extension")
            )
        }
    },

    // ... other options
)

attachmentQueue.startSync()
// Example: watching users.photo_id, documents.document_id, and videos.video_id
// Assuming your tables store file extensions
var queue = new AttachmentQueue(new AttachmentQueueOptions
{
    Db = powersync,
    LocalStorage = localStorage,
    RemoteStorage = remoteStorage,
    WatchAttachments = ct => WatchAllAttachments(powersync, ct),
    // ... other options
});

await queue.StartSyncAsync();

static async IAsyncEnumerable<WatchedAttachmentItem[]> WatchAllAttachments(
    PowerSyncDatabase db,
    [EnumeratorCancellation] CancellationToken ct)
{
    var stream = db.Watch<AttachmentRef>(
        """
        SELECT photo_id AS id, photo_file_extension AS file_extension
        FROM users
        WHERE photo_id IS NOT NULL

        UNION ALL

        SELECT document_id AS id, document_file_extension AS file_extension
        FROM documents
        WHERE document_id IS NOT NULL

        UNION ALL

        SELECT video_id AS id, video_file_extension AS file_extension
        FROM videos
        WHERE video_id IS NOT NULL
        """,
        null,
        new SQLWatchOptions { TriggerImmediately = true, Signal = ct });

    await foreach (var rows in stream.WithCancellation(ct))
        yield return [.. rows.Select(r => new WatchedAttachmentItem(r.id, fileExtension: r.file_extension))];
}

internal sealed class AttachmentRef
{
    public string id { get; set; } = "";
    public string file_extension { get; set; } = "";
}
// Create separate queues for different attachment types
const photoQueue = new AttachmentQueue({
  db: db,
  localStorage,
  remoteStorage,
  watchAttachments: (onUpdate) => {
    db.watch(
      `SELECT photo_id FROM users WHERE photo_id IS NOT NULL`,
      [],
      {
        onResult: async (result) => {
          const attachments = result.rows?._array.map(row => ({
            id: row.photo_id,
            fileExtension: 'jpg',
            mediaType: 'image/jpeg'  // Optional: preserved on the downloaded record
          })) ?? [];
          await onUpdate(attachments);
        }
      }
    );
  },
});

const documentQueue = new AttachmentQueue({
  db: db,
  localStorage,
  remoteStorage,
  watchAttachments: (onUpdate) => {
    db.watch(
      `SELECT document_id FROM documents WHERE document_id IS NOT NULL`,
      [],
      {
        onResult: async (result) => {
          const attachments = result.rows?._array.map(row => ({
            id: row.document_id,
            fileExtension: 'pdf',
            mediaType: 'application/pdf'  // Optional: preserved on the downloaded record
          })) ?? [];
          await onUpdate(attachments);
        }
      }
    );
  },
});

await Promise.all([
  photoQueue.startSync(),
  documentQueue.startSync()
]);
// Create separate queues for different attachment types
final photoQueue = AttachmentQueue(
  db: db,
  remoteStorage: SignedUrlStorageAdapter(),
  localStorage: await getLocalStorage(),
  watchAttachments: () => db.watch('''
    SELECT photo_id as id
    FROM users
    WHERE photo_id IS NOT NULL
  ''').map(
    (results) => [
      for (final row in results)
        WatchedAttachmentItem(
          id: row['id'] as String,
          fileExtension: 'jpg',
        )
    ],
  ),
);

final documentQueue = AttachmentQueue(
  db: db,
  remoteStorage: SignedUrlStorageAdapter(),
  localStorage: await getLocalStorage(),
  watchAttachments: () => db.watch('''
    SELECT document_id as id
    FROM documents
    WHERE document_id IS NOT NULL
  ''').map(
    (results) => [
      for (final row in results)
        WatchedAttachmentItem(
          id: row['id'] as String,
          fileExtension: 'pdf',
        )
    ],
  ),
);

await Future.wait([
  photoQueue.startSync(),
  documentQueue.startSync(),
]);
// Create separate queues for different attachment types
let photoQueue = AttachmentQueue(
    db: db,
    remoteStorage: remoteStorage,
    attachmentsDirectory: try getAttachmentsDirectoryPath(),
    watchAttachments: {
        try db.watch(
            sql: """
                SELECT photo_id
                FROM users
                WHERE photo_id IS NOT NULL
            """,
            parameters: [],
            mapper: { cursor in
                try WatchedAttachmentItem(
                    id: cursor.getString(name: "photo_id"),
                    fileExtension: "jpg"
                )
            }
        )
    }
)

let documentQueue = AttachmentQueue(
    db: db,
    remoteStorage: remoteStorage,
    attachmentsDirectory: try getAttachmentsDirectoryPath(),
    watchAttachments: {
        try db.watch(
            sql: """
                SELECT document_id
                FROM documents
                WHERE document_id IS NOT NULL
            """,
            parameters: [],
            mapper: { cursor in
                try WatchedAttachmentItem(
                    id: cursor.getString(name: "document_id"),
                    fileExtension: "pdf"
                )
            }
        )
    }
)

try await photoQueue.startSync()
try await documentQueue.startSync()
// Create separate queues for different attachment types
val photoQueue = AttachmentQueue(
    db = db,
    remoteStorage = remoteStorage,
    attachmentsDirectory = attachmentsDirectory,
    localStorage = localStorage,
    watchAttachments = {
        db.watch(
            sql = """
                SELECT photo_id
                FROM users
                WHERE photo_id IS NOT NULL
            """,
            parameters = null
        ) { cursor ->
            WatchedAttachmentItem(
                id = cursor.getString("photo_id"),
                fileExtension = "jpg"
            )
        }
    }
)

val documentQueue = AttachmentQueue(
    db = db,
    remoteStorage = remoteStorage,
    attachmentsDirectory = attachmentsDirectory,
    localStorage = localStorage,
    watchAttachments = {
        db.watch(
            sql = """
                SELECT document_id
                FROM documents
                WHERE document_id IS NOT NULL
            """,
            parameters = null
        ) { cursor ->
            WatchedAttachmentItem(
                id = cursor.getString("document_id"),
                fileExtension = "pdf"
            )
        }
    }
)

photoQueue.startSync()
documentQueue.startSync()
// Create separate queues for different attachment types
var photoQueue = new AttachmentQueue(new AttachmentQueueOptions
{
    Db = powersync,
    LocalStorage = localStorage,
    RemoteStorage = remoteStorage,
    WatchAttachments = ct => WatchPhotos(powersync, ct),
});

var documentQueue = new AttachmentQueue(new AttachmentQueueOptions
{
    Db = powersync,
    LocalStorage = localStorage,
    RemoteStorage = remoteStorage,
    WatchAttachments = ct => WatchDocuments(powersync, ct),
});

await Task.WhenAll(
    photoQueue.StartSyncAsync(),
    documentQueue.StartSyncAsync());

static async IAsyncEnumerable<WatchedAttachmentItem[]> WatchPhotos(
    PowerSyncDatabase db,
    [EnumeratorCancellation] CancellationToken ct)
{
    var stream = db.Watch<UserPhotoRow>(
        "SELECT photo_id FROM users WHERE photo_id IS NOT NULL",
        null,
        new SQLWatchOptions { TriggerImmediately = true, Signal = ct });

    await foreach (var rows in stream.WithCancellation(ct))
        yield return [.. rows.Select(r => new WatchedAttachmentItem(r.photo_id, fileExtension: "jpg"))];
}

static async IAsyncEnumerable<WatchedAttachmentItem[]> WatchDocuments(
    PowerSyncDatabase db,
    [EnumeratorCancellation] CancellationToken ct)
{
    var stream = db.Watch<DocumentRow>(
        "SELECT document_id FROM documents WHERE document_id IS NOT NULL",
        null,
        new SQLWatchOptions { TriggerImmediately = true, Signal = ct });

    await foreach (var rows in stream.WithCancellation(ct))
        yield return [.. rows.Select(r => new WatchedAttachmentItem(r.document_id, fileExtension: "pdf"))];
}

internal sealed class DocumentRow { public string document_id { get; set; } = ""; }
Upload an Attachment
async function uploadProfilePhoto(imageBlob: Blob, userId: string) {
  const arrayBuffer = await imageBlob.arrayBuffer();

  const attachment = await attachmentQueue.saveFile({
    data: arrayBuffer,
    fileExtension: 'jpg',
    mediaType: 'image/jpeg',

    // updateHook runs in same transaction, ensuring atomicity
    updateHook: async (tx, attachment) => {
      await tx.execute(
        'UPDATE users SET photo_id = ? WHERE id = ?',
        [attachment.id, userId]
      );
    }
  });

  return attachment;
}

// The queue will:
// 1. Save file locally immediately
// 2. Create attachment record with state QUEUED_UPLOAD
// 3. Update user record in same transaction
// 4. Automatically upload file in background
// 5. Update state to SYNCED when complete
import 'dart:io';
import 'dart:typed_data';
import 'package:powersync_core/attachments/attachments.dart';

Future<Attachment> uploadProfilePhoto(
  File imageFile,
  String userId,
) async {
  final imageBytes = await imageFile.readAsBytes();

  final attachment = await attachmentQueue.saveFile(
    data: Stream.value(imageBytes),
    mediaType: 'image/jpeg',
    fileExtension: 'jpg',

    // updateHook runs in same transaction, ensuring atomicity
    updateHook: (context, attachment) async {
      await context.execute(
        'UPDATE users SET photo_id = ? WHERE id = ?',
        [attachment.id, userId],
      );
    },
  );

  return attachment;
}

// The queue will:
// 1. Save file locally immediately
// 2. Create attachment record with state QUEUED_UPLOAD
// 3. Update user record in same transaction
// 4. Automatically upload file in background
// 5. Update state to SYNCED when complete
func uploadProfilePhoto(imageData: Data, userId: String) async throws -> Attachment {
    let attachment = try await attachmentQueue.saveFile(
        data: imageData,
        mediaType: "image/jpeg",
        fileExtension: "jpg",

        // updateHook runs in same transaction, ensuring atomicity
        updateHook: { tx, attachment in
            try tx.execute(
                sql: "UPDATE users SET photo_id = ? WHERE id = ?",
                parameters: [attachment.id, userId]
            )
        }
    )

    return attachment
}

// The queue will:
// 1. Save file locally immediately
// 2. Create attachment record with state QUEUED_UPLOAD
// 3. Update user record in same transaction
// 4. Automatically upload file in background
// 5. Update state to SYNCED when complete
import kotlinx.coroutines.flow.flowOf

suspend fun uploadProfilePhoto(imageBytes: ByteArray, userId: String) {
    val attachment = attachmentQueue.saveFile(
        data = flowOf(imageBytes),
        mediaType = "image/jpeg",
        fileExtension = "jpg",

        // updateHook runs in same transaction, ensuring atomicity
        updateHook = { tx, attachment ->
            tx.execute(
                "UPDATE users SET photo_id = ? WHERE id = ?",
                listOf(attachment.id, userId)
            )
        }
    )

    return attachment
}

// The queue will:
// 1. Save file locally immediately
// 2. Create attachment record with state QUEUED_UPLOAD
// 3. Update user record in same transaction
// 4. Automatically upload file in background
// 5. Update state to SYNCED when complete
async Task UploadProfilePhotoAsync(Stream imageStream, string currentUserId)
{
    var attachment = await queue.SaveFileAsync(
        data: imageStream,
        fileExtension: "jpg",
        mediaType: "image/jpeg",
        // updateHook runs in the same transaction, ensuring atomicity
        updateHook: async (tx, attachment) =>
        {
            await tx.Execute(
                "UPDATE users SET photo_id = ? WHERE id = ?",
                [attachment.Id, currentUserId]);
        });

    // The queue will:
    // 1. Save the file locally immediately
    // 2. Create an attachment record with state QueuedUpload
    // 3. Update the user record in the same transaction
    // 4. Automatically upload the file in the background
    // 5. Update the state to Synced when complete
}
The
updateHook parameter is the recommended way to link attachments to your data model. It runs in the same database transaction, ensuring data consistency.Download/Access an Attachment
// Downloads happen automatically when watchAttachments references a file

async function getProfilePhotoUri(userId: string): Promise<string | null> {
  const user = await db.get(
    'SELECT photo_id FROM users WHERE id = ?',
    [userId]
  );

  if (!user?.photo_id) {
    return null;
  }

  const attachment = await db.get(
    'SELECT * FROM attachments WHERE id = ?',
    [user.photo_id]
  );

  if (!attachment) {
    return null;
  }

  if (attachment.state === 'SYNCED' && attachment.local_uri) {
    return attachment.local_uri;
  }

  return null;
}

// Example: Display image in React with watch query
function ProfilePhoto({ userId }: { userId: string }) {
  const [photoUri, setPhotoUri] = useState<string | null>(null);

  useEffect(() => {
    const watch = db.watch(
      `SELECT a.local_uri, a.state
       FROM users u
       LEFT JOIN attachments a ON a.id = u.photo_id
       WHERE u.id = ?`,
      [userId],
      {
        onResult: (result) => {
          const row = result.rows?._array[0];
          if (row?.state === 'SYNCED' && row?.local_uri) {
            setPhotoUri(row.local_uri);
          }
        }
      }
    );

    return () => watch.close();
  }, [userId]);

  if (!photoUri) {
    return <div>Loading photo...</div>;
  }

  return <img src={photoUri} alt="Profile" />;
}
import 'package:powersync/powersync.dart';
import 'package:powersync_core/attachments/attachments.dart';

// Downloads happen automatically when watchAttachments references a file
Future<String?> getProfilePhotoUri(
  PowerSyncDatabase db,
  String userId,
) async {
  final user = await db.get(
    'SELECT photo_id FROM users WHERE id = ?',
    [userId],
  );

  if (user == null || user['photo_id'] == null) {
    return null;
  }

  final attachment = await db.get(
    'SELECT * FROM attachments_queue WHERE id = ?',
    [user['photo_id']],
  );

  if (attachment == null) {
    return null;
  }

  final state = AttachmentState.fromInt(attachment['state'] as int);
  final localUri = attachment['local_uri'] as String?;

  if (state == AttachmentState.synced && localUri != null) {
    // Resolve full path from local storage
    final appDocDir = await getApplicationDocumentsDirectory();
    return '${appDocDir.path}/attachments/$localUri';
  }

  return null;
}

// Example: Display image in Flutter with StreamBuilder
StreamBuilder<List<Map<String, dynamic>>>(
  stream: db.watch('''
    SELECT a.local_uri, a.state
    FROM users u
    LEFT JOIN attachments_queue a ON a.id = u.photo_id
    WHERE u.id = ?
  ''').map((results) => results.toList()),
  builder: (context, snapshot) {
    if (!snapshot.hasData || snapshot.data!.isEmpty) {
      return const CircularProgressIndicator();
    }

    final row = snapshot.data!.first;
    final state = AttachmentState.fromInt(row['state'] as int);
    final localUri = row['local_uri'] as String?;

    if (state == AttachmentState.synced && localUri != null) {
      // Load and display image
      return Image.file(File(localUri));
    }

    return const Text('Loading photo...');
  },
)
// Downloads happen automatically when watchAttachments references a file
func getProfilePhotoUri(userId: String) async throws -> String? {
    guard let user = try await db.getOptional(
        sql: "SELECT photo_id FROM users WHERE id = ?",
        parameters: [userId],
        mapper: { cursor in
            try cursor.getStringOptional(name: "photo_id")
        }
    ), let photoId = user else {
        return nil
    }

    guard let attachment = try await db.getOptional(
        sql: "SELECT * FROM attachments WHERE id = ?",
        parameters: [photoId],
        mapper: { cursor in
            try Attachment.fromCursor(cursor)
        }
    ) else {
        return nil
    }

    if attachment.state == .synced, let localUri = attachment.localUri {
        return localUri
    }

    return nil
}

// Example: Display image in SwiftUI with watch query
struct ProfilePhotoView: View {
    let userId: String
    @State private var photoUri: String?

    var body: some View {
        Group {
            if let photoUri = photoUri {
                AsyncImage(url: URL(fileURLWithPath: photoUri)) { image in
                    image.resizable()
                } placeholder: {
                    ProgressView()
                }
            } else {
                Text("Loading photo...")
            }
        }
        .task {
            do {
                for try await results in try db.watch(
                    sql: """
                        SELECT a.local_uri, a.state
                        FROM users u
                        LEFT JOIN attachments a ON a.id = u.photo_id
                        WHERE u.id = ?
                    """,
                    parameters: [userId],
                    mapper: { cursor in
                        (
                            state: try AttachmentState.from(cursor.getInt(name: "state")),
                            localUri: try cursor.getStringOptional(name: "local_uri")
                        )
                    }
                ) {
                    if let first = results.first,
                       first.state == .synced,
                       let localUri = first.localUri {
                        photoUri = localUri
                    }
                }
            } catch {
                print("Error watching photo: \(error)")
            }
        }
    }
}
import com.powersync.attachments.AttachmentState
import com.powersync.db.getString
import com.powersync.db.getStringOptional
import kotlinx.coroutines.flow.Flow
import kotlinx.coroutines.flow.map

// Downloads happen automatically when watchAttachments references a file
suspend fun getProfilePhotoUri(userId: String): String? {
    val user = db.get(
        "SELECT photo_id FROM users WHERE id = ?",
        listOf(userId)
    ) { cursor ->
        cursor.getStringOptional("photo_id")
    }

    if (user == null) {
        return null
    }

    val attachment = db.get(
        "SELECT * FROM attachments WHERE id = ?",
        listOf(user)
    ) { cursor ->
        com.powersync.attachments.Attachment.fromCursor(cursor)
    }

    if (attachment == null) {
        return null
    }

    if (attachment.state == AttachmentState.SYNCED && attachment.localUri != null) {
        return attachment.localUri
    }

    return null
}

// Example: Watch attachment state in Compose/UI
fun watchProfilePhoto(userId: String): Flow<String?> {
    return db.watch(
        sql = """
            SELECT a.local_uri, a.state
            FROM users u
            LEFT JOIN attachments a ON a.id = u.photo_id
            WHERE u.id = ?
        """,
        parameters = listOf(userId)
    ) { cursor ->
        val state = AttachmentState.fromLong(cursor.getLong("state"))
        val localUri = cursor.getStringOptional("local_uri")

        if (state == AttachmentState.SYNCED && localUri != null) {
            localUri
        } else {
            null
        }
    }.map { results -> results.firstOrNull() }
}
// Downloads happen automatically when WatchAttachments references a file

// Reactively yield the local file path whenever the attachment reaches the Synced state
static async IAsyncEnumerable<string?> WatchProfilePhotoUri(
    PowerSyncDatabase db,
    string userId,
    [EnumeratorCancellation] CancellationToken ct = default)
{
    var stream = db.Watch<PhotoState>(
        """
        SELECT a.local_uri, a.state
        FROM users u
        LEFT JOIN attachments a ON a.id = u.photo_id
        WHERE u.id = ?
        """,
        [userId],
        new SQLWatchOptions { TriggerImmediately = true, Signal = ct });

    await foreach (var rows in stream.WithCancellation(ct))
    {
        var row = rows.FirstOrDefault();
        yield return row?.state == (long)AttachmentState.Synced ? row.local_uri : null;
    }
}

internal sealed class PhotoState
{
    public string? local_uri { get; set; }
    public long state { get; set; }
}
Delete an Attachment
async function deleteProfilePhoto(userId: string, photoId: string) {
  await attachmentQueue.deleteFile({
    id: photoId,

    // updateHook ensures atomic deletion
    updateHook: async (tx, attachment) => {
      await tx.execute(
        'UPDATE users SET photo_id = NULL WHERE id = ?',
        [userId]
      );
    }
  });

  console.log('Photo queued for deletion');
  // The queue will:
  // 1. Delete from remote storage
  // 2. Delete local file
  // 3. Remove attachment record
}

// Alternative: Remove reference and let queue archive it automatically
async function removePhotoReference(userId: string) {
  await db.execute(
    'UPDATE users SET photo_id = NULL WHERE id = ?',
    [userId]
  );

  // The watchAttachments callback will detect this change
  // The queue will automatically archive the unreferenced attachment
  // After reaching archivedCacheLimit, it will be deleted
}
Future<void> deleteProfilePhoto(
  String userId,
  String photoId,
) async {
  await attachmentQueue.deleteFile(
    attachmentId: photoId,

    // updateHook ensures atomic deletion
    updateHook: (context, attachment) async {
      await context.execute(
        'UPDATE users SET photo_id = NULL WHERE id = ?',
        [userId],
      );
    },
  );

  print('Photo queued for deletion');
  // The queue will:
  // 1. Delete from remote storage
  // 2. Delete local file
  // 3. Remove attachment record
}

// Alternative: Remove reference and let queue archive it automatically
Future<void> removePhotoReference(
  PowerSyncDatabase db,
  String userId,
) async {
  await db.execute(
    'UPDATE users SET photo_id = NULL WHERE id = ?',
    [userId],
  );

  // The watchAttachments callback will detect this change
  // The queue will automatically archive the unreferenced attachment
  // After reaching archivedCacheLimit, it will be deleted
}
func deleteProfilePhoto(userId: String, photoId: String) async throws {
    try await attachmentQueue.deleteFile(
        attachmentId: photoId,

        // updateHook ensures atomic deletion
        updateHook: { tx, attachment in
            try tx.execute(
                sql: "UPDATE users SET photo_id = NULL WHERE id = ?",
                parameters: [userId]
            )
        }
    )

    print("Photo queued for deletion")
    // The queue will:
    // 1. Delete from remote storage
    // 2. Delete local file
    // 3. Remove attachment record
}

// Alternative: Remove reference and let queue archive it automatically
func removePhotoReference(userId: String) async throws {
    try await db.execute(
        sql: "UPDATE users SET photo_id = NULL WHERE id = ?",
        parameters: [userId]
    )

    // The watchAttachments callback will detect this change
    // The queue will automatically archive the unreferenced attachment
    // After reaching archivedCacheLimit, it will be deleted
}
suspend fun deleteProfilePhoto(userId: String, photoId: String) {
    attachmentQueue.deleteFile(
        attachmentId = photoId,

        // updateHook ensures atomic deletion
        updateHook = { tx, attachment ->
            tx.execute(
                "UPDATE users SET photo_id = NULL WHERE id = ?",
                listOf(userId)
            )
        }
    )

    // The queue will:
    // 1. Delete from remote storage
    // 2. Delete local file
    // 3. Remove attachment record
}

// Alternative: Remove reference and let queue archive it automatically
suspend fun removePhotoReference(userId: String) {
    db.writeTransaction { tx ->
        tx.execute(
            "UPDATE users SET photo_id = NULL WHERE id = ?",
            listOf(userId)
        )
    }

    // The watchAttachments callback will detect this change
    // The queue will automatically archive the unreferenced attachment
    // After reaching archivedCacheLimit, it will be deleted
}
async Task DeleteProfilePhotoAsync(string userId, string photoId)
{
    await queue.DeleteFileAsync(
        id: photoId,
        // updateHook ensures the data model update and deletion are atomic
        updateHook: async (tx, attachment) =>
        {
            await tx.Execute(
                "UPDATE users SET photo_id = NULL WHERE id = ?",
                [userId]);
        });

    // The queue will:
    // 1. Delete from remote storage
    // 2. Delete the local file
    // 3. Remove the attachment record
}

// Alternative: remove the reference and let the queue archive it automatically
async Task RemovePhotoReferenceAsync(string userId)
{
    await powersync.Execute(
        "UPDATE users SET photo_id = NULL WHERE id = ?",
        [userId]);

    // The WatchAttachments callback detects this change.
    // The queue archives the unreferenced attachment automatically.
    // Once the cache limit is reached, archived attachments are deleted.
}
Advanced Topics
Error Handling
Implement custom error handling to control retry behavior:import { AttachmentErrorHandler } from '@powersync/web';
const errorHandler: AttachmentErrorHandler = {
async onDownloadError(attachment, error) {
console.error(`Download failed: ${attachment.filename}`, error);
// Return true to retry, false to archive
if (error.message.includes('404')) {
return false; // File doesn't exist, don't retry
}
return true; // Retry on network errors
},
async onUploadError(attachment, error) {
console.error(`Upload failed: ${attachment.filename}`, error);
return true; // Always retry uploads
},
async onDeleteError(attachment, error) {
console.error(`Delete failed: ${attachment.filename}`, error);
return true; // Retry deletes
}
};
const queue = new AttachmentQueue({
// ... other options
errorHandler
});
import 'package:powersync_core/attachments/attachments.dart';

final errorHandler = AttachmentErrorHandler(
  onDownloadError: (attachment, exception, stackTrace) async {
    print('Download failed: ${attachment.filename}');
    print('Error: $exception');

    // Return true to retry, false to archive
    if (exception.toString().contains('404')) {
      return false; // File doesn't exist, don't retry
    }
    return true; // Retry on network errors
  },

  onUploadError: (attachment, exception, stackTrace) async {
    print('Upload failed: ${attachment.filename}');
    print('Error: $exception');
    return true; // Always retry uploads
  },

  onDeleteError: (attachment, exception, stackTrace) async {
    print('Delete failed: ${attachment.filename}');
    print('Error: $exception');
    return true; // Retry deletes
  },
);

final queue = AttachmentQueue(
  // ... other options
  errorHandler: errorHandler,
);
class CustomErrorHandler: SyncErrorHandler {
    func onDownloadError(attachment: Attachment, error: Error) async -> Bool {
        print("Download failed: \(attachment.filename), error: \(error)")

        // Return true to retry, false to archive
        if let urlError = error as? URLError, urlError.code == .badServerResponse {
            return false  // File doesn't exist (404), don't retry
        }
        return true  // Retry on network errors
    }

    func onUploadError(attachment: Attachment, error: Error) async -> Bool {
        print("Upload failed: \(attachment.filename), error: \(error)")
        return true  // Always retry uploads
    }

    func onDeleteError(attachment: Attachment, error: Error) async -> Bool {
        print("Delete failed: \(attachment.filename), error: \(error)")
        return true  // Retry deletes
    }
}

let queue = AttachmentQueue(
    db: db,
    remoteStorage: remoteStorage,
    attachmentsDirectory: try getAttachmentsDirectoryPath(),
    watchAttachments: watchAttachments,
    errorHandler: CustomErrorHandler()
)
import com.powersync.attachments.SyncErrorHandler

val errorHandler = object : SyncErrorHandler {
    override suspend fun onDownloadError(
        attachment: Attachment,
        exception: Exception
    ): Boolean {
        println("Download failed: ${attachment.filename}", exception)

        // Return true to retry, false to archive
        if (exception.message?.contains("404") == true) {
            return false  // File doesn't exist, don't retry
        }
        return true  // Retry on network errors
    }

    override suspend fun onUploadError(
        attachment: Attachment,
        exception: Exception
    ): Boolean {
        println("Upload failed: ${attachment.filename}", exception)
        return true  // Always retry uploads
    }

    override suspend fun onDeleteError(
        attachment: Attachment,
        exception: Exception
    ): Boolean {
        println("Delete failed: ${attachment.filename}", exception)
        return true  // Retry deletes
    }
}

val queue = AttachmentQueue(
    // ... other options
    errorHandler = errorHandler
)
using PowerSync.Common.Attachments;

public sealed class MyErrorHandler(ILogger logger) : IAttachmentErrorHandler
{
    public Task<bool> OnDownloadErrorAsync(Attachment attachment, Exception error)
    {
        logger.LogError(error, "Download failed for {Filename}", attachment.Filename);

        // Return true to retry, false to archive
        if (error is HttpRequestException { StatusCode: HttpStatusCode.NotFound })
            return Task.FromResult(false);  // File no longer exists

        return Task.FromResult(true);  // Retry on network errors
    }

    public Task<bool> OnUploadErrorAsync(Attachment attachment, Exception error)
    {
        logger.LogError(error, "Upload failed for {Filename}", attachment.Filename);
        return Task.FromResult(true);  // Always retry
    }

    public Task<bool> OnDeleteErrorAsync(Attachment attachment, Exception error)
    {
        logger.LogError(error, "Delete failed for {Filename}", attachment.Filename);
        return Task.FromResult(true);  // Retry
    }
}

var queue = new AttachmentQueue(new AttachmentQueueOptions
{
    // ... other options
    ErrorHandler = new MyErrorHandler(logger),
});
Custom Storage Adapters
The following is an example of how to implement a custom storage adapter for IPFS:import { LocalStorageAdapter, RemoteStorageAdapter } from '@powersync/web';
// Example: IPFS remote storage
class IPFSStorageAdapter implements RemoteStorageAdapter {
async uploadFile(fileData: ArrayBuffer, attachment: AttachmentRecord) {
// Upload to IPFS
const cid = await ipfs.add(fileData);
// Store CID in your backend for retrieval
await fetch('/api/ipfs-cids', {
method: 'POST',
body: JSON.stringify({ attachmentId: attachment.id, cid })
});
}
async downloadFile(attachment: AttachmentRecord): Promise<ArrayBuffer> {
// Retrieve CID from backend
const { cid } = await fetch(`/api/ipfs-cids/${attachment.id}`)
.then(r => r.json());
// Download from IPFS
return ipfs.cat(cid);
}
async deleteFile(attachment: AttachmentRecord) {
// IPFS is immutable, but you can unpin and remove from backend
await fetch(`/api/ipfs-cids/${attachment.id}`, { method: 'DELETE' });
}
}
// Example: IPFS remote storage
class IPFSStorageAdapter implements RemoteStorage {
  @override
  Future<void> uploadFile(
    Stream<List<int>> fileData,
    Attachment attachment,
  ) async {
    // Collect the stream
    final bytes = <int>[];
    await for (final chunk in fileData) {
      bytes.addAll(chunk);
    }

    // Upload to IPFS
    final cid = await ipfs.add(Uint8List.fromList(bytes));

    // Store CID in your backend for retrieval
    await http.post(
      Uri.parse('/api/ipfs-cids'),
      body: jsonEncode({
        'attachmentId': attachment.id,
        'cid': cid,
      }),
    );
  }

  @override
  Future<Stream<List<int>>> downloadFile(Attachment attachment) async {
    // Retrieve CID from backend
    final response = await http.get(
      Uri.parse('/api/ipfs-cids/${attachment.id}'),
    );
    final cid = jsonDecode(response.body)['cid'] as String;

    // Download from IPFS
    final data = await ipfs.cat(cid);
    return Stream.value(data);
  }

  @override
  Future<void> deleteFile(Attachment attachment) async {
    // IPFS is immutable, but you can unpin and remove from backend
    await http.delete(
      Uri.parse('/api/ipfs-cids/${attachment.id}'),
    );
  }
}
// Example: IPFS remote storage
class IPFSStorageAdapter: RemoteStorageAdapter {
    func uploadFile(fileData: Data, attachment: Attachment) async throws {
        // Upload to IPFS
        // let cid = try await ipfs.add(fileData)

        // Store CID in your backend for retrieval
        struct CIDRequest: Codable {
            let attachmentId: String
            let cid: String
        }

        let requestBody = CIDRequest(attachmentId: attachment.id, cid: "your-cid-here")
        var request = URLRequest(url: URL(string: "/api/ipfs-cids")!)
        request.httpMethod = "POST"
        request.setValue("application/json", forHTTPHeaderField: "Content-Type")
        request.httpBody = try JSONEncoder().encode(requestBody)

        _ = try await URLSession.shared.data(for: request)
    }

    func downloadFile(attachment: Attachment) async throws -> Data {
        // Retrieve CID from backend
        struct CIDResponse: Codable {
            let cid: String
        }

        let request = URLRequest(url: URL(string: "/api/ipfs-cids/\(attachment.id)")!)
        let (data, _) = try await URLSession.shared.data(for: request)
        let response = try JSONDecoder().decode(CIDResponse.self, from: data)

        // Download from IPFS
        // let fileData = try await ipfs.cat(response.cid)
        // return fileData
        return Data()  // Replace with actual IPFS download
    }

    func deleteFile(attachment: Attachment) async throws {
        // IPFS is immutable, but you can unpin and remove from backend
        var request = URLRequest(url: URL(string: "/api/ipfs-cids/\(attachment.id)")!)
        request.httpMethod = "DELETE"
        _ = try await URLSession.shared.data(for: request)
    }
}
// Example: IPFS remote storage
class IPFSStorageAdapter : RemoteStorage {
    override suspend fun uploadFile(
        fileData: Flow<ByteArray>,
        attachment: Attachment
    ) {
        // Collect the flow
        val bytes = mutableListOf<ByteArray>()
        fileData.collect { bytes.add(it) }
        val allBytes = bytes.flatMap { it.toList() }.toByteArray()

        // Upload to IPFS
        val cid = // ... upload to IPFS

        // Store CID in your backend for retrieval
        // ... your HTTP POST to store CID
    }

    override suspend fun downloadFile(attachment: Attachment): Flow<ByteArray> {
        // Retrieve CID from backend
        val cid = // ... fetch CID from your API

        // Download from IPFS
        val data = // ... download from IPFS
        return flowOf(data)
    }

    override suspend fun deleteFile(attachment: Attachment) {
        // IPFS is immutable, but you can unpin and remove from backend
        // ... your HTTP DELETE implementation
    }
}
// Example: IPFS remote storage
public sealed class IPFSStorageAdapter(HttpClient http) : IRemoteStorageAdapter
{
    public async Task UploadFileAsync(Stream fileData, Attachment attachment)
    {
        // Upload the file to IPFS via your backend
        using var content = new StreamContent(fileData);
        var resp = await http.PostAsync("/api/ipfs/add", content);
        resp.EnsureSuccessStatusCode();
        var cid = await resp.Content.ReadAsStringAsync();

        // Store the CID so it can be retrieved for downloads
        await http.PostAsJsonAsync("/api/ipfs-cids",
            new { attachmentId = attachment.Id, cid });
    }

    public async Task<Stream> DownloadFileAsync(Attachment attachment)
    {
        // Retrieve the CID from your backend
        var cid = await http.GetStringAsync($"/api/ipfs-cids/{attachment.Id}");
        return await http.GetStreamAsync($"/api/ipfs/cat/{cid}");
    }

    public async Task DeleteFileAsync(Attachment attachment)
    {
        // IPFS is immutable; unpin and remove the record from your backend
        var resp = await http.DeleteAsync($"/api/ipfs-cids/{attachment.Id}");
        if (resp.StatusCode != HttpStatusCode.NotFound)
            resp.EnsureSuccessStatusCode();
    }
}
Verification and Recovery
verifyAttachments() is always called internally during startSync().
This method does the following:
- Verifies local files exist at expected paths
- Repairs broken
localUrireferences - Archives attachments with missing files
- Requeues downloads for synced files with missing local copies
await attachmentQueue.verifyAttachments();
Coming soon, need to expose the function publicly
try await attachmentQueue.waitForInit()
Coming soon, need to expose the function publicly
await queue.VerifyAttachmentsAsync();
Cache Management
Control archived file retention:const queue = new AttachmentQueue({
// ... other options
archivedCacheLimit: 200 // Keep 200 archived files; oldest deleted when limit reached
});
// For manually expiring the cache
queue.expireCache()
final queue = AttachmentQueue(
  // ... other options
  archivedCacheLimit: 200,  // Keep 200 archived files; oldest deleted when limit reached
);

// For manually expiring the cache
await queue.expireCache();
let queue = AttachmentQueue(
    db: db,
    remoteStorage: remoteStorage,
    attachmentsDirectory: try getAttachmentsDirectoryPath(),
    watchAttachments: watchAttachments,
    // ... other options
    archivedCacheLimit: 200  // Keep 200 archived files; oldest deleted when limit reached
)

// For manually expiring the cache
try await queue.expireCache()
val queue = AttachmentQueue(
    // ... other options
    archivedCacheLimit = 200  // Keep 200 archived files; oldest deleted when limit reached
)

// For manually expiring the cache
queue.expireCache()
var queue = new AttachmentQueue(new AttachmentQueueOptions
{
    // ... other options
    ArchivedCacheLimit = 200,  // Keep 200 archived files; oldest deleted when limit reached
});

// Manually expire the cache
await queue.ExpireCacheAsync();
Offline-First Considerations
The attachment queue is designed for offline-first apps:- Local-first operations - Files are saved locally immediately, synced later
- Automatic retry - Failed uploads/downloads retry when connection returns
- Queue persistence - Queue state survives app restarts
- Conflict-free - Files are immutable, identified by UUID
- Bandwidth efficient - Only syncs when needed, respects network conditions
Migrating From Deprecated Packages
If you are migrating from the now deprecated attachment helpers for Dart or JavaScript, follow the notes below:- powersync_attachments_helper (Dart)
- @powersync/attachments (JS)
A fairly simple migration from
powersync_attachments_helper to the new utilities would be to adopt the new library with a different Attachment Queue table name and drop the legacy package. This means existing attachments are lost, but will be re-downloaded automatically.Import
Tip: use a different
AttachmentTable and AttachmentQueue directly from your platform SDK (@powersync/web, @powersync/node, or @powersync/react-native), then remove @powersync/attachments from your dependencies.React Native only: also install @powersync/attachments-storage-react-native plus either expo-file-system (Expo 54+) or @dr.pogodin/react-native-fs.What changed:Before (@powersync/attachments) | After (platform SDK) |
|---|---|
AbstractAttachmentQueue subclass | AttachmentQueue instantiated directly |
onAttachmentIdsChange(ids: string[]) | watchAttachments — items must be { id, fileExtension }, not just IDs |
newAttachmentRecord() + saveToQueue() | saveFile({ data, fileExtension, updateHook }) |
init() | startSync() |
Single storage adapter | localStorage + remoteStorage (two separate adapters) |
syncInterval | syncIntervalMs |
cacheLimit | archivedCacheLimit |
AttachmentTable option: name | viewName |
AttachmentTable option: additionalColumns | Removed — use the built-in meta_data column (JSON string) instead |
Error handlers return { retry: boolean } | Return Promise<boolean>; onDeleteError is now also required |
viewName (e.g. attachment_queue) to avoid a SQLite conflict with the old attachments table during the transition.Data on existing users: the new local attachments table starts empty. Files already in remote storage will re-download automatically once referenced by your watchAttachments query. Files that were only ever stored locally and never uploaded have no remote copy and will not be recoverable.Related Resources
- An Implementation Walkthrough Using The Flutter/Dart Attachment Helpers - Blog post on building offline-first uploads