# Architecture Overview
Source: https://docs.powersync.com/architecture/architecture-overview
The core components of PowerSync are the service and client SDKs
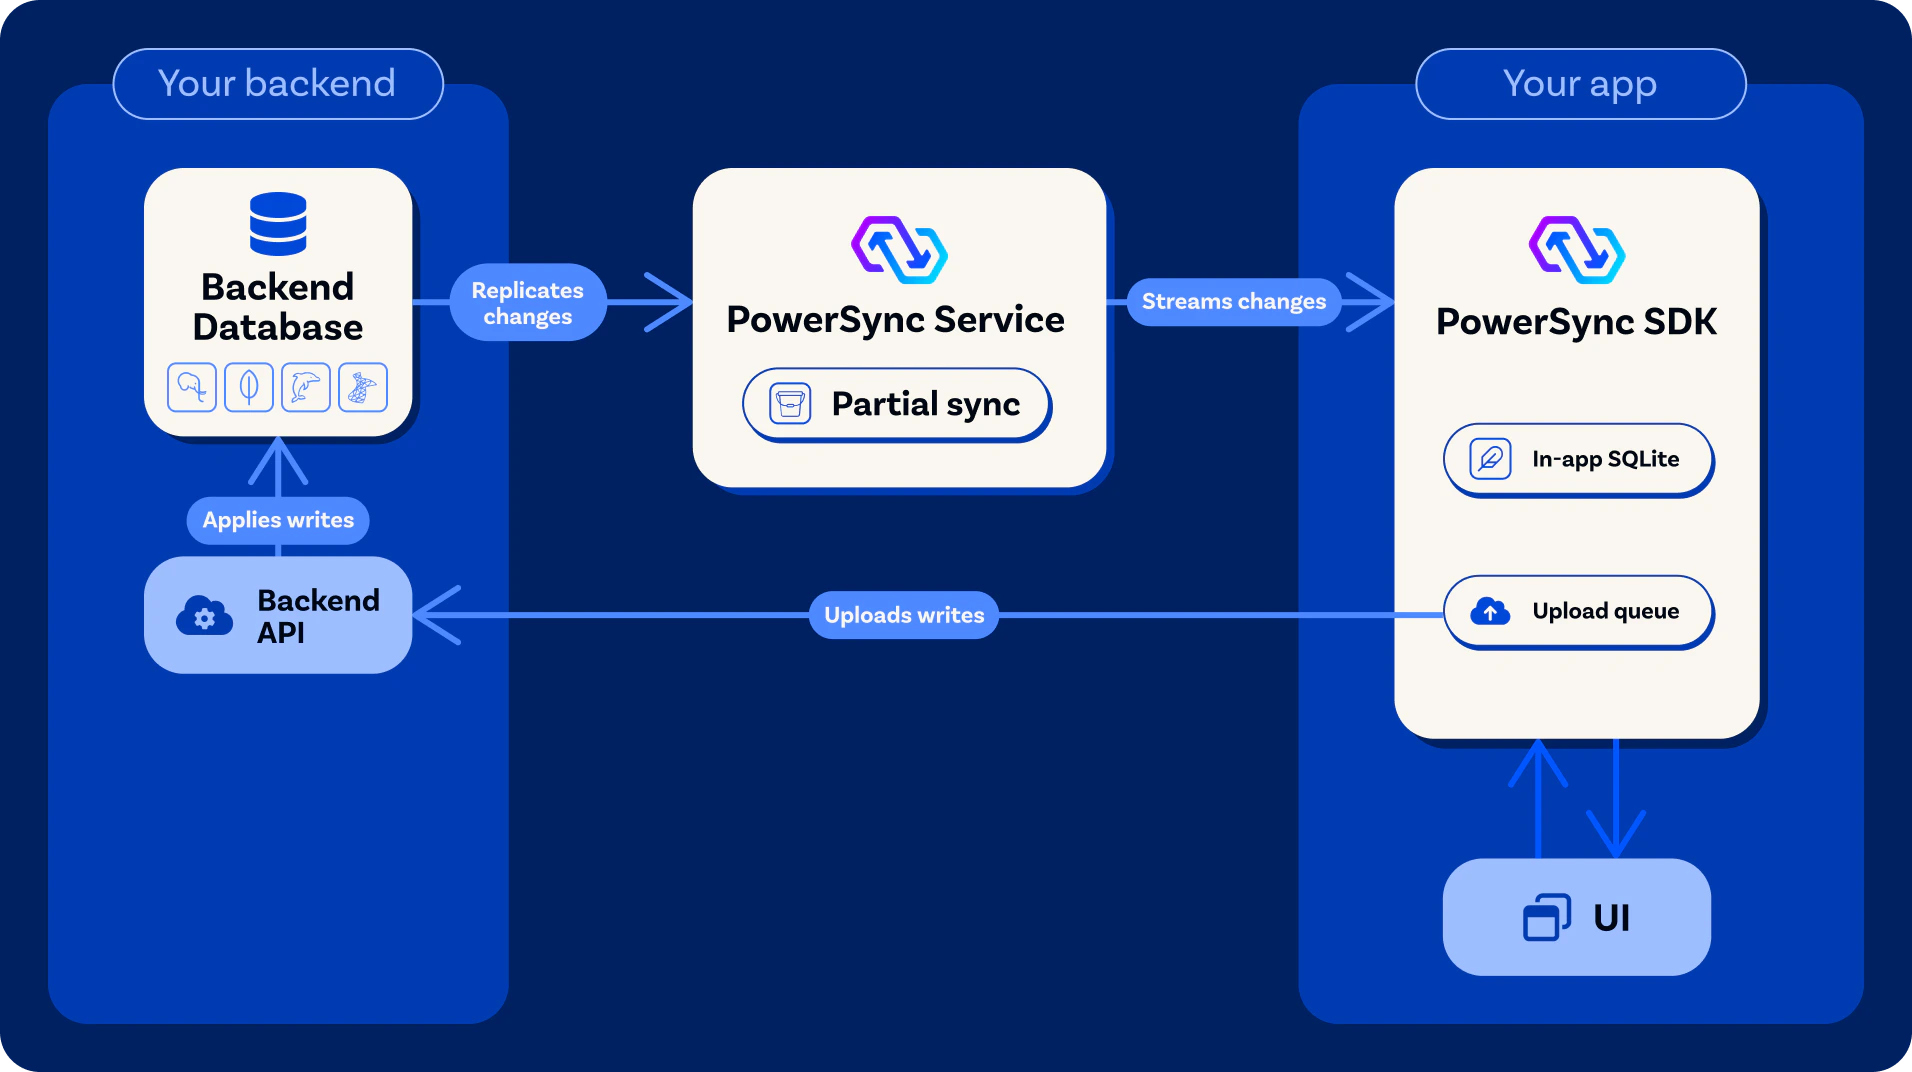
The [PowerSync Service](/architecture/powersync-service) and client SDK operate in unison to keep client-side SQLite databases in sync with a backend database. Learn about their architecture:
### Protocol
Learn about the sync protocol used between PowerSync clients and a [PowerSync Service](/architecture/powersync-service):
### Self-Hosted Architecture
For more details on typical architecture of a production self-hosted deployment, see here:
# Client Architecture
Source: https://docs.powersync.com/architecture/client-architecture
### Reading and Writing Data
From the client-side perspective, there are two data flow paths:
* Reading data from the server or downloading data (to the SQLite database)
* Writing changes back to the server, or uploading data (from the SQLite database)
#### Reading Data
App clients always read data from a local SQLite database. The local database is asynchronously hydrated from the PowerSync Service.
A developer configures [Sync Rules](/usage/sync-rules) for their PowerSync instance to control which data is synced to which users.
The PowerSync Service connects directly to the backend database and uses a change stream to hydrate dynamic data partitions, called [sync buckets](/usage/sync-rules/organize-data-into-buckets). Sync buckets are used to partition data according to the configured Sync Rules. (In most use cases, only a subset of data is required in a client's database and not a copy of the entire backend database.)
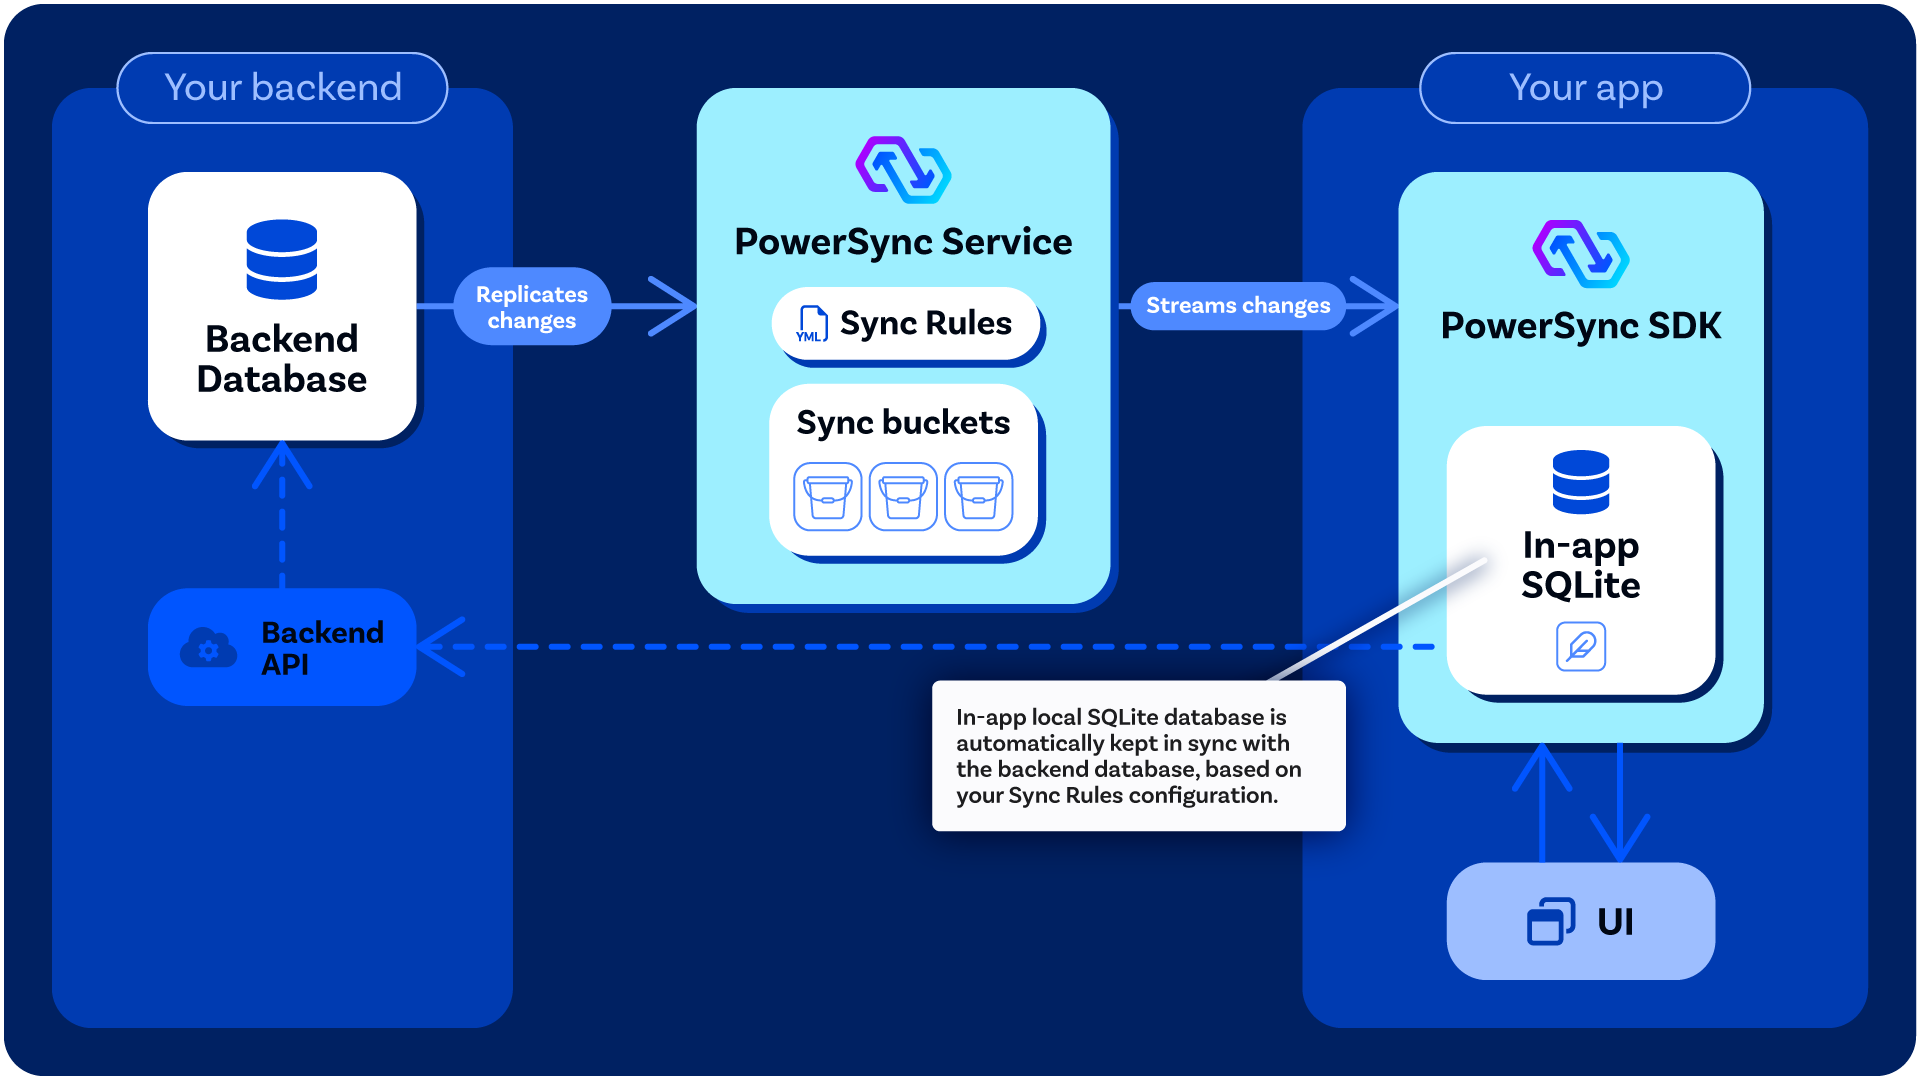
The local SQLite database embedded in the PowerSync SDK is automatically kept in sync with the backend database, based on the [Sync Rules](/usage/sync-rules) configured by the developer:
#### Writing Data
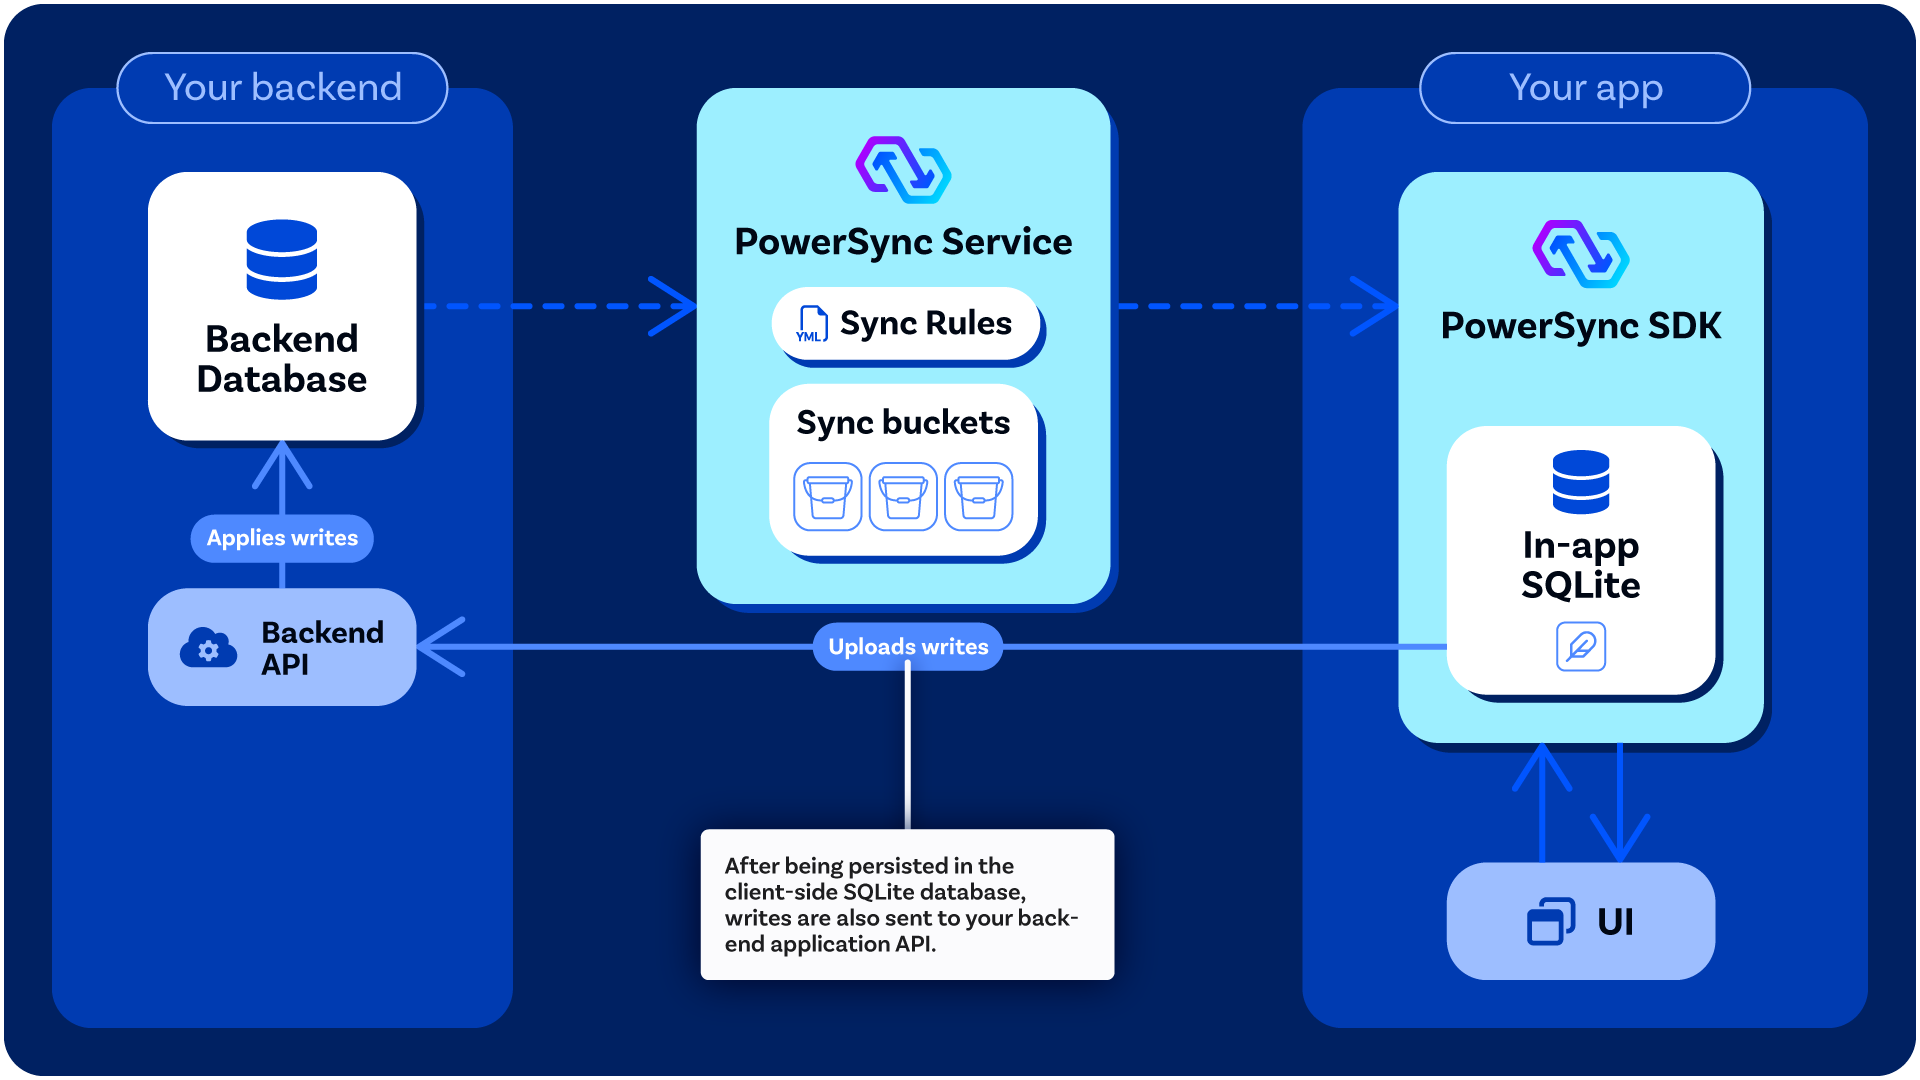
Client-side data modifications, namely updates, deletes and inserts, are persisted in the embedded SQLite database as well as stored in an upload queue. The upload queue is a blocking [FIFO](https://en.wikipedia.org/wiki/FIFO_%28computing_and_electronics%29) queue that gets processed when network connectivity is available.
Each entry in the queue is processed by writing the entry to your existing backend application API, using a function [defined by you](/installation/client-side-setup/integrating-with-your-backend) (the developer). This is to ensure that existing backend business logic is honored when uploading data changes. For more information, see the section on [integrating with your backend](/installation/client-side-setup/integrating-with-your-backend).
### Schema
On the client, the application [defines a schema](/installation/client-side-setup/define-your-schema) with tables, columns and indexes.
These are then usable as if they were actual SQLite tables, while in reality these are created as SQLite views.
The client SDK maintains the following tables:
1. `ps_data__
` This contains the data for `` , in JSON format. This table's schema does not change when columns are added, removed or changed.
2. `ps_data_local__` Same as the above, but for local-only tables.
3. `` (VIEW) - this is a view on the above table, with each defined column extracted from the JSON field. For example, a "description" text column would be `CAST(data ->> '$.description' as TEXT)`.
4. `ps_untyped` - Any synced table that does is not defined in the client-side schema is placed here. If the table is added to the schema at a later point, the data is then migrated to `ps_data__`.
5. `ps_oplog` - This is data as received by the [PowerSync Service](/architecture/powersync-service), grouped per bucket.
6. `ps_crud` - The local upload queue.
7. `ps_buckets` - A small amount of metadata for each bucket.
8. `ps_migrations` - Table keeping track of SDK schema migrations.
Most rows will be present in at least two tables — the `ps_data__` table, and in `ps_oplog`. It may be present multiple times in `ps_oplog`, if it was synced via multiple buckets.
The copy in `ps_oplog` may be newer than the one in `ps_data__`. Only when a full checkpoint has been downloaded, will the data be copied over to the individual tables. If multiple rows with the same table and id has been synced, only one will be preserved (the one with the highest `op_id`).
If you run into limitations with the above JSON-based SQLite view system, check out [this experimental feature](/usage/use-case-examples/raw-tables) which allows you to define and manage raw SQLite tables to work around some limitations. We are actively seeking feedback about this functionality.
# Consistency
Source: https://docs.powersync.com/architecture/consistency
PowerSync uses the concept of "checkpoints" to ensure the data is consistent.
## PowerSync: Designed for causal+ consistency
PowerSync is designed to have [Causal+ Consistency](https://jepsen.io/consistency/models/causal), while providing enough flexibility for applications to perform their own data validations and conflict handling.
## How it works: Checkpoints
A checkpoint is a single point-in-time on the server (similar to an [LSN in Postgres](https://www.postgresql.org/docs/current/datatype-pg-lsn.html)) with a consistent state — only fully committed transactions are part of the state.
The client only updates its local state when it has all the data matching a checkpoint, and then it updates the state to exactly match that of the checkpoint. There is no intermediate state while downloading large sets of changes such as large server-side transactions. Different tables and sync buckets are all included in the same consistent checkpoint, to ensure that the state is consistent over all data in the app.
## Local client changes
Local changes are applied on top of the last checkpoint received from the server, as well as being persisted into an upload queue.
While changes are present in the upload queue, the client does not advance to a new checkpoint. This means the client never has to resolve conflicts locally.
Only once all the local changes have been acknowledged by the server, and the data for that new checkpoint is downloaded by the client, does the client advance to the next checkpoint. This ensures that the operations are always ordered correctly on the client.
## Types of local operations
The client automatically records changes to the local database as PUT, PATCH or DELETE operations — corresponding to INSERT, UPDATE or DELETE statements. These are grouped together in a batch per local transaction.
Since the developer has full control over how operations are applied, more advanced operations can be modeled on top of these three. For example an insert-only "operations" table can be added, that records additional metadata for individual operations.
## Validation and conflict handling
With PowerSync offering full flexibility in how changes are applied on the server, it is also the developer's responsibility to implement this correctly to avoid consistency issues.
Some scenarios to consider:
While the client was offline, a record was modified locally. By the time the client is online again, that record has been deleted. Some options for handling the change:
* Discard the change.
* Discard the entire transaction.
* Re-create the record.
* Record the change elsewhere, potentially notifying the user and allowing the user to resolve the issue.
Some other examples include foreign-key or not-null constraints, maximum size of numeric fields, unique constraints, and access restrictions (such as row-level security policies).
With an online-only application, the user typically sees the error as soon as it occurs, and can make changes as required. In an offline-capable application, these errors may occur much later than when the change was made, so more care is required to handle these cases.
Special care must be taken so that issues such as those do not block the upload queue — the queue cannot advance if the server does not acknowledge a change.
There is no single correct choice on how to handle write failures such as mentioned above — the best action depends on the specific application and scenario. However, we do have some suggestions for general approaches:
1. In general, consider relaxing constraints somewhat on the server where it is not absolutely important. It may be better to accept data that is somewhat inconsistent (e.g. a client not applying all expected validations), rather than discarding the data completely.
2. If it is critical to preserve all client changes and preserve the order of changes:
1. Block the client's queue on unexpected errors (don't acknowledge the change).
2. Implement error monitoring to be notified of issues, and resolve the issues as soon as possible.
3. If it is critical to preserve all client changes, but the exact order may not be critical:
1. On a constraint error, persist the transaction in a separate server-side queue, and acknowledge the change.
2. The server-side queue can then be inspected and retried asynchronously, without blocking the client-side queue.
4. If it is acceptable to lose some changes due to constraint errors:
1. Discard the change, or the entire transaction if the changes must all be applied together.
2. Implement error notifications to detect these issues.
See also:
* [Handling Update Conflicts](/usage/lifecycle-maintenance/handling-update-conflicts)
* [Custom Conflict Resolution](/usage/lifecycle-maintenance/handling-update-conflicts/custom-conflict-resolution)
If you have any questions about consistency, please [join our Discord](https://discord.gg/powersync) to discuss.
# PowerSync Protocol
Source: https://docs.powersync.com/architecture/powersync-protocol
This contains a broad overview of the sync protocol used between PowerSync clients and a [PowerSync Service](/architecture/powersync-service) instance.
For details, see the implementation in the various client SDKs.
## Design
The PowerSync protocol is designed to efficiently sync changes to clients, while maintaining [consistency](/architecture/consistency) and integrity of data.
The same process is used to download the initial set of data, bulk download changes after being offline for a while, and incrementally stream changes while connected.
## Concepts
### Buckets
All synced data is grouped into [buckets](/usage/sync-rules/organize-data-into-buckets). A bucket represents a collection of synced rows, synced to any number of users.
[Buckets](/usage/sync-rules/organize-data-into-buckets) is a core concept that allows PowerSync to efficiently scale to thousands of concurrent users, incrementally syncing changes to hundreds of thousands of rows to each.
Each bucket keeps an ordered list of changes to rows within the bucket — generally as "PUT" or "REMOVE" operations.
* PUT is the equivalent of "INSERT OR REPLACE"
* REMOVE is slightly different from "DELETE": a row is only deleted from the client if it has been removed from *all* buckets synced to the client.
### Checkpoints
A checkpoint is a sequential id that represents a single point-in-time for consistency purposes. This is further explained in [Consistency](/architecture/consistency).
### Checksums
For any checkpoint, the client and server can compute a per-bucket checksum. This is essentially the sum of checksums of individual operations within the bucket, which each individual checksum being a hash of the operation data.
The checksum helps to ensure that the client has all the correct data. If the bucket data changes on the server, for example because of a manual edit to the underlying bucket storage, the checksums will stop matching, and the client will re-download the entire bucket.
Note: Checksums are not a cryptographically secure method to verify data integrity. Rather, it is designed to detect simple data mismatches, whether due to bugs, manual data modification, or other corruption issues.
### Compacting
To avoid indefinite growth in size of buckets, the history of a bucket can be compacted. Stale updates are replaced with marker entries, which can be merged together, while keeping the same checksums.
## Protocol
A client initiates a sync session using:
1. A JWT token that typically contains the user\_id, and additional parameters (optional).
2. A list of current buckets and the latest operation id in each.
The server then responds with a stream of:
1. "Checkpoint available": A new checkpoint id, with a checksum for each bucket in the checkpoint.
2. "Data": New operations for the above checkpoint for each relevant bucket, starting from the last operation id as sent by the client.
3. "Checkpoint complete": Sent once all data for the checkpoint have been sent.
The server then waits until a new checkpoint is available, then repeats the above sequence.
The stream can be interrupted at any time, at which point the client will initiate a new session, resuming from the last point.
If a checksum validation fails on the client, the client will delete the bucket and start a new sync session.
Data for individual rows are represented using JSON. The protocol itself is schemaless - the client is expected to use their own copy of the schema, and gracefully handle schema differences.
#### Write Checkpoints
Write checkpoints are used to ensure clients have synced their own changes back before applying downloaded data locally.
Creating a write checkpoint is a separate operation, which is performed by the client after all data has been uploaded. It is important that this happens after the data has been written to the backend source database.
The server then keeps track of the current CDC stream position on the database (LSN in Postgres, resume token in MongoDB, or binlog position in MySQL), and notifies the client when the data has been replicated, as part of checkpoint data in the normal data stream.
# PowerSync Service
Source: https://docs.powersync.com/architecture/powersync-service
Each PowerSync instance runs a copy of the PowerSync Service. The primary purpose of this service is to stream changes to clients.
This service has the following components:
## Replication
The service continuously replicates data from the source database, then:
1. Pre-processes the data according to the [sync rules](/usage/sync-rules) (both data queries and parameter queries), splitting data into [sync buckets](/usage/sync-rules/organize-data-into-buckets) and transforming the data if required.
2. Persists each operation into the relevant sync buckets, ready to be streamed to clients.
The recent history of operations to each row is stored, not only the current version. This supports the "append-only" structure of sync buckets, which allows clients to efficiently stream changes while maintaining data integrity. Sync buckets can be compacted to avoid an ever-growing history.
Replication is initially performed by taking a snapshot of all tables defined in the sync rules, then data is incrementally replicated using [logical replication](https://www.postgresql.org/docs/current/logical-replication.html). When sync rules are updated, this process restarts with a new snapshot.
## Authentication
The service authenticates users using [JWTs](/installation/authentication-setup), before allowing access to data.
## Streaming Sync
Once a user is authenticated:
1. The service calculates a list of buckets for the user to sync using [parameter queries](/usage/sync-rules/parameter-queries).
2. The service streams any operations added to those buckets since the last time the user connected.
The service then continuously monitors for buckets that are added or removed, as well as for new operations within those buckets, and streams those changes.
Only the internal (replicated) storage of the PowerSync Service is used — the source database is not queried directly during streaming.
## Source Code
To access the source code for the PowerSync Service, refer to the [powersync-service](https://github.com/powersync-ja/powersync-service) repo on GitHub.
## See Also
* [PowerSync Overview](/intro/powersync-overview)
# .NET (alpha)
Source: https://docs.powersync.com/client-sdk-references/dotnet
SDK reference for using PowerSync in .NET clients.
This SDK is distributed via NuGet [\[External link\].](https://www.nuget.org/packages/PowerSync.Common/)
Refer to the powersync-dotnet repo on GitHub.
A full API Reference for this SDK is not yet available. This is planned for a future release.
Gallery of .NET example projects/demo apps built with PowerSync.
This SDK is currently in an [**alpha** release](/resources/feature-status). It is not suitable for production use as breaking changes may still occur.
## Supported Frameworks and Targets
The PowerSync .NET SDK supports:
* **.NET Versions**: 6, 8, and 9
* **.NET Framework**: Version 4.8 (requires additional configuration)
* **MAUI**: Cross-platform support for Android, iOS, and Windows
* **WPF**: Windows desktop applications
**Current Limitations**:
* Blazor (web) platforms are not yet supported.
For more details, please refer to the package [README](https://github.com/powersync-ja/powersync-dotnet/tree/main?tab=readme-ov-file).
## SDK Features
* Provides real-time streaming of database changes.
* Offers direct access to the SQLite database, enabling the use of SQL on both client and server sides.
* Enables subscription to queries for receiving live updates.
* Eliminates the need for client-side database migrations as these are managed automatically.
## Quickstart
For desktop/server/binary use-cases and WPF, add the [`PowerSync.Common`](https://www.nuget.org/packages/PowerSync.Common/) NuGet package to your project:
```bash
dotnet add package PowerSync.Common --prerelease
```
For MAUI apps, add both [`PowerSync.Common`](https://www.nuget.org/packages/PowerSync.Common/) and [`PowerSync.Maui`](https://www.nuget.org/packages/PowerSync.Maui/) NuGet packages to your project:
```bash
dotnet add package PowerSync.Common --prerelease
dotnet add package PowerSync.Maui --prerelease
```
Add `--prerelease` while this package is in alpha.
Next, make sure that you have:
* Signed up for a PowerSync Cloud account ([here](https://accounts.journeyapps.com/portal/powersync-signup?s=docs)) or [self-host PowerSync](/self-hosting/getting-started).
* [Configured your backend database](/installation/database-setup) and connected it to your PowerSync instance.
### 1. Define the schema
The first step is defining the schema for the local SQLite database.
This schema represents a "view" of the downloaded data. No migrations are required — the schema is applied directly when the local PowerSync database is constructed (as we'll show in the next step).
You can use [this example](https://github.com/powersync-ja/powersync-dotnet/blob/main/demos/CommandLine/AppSchema.cs) as a reference when defining your schema.
### 2. Instantiate the PowerSync Database
Next, you need to instantiate the PowerSync database — this is the core managed database.
Its primary functions are to record all changes in the local database, whether online or offline. In addition, it automatically uploads changes to your app backend when connected.
**Example**:
The initialization syntax differs slightly between the Common and MAUI SDKs:
```cs
using PowerSync.Common.Client;
class Demo
{
static async Task Main()
{
var db = new PowerSyncDatabase(new PowerSyncDatabaseOptions
{
Database = new SQLOpenOptions { DbFilename = "tododemo.db" },
Schema = AppSchema.PowerSyncSchema,
});
await db.Init();
}
}
```
```cs
using PowerSync.Common.Client;
using PowerSync.Common.MDSQLite;
using PowerSync.Maui.SQLite;
class Demo
{
static async Task Main()
{
// Ensures the DB file is stored in a platform appropriate location
var dbPath = Path.Combine(FileSystem.AppDataDirectory, "maui-example.db");
var factory = new MAUISQLiteDBOpenFactory(new MDSQLiteOpenFactoryOptions()
{
DbFilename = dbPath
});
var Db = new PowerSyncDatabase(new PowerSyncDatabaseOptions()
{
Database = factory, // Supply a factory
Schema = AppSchema.PowerSyncSchema,
});
await db.Init();
}
}
```
### 3. Integrate with your Backend
The PowerSync backend connector provides the connection between your application backend and the PowerSync client-side managed SQLite database.
It is used to:
1. Retrieve an auth token to connect to the PowerSync instance.
2. Apply local changes on your backend application server (and from there, to your backend database)
Accordingly, the connector must implement two methods:
1. [PowerSyncBackendConnector.FetchCredentials](https://github.com/powersync-ja/powersync-dotnet/blob/main/demos/CommandLine/NodeConnector.cs#L50) - This is called every couple of minutes and is used to obtain credentials for your app backend API. -> See [Authentication Setup](/installation/authentication-setup) for instructions on how the credentials should be generated.
2. [PowerSyncBackendConnector.UploadData](https://github.com/powersync-ja/powersync-dotnet/blob/main/demos/CommandLine/NodeConnector.cs#L72) - Use this to upload client-side changes to your app backend.
-> See [Writing Client Changes](/installation/app-backend-setup/writing-client-changes) for considerations on the app backend implementation.
**Example**:
```cs
using System;
using System.Collections.Generic;
using System.Net.Http;
using System.Text;
using System.Text.Json;
using System.Threading.Tasks;
using PowerSync.Common.Client;
using PowerSync.Common.Client.Connection;
using PowerSync.Common.DB.Crud;
public class MyConnector : IPowerSyncBackendConnector
{
private readonly HttpClient _httpClient;
// User credentials for the current session
public string UserId { get; private set; }
// Service endpoints
private readonly string _backendUrl;
private readonly string _powerSyncUrl;
private string? _clientId;
public MyConnector()
{
_httpClient = new HttpClient();
// In a real app, this would come from your authentication system
UserId = "user-123";
// Configure your service endpoints
_backendUrl = "https://your-backend-api.example.com";
_powerSyncUrl = "https://your-powersync-instance.powersync.journeyapps.com";
}
public async Task FetchCredentials()
{
try {
// Obtain a JWT from your authentication service.
// See https://docs.powersync.com/installation/authentication-setup
// If you're using Supabase or Firebase, you can re-use the JWT from those clients, see
// - https://docs.powersync.com/installation/authentication-setup/supabase-auth
// - https://docs.powersync.com/installation/authentication-setup/firebase-auth
var authToken = "your-auth-token"; // Use a development token (see Authentication Setup https://docs.powersync.com/installation/authentication-setup/development-tokens) to get up and running quickly
// Return credentials with PowerSync endpoint and JWT token
return new PowerSyncCredentials(_powerSyncUrl, authToken);
}
catch (Exception ex)
{
Console.WriteLine($"Error fetching credentials: {ex.Message}");
throw;
}
}
public async Task UploadData(IPowerSyncDatabase database)
{
// Get the next transaction to upload
CrudTransaction? transaction;
try
{
transaction = await database.GetNextCrudTransaction();
}
catch (Exception ex)
{
Console.WriteLine($"UploadData Error: {ex.Message}");
return;
}
// If there's no transaction, there's nothing to upload
if (transaction == null)
{
return;
}
// Get client ID if not already retrieved
_clientId ??= await database.GetClientId();
try
{
// Convert PowerSync operations to your backend format
var batch = new List();
foreach (var operation in transaction.Crud)
{
batch.Add(new
{
op = operation.Op.ToString(), // INSERT, UPDATE, DELETE
table = operation.Table,
id = operation.Id,
data = operation.OpData
});
}
// Send the operations to your backend
var payload = JsonSerializer.Serialize(new { batch });
var content = new StringContent(payload, Encoding.UTF8, "application/json");
HttpResponseMessage response = await _httpClient.PostAsync($"{_backendUrl}/api/data", content);
response.EnsureSuccessStatusCode();
// Mark the transaction as completed
await transaction.Complete();
}
catch (Exception ex)
{
Console.WriteLine($"UploadData Error: {ex.Message}");
throw;
}
}
}
```
With your database instantiated and your connector ready, call `connect` to start the synchronization process:
```cs
await db.Connect(new MyConnector());
await db.WaitForFirstSync(); // Optional, to wait for a complete snapshot of data to be available
```
## Usage
After connecting the client database, it is ready to be used. You can run queries and make updates as follows:
```cs
// Use db.Get() to fetch a single row:
Console.WriteLine(await db.Get("SELECT powersync_rs_version();"));
// Or db.GetAll() to fetch all:
// Where List result is defined:
// record ListResult(string id, string name, string owner_id, string created_at);
Console.WriteLine(await db.GetAll("SELECT * FROM lists;"));
// Use db.Watch() to watch queries for changes (await is used to wait for initialization):
await db.Watch("select * from lists", null, new WatchHandler
{
OnResult = (results) =>
{
Console.WriteLine("Results: ");
foreach (var result in results)
{
Console.WriteLine(result.id + ":" + result.name);
}
},
OnError = (error) =>
{
Console.WriteLine("Error: " + error.Message);
}
});
// And db.Execute for inserts, updates and deletes:
await db.Execute(
"insert into lists (id, name, owner_id, created_at) values (uuid(), 'New User', ?, datetime())",
[connector.UserId]
);
```
## Configure Logging
Enable logging to help you debug your app. By default, the SDK uses a no-op logger that doesn't output any logs. To enable logging, you can configure a custom logger using .NET's `ILogger` interface:
```cs
using Microsoft.Extensions.Logging;
using PowerSync.Common.Client;
// Create a logger factory
ILoggerFactory loggerFactory = LoggerFactory.Create(builder =>
{
builder.AddConsole(); // Enable console logging
builder.SetMinimumLevel(LogLevel.Information); // Set minimum log level
});
var logger = loggerFactory.CreateLogger("PowerSyncLogger");
var db = new PowerSyncDatabase(new PowerSyncDatabaseOptions
{
Database = new SQLOpenOptions { DbFilename = "powersync.db" },
Schema = AppSchema.PowerSyncSchema,
Logger = logger
});
```
# Flutter
Source: https://docs.powersync.com/client-sdk-references/flutter
Full SDK reference for using PowerSync in Flutter/Dart clients
The SDK is distributed via pub.dev [\[External link\].](https://pub.dev/packages/powersync)
Refer to the powersync.dart repo on GitHub.
Full API reference for the PowerSync SDK [\[External link\].](https://pub.dev/documentation/powersync/latest/powersync/powersync-library.html)
Gallery of example projects/demo apps built with Flutter and PowerSync.
### SDK Features
* **Real-time streaming of database changes**: Changes made by one user are instantly streamed to all other users with access to that data. This keeps clients automatically in sync without manual polling or refresh logic.
* **Direct access to a local SQLite database**: Data is stored locally, so apps can read and write instantly without network calls. This enables offline support and faster user interactions.
* **Asynchronous background execution**: The SDK performs database operations in the background to avoid blocking the application’s main thread. This means that apps stay responsive, even during heavy data activity.
* **Query subscriptions for live updates**: The SDK supports query subscriptions that automatically push real-time updates to client applications as data changes, keeping your UI reactive and up to date.
* **Automatic schema management**: PowerSync syncs schemaless data and applies a client-defined schema using SQLite views. This architecture means that PowerSync SDKs can handle schema changes gracefully without requiring explicit migrations on the client-side.
Web support is currently in a beta release. Refer to [Flutter Web Support](/client-sdk-references/flutter/flutter-web-support) for more details.
## Installation
Add the [PowerSync pub.dev package](https://pub.dev/packages/powersync) to your project:
```bash
flutter pub add powersync
```
## Getting Started
Before implementing the PowerSync SDK in your project, make sure you have completed these steps:
* Signed up for a PowerSync Cloud account ([here](https://accounts.journeyapps.com/portal/powersync-signup?s=docs)) or [self-host PowerSync](/self-hosting/getting-started).
* [Configured your backend database](/installation/database-setup) and connected it to your PowerSync instance.
* [Installed](/client-sdk-references/flutter#installation) the PowerSync Flutter SDK.
For this reference document, we assume that you have created a Flutter project and have the following directory structure:
```plaintext
lib/
├── models/
├── schema.dart
└── todolist.dart
├── powersync/
├── my_backend_connector.dart
└── powersync.dart
├── widgets/
├── lists_widget.dart
├── todos_widget.dart
├── main.dart
```
### 1. Define the Schema
The first step is defining the schema for the local SQLite database. This will be provided as a `schema` parameter to the [PowerSyncDatabase](https://pub.dev/documentation/powersync/latest/powersync/PowerSyncDatabase/PowerSyncDatabase.html) constructor.
This schema represents a "view" of the downloaded data. No migrations are required — the schema is applied directly when the PowerSync database is constructed.
**Generate schema automatically**
In the [dashboard](/usage/tools/powersync-dashboard), the schema can be generated based off your sync rules by right-clicking on an instance and selecting **Generate client-side schema**.
Similar functionality exists in the [CLI](/usage/tools/cli).
The types available are `text`, `integer` and `real`. These should map directly to the values produced by the [Sync Rules](/usage/sync-rules). If a value doesn't match, it is cast automatically. For details on how Postgres types are mapped to the types below, see the section on [Types](/usage/sync-rules/types) in the *Sync Rules* documentation.
**Example**:
```dart lib/models/schema.dart
import 'package:powersync/powersync.dart';
const schema = Schema(([
Table('todos', [
Column.text('list_id'),
Column.text('created_at'),
Column.text('completed_at'),
Column.text('description'),
Column.integer('completed'),
Column.text('created_by'),
Column.text('completed_by'),
], indexes: [
// Index to allow efficient lookup within a list
Index('list', [IndexedColumn('list_id')])
]),
Table('lists', [
Column.text('created_at'),
Column.text('name'),
Column.text('owner_id')
])
]));
```
**Note**: No need to declare a primary key `id` column, as PowerSync will automatically create this.
### 2. Instantiate the PowerSync Database
Next, you need to instantiate the PowerSync database — this is the core managed client-side database.
Its primary functions are to record all changes in the local database, whether online or offline. In addition, it automatically uploads changes to your app backend when connected.
To instantiate `PowerSyncDatabase`, inject the Schema you defined in the previous step and a file path — it's important to only instantiate one instance of `PowerSyncDatabase` per file.
**Example**:
```dart lib/powersync/powersync.dart
import 'package:path/path.dart';
import 'package:path_provider/path_provider.dart';
import 'package:powersync/powersync.dart';
import '../main.dart';
import '../models/schema.dart';
openDatabase() async {
final dir = await getApplicationSupportDirectory();
final path = join(dir.path, 'powersync-dart.db');
// Set up the database
// Inject the Schema you defined in the previous step and a file path
db = PowerSyncDatabase(schema: schema, path: path);
await db.initialize();
}
```
Once you've instantiated your PowerSync database, you will need to call the [connect()](https://pub.dev/documentation/powersync/latest/powersync/PowerSyncDatabase/connect.html) method to activate it. This method requires the backend connector that will be created in the next step.
```dart lib/main.dart {35}
import 'package:flutter/material.dart';
import 'package:powersync/powersync.dart';
import 'powersync/powersync.dart';
late PowerSyncDatabase db;
Future main() async {
WidgetsFlutterBinding.ensureInitialized();
await openDatabase();
runApp(const DemoApp());
}
class DemoApp extends StatefulWidget {
const DemoApp({super.key});
@override
State createState() => _DemoAppState();
}
class _DemoAppState extends State {
@override
Widget build(BuildContext context) {
return MaterialApp(
title: 'Demo',
home: // TODO: Implement your own UI here.
// You could listen for authentication state changes to connect or disconnect from PowerSync
StreamBuilder(
stream: // TODO: some stream,
builder: (ctx, snapshot) {,
// TODO: implement your own condition here
if ( ... ) {
// Uses the backend connector that will be created in the next step
db.connect(connector: MyBackendConnector());
// TODO: implement your own UI here
}
},
)
);
}
}
```
### 3. Integrate with your Backend
The PowerSync backend connector provides the connection between your application backend and the PowerSync client-slide managed SQLite database.
It is used to:
1. [Retrieve an auth token](/installation/authentication-setup) to connect to the PowerSync instance.
2. [Apply local changes](/installation/app-backend-setup/writing-client-changes) on your backend application server (and from there, to your backend database)
Accordingly, the connector must implement two methods:
1. [PowerSyncBackendConnector.fetchCredentials](https://pub.dev/documentation/powersync/latest/powersync/PowerSyncBackendConnector/fetchCredentials.html) - This is called every couple of minutes and is used to obtain credentials for your app backend API. -> See [Authentication Setup](/installation/authentication-setup) for instructions on how the credentials should be generated.
2. [PowerSyncBackendConnector.uploadData](https://pub.dev/documentation/powersync/latest/powersync/PowerSyncBackendConnector/uploadData.html) - Use this to upload client-side changes to your app backend.
-> See [Writing Client Changes](/installation/app-backend-setup/writing-client-changes) for considerations on the app backend implementation.
**Example**:
```dart lib/powersync/my_backend_connector.dart
import 'package:powersync/powersync.dart';
class MyBackendConnector extends PowerSyncBackendConnector {
PowerSyncDatabase db;
MyBackendConnector(this.db);
@override
Future fetchCredentials() async {
// Implement fetchCredentials to obtain a JWT from your authentication service
// If you're using Supabase or Firebase, you can re-use the JWT from those clients, see
// - https://docs.powersync.com/installation/authentication-setup/supabase-auth
// - https://docs.powersync.com/installation/authentication-setup/firebase-auth
// See example implementation here: https://pub.dev/documentation/powersync/latest/powersync/DevConnector/fetchCredentials.html
return PowerSyncCredentials(
endpoint: 'https://xxxxxx.powersync.journeyapps.com',
// Use a development token (see Authentication Setup https://docs.powersync.com/installation/authentication-setup/development-tokens) to get up and running quickly
token: 'An authentication token'
);
}
// Implement uploadData to send local changes to your backend service
// You can omit this method if you only want to sync data from the server to the client
// See example implementation here: https://docs.powersync.com/client-sdk-references/flutter#3-integrate-with-your-backend
@override
Future uploadData(PowerSyncDatabase database) async {
// This function is called whenever there is data to upload, whether the
// device is online or offline.
// If this call throws an error, it is retried periodically.
final transaction = await database.getNextCrudTransaction();
if (transaction == null) {
return;
}
// The data that needs to be changed in the remote db
for (var op in transaction.crud) {
switch (op.op) {
case UpdateType.put:
// TODO: Instruct your backend API to CREATE a record
case UpdateType.patch:
// TODO: Instruct your backend API to PATCH a record
case UpdateType.delete:
//TODO: Instruct your backend API to DELETE a record
}
}
// Completes the transaction and moves onto the next one
await transaction.complete();
}
}
```
## Using PowerSync: CRUD functions
Once the PowerSync instance is configured you can start using the SQLite DB functions.
The most commonly used CRUD functions to interact with your SQLite data are:
* [PowerSyncDatabase.get](/client-sdk-references/flutter#fetching-a-single-item) - get (SELECT) a single row from a table.
* [PowerSyncDatabase.getAll](/client-sdk-references/flutter#querying-items-powersync.getall) - get (SELECT) a set of rows from a table.
* [PowerSyncDatabase.watch](/client-sdk-references/flutter#watching-queries-powersync.watch) - execute a read query every time source tables are modified.
* [PowerSyncDatabase.execute](/client-sdk-references/flutter#mutations-powersync.execute) - execute a write (INSERT/UPDATE/DELETE) query.
For the following examples, we will define a `TodoList` model class that represents a List of todos.
```dart lib/models/todolist.dart
/// This is a simple model class representing a TodoList
class TodoList {
final int id;
final String name;
final DateTime createdAt;
final DateTime updatedAt;
TodoList({
required this.id,
required this.name,
required this.createdAt,
required this.updatedAt,
});
factory TodoList.fromRow(Map row) {
return TodoList(
id: row['id'],
name: row['name'],
createdAt: DateTime.parse(row['created_at']),
updatedAt: DateTime.parse(row['updated_at']),
);
}
}
```
### Fetching a Single Item
The [get](https://pub.dev/documentation/powersync/latest/sqlite_async/SqliteQueries/get.html) method executes a read-only (SELECT) query and returns a single result. It throws an exception if no result is found. Use [getOptional](https://pub.dev/documentation/powersync/latest/sqlite_async/SqliteQueries/getOptional.html) to return a single optional result (returns `null` if no result is found).
The following is an example of selecting a list item by ID
```dart lib/widgets/lists_widget.dart
import '../main.dart';
import '../models/todolist.dart';
Future find(id) async {
final result = await db.get('SELECT * FROM lists WHERE id = ?', [id]);
return TodoList.fromRow(result);
}
```
### Querying Items (PowerSync.getAll)
The [getAll](https://pub.dev/documentation/powersync/latest/sqlite_async/SqliteQueries/getAll.html) method returns a set of rows from a table.
```dart lib/widgets/lists_widget.dart
import 'package:powersync/sqlite3.dart';
import '../main.dart';
Future> getLists() async {
ResultSet results = await db.getAll('SELECT id FROM lists WHERE id IS NOT NULL');
List ids = results.map((row) => row['id'] as String).toList();
return ids;
}
```
### Watching Queries (PowerSync.watch)
The [watch](https://pub.dev/documentation/powersync/latest/sqlite_async/SqliteQueries/watch.html) method executes a read query whenever a change to a dependent table is made.
```dart lib/widgets/todos_widget.dart {13-17}
import 'package:flutter/material.dart';
import '../main.dart';
import '../models/todolist.dart';
// Example Todos widget
class TodosWidget extends StatelessWidget {
const TodosWidget({super.key});
@override
Widget build(BuildContext context) {
return StreamBuilder(
// You can watch any SQL query
stream: db
.watch('SELECT * FROM lists ORDER BY created_at, id')
.map((results) {
return results.map(TodoList.fromRow).toList(growable: false);
}),
builder: (context, snapshot) {
if (snapshot.hasData) {
// TODO: implement your own UI here based on the result set
return ...;
} else {
return const Center(child: CircularProgressIndicator());
}
},
);
}
}
```
### Mutations (PowerSync.execute)
The [execute](https://pub.dev/documentation/powersync/latest/powersync/PowerSyncDatabase/execute.html) method can be used for executing single SQLite write statements.
```dart lib/widgets/todos_widget.dart {12-15}
import 'package:flutter/material.dart';
import '../main.dart';
// Example Todos widget
class TodosWidget extends StatelessWidget {
const TodosWidget({super.key});
@override
Widget build(BuildContext context) {
return FloatingActionButton(
onPressed: () async {
await db.execute(
'INSERT INTO lists(id, created_at, name, owner_id) VALUES(uuid(), datetime(), ?, ?)',
['name', '123'],
);
},
tooltip: '+',
child: const Icon(Icons.add),
);
}
}
```
## Configure Logging
Since version 1.1.2 of the SDK, logging is enabled by default and outputs logs from PowerSync to the console in debug mode.
## Additional Usage Examples
See [Usage Examples](/client-sdk-references/flutter/usage-examples) for further examples of the SDK.
## ORM Support
See [Flutter ORM Support](/client-sdk-references/flutter/flutter-orm-support) for details.
## Troubleshooting
See [Troubleshooting](/resources/troubleshooting) for pointers to debug common issues.
# API Reference
Source: https://docs.powersync.com/client-sdk-references/flutter/api-reference
# Encryption
Source: https://docs.powersync.com/client-sdk-references/flutter/encryption
# Flutter ORM Support (Alpha)
Source: https://docs.powersync.com/client-sdk-references/flutter/flutter-orm-support
An introduction to using ORMs with PowerSync is available on our blog [here](https://www.powersync.com/blog/using-orms-with-powersync).
ORM support is available via the following package (currently in an alpha release):
This package enables using the [Drift](https://pub.dev/packages/drift) persistence library (ORM) with the PowerSync Flutter SDK. The Drift integration gives Flutter developers the flexibility to write queries in either Dart or SQL.
Importantly, it supports propagating change notifications from the PowerSync side to Drift, which is necessary for streaming queries.
The use of this package is recommended for Flutter developers who already know Drift, or specifically want the benefits of an ORM for their PowerSync projects.
### Example implementation
An example project which showcases setting up and using Drift with PowerSync is available here:
### Support for Other Flutter ORMs
Other ORMs for Flutter, like [Floor](https://pinchbv.github.io/floor/), are not currently supported. It is technically possible to open a separate connection to the same database file using Floor but there are two big caveats to that:
**Write locks**
Every write transaction (or write statement) will lock the database for other writes for the duration of the transaction. While transactions are typically short, if multiple happen to run at the same time they may fail with a SQLITE\_BUSY or similar error.
**External modifications**
Often, ORMs only detect notifications made using the same library. In order to support streaming queries, PowerSync requires the ORM to allow external modifications to trigger the same change notifications, meaning streaming queries are unlikely to work out-of-the-box.
# Flutter Web Support (Beta)
Source: https://docs.powersync.com/client-sdk-references/flutter/flutter-web-support
Web support for Flutter in version `^1.9.0` is currently in a **beta** release. It is functionally ready for production use, provided that you've tested your use cases.
Please see the [Limitations](#limitations) detailed below.
## Demo app
The easiest way to test Flutter Web support is to run the [Supabase Todo-List](https://github.com/powersync-ja/powersync.dart/tree/main/demos/supabase-todolist) demo app:
1. Clone the [powersync.dart](https://github.com/powersync-ja/powersync.dart/tree/main) repo.
1. **Note**: If you are an existing user updating to the latest code after a git pull, run `melos exec 'flutter pub upgrade'` in the repo's root and make sure it succeeds.
2. Run `melos prepare` in the repo's root
3. cd into the `demos/supabase-todolist` folder
4. If you haven’t yet: `cp lib/app_config_template.dart lib/app_config.dart` (optionally update this config with your own Supabase and PowerSync project details).
5. Run `flutter run -d chrome`
## Installing PowerSync in your own project
Install the [latest version](https://pub.dev/packages/powersync/versions) of the package, for example:
```bash
flutter pub add powersync:'^1.9.0'
```
### Additional config
#### Assets
Web support requires `sqlite3.wasm` and worker (`powersync_db.worker.js` and `powersync_sync.worker.js`) assets to be served from the web application. They can be downloaded to the web directory by running the following command in your application's root folder.
```bash
dart run powersync:setup_web
```
The same code is used for initializing native and web `PowerSyncDatabase` clients.
#### OPFS for improved performance
This SDK supports different storage modes of the SQLite database with varying levels of performance and compatibility:
* **IndexedDB**: Highly compatible with different browsers, but performance is slow.
* **OPFS** (Origin-Private File System): Significantly faster but requires additional configuration.
OPFS is the preferred mode when it is available. Otherwise database storage falls back to IndexedDB.
Enabling OPFS requires adding two headers to the HTTP server response when a client requests the Flutter web application:
* `Cross-Origin-Opener-Policy`: Needs to be set to `same-origin`.
* `Cross-Origin-Embedder-Policy`: Needs to be set to `require-corp`.
When running the app locally, you can use the following command to include the required headers:
```bash
flutter run -d chrome --web-header "Cross-Origin-Opener-Policy=same-origin" --web-header "Cross-Origin-Embedder-Policy=require-corp"
```
When serving a Flutter Web app in production, the [Flutter docs](https://docs.flutter.dev/deployment/web#building-the-app-for-release) recommend building the web app with `flutter build web`, then serving the content with an HTTP server. The server should be configured to use the above headers.
**Further reading**:
[Drift](https://drift.simonbinder.eu/) uses the same packages as our [`sqlite_async`](https://github.com/powersync-ja/sqlite_async.dart) package under the hood, and has excellent documentation for how the web filesystem is selected. See [here](https://drift.simonbinder.eu/platforms/web/) for web compatibility notes and [here](https://drift.simonbinder.eu/platforms/web/#additional-headers) for additional notes on the required web headers.
## Limitations
The API for Web is essentially the same as for native platforms, however, some features within `PowerSyncDatabase` clients are not available.
### Imports
Flutter Web does not support importing directly from `sqlite3.dart` as it uses `dart:ffi`.
Change imports from:
```dart
import 'package/powersync/sqlite3.dart`
```
to:
```dart
import 'package/powersync/sqlite3_common.dart'
```
in code which needs to run on the Web platform. Isolated native-specific code can still import from `sqlite3.dart`.
### Database connections
Web database connections do not support concurrency. A single database connection is used. `readLock` and `writeLock` contexts do not implement checks for preventing writable queries in read connections and vice-versa.
Direct access to the synchronous `CommonDatabase` (`sqlite.Database` equivalent for web) connection is not available. `computeWithDatabase` is not available on web.
# State Management
Source: https://docs.powersync.com/client-sdk-references/flutter/state-management
Guidance on using PowerSync with popular Flutter state management libraries.
Our [demo apps](/resources/demo-apps-example-projects) for Flutter are intentionally kept simple to put a focus on demonstrating
PowerSync APIs.
Instead of using heavy state management solutions, they use simple global fields to make the PowerSync database accessible to widgets.
When adopting PowerSync, you might be interested in using a more sophisticated approach for state management.
This section explains how PowerSync's Flutter SDK integrates with popular packages for state management.
Adopting PowerSync can simplify the architecture of your app by using a local SQLite database as the single source of truth for all data.
For a general discussion on how PowerSync fits into modern app architecture on Flutter, also see [this blogpost](https://dinkomarinac.dev/building-local-first-flutter-apps-with-riverpod-drift-and-powersync).
PowerSync exposes database queries with the standard `Future` and `Stream` classes from `dart:async`. Given how widely used these are
in the Dart ecosystem, PowerSync works well with all popular approaches for state management, such as:
1. Providers with `package:provider`: Create your database as a `Provider` and expose watched queries to child widgets with `StreamProvider`!
The provider for databases should `close()` the database in `dispose`.
2. Providers with `package:riverpod`: We mention relevant snippets [below](#riverpod).
3. Dependency injection with `package:get_it`: PowerSync databases can be registered with `registerSingletonAsync`. Again, make sure
to `close()` the database in the `dispose` callback.
4. The BLoC pattern with the `bloc` package: You can easily listen to watched queries in Cubits (although, if you find your
Blocs and Cubits becoming trivial wrappers around database streams, consider just `watch()`ing database queries in widgets directly.
That doesn't make your app [less testable](/client-sdk-references/flutter/unit-testing)!).
To simplify state management, avoid the use of hydrated blocs and cubits for state that depends on database queries. With PowerSync,
regular data is already available locally and doesn't need a second local cache.
## Riverpod
We have a [complete example](https://github.com/powersync-ja/powersync.dart/tree/main/demos/supabase-todolist-drift) on using PowerSync
with modern Flutter libraries like Riverpod, Drift and `auto_route`.
A good way to open PowerSync databases with Riverpod is to use an async provider. You can also manage your `connect` and
`disconnect` calls there, for instance by listening to the authentication state:
```dart
@Riverpod(keepAlive: true)
Future powerSyncInstance(Ref ref) async {
final db = PowerSyncDatabase(
schema: schema,
path: await _getDatabasePath(),
logger: attachedLogger,
);
await db.initialize();
// TODO: Listen for auth changes and connect() the database here.
ref.listen(yourAuthProvider, (prev, next) {
if (next.isAuthenticated && !prev.isAuthenticated) {
db.connect(connector: MyConnector());
}
// ...
});
ref.onDispose(db.close);
return db;
}
```
### Running queries
To expose auto-updating query results, use a `StreamProvider` reading the database:
```dart
final _lists = StreamProvider((ref) async* {
final database = await ref.read(powerSyncInstanceProvider.future);
yield* database.watch('SELECT * FROM lists');
});
```
### Waiting for sync
If you were awaiting `waitForFirstSync` before, you can keep doing that:
```dart
final db = await ref.read(powerSyncInstanceProvider.future);
await db.waitForFirstSync();
```
Alternatively, you can expose the sync status as a provider and use that to determine
whether the synchronization has completed:
```dart
final syncStatus = statefulProvider((ref, change) {
final status = Stream.fromFuture(ref.read(powerSyncInstanceProvider.future))
.asyncExpand((db) => db.statusStream);
final sub = status.listen(change);
ref.onDispose(sub.cancel);
return const SyncStatus();
});
@riverpod
bool didCompleteSync(Ref ref, [BucketPriority? priority]) {
final status = ref.watch(syncStatus);
if (priority != null) {
return status.statusForPriority(priority).hasSynced ?? false;
} else {
return status.hasSynced ?? false;
}
}
final class MyWidget extends ConsumerWidget {
const MyWidget({super.key});
@override
Widget build(BuildContext context, WidgetRef ref) {
final didSync = ref.watch(didCompleteSyncProvider());
if (!didSync) {
return const Text('Busy with sync...');
}
// ... content after first sync
}
}
```
### Attachment queue
If you're using the attachment queue helper to synchronize media assets, you can also wrap that in a provider:
```dart
@Riverpod(keepAlive: true)
Future attachmentQueue(Ref ref) async {
final db = await ref.read(powerSyncInstanceProvider.future);
final queue = YourAttachmentQueue(db, remoteStorage);
await queue.init();
return queue;
}
```
Reading and awaiting this provider can then be used to show attachments:
```dart
final class PhotoWidget extends ConsumerWidget {
final TodoItem todo;
const PhotoWidget({super.key, required this.todo});
@override
Widget build(BuildContext context, WidgetRef ref) {
final photoState = ref.watch(_getPhotoStateProvider(todo.photoId));
if (!photoState.hasValue) {
return Container();
}
final data = photoState.value;
if (data == null) {
return Container();
}
String? filePath = data.photoPath;
bool fileIsDownloading = !data.fileExists;
bool fileArchived =
data.attachment?.state == AttachmentState.archived.index;
if (fileArchived) {
return Column(
crossAxisAlignment: CrossAxisAlignment.center,
mainAxisAlignment: MainAxisAlignment.center,
children: [
const Text("Unavailable"),
const SizedBox(height: 8),
],
);
}
if (fileIsDownloading) {
return const Text("Downloading...");
}
File imageFile = File(filePath!);
int lastModified = imageFile.existsSync()
? imageFile.lastModifiedSync().millisecondsSinceEpoch
: 0;
Key key = ObjectKey('$filePath:$lastModified');
return Image.file(
key: key,
imageFile,
width: 50,
height: 50,
);
}
}
class _ResolvedPhotoState {
String? photoPath;
bool fileExists;
Attachment? attachment;
_ResolvedPhotoState(
{required this.photoPath, required this.fileExists, this.attachment});
}
@riverpod
Future<_ResolvedPhotoState> _getPhotoState(Ref ref, String? photoId) async {
if (photoId == null) {
return _ResolvedPhotoState(photoPath: null, fileExists: false);
}
final queue = await ref.read(attachmentQueueProvider.future);
final photoPath = await queue.getLocalUri('$photoId.jpg');
bool fileExists = await File(photoPath).exists();
final row = await queue.db
.getOptional('SELECT * FROM attachments_queue WHERE id = ?', [photoId]);
if (row != null) {
Attachment attachment = Attachment.fromRow(row);
return _ResolvedPhotoState(
photoPath: photoPath, fileExists: fileExists, attachment: attachment);
}
return _ResolvedPhotoState(
photoPath: photoPath, fileExists: fileExists, attachment: null);
}
```
# Unit Testing
Source: https://docs.powersync.com/client-sdk-references/flutter/unit-testing
Guidelines for unit testing with PowerSync
For unit-testing your projects using PowerSync
(e.g. testing whether your queries run as expected) you will need the `powersync-sqlite-core` binary in your project's root directory.
1. Download the PowerSync SQLite binary
* Go to the [Releases](https://github.com/powersync-ja/powersync-sqlite-core/releases) for `powersync-sqlite-core`.
* Download the binary compatible with your OS.
2. Rename the binary
* Rename the binary by removing the architecture suffix.
* Example: `powersync_x64.dll` to `powersync.dll`
* Example: `libpowersync_aarch64.dylib` to `libpowersync.dylib`
* Example: `libpowersync_x64.so` to `libpowersync.so`
3. Place the binary in your project
* Move the renamed binary to the root directory of your project.
This snippet below is only included as a guide to unit testing in Flutter with PowerSync. For more information refer to the [official Flutter unit testing documentation](https://docs.flutter.dev/cookbook/testing/unit/introduction).
```dart
import 'dart:io';
import 'package:powersync/powersync.dart';
import 'package:path/path.dart';
const schema = Schema([
Table('customers', [Column.text('name'), Column.text('email')])
]);
late PowerSyncDatabase testDB;
String getTestDatabasePath() async {
const dbFilename = 'powersync-test.db';
final dir = Directory.current.absolute.path;
return join(dir, dbFilename);
}
Future openTestDatabase() async {
testDB = PowerSyncDatabase(
schema: schema,
path: await getTestDatabasePath(),
logger: testLogger,
);
await testDB.initialize();
}
test('INSERT', () async {
await testDB.execute(
'INSERT INTO customers(name, email) VALUES(?, ?)', ['John Doe', 'john@hotmail.com']);
final results = await testDB.getAll('SELECT * FROM customers');
expect(results.length, 1);
expect(results, ['John Doe', 'john@hotmail.com']);
});
```
#### If you have trouble with loading the extension, confirm the following
Ensure that your SQLite3 binary install on your system has extension loading enabled. You can confirm this by doing the following
* Run `sqlite3` in your command-line interface.
* In the sqlite3 prompt run `PRAGMA compile_options;`
* Check the output for the option `ENABLE_LOAD_EXTENSION`.
* If you see `ENABLE_LOAD_EXTENSION`, it means extension loading is enabled.
If the above steps don't work, you can also confirm if extension loading is enabled by trying to load the extension in your command-line interface.
* Run `sqlite3` in your command-line interface.
* Run `.load /path/to/file/libpowersync.dylib` (macOS) or `.load /path/to/file/libpowersync.so` (Linux) or `.load /path/to/file/powersync.dll` (Windows).
* If this runs without error, then extension loading is enabled. If it fails with an error message about extension loading being disabled, then it’s not enabled in your SQLite installation.
If it is not enabled, you will have to download a compiled SQLite binary with extension loading enabled (e.g. using Homebrew) or [compile SQLite](https://www.sqlite.org/howtocompile.html) with extension loading enabled and
include it in your project's folder alongside the extension.
# Usage Examples
Source: https://docs.powersync.com/client-sdk-references/flutter/usage-examples
Code snippets and guidelines for common scenarios
## Using transactions to group changes
Read and write transactions present a context where multiple changes can be made then finally committed to the DB or rolled back. This ensures that either all the changes get persisted, or no change is made to the DB (in the case of a rollback or exception).
The [writeTransaction(callback)](https://pub.dev/documentation/powersync/latest/sqlite_async/SqliteQueries/writeTransaction.html) method combines all writes into a single transaction, only committing to persistent storage once.
```dart
deleteList(SqliteDatabase db, String id) async {
await db.writeTransaction((tx) async {
// Delete the main list
await tx.execute('DELETE FROM lists WHERE id = ?', [id]);
// Delete any children of the list
await tx.execute('DELETE FROM todos WHERE list_id = ?', [id]);
});
}
```
Also see [readTransaction(callback)](https://pub.dev/documentation/powersync/latest/sqlite_async/SqliteQueries/readTransaction.html) .
## Subscribe to changes in data
Use [watch](https://pub.dev/documentation/powersync/latest/sqlite_async/SqliteQueries/watch.html) to watch for changes to the dependent tables of any SQL query.
```dart
StreamBuilder(
// You can watch any SQL query
stream: db.watch('SELECT * FROM customers order by id asc'),
builder: (context, snapshot) {
if (snapshot.hasData) {
// TODO: implement your own UI here based on the result set
return ...;
} else {
return const Center(child: CircularProgressIndicator());
}
},
)
```
## Insert, update, and delete data in the local database
Use [execute](https://pub.dev/documentation/powersync/latest/powersync/PowerSyncDatabase/execute.html) to run INSERT, UPDATE or DELETE queries.
```dart
FloatingActionButton(
onPressed: () async {
await db.execute(
'INSERT INTO customers(id, name, email) VALUES(uuid(), ?, ?)',
['Fred', 'fred@example.org'],
);
},
tooltip: '+',
child: const Icon(Icons.add),
);
```
## Send changes in local data to your backend service
Override [uploadData](https://pub.dev/documentation/powersync/latest/powersync/PowerSyncBackendConnector/uploadData.html) to send local updates to your backend service.
```dart
@override
Future uploadData(PowerSyncDatabase database) async {
final batch = await database.getCrudBatch();
if (batch == null) return;
for (var op in batch.crud) {
switch (op.op) {
case UpdateType.put:
// Send the data to your backend service
// Replace `_myApi` with your own API client or service
await _myApi.put(op.table, op.opData!);
break;
default:
// TODO: implement the other operations (patch, delete)
break;
}
}
await batch.complete();
}
```
## Accessing PowerSync connection status information
Use [SyncStatus](https://pub.dev/documentation/powersync/latest/powersync/SyncStatus-class.html) and register an event listener with [statusStream](https://pub.dev/documentation/powersync/latest/powersync/PowerSyncDatabase/statusStream.html) to listen for status changes to your PowerSync instance.
```dart
class _StatusAppBarState extends State {
late SyncStatus _connectionState;
StreamSubscription? _syncStatusSubscription;
@override
void initState() {
super.initState();
_connectionState = db.currentStatus;
_syncStatusSubscription = db.statusStream.listen((event) {
setState(() {
_connectionState = db.currentStatus;
});
});
}
@override
void dispose() {
super.dispose();
_syncStatusSubscription?.cancel();
}
@override
Widget build(BuildContext context) {
final statusIcon = _getStatusIcon(_connectionState);
return AppBar(
title: Text(widget.title),
actions: [
...
statusIcon
],
);
}
}
Widget _getStatusIcon(SyncStatus status) {
if (status.anyError != null) {
// The error message is verbose, could be replaced with something
// more user-friendly
if (!status.connected) {
return _makeIcon(status.anyError!.toString(), Icons.cloud_off);
} else {
return _makeIcon(status.anyError!.toString(), Icons.sync_problem);
}
} else if (status.connecting) {
return _makeIcon('Connecting', Icons.cloud_sync_outlined);
} else if (!status.connected) {
return _makeIcon('Not connected', Icons.cloud_off);
} else if (status.uploading && status.downloading) {
// The status changes often between downloading, uploading and both,
// so we use the same icon for all three
return _makeIcon('Uploading and downloading', Icons.cloud_sync_outlined);
} else if (status.uploading) {
return _makeIcon('Uploading', Icons.cloud_sync_outlined);
} else if (status.downloading) {
return _makeIcon('Downloading', Icons.cloud_sync_outlined);
} else {
return _makeIcon('Connected', Icons.cloud_queue);
}
}
```
## Wait for the initial sync to complete
Use the [hasSynced](https://pub.dev/documentation/powersync/latest/powersync/SyncStatus/hasSynced.html) property (available since version 1.5.1 of the SDK) and register a listener to indicate to the user whether the initial sync is in progress.
```dart
// Example of using hasSynced to show whether the first sync has completed
/// Global reference to the database
final PowerSyncDatabase db;
bool hasSynced = false;
StreamSubscription? _syncStatusSubscription;
// Use the exposed statusStream
Stream watchSyncStatus() {
return db.statusStream;
}
@override
void initState() {
super.initState();
_syncStatusSubscription = watchSyncStatus.listen((status) {
setState(() {
hasSynced = status.hasSynced ?? false;
});
});
}
@override
Widget build(BuildContext context) {
return Text(hasSynced ? 'Initial sync completed!' : 'Busy with initial sync...');
}
// Don't forget to dispose of stream subscriptions when the view is disposed
void dispose() {
super.dispose();
_syncStatusSubscription?.cancel();
}
```
For async use cases, see the [waitForFirstSync](https://pub.dev/documentation/powersync/latest/powersync/PowerSyncDatabase/waitForFirstSync.html) method which returns a promise that resolves once the first full sync has completed.
## Report sync download progress
You can show users a progress bar when data downloads using the `downloadProgress` property from the
[SyncStatus](https://pub.dev/documentation/powersync/latest/powersync/SyncStatus/downloadProgress.html) class.
`downloadProgress.downloadedFraction` gives you a value from 0.0 to 1.0 representing the total sync progress. This is especially useful for long-running initial syncs.
As an example, this widget renders a progress bar when a download is active:
```dart
import 'package:flutter/material.dart';
import 'package:powersync/powersync.dart' hide Column;
class SyncProgressBar extends StatelessWidget {
final PowerSyncDatabase db;
/// When set, show progress towards the [BucketPriority] instead of towards
/// the full sync.
final BucketPriority? priority;
const SyncProgressBar({
super.key,
required this.db,
this.priority,
});
@override
Widget build(BuildContext context) {
return StreamBuilder(
stream: db.statusStream,
initialData: db.currentStatus,
builder: (context, snapshot) {
final status = snapshot.requireData;
final progress = switch (priority) {
null => status.downloadProgress,
var priority? => status.downloadProgress?.untilPriority(priority),
};
if (progress != null) {
return Center(
child: Column(
children: [
const Text('Busy with sync...'),
LinearProgressIndicator(value: progress?.downloadedFraction),
Text(
'${progress.downloadedOperations} out of ${progress.totalOperations}')
],
),
);
} else {
return const SizedBox.shrink();
}
},
);
}
}
```
Also see:
* [SyncDownloadProgress API](https://pub.dev/documentation/powersync/latest/powersync/SyncDownloadProgress-extension-type.html)
* [Demo component](https://github.com/powersync-ja/powersync.dart/blob/main/demos/supabase-todolist/lib/widgets/guard_by_sync.dart)
# Introduction
Source: https://docs.powersync.com/client-sdk-references/introduction
PowerSync supports multiple client-side frameworks with official SDKs
Select your client framework for the full SDK reference, getting started instructions and example code:
# JavaScript Web
Source: https://docs.powersync.com/client-sdk-references/javascript-web
Full SDK reference for using PowerSync in JavaScript Web clients
This SDK is distributed via NPM [\[External link\].](https://www.npmjs.com/package/@powersync/web)
Refer to packages/web in the powersync-js repo on GitHub.
Full API reference for the PowerSync SDK [\[External link\].](https://powersync-ja.github.io/powersync-js/web-sdk)
Gallery of example projects/demo apps built with JavaScript Web stacks and PowerSync.
### SDK Features
* **Real-time streaming of database changes**: Changes made by one user are instantly streamed to all other users with access to that data. This keeps clients automatically in sync without manual polling or refresh logic.
* **Direct access to a local SQLite database**: Data is stored locally, so apps can read and write instantly without network calls. This enables offline support and faster user interactions.
* **Asynchronous background execution**: The SDK performs database operations in the background to avoid blocking the application’s main thread. This means that apps stay responsive, even during heavy data activity.
* **Query subscriptions for live updates**: The SDK supports query subscriptions that automatically push real-time updates to client applications as data changes, keeping your UI reactive and up to date.
* **Automatic schema management**: PowerSync syncs schemaless data and applies a client-defined schema using SQLite views. This architecture means that PowerSync SDKs can handle schema changes gracefully without requiring explicit migrations on the client-side.
## Installation
Add the [PowerSync Web NPM package](https://www.npmjs.com/package/@powersync/web) to your project:
```bash
npm install @powersync/web
```
```bash
yarn add @powersync/web
```
```bash
pnpm install @powersync/web
```
**Required peer dependencies**
This SDK currently requires [`@journeyapps/wa-sqlite`](https://www.npmjs.com/package/@journeyapps/wa-sqlite) as a peer dependency. Install it in your app with:
```bash
npm install @journeyapps/wa-sqlite
```
```bash
yarn add @journeyapps/wa-sqlite
```
```bash
pnpm install @journeyapps/wa-sqlite
```
By default, this SDK connects to a PowerSync instance via WebSocket (from `@powersync/web@1.6.0`) or HTTP streaming (before `@powersync/web@1.6.0`). See [Developer Notes](/client-sdk-references/javascript-web#developer-notes) for more details on connection methods.
## Getting Started
Before implementing the PowerSync SDK in your project, make sure you have completed these steps:
* Signed up for a PowerSync Cloud account ([here](https://accounts.journeyapps.com/portal/powersync-signup?s=docs)) or [self-host PowerSync](/self-hosting/getting-started).
* [Configured your backend database](/installation/database-setup) and connected it to your PowerSync instance.
* [Installed](/client-sdk-references/javascript-web#installation) the PowerSync Web SDK.
### 1. Define the Schema
The first step is defining the schema for the local SQLite database.
This schema represents a "view" of the downloaded data. No migrations are required — the schema is applied directly when the local PowerSync database is constructed (as we'll show in the next step).
**Generate schema automatically**
In the [dashboard](/usage/tools/powersync-dashboard), the schema can be generated based off your sync rules by right-clicking on an instance and selecting **Generate client-side schema**.
Similar functionality exists in the [CLI](/usage/tools/cli).
The types available are `text`, `integer` and `real`. These should map directly to the values produced by the [Sync Rules](/usage/sync-rules). If a value doesn't match, it is cast automatically. For details on how Postgres types are mapped to the types below, see the section on [Types](/usage/sync-rules/types) in the *Sync Rules* documentation.
**Example**:
```js
// AppSchema.ts
import { column, Schema, Table } from '@powersync/web';
const lists = new Table({
created_at: column.text,
name: column.text,
owner_id: column.text
});
const todos = new Table(
{
list_id: column.text,
created_at: column.text,
completed_at: column.text,
description: column.text,
created_by: column.text,
completed_by: column.text,
completed: column.integer
},
{ indexes: { list: ['list_id'] } }
);
export const AppSchema = new Schema({
todos,
lists
});
// For types
export type Database = (typeof AppSchema)['types'];
export type TodoRecord = Database['todos'];
// OR:
// export type Todo = RowType;
export type ListRecord = Database['lists'];
```
**Note**: No need to declare a primary key `id` column, as PowerSync will automatically create this.
### 2. Instantiate the PowerSync Database
Next, you need to instantiate the PowerSync database — this is the core managed database.
Its primary functions are to record all changes in the local database, whether online or offline. In addition, it automatically uploads changes to your app backend when connected.
**Example**:
```js
import { PowerSyncDatabase } from '@powersync/web';
import { Connector } from './Connector';
import { AppSchema } from './AppSchema';
export const db = new PowerSyncDatabase({
// The schema you defined in the previous step
schema: AppSchema,
database: {
// Filename for the SQLite database — it's important to only instantiate one instance per file.
dbFilename: 'powersync.db'
// Optional. Directory where the database file is located.'
// dbLocation: 'path/to/directory'
}
});
```
**SDK versions lower than 1.2.0**
In SDK versions lower than 1.2.0, you will need to use the deprecated [WASQLitePowerSyncDatabaseOpenFactory](https://powersync-ja.github.io/powersync-js/web-sdk/classes/WASQLitePowerSyncDatabaseOpenFactory) syntax to instantiate the database.
Once you've instantiated your PowerSync database, you will need to call the [connect()](https://powersync-ja.github.io/powersync-js/web-sdk/classes/AbstractPowerSyncDatabase#connect) method to activate it.
```js
export const setupPowerSync = async () => {
// Uses the backend connector that will be created in the next section
const connector = new Connector();
db.connect(connector);
};
```
### 3. Integrate with your Backend
The PowerSync backend connector provides the connection between your application backend and the PowerSync client-slide managed SQLite database.
It is used to:
1. Retrieve an auth token to connect to the PowerSync instance.
2. Apply local changes on your backend application server (and from there, to your backend database)
Accordingly, the connector must implement two methods:
1. [PowerSyncBackendConnector.fetchCredentials](https://github.com/powersync-ja/powersync-js/blob/ed5bb49b5a1dc579050304fab847feb8d09b45c7/packages/common/src/client/connection/PowerSyncBackendConnector.ts#L16) - This is called every couple of minutes and is used to obtain credentials for your app backend API. -> See [Authentication Setup](/installation/authentication-setup) for instructions on how the credentials should be generated.
2. [PowerSyncBackendConnector.uploadData](https://github.com/powersync-ja/powersync-js/blob/ed5bb49b5a1dc579050304fab847feb8d09b45c7/packages/common/src/client/connection/PowerSyncBackendConnector.ts#L24) - Use this to upload client-side changes to your app backend.
-> See [Writing Client Changes](/installation/app-backend-setup/writing-client-changes) for considerations on the app backend implementation.
**Example**:
```js
import { UpdateType } from '@powersync/web';
export class Connector {
async fetchCredentials() {
// Implement fetchCredentials to obtain a JWT from your authentication service.
// See https://docs.powersync.com/installation/authentication-setup
// If you're using Supabase or Firebase, you can re-use the JWT from those clients, see
// - https://docs.powersync.com/installation/authentication-setup/supabase-auth
// - https://docs.powersync.com/installation/authentication-setup/firebase-auth
return {
endpoint: '[Your PowerSync instance URL or self-hosted endpoint]',
// Use a development token (see Authentication Setup https://docs.powersync.com/installation/authentication-setup/development-tokens) to get up and running quickly
token: 'An authentication token'
};
}
async uploadData(database) {
// Implement uploadData to send local changes to your backend service.
// You can omit this method if you only want to sync data from the database to the client
// See example implementation here: https://docs.powersync.com/client-sdk-references/javascript-web#3-integrate-with-your-backend
}
}
```
## Using PowerSync: CRUD functions
Once the PowerSync instance is configured you can start using the SQLite DB functions.
The most commonly used CRUD functions to interact with your SQLite data are:
* [PowerSyncDatabase.get](/client-sdk-references/javascript-web#fetching-a-single-item) - get (SELECT) a single row from a table.
* [PowerSyncDatabase.getAll](/client-sdk-references/javascript-web#querying-items-powersync.getall) - get (SELECT) a set of rows from a table.
* [PowerSyncDatabase.watch](/client-sdk-references/javascript-web#watching-queries-powersync.watch) - execute a read query every time source tables are modified.
* [PowerSyncDatabase.execute](/client-sdk-references/javascript-web#mutations-powersync.execute) - execute a write (INSERT/UPDATE/DELETE) query.
### Fetching a Single Item
The [get](https://powersync-ja.github.io/powersync-js/web-sdk/classes/PowerSyncDatabase#get) method executes a read-only (SELECT) query and returns a single result. It throws an exception if no result is found. Use [getOptional](https://powersync-ja.github.io/powersync-js/web-sdk/classes/PowerSyncDatabase#getoptional) to return a single optional result (returns `null` if no result is found).
```js
// Find a list item by ID
export const findList = async (id) => {
const result = await db.get('SELECT * FROM lists WHERE id = ?', [id]);
return result;
}
```
### Querying Items (PowerSync.getAll)
The [getAll](https://powersync-ja.github.io/powersync-js/web-sdk/classes/PowerSyncDatabase#getall) method returns a set of rows from a table.
```js
// Get all list IDs
export const getLists = async () => {
const results = await db.getAll('SELECT * FROM lists');
return results;
}
```
### Watching Queries (PowerSync.watch)
The [watch](https://powersync-ja.github.io/powersync-js/web-sdk/classes/PowerSyncDatabase#watch) method executes a read query whenever a change to a dependent table is made.
```js
// Watch changes to lists
const abortController = new AbortController();
export const function watchLists = (onUpdate) => {
for await (const update of PowerSync.watch(
'SELECT * from lists',
[],
{ signal: abortController.signal }
)
) {
onUpdate(update);
}
}
```
### Mutations (PowerSync.execute, PowerSync.writeTransaction)
The [execute](https://powersync-ja.github.io/powersync-js/web-sdk/classes/PowerSyncDatabase#execute) method can be used for executing single SQLite write statements.
```js
// Delete a list item by ID
export const deleteList = async (id) => {
const result = await db.execute('DELETE FROM lists WHERE id = ?', [id]);
return TodoList.fromRow(results);
}
// OR: using a transaction
const deleteList = async (id) => {
await db.writeTransaction(async (tx) => {
// Delete associated todos
await tx.execute(`DELETE FROM ${TODOS_TABLE} WHERE list_id = ?`, [id]);
// Delete list record
await tx.execute(`DELETE FROM ${LISTS_TABLE} WHERE id = ?`, [id]);
});
};
```
## Configure Logging
```js
import { createBaseLogger, LogLevel } from '@powersync/web';
const logger = createBaseLogger();
// Configure the logger to use the default console output
logger.useDefaults();
// Set the minimum log level to DEBUG to see all log messages
// Available levels: DEBUG, INFO, WARN, ERROR, TRACE, OFF
logger.setLevel(LogLevel.DEBUG);
```
Enable verbose output in the developer tools for detailed logs.
Additionally, the [WASQLiteDBAdapter](https://powersync-ja.github.io/powersync-js/web-sdk/classes/WASQLiteDBAdapter) opens SQLite connections inside a shared web worker. This worker can be inspected in Chrome by accessing:
```
chrome://inspect/#workers
```
## Additional Usage Examples
See [Usage Examples](/client-sdk-references/javascript-web/usage-examples) for further examples of the SDK.
## Developer Notes
### Connection Methods
This SDK supports two methods for streaming sync commands:
1. **WebSocket (Default)**
* The implementation leverages RSocket for handling reactive socket streams.
* Back-pressure is effectively managed through client-controlled command requests.
* Sync commands are transmitted efficiently as BSON (binary) documents.
* This method is **recommended** since it will support the future [BLOB column support](https://roadmap.powersync.com/c/88-support-for-blob-column-types) feature.
2. **HTTP Streaming (Legacy)**
* This is the original implementation method.
* This method will not support the future BLOB column feature.
By default, the `PowerSyncDatabase.connect()` method uses WebSocket. You can optionally specify the `connectionMethod` to override this:
```js
// WebSocket (default)
powerSync.connect(connector);
// HTTP Streaming
powerSync.connect(connector, { connectionMethod: SyncStreamConnectionMethod.HTTP });
```
### SQLite Virtual File Systems
This SDK supports multiple Virtual File Systems (VFS), responsible for storing the local SQLite database:
#### 1. IDBBatchAtomicVFS (Default)
* This system utilizes IndexedDB as its underlying storage mechanism.
* Multiple tabs are fully supported across most modern browsers.
* Users may experience stability issues when using Safari.
#### 2. OPFS-based Alternatives
PowerSync supports two OPFS (Origin Private File System) implementations that generally offer improved performance:
##### OPFSCoopSyncVFS (Recommended)
* This implementation provides comprehensive multi-tab support across all major browsers.
* It offers the most reliable compatibility with Safari and Safari iOS.
* Example configuration:
```js
import { PowerSyncDatabase, WASQLiteOpenFactory, WASQLiteVFS } from '@powersync/web';
export const db = new PowerSyncDatabase({
schema: AppSchema,
database: new WASQLiteOpenFactory({
dbFilename: 'exampleVFS.db',
vfs: WASQLiteVFS.OPFSCoopSyncVFS,
flags: {
enableMultiTabs: typeof SharedWorker !== 'undefined'
}
}),
flags: {
enableMultiTabs: typeof SharedWorker !== 'undefined'
}
});
```
##### AccessHandlePoolVFS
* This implementation delivers optimal performance for single-tab applications.
* The system is not designed to handle multiple tab scenarios.
* The configuration is similar to `OPFSCoopSyncVFS`, but requires using `WASQLiteVFS.AccessHandlePoolVFS`.
#### VFS Compatibility Matrix
| VFS Type | Multi-Tab Support (Standard Browsers) | Multi-Tab Support (Safari/iOS) | Notes |
| ------------------- | ------------------------------------- | ------------------------------ | ------------------------------------- |
| IDBBatchAtomicVFS | ✅ | ❌ | Default, some Safari stability issues |
| OPFSCoopSyncVFS | ✅ | ✅ | Recommended for multi-tab support |
| AccessHandlePoolVFS | ❌ | ❌ | Best for single-tab applications |
**Note**: There are known issues with OPFS when using Safari's incognito mode.
### Managing OPFS Storage
Unlike IndexedDB, OPFS storage cannot be managed through browser developer tools. The following utility functions can help you manage OPFS storage programmatically:
```js
// Clear all OPFS storage
async function purgeVFS() {
await powerSync.disconnect();
await powerSync.close();
const root = await navigator.storage.getDirectory();
await new Promise(resolve => setTimeout(resolve, 1)); // Allow .db-wal to become deletable
for await (const [name, entry] of root.entries!()) {
try {
if (entry.kind === 'file') {
await root.removeEntry(name);
} else if (entry.kind === 'directory') {
await root.removeEntry(name, { recursive: true });
}
} catch (err) {
console.error(`Failed to delete ${entry.kind}: ${name}`, err);
}
}
}
// List OPFS entries
async function listVfsEntries() {
const root = await navigator.storage.getDirectory();
for await (const [name, entry] of root.entries()) {
console.log(`${entry.kind}: ${name}`);
}
}
```
## ORM Support
See [JavaScript ORM Support](/client-sdk-references/javascript-web/javascript-orm/overview) for details.
## Troubleshooting
See [Troubleshooting](/resources/troubleshooting) for pointers to debug common issues.
# API Reference
Source: https://docs.powersync.com/client-sdk-references/javascript-web/api-reference
# Encryption
Source: https://docs.powersync.com/client-sdk-references/javascript-web/encryption
# Drizzle
Source: https://docs.powersync.com/client-sdk-references/javascript-web/javascript-orm/drizzle
This package enables using [Drizzle](https://orm.drizzle.team/) with the PowerSync [React Native](/client-sdk-references/react-native-and-expo) and [JavaScript Web](/client-sdk-references/javascript-web) SDKs.
## Setup
Set up the PowerSync Database and wrap it with Drizzle.
```js
import { wrapPowerSyncWithDrizzle } from '@powersync/drizzle-driver';
import { PowerSyncDatabase } from '@powersync/web';
import { relations } from 'drizzle-orm';
import { index, integer, sqliteTable, text } from 'drizzle-orm/sqlite-core';
import { AppSchema } from './schema';
export const lists = sqliteTable('lists', {
id: text('id'),
name: text('name')
});
export const todos = sqliteTable('todos', {
id: text('id'),
description: text('description'),
list_id: text('list_id'),
created_at: text('created_at')
});
export const listsRelations = relations(lists, ({ one, many }) => ({
todos: many(todos)
}));
export const todosRelations = relations(todos, ({ one, many }) => ({
list: one(lists, {
fields: [todos.list_id],
references: [lists.id]
})
}));
export const drizzleSchema = {
lists,
todos,
listsRelations,
todosRelations
};
// As an alternative to manually defining a PowerSync schema, generate the local PowerSync schema from the Drizzle schema with the `DrizzleAppSchema` constructor:
// import { DrizzleAppSchema } from '@powersync/drizzle-driver';
// export const AppSchema = new DrizzleAppSchema(drizzleSchema);
//
// This is optional, but recommended, since you will only need to maintain one schema on the client-side
// Read on to learn more.
export const powerSyncDb = new PowerSyncDatabase({
database: {
dbFilename: 'test.sqlite'
},
schema: AppSchema
});
// This is the DB you will use in queries
export const db = wrapPowerSyncWithDrizzle(powerSyncDb, {
schema: drizzleSchema
});
```
## Schema Conversion
The `DrizzleAppSchema` constructor simplifies the process of integrating Drizzle with PowerSync. It infers the local [PowerSync schema](/installation/client-side-setup/define-your-schema) from your Drizzle schema definition, providing a unified development experience.
As the PowerSync schema only supports SQLite types (`text`, `integer`, and `real`), the same limitation extends to the Drizzle table definitions.
To use it, define your Drizzle tables and supply the schema to the `DrizzleAppSchema` function:
```js
import { DrizzleAppSchema } from '@powersync/drizzle-driver';
import { sqliteTable, text } from 'drizzle-orm/sqlite-core';
// Define a Drizzle table
const lists = sqliteTable('lists', {
id: text('id').primaryKey().notNull(),
created_at: text('created_at'),
name: text('name').notNull(),
owner_id: text('owner_id')
});
export const drizzleSchema = {
lists
};
// Infer the PowerSync schema from your Drizzle schema
export const AppSchema = new DrizzleAppSchema(drizzleSchema);
```
### Defining PowerSync Options
The PowerSync table definition allows additional options supported by PowerSync's app schema beyond that which are supported by Drizzle.
They can be specified as follows. Note that these options exclude indexes as they can be specified in a Drizzle table.
```js
import { DrizzleAppSchema } from '@powersync/drizzle-driver';
// import { DrizzleAppSchema, type DrizzleTableWithPowerSyncOptions} from '@powersync/drizzle-driver'; for TypeScript
const listsWithOptions = { tableDefinition: logs, options: { localOnly: true } };
// const listsWithOptions: DrizzleTableWithPowerSyncOptions = { tableDefinition: logs, options: { localOnly: true } }; for TypeScript
export const drizzleSchemaWithOptions = {
lists: listsWithOptions
};
export const AppSchema = new DrizzleAppSchema(drizzleSchemaWithOptions);
```
### Converting a Single Table From Drizzle to PowerSync
Drizzle tables can also be converted on a table-by-table basis with `toPowerSyncTable`.
```js
import { toPowerSyncTable } from '@powersync/drizzle-driver';
import { Schema } from '@powersync/web';
import { sqliteTable, text } from 'drizzle-orm/sqlite-core';
// Define a Drizzle table
const lists = sqliteTable('lists', {
id: text('id').primaryKey().notNull(),
created_at: text('created_at'),
name: text('name').notNull(),
owner_id: text('owner_id')
});
const psLists = toPowerSyncTable(lists); // converts the Drizzle table to a PowerSync table
// toPowerSyncTable(lists, { localOnly: true }); - allows for PowerSync table configuration
export const AppSchema = new Schema({
lists: psLists // names the table `lists` in the PowerSync schema
});
```
## Compilable queries
To use Drizzle queries in your hooks and composables, they currently need to be converted using `toCompilableQuery`.
```js
import { toCompilableQuery } from "@powersync/drizzle-driver";
const query = db.select().from(users);
const { data: listRecords, isLoading } = useQuery(toCompilableQuery(query));
```
## Usage Examples
Below are examples comparing Drizzle and PowerSync syntax for common database operations.
### Select Operations
```js Drizzle
const result = await db.select().from(users);
// [{ id: '1', name: 'user1' }, { id: '2', name: 'user2' }]
```
```js PowerSync
const result = await powerSyncDb.getAll('SELECT * from users');
// [{ id: '1', name: 'user1' }, { id: '2', name: 'user2' }]
```
### Insert Operations
```js Drizzle
await db.insert(users).values({ id: '1', name: 'John' });
const result = await db.select().from(users);
// [{ id: '1', name: 'John' }]
```
```js PowerSync
await powerSyncDb.execute('INSERT INTO users (id, name) VALUES(1, ?)', ['John']);
const result = await powerSyncDb.getAll('SELECT * from users');
// [{ id: '1', name: 'John' }]
```
### Delete Operations
```js Drizzle
await db.insert(users).values({ id: '2', name: 'Ben' });
await db.delete(users).where(eq(users.name, 'Ben'));
const result = await db.select().from(users);
// []
```
```js PowerSync
await powerSyncDb.execute('INSERT INTO users (id, name) VALUES(2, ?)', ['Ben']);
await powerSyncDb.execute(`DELETE FROM users WHERE name = ?`, ['Ben']);
const result = await powerSyncDb.getAll('SELECT * from users');
// []
```
### Update Operations
```js Drizzle
await db.insert(users).values({ id: '3', name: 'Lucy' });
await db.update(users).set({ name: 'Lucy Smith' }).where(eq(users.name, 'Lucy'));
const result = await db.select({ name: users.name }).from(users).get();
// 'Lucy Smith'
```
```js PowerSync
await powerSyncDb.execute('INSERT INTO users (id, name) VALUES(3, ?)', ['Lucy']);
await powerSyncDb.execute('UPDATE users SET name = ? WHERE name = ?', ['Lucy Smith', 'Lucy']);
const result = await powerSyncDb.get('SELECT name FROM users WHERE name = ?', ['Lucy Smith'])
// 'Lucy Smith'
```
### Watched Queries
For watched queries with Drizzle it's recommended to use the `watch()` function from the Drizzle integration which takes in a Drizzle query.
```js Drizzle
const query = db.select().from(users);
db.watch(query, {
onResult(results) {
console.log(results);
},
});
// [{ id: '1', name: 'John' }]
```
```js PowerSync
powerSyncDb.watch("select * from users", [], {
onResult(results) {
console.log(results.rows?._array);
},
});
// [{ id: '1', name: 'John' }]
```
### Transactions
```js Drizzle
await db.transaction(async (transaction) => {
await db.insert(users).values({ id: "4", name: "James" });
await db
.update(users)
.set({ name: "Lucy James Smith" })
.where(eq(users.name, "James"));
});
const result = await db.select({ name: users.name }).from(users).get();
// 'James Smith'
```
```js PowerSync
await powerSyncDb.writeTransaction((transaction) => {
await transaction.execute('INSERT INTO users (id, name) VALUES(4, ?)', ['James']);
await transaction.execute("UPDATE users SET name = ? WHERE name = ?", ['James Smith', 'James']);
})
const result = await powerSyncDb.get('SELECT name FROM users WHERE name = ?', ['James Smith'])
// 'James Smith'
```
## Developer Notes
### Table Constraint Restrictions
The Drizzle ORM relies on the underlying PowerSync table definitions which are subject to certain limitations.
This means that most Drizzle [constraint features](https://orm.drizzle.team/docs/indexes-constraints) (such as cascading deletes, foreign checks, unique) are currently not supported.
# Kysely
Source: https://docs.powersync.com/client-sdk-references/javascript-web/javascript-orm/kysely
This package enables using [Kysely](https://kysely.dev/) with PowerSync React Native and web SDKs.
It gives JavaScript developers the flexibility to write queries in either JavaScript/TypeScript or SQL, and provides type-safe imperative APIs.
## Setup
Set up the PowerSync Database and wrap it with Kysely.
### JavaScript Setup
```js
import { wrapPowerSyncWithKysely } from '@powersync/kysely-driver';
import { PowerSyncDatabase } from '@powersync/web';
// Define schema as in: https://docs.powersync.com/usage/installation/client-side-setup/define-your-schema
import { appSchema } from './schema';
export const powerSyncDb = new PowerSyncDatabase({
database: {
dbFilename: 'test.sqlite'
},
schema: appSchema
});
export const db = wrapPowerSyncWithKysely(powerSyncDb);
```
### TypeScript Setup
```js
import { wrapPowerSyncWithKysely } from '@powersync/kysely-driver';
import { PowerSyncDatabase } from "@powersync/web";
// Define schema as in: https://docs.powersync.com/usage/installation/client-side-setup/define-your-schema
import { appSchema, Database } from "./schema";
export const powerSyncDb = new PowerSyncDatabase({
database: {
dbFilename: "test.sqlite"
},
schema: appSchema,
});
// `db` now automatically contains types for defined tables
export const db = wrapPowerSyncWithKysely(powerSyncDb)
```
For more information on Kysely typing, see [their documentation](https://kysely.dev/docs/getting-started#types).
## Usage Examples
Below are examples comparing Kysely and PowerSync syntax for common database operations.
### Select Operations
```js Kysely
const result = await db.selectFrom('users').selectAll().execute();
// [{ id: '1', name: 'user1' }, { id: '2', name: 'user2' }]
```
```js PowerSync
const result = await powerSyncDb.getAll('SELECT * from users');
// [{ id: '1', name: 'user1' }, { id: '2', name: 'user2' }]
```
### Insert Operations
```js Kysely
await db.insertInto('users').values({ id: '1', name: 'John' }).execute();
const result = await db.selectFrom('users').selectAll().execute();
// [{ id: '1', name: 'John' }]
```
```js PowerSync
await powerSyncDb.execute('INSERT INTO users (id, name) VALUES(1, ?)', ['John']);
const result = await powerSyncDb.getAll('SELECT * from users');
// [{ id: '1', name: 'John' }]
```
### Delete Operations
```js Kysely
await db.insertInto('users').values({ id: '2', name: 'Ben' }).execute();
await db.deleteFrom('users').where('name', '=', 'Ben').execute();
const result = await db.selectFrom('users').selectAll().execute();
// []
```
```js PowerSync
await powerSyncDb.execute('INSERT INTO users (id, name) VALUES(2, ?)', ['Ben']);
await powerSyncDb.execute(`DELETE FROM users WHERE name = ?`, ['Ben']);
const result = await powerSyncDb.getAll('SELECT * from users');
// []
```
### Update Operations
```js Kysely
await db.insertInto('users').values({ id: '3', name: 'Lucy' }).execute();
await db.updateTable('users').where('name', '=', 'Lucy').set('name', 'Lucy Smith').execute();
const result = await db.selectFrom('users').select('name').executeTakeFirstOrThrow();
// 'Lucy Smith'
```
```js PowerSync
await powerSyncDb.execute('INSERT INTO users (id, name) VALUES(3, ?)', ['Lucy']);
await powerSyncDb.execute('UPDATE users SET name = ? WHERE name = ?', ['Lucy Smith', 'Lucy']);
const result = await powerSyncDb.get('SELECT name FROM users WHERE name = ?', ['Lucy Smith'])
// 'Lucy Smith'
```
### Watched Queries
For watched queries with Kysely it's recommended to use the `watch()` function from the wrapper package which takes in a Kysely query.
```js Kysely
const query = db.selectFrom('users').selectAll();
db.watch(query, {
onResult(results) {
console.log(results);
},
});
// [{ id: '1', name: 'John' }]
```
```js PowerSync
powerSyncDb.watch("select * from users", [], {
onResult(results) {
console.log(results.rows?._array);
},
});
// [{ id: '1', name: 'John' }]
```
### Transactions
```js Kysely
await db.transaction().execute(async (transaction) => {
await transaction.insertInto('users').values({ id: '4', name: 'James' }).execute();
await transaction.updateTable('users').where('name', '=', 'James').set('name', 'James Smith').execute();
});
const result = await db.selectFrom('users').select('name').executeTakeFirstOrThrow();
// 'James Smith'
```
```js Kysely with Raw SQL
await db.transaction().execute(async (transaction) => {
await sql`INSERT INTO users (id, name) VALUES ('4', 'James');`.execute(transaction)
await transaction.updateTable('users').where('name', '=', 'James').set('name', 'James Smith').execute();
});
const result = await db.selectFrom('users').select('name').executeTakeFirstOrThrow();
// 'James Smith'
```
```js PowerSync
await powerSyncDb.writeTransaction((transaction) => {
await transaction.execute('INSERT INTO users (id, name) VALUES(4, ?)', ['James']);
await transaction.execute("UPDATE users SET name = ? WHERE name = ?", ['James Smith', 'James']);
})
const result = await powerSyncDb.get('SELECT name FROM users WHERE name = ?', ['James Smith'])
// 'James Smith'
```
# ORM Overview
Source: https://docs.powersync.com/client-sdk-references/javascript-web/javascript-orm/overview
Reference for using PowerSync with ORMs in JavaScript and React Native
An introduction to using ORMs with PowerSync is available on our blog [here](https://www.powersync.com/blog/using-orms-with-powersync).
The following ORMs are officially supported:
Kysely query builder for PowerSync.
Drizzle ORM for PowerSync.
# JavaScript SPA Frameworks
Source: https://docs.powersync.com/client-sdk-references/javascript-web/javascript-spa-frameworks
Compatibility with SPA frameworks
The PowerSync [JavaScript Web SDK](../javascript-web) is compatible with popular Single-Page Application (SPA) frameworks like React, Vue, Angular, and Svelte. For [React](#react-hooks) and [Vue](#vue-composables) specifically, wrapper packages are available to support reactivity and live queries, making it easier for developers to leverage PowerSync's features.
PowerSync also integrates with [TanStack Query for React](#tanstack-query) (details below). This integration provides a wide range of developer tools and paves the way for future live query support in other frameworks.
Notable community library:
* Using SolidJS? Check out [powersync-solid](https://github.com/aboviq/powersync-solid) for SolidJS hooks for PowerSync queries.
### Which package should I choose for queries?
For React or React Native apps:
* The [`@powersync/react`](#react-hooks) package is best for most basic use cases, especially when you only need reactive queries with loading and error states.
* For more advanced scenarios, such as query caching and pagination, TanStack is a powerful solution. The [`@powersync/tanstack-react-query`](#tanstack-query) package extends the `useQuery` hook from `@powersync/react` and adds functionality from [TanStack Query](https://tanstack.com/query/latest/docs/framework/react/overview), making it a better fit for advanced use cases or performance-optimized apps.
If you have a Vue app, use the Vue-specific package: [`@powersync/vue`](#vue-composables).
## React Hooks
The `@powersync/react` package provides React hooks for use with the [JavaScript Web SDK](./) or [React Native SDK](../react-native-and-expo/). These hooks are designed to support reactivity, and can be used to automatically re-render React components when query results update or to access PowerSync connectivity status changes.
The main hooks available are:
* `useQuery`: This allows you to access the results of a watched query. The response includes `isLoading`, `isFetching` and `error` properties.
* `useStatus`: Access the PowerSync connectivity status. This can be used to update the UI based on whether the client is connected or not.
* `useSuspenseQuery`: This hook also allows you to access the results of a watched query, but its loading and fetching states are handled through [Suspense](https://react.dev/reference/react/Suspense). It automatically converts certain loading/fetching states into Suspense signals, triggering Suspense boundaries in parent components.
The full API Reference and example code can be found here:
## TanStack Query
PowerSync integrates with [TanStack Query](https://tanstack.com/query/latest/docs/framework/react/overview) (formerly React Query) through the `@powersync/tanstack-react-query` package.
This package wraps TanStack's `useQuery` and `useSuspenseQuery` hooks, bringing many of TanStack's advanced asynchronous state management features to PowerSync web and React Native applications, including:
* **Loading and error states** via [`useQuery`](https://tanstack.com/query/latest/docs/framework/react/guides/queries)
* [**React Suspense**](https://tanstack.com/query/latest/docs/framework/react/guides/suspense) **support**: `useSuspenseQuery` automatically converts certain loading states into Suspense signals, triggering Suspense boundaries in parent components.
* [**Caching queries**](https://tanstack.com/query/latest/docs/framework/react/guides/caching): Queries are cached with a unique key and reused across the app, so subsequent instances of the same query won't refire unnecessarily.
* **Built-in support for** [**pagination**](https://tanstack.com/query/latest/docs/framework/react/guides/paginated-queries)
#### Additional hooks
We plan to support more TanStack Query hooks over time. If there are specific hooks you're interested in, please let us know on [Discord](https://discord.gg/powersync).
### Example Use Case
When navigating to or refreshing a page, you may notice a brief UI "flicker" (10-50ms). Here are a few ways to manage this with TanStack Query:
* **First load**: When a page loads for the first time, use a loading indicator or a Suspense fallback to handle queries. See the [examples](https://www.npmjs.com/package/@powersync/tanstack-react-query#usage).
* **Subsequent loads**: With TanStack's query caching, subsequent loads of the same page won't refire queries, which reduces the flicker effect.
* **Block navigation until components are ready**: Using `useSuspenseQuery`, you can ensure that navigation from page A to page B only happens after the queries for page B have loaded. You can do this by combining `useSuspenseQuery` with the ` ` element and React Router’s [`v7_startTransition`](https://reactrouter.com/en/main/upgrading/future#v7_starttransition) future flag, which blocks navigation until all suspending components are ready.
### Usage and Examples
For more examples and usage details, see the package [README](https://www.npmjs.com/package/@powersync/tanstack-react-query).
The full API Reference can be found here:
## Vue Composables
The [`powersync/vue`](https://www.npmjs.com/package/@powersync/vue) package is a Vue-specific wrapper for PowerSync. It provides Vue [composables](https://vuejs.org/guide/reusability/composables) that are designed to support reactivity, and can be used to automatically re-render components when query results update or to access PowerSync connectivity status changes.
The main hooks available are:
* `useQuery`: This allows you to access the results of a watched query. The response includes `isLoading`, `isFetching` and `error` properties.
* `useStatus`: Access the PowerSync connectivity status. This can be used to update the UI based on whether the client is connected or not.
The full API Reference and example code can be found here:
# Usage Examples
Source: https://docs.powersync.com/client-sdk-references/javascript-web/usage-examples
Code snippets and guidelines for common scenarios
## Multiple Tab Support
* Multiple tab support is not currently available on Android.
* For Safari, use the [`OPFSCoopSyncVFS`](/client-sdk-references/javascript-web#sqlite-virtual-file-systems) virtual file system to ensure stable multi-tab functionality.
Using PowerSync between multiple tabs is supported on some web browsers. Multiple tab support relies on shared web workers for database and sync streaming operations. When enabled, shared web workers named `shared-DB-worker-[dbFileName]` and `shared-sync-[dbFileName]` will be created.
#### `shared-DB-worker-[dbFileName]`
The shared database worker will ensure writes to the database will instantly be available between tabs.
#### `shared-sync-[dbFileName]`
The shared sync worker connects directly to the PowerSync backend instance and applies changes to the database. Note that the shared sync worker will call the `fetchCredentials` and `uploadData` method of the latest opened available tab. Closing a tab will shift the latest tab to the previously opened one.
Currently, using the SDK in multiple tabs without enabling the [enableMultiTabs](https://github.com/powersync-ja/powersync-js/blob/ed5bb49b5a1dc579050304fab847feb8d09b45c7/packages/web/src/db/adapters/web-sql-flags.ts#L23) flag will spawn a standard web worker per tab for DB operations. These workers are safe to operate on the DB concurrently, however changes from one tab may not update watches on other tabs. Only one tab can sync from the PowerSync instance at a time. The sync status will not be shared between tabs, only the oldest tab will connect and display the latest sync status.
Support is enabled by default if available. This can be disabled as below:
```js
export const db = new PowerSyncDatabase({
schema: AppSchema,
database: {
dbFilename: 'my_app_db.sqlite'
},
flags: {
/**
* Multiple tab support is enabled by default if available.
* This can be disabled by setting this flag to false.
*/
enableMultiTabs: false
}
});
```
## Using transactions to group changes
Read and write transactions present a context where multiple changes can be made then finally committed to the DB or rolled back. This ensures that either all the changes get persisted, or no change is made to the DB (in the case of a rollback or exception).
[PowerSyncDatabase.writeTransaction(callback)](https://powersync-ja.github.io/powersync-js/web-sdk/classes/PowerSyncDatabase#writetransaction) automatically commits changes after the transaction callback is completed if `tx.rollback()` has not explicitly been called. If an exception is thrown in the callback then changes are automatically rolled back.
```js
// ListsWidget.jsx
import React, { useState } from 'react';
export const ListsWidget = () => {
const [lists, setLists] = useState([]);
return (
{lists.map((list) => (
{list.name}
{
try {
await PowerSync.writeTransaction(async (tx) => {
// Delete the main list
await tx.execute(`DELETE FROM lists WHERE id = ?`, [item.id]);
// Delete any children of the list
await tx.execute(`DELETE FROM todos WHERE list_id = ?`, [item.id]);
// Transactions are automatically committed at the end of execution
// Transactions are automatically rolled back if an exception occurred
})
// Watched queries should automatically reload after mutation
} catch (ex) {
Alert.alert('Error', ex.message)
}
}}
>
Delete
))}
{
try {
await PowerSync.execute('INSERT INTO lists (id, created_at, name, owner_id) VALUES (uuid(), datetime(), ?, ?) RETURNING *', [
'A list name',
"[The user's uuid]"
])
// Watched queries should automatically reload after mutation
} catch (ex) {
Alert.alert('Error', ex.message)
}
}}
>
Create List
);
};
```
Also see [PowerSyncDatabase.readTransaction(callback)](https://powersync-ja.github.io/powersync-js/web-sdk/classes/PowerSyncDatabase#readtransaction).
## Subscribe to changes in data
Use [PowerSyncDatabase.watch](https://powersync-ja.github.io/powersync-js/web-sdk/classes/PowerSyncDatabase#watch) to watch for changes in source tables.
The `watch` method can be used with a `AsyncIterable` signature as follows:
```js
async *attachmentIds(): AsyncIterable {
for await (const result of this.powersync.watch(
`SELECT photo_id as id FROM ${TODO_TABLE} WHERE photo_id IS NOT NULL`,
[]
)) {
yield result.rows?._array.map((r) => r.id) ?? [];
}
}
```
As of version **1.3.3** of the SDK, the `watch` method can also be used with a callback:
```js
attachmentIds(onResult: (ids: string[]) => void): void {
this.powersync.watch(
`SELECT photo_id as id FROM ${TODO_TABLE} WHERE photo_id IS NOT NULL`,
[],
{
onResult: (result) => {
onResult(result.rows?._array.map((r) => r.id) ?? []);
}
}
);
}
```
## Insert, update, and delete data in the local database
Use [PowerSyncDatabase.execute](https://powersync-ja.github.io/powersync-js/web-sdk/classes/PowerSyncDatabase#execute) to run INSERT, UPDATE or DELETE queries.
```js
const handleButtonClick = async () => {
await db.execute(
'INSERT INTO customers(id, name, email) VALUES(uuid(), ?, ?)',
['Fred', 'fred@example.org']
);
};
return (
+
add
);
```
## Send changes in local data to your backend service
Override [uploadData](https://github.com/powersync-ja/powersync-js/blob/ed5bb49b5a1dc579050304fab847feb8d09b45c7/packages/common/src/client/connection/PowerSyncBackendConnector.ts#L24) to send local updates to your backend service.
```js
// Implement the uploadData method in your backend connector
async function uploadData(database) {
const batch = await database.getCrudBatch();
if (batch === null) return;
for (const op of batch.crud) {
switch (op.op) {
case 'put':
// Send the data to your backend service
// replace `_myApi` with your own API client or service
await _myApi.put(op.table, op.opData);
break;
default:
// TODO: implement the other operations (patch, delete)
break;
}
}
await batch.complete();
}
```
## Accessing PowerSync connection status information
Use [PowerSyncDatabase.connected](https://powersync-ja.github.io/powersync-js/web-sdk/classes/PowerSyncDatabase#connected) and register an event listener with [PowerSyncDatabase.registerListener](https://powersync-ja.github.io/powersync-js/web-sdk/classes/PowerSyncDatabase#registerlistener) to listen for status changes to your PowerSync instance.
```js
// Example of using connected status to show online or offline
// Tap into connected
const [connected, setConnected] = React.useState(powersync.connected);
React.useEffect(() => {
// Register listener for changes made to the powersync status
return powersync.registerListener({
statusChanged: (status) => {
setConnected(status.connected);
}
});
}, [powersync]);
// Icon to show connected or not connected to powersync
// as well as the last synced time
{
Alert.alert(
'Status',
`${connected ? 'Connected' : 'Disconnected'}. \nLast Synced at ${powersync.currentStatus?.lastSyncedAt.toISOString() ?? '-'
}\nVersion: ${powersync.sdkVersion}`
);
}}
/>;
```
## Wait for the initial sync to complete
Use the [hasSynced](https://powersync-ja.github.io/powersync-js/web-sdk/classes/SyncStatus#hassynced) property (available since version 0.4.1 of the SDK) and register an event listener with [PowerSyncDatabase.registerListener](https://powersync-ja.github.io/powersync-js/web-sdk/classes/PowerSyncDatabase#registerlistener) to indicate to the user whether the initial sync is in progress.
```js
// Example of using hasSynced to show whether the first sync has completed
// Tap into hasSynced
const [hasSynced, setHasSynced] = React.useState(powerSync.currentStatus?.hasSynced || false);
React.useEffect(() => {
// Register listener for changes made to the powersync status
return powerSync.registerListener({
statusChanged: (status) => {
setHasSynced(!!status.hasSynced);
}
});
}, [powerSync]);
return {hasSynced ? 'Initial sync completed!' : 'Busy with initial sync...'}
;
```
For async use cases, see [PowerSyncDatabase.waitForFirstSync()](https://powersync-ja.github.io/powersync-js/web-sdk/classes/AbstractPowerSyncDatabase#waitforfirstsync), which returns a promise that resolves once the first full sync has completed (it queries the internal SQL [ps\_buckets](/architecture/client-architecture) table to determine if data has been synced).
## Report sync download progress
You can show users a progress bar when data downloads using the `downloadProgress` property from the
[SyncStatus](https://powersync-ja.github.io/powersync-js/web-sdk/classes/SyncStatus) class. This is especially useful for long-running initial syncs. `downloadProgress.downloadedFraction` gives you a value from 0.0 to 1.0 representing the total sync progress.
Example (React, using [MUI](https://mui.com) components):
```jsx
import { Box, LinearProgress, Stack, Typography } from '@mui/material';
import { useStatus } from '@powersync/react';
import { FC, ReactNode } from 'react';
export const SyncProgressBar: FC<{ priority?: number }> = ({ priority }) => {
const status = useStatus();
const progressUntilNextSync = status.downloadProgress;
const progress = priority == null ? progressUntilNextSync : progressUntilNextSync?.untilPriority(priority);
if (progress == null) {
return <>>;
}
return (
{progress.downloadedOperations == progress.totalOperations ? (
Applying server-side changes
) : (
Downloaded {progress.downloadedOperations} out of {progress.totalOperations}.
)}
);
};
```
Also see:
* [SyncStatus API](https://powersync-ja.github.io/powersync-js/web-sdk/classes/SyncStatus)
* [Demo component](https://github.com/powersync-ja/powersync-js/blob/main/demos/react-supabase-todolist/src/components/widgets/GuardBySync.tsx)
## Using PowerSyncDatabase Flags
This guide provides an overview of the customizable flags available for the `PowerSyncDatabase` in the JavaScript Web SDK. These flags allow you to enable or disable specific features to suit your application's requirements.
### Configuring Flags
You can configure flags during the initialization of the `PowerSyncDatabase`. Flags can be set using the `flags` property, which allows you to enable or disable specific functionalities.
```javascript
import { PowerSyncDatabase, resolveWebPowerSyncFlags, WebPowerSyncFlags } from '@powersync/web';
import { AppSchema } from '@/library/powersync/AppSchema';
// Define custom flags
const customFlags: WebPowerSyncFlags = resolveWebPowerSyncFlags({
enableMultiTabs: true,
broadcastLogs: true,
disableSSRWarning: false,
ssrMode: false,
useWebWorker: true,
});
// Create the PowerSync database instance
export const db = new PowerSyncDatabase({
schema: AppSchema,
database: {
dbFilename: 'example.db',
},
flags: customFlags,
});
```
#### Available Flags
default: `true`
Enables support for multiple tabs using shared web workers. When enabled, multiple tabs can interact with the same database and sync data seamlessly.
default: `false`
Enables the broadcasting of logs for debugging purposes. This flag helps monitor shared worker logs in a multi-tab environment.
default: `false`
Disables warnings when running in SSR (Server-Side Rendering) mode.
default: `false`
Enables SSR mode. In this mode, only empty query results will be returned, and syncing with the backend is disabled.
default: `true`
Enables the use of web workers for database operations. Disabling this flag also disables multi-tab support.
### Flag Behavior
#### Example 1: Multi-Tab Support
By default, multi-tab support is enabled if supported by the browser. To explicitly disable this feature:
```javascript
export const db = new PowerSyncDatabase({
schema: AppSchema,
database: {
dbFilename: 'my_app_db.sqlite',
},
flags: {
enableMultiTabs: false,
},
});
```
When disabled, each tab will use independent workers, and changes in one tab will not automatically propagate to others.
#### Example 2: SSR Mode
To enable SSR mode and suppress warnings:
```javascript
export const db = new PowerSyncDatabase({
schema: AppSchema,
database: {
dbFilename: 'my_app_db.sqlite',
},
flags: {
ssrMode: true,
disableSSRWarning: true,
},
});
```
#### Example 3: Verbose Debugging with Broadcast Logs
To enable detailed logging for debugging:
```javascript
export const db = new PowerSyncDatabase({
schema: AppSchema,
database: {
dbFilename: 'my_app_db.sqlite',
},
flags: {
broadcastLogs: true,
},
});
```
Logs will include detailed insights into database operations and synchronization.
### Recommendations
1. **Set `enableMultiTabs`** to `true` if your application requires seamless data sharing across multiple tabs.
2. **Set `useWebWorker`** to `true` for efficient database operations using web workers.
3. **Set `broadcastLogs`** to `true` during development to troubleshoot and monitor database and sync operations.
4. **Set `disableSSRWarning`** to `true` when running in SSR mode to avoid unnecessary console warnings.
5. **Test combinations** of flags to validate their behavior in your application's specific use case.
# Kotlin Multiplatform
Source: https://docs.powersync.com/client-sdk-references/kotlin-multiplatform
The PowerSync KMP SDK is distributed via Maven Central [\[External link\].](https://central.sonatype.com/artifact/com.powersync/core)
Refer to the powersync-kotlin repo on GitHub.
Full API reference for the PowerSync SDK [\[External link\].](https://powersync-ja.github.io/powersync-kotlin)
Gallery of example projects/demo apps built with Kotlin Multiplatform and PowerSync.
### SDK Features
* **Real-time streaming of database changes**: Changes made by one user are instantly streamed to all other users with access to that data. This keeps clients automatically in sync without manual polling or refresh logic.
* **Direct access to a local SQLite database**: Data is stored locally, so apps can read and write instantly without network calls. This enables offline support and faster user interactions.
* **Asynchronous background execution**: The SDK performs database operations in the background to avoid blocking the application’s main thread. This means that apps stay responsive, even during heavy data activity.
* **Query subscriptions for live updates**: The SDK supports query subscriptions that automatically push real-time updates to client applications as data changes, keeping your UI reactive and up to date.
* **Automatic schema management**: PowerSync syncs schemaless data and applies a client-defined schema using SQLite views. This architecture means that PowerSync SDKs can handle schema changes gracefully without requiring explicit migrations on the client-side.
Supported targets: Android, iOS and Desktop.
## Installation
Add the [PowerSync SDK](https://central.sonatype.com/artifact/com.powersync/core) to your project by adding the following to your `build.gradle.kts` file:
```gradle
kotlin {
//...
sourceSets {
commonMain.dependencies {
api("com.powersync:core:$powersyncVersion")
// If you want to use the Supabase Connector, also add the following:
implementation("com.powersync:connectors:$powersyncVersion")
}
//...
}
}
```
**CocoaPods configuration (recommended for iOS)**
Add the following to the `cocoapods` config in your `build.gradle.kts`:
```gradle
cocoapods {
//...
pod("powersync-sqlite-core") {
linkOnly = true
}
framework {
isStatic = true
export("com.powersync:core")
}
//...
}
```
The `linkOnly = true` attribute and `isStatic = true` framework setting ensure that the `powersync-sqlite-core` binaries are statically linked.
**JVM compatibility for Desktop**
* The following platforms are supported: Linux AArch64, Linux X64, MacOS AArch64, MacOS X64, Windows X64.
* See this [example build.gradle file](https://github.com/powersync-ja/powersync-kotlin/blob/main/demos/hello-powersync/composeApp/build.gradle.kts) for the relevant JVM config.
## Getting Started
Before implementing the PowerSync SDK in your project, make sure you have completed these steps:
* Signed up for a PowerSync Cloud account ([here](https://accounts.journeyapps.com/portal/powersync-signup?s=docs)) or [self-host PowerSync](/self-hosting/getting-started).
* [Configured your backend database](/installation/database-setup) and connected it to your PowerSync instance.
* [Installed](/client-sdk-references/kotlin-multiplatform#installation) the PowerSync SDK.
### 1. Define the Schema
The first step is defining the schema for the local SQLite database, which is provided to the `PowerSyncDatabase` constructor via the `schema` parameter. This schema represents a "view" of the downloaded data. No migrations are required — the schema is applied directly when the PowerSync database is constructed.
The types available are `text`, `integer` and `real`. These should map directly to the values produced by the [Sync Rules](/usage/sync-rules). If a value doesn't match, it is cast automatically.
**Example**:
```kotlin
// AppSchema.kt
import com.powersync.db.schema.Column
import com.powersync.db.schema.Index
import com.powersync.db.schema.IndexedColumn
import com.powersync.db.schema.Schema
import com.powersync.db.schema.Table
val AppSchema: Schema = Schema(
listOf(
Table(
name = "todos",
columns = listOf(
Column.text('list_id'),
Column.text('created_at'),
Column.text('completed_at'),
Column.text('description'),
Column.integer('completed'),
Column.text('created_by'),
Column.text('completed_by')
),
// Index to allow efficient lookup within a list
indexes = listOf(
Index("list", listOf(IndexedColumn.descending("list_id")))
)
),
Table(
name = "lists",
columns = listOf(
Column.text('created_at'),
Column.text('name'),
Column.text('owner_id')
)
)
)
)
```
**Note**: No need to declare a primary key `id` column, as PowerSync will automatically create this.
### 2. Instantiate the PowerSync Database
Next, you need to instantiate the PowerSync database — this is the core managed database.
Its primary functions are to record all changes in the local database, whether online or offline. In addition, it automatically uploads changes to your app backend when connected.
**Example**:
a. Create platform specific `DatabaseDriverFactory` to be used by the `PowerSyncBuilder` to create the SQLite database driver.
```kotlin
// commonMain
import com.powersync.DatabaseDriverFactory
import com.powersync.PowerSyncDatabase
// Android
val driverFactory = DatabaseDriverFactory(this)
// iOS & Desktop
val driverFactory = DatabaseDriverFactory()
```
b. Build a `PowerSyncDatabase` instance using the `PowerSyncBuilder` and the `DatabaseDriverFactory`. The schema you created in a previous step is provided as a parameter:
```kotlin
// commonMain
val database = PowerSyncDatabase({
factory: driverFactory, // The factory you defined above
schema: AppSchema, // The schema you defined in the previous step
dbFilename: "powersync.db"
// logger: YourLogger // Optionally include your own Logger that must conform to Kermit Logger
// dbDirectory: "path/to/directory" // Optional. Directory path where the database file is located. This parameter is ignored for iOS.
});
```
c. Connect the `PowerSyncDatabase` to the backend connector:
```kotlin
// commonMain
// Uses the backend connector that will be created in the next step
database.connect(MyConnector())
```
**Special case: Compose Multiplatform**
The artifact `com.powersync:powersync-compose` provides a simpler API:
```kotlin
// commonMain
val database = rememberPowerSyncDatabase(schema)
remember {
database.connect(MyConnector())
}
```
### 3. Integrate with your Backend
Create a connector to integrate with your backend. The PowerSync backend connector provides the connection between your application backend and the PowerSync managed database.
It is used to:
1. Retrieve an auth token to connect to the PowerSync instance.
2. Apply local changes on your backend application server (and from there, to your backend database)
Accordingly, the connector must implement two methods:
1. `PowerSyncBackendConnector.fetchCredentials` - This is called every couple of minutes and is used to obtain credentials for your app backend API. -> See [Authentication Setup](/installation/authentication-setup) for instructions on how the credentials should be generated.
2. `PowerSyncBackendConnector.uploadData` - Use this to upload client-side changes to your app backend.
-> See [Writing Client Changes](/installation/app-backend-setup/writing-client-changes) for considerations on the app backend implementation.
**Example**:
```kotlin
// PowerSync.kt
import com.powersync.DatabaseDriverFactory
import com.powersync.PowerSyncDatabase
class MyConnector : PowerSyncBackendConnector() {
override suspend fun fetchCredentials(): PowerSyncCredentials {
// implement fetchCredentials to obtain the necessary credentials to connect to your backend
// See an example implementation in https://github.com/powersync-ja/powersync-kotlin/blob/main/connectors/supabase/src/commonMain/kotlin/com/powersync/connector/supabase/SupabaseConnector.kt
return {
endpoint: '[Your PowerSync instance URL or self-hosted endpoint]',
// Use a development token (see Authentication Setup https://docs.powersync.com/installation/authentication-setup/development-tokens) to get up and running quickly) to get up and running quickly
token: 'An authentication token'
}
}
override suspend fun uploadData(database: PowerSyncDatabase) {
// Implement uploadData to send local changes to your backend service
// You can omit this method if you only want to sync data from the server to the client
// See an example implementation under Usage Examples (sub-page)
// See https://docs.powersync.com/installation/app-backend-setup/writing-client-changes for considerations.
}
}
```
**Note**: If you are using Supabase, you can use [SupabaseConnector.kt](https://github.com/powersync-ja/powersync-kotlin/blob/main/connectors/supabase/src/commonMain/kotlin/com/powersync/connector/supabase/SupabaseConnector.kt) as a starting point.
## Using PowerSync: CRUD functions
Once the PowerSync instance is configured you can start using the SQLite DB functions.
The most commonly used CRUD functions to interact with your SQLite data are:
* [PowerSyncDatabase.get](/client-sdk-references/kotlin-multiplatform#fetching-a-single-item) - get (SELECT) a single row from a table.
* [PowerSyncDatabase.getAll](/client-sdk-references/kotlin-multiplatform#querying-items-powersync-getall) - get (SELECT) a set of rows from a table.
* [PowerSyncDatabase.watch](/client-sdk-references/kotlin-multiplatform#watching-queries-powersync-watch) - execute a read query every time source tables are modified.
* [PowerSyncDatabase.execute](/client-sdk-references/kotlin-multiplatform#mutations-powersync-execute) - execute a write (INSERT/UPDATE/DELETE) query.
### Fetching a Single Item
The `get` method executes a read-only (SELECT) query and returns a single result. It throws an exception if no result is found. Use `getOptional` to return a single optional result (returns `null` if no result is found).
```kotlin
// Find a list item by ID
suspend fun find(id: Any): TodoList {
return database.get(
"SELECT * FROM lists WHERE id = ?",
listOf(id)
) { cursor ->
TodoList.fromCursor(cursor)
}
}
```
### Querying Items (PowerSync.getAll)
The `getAll` method executes a read-only (SELECT) query and returns a set of rows.
```kotlin
// Get all list IDs
suspend fun getLists(): List {
return database.getAll(
"SELECT id FROM lists WHERE id IS NOT NULL"
) { cursor ->
cursor.getString("id")
}
}
```
### Watching Queries (PowerSync.watch)
The `watch` method executes a read query whenever a change to a dependent table is made.
```kotlin
// You can watch any SQL query
fun watchCustomers(): Flow> {
// TODO: implement your UI based on the result set
return database.watch(
"SELECT * FROM customers"
) { cursor ->
User(
id = cursor.getString("id"),
name = cursor.getString("name"),
email = cursor.getString("email")
)
}
}
```
### Mutations (PowerSync.execute)
The `execute` method executes a write query (INSERT, UPDATE, DELETE) and returns the results (if any).
```kotlin
suspend fun insertCustomer(name: String, email: String) {
database.writeTransaction { tx ->
tx.execute(
sql = "INSERT INTO customers (id, name, email) VALUES (uuid(), ?, ?)",
parameters = listOf(name, email)
)
}
}
suspend fun updateCustomer(id: String, name: String, email: String) {
database.execute(
sql = "UPDATE customers SET name = ? WHERE email = ?",
parameters = listOf(name, email)
)
}
suspend fun deleteCustomer(id: String? = null) {
// If no id is provided, delete the first customer in the database
val targetId =
id ?: database.getOptional(
sql = "SELECT id FROM customers LIMIT 1",
mapper = { cursor ->
cursor.getString(0)!!
}
) ?: return
database.writeTransaction { tx ->
tx.execute(
sql = "DELETE FROM customers WHERE id = ?",
parameters = listOf(targetId)
)
}
}
```
## Configure Logging
You can include your own Logger that must conform to the [Kermit Logger](https://kermit.touchlab.co/docs/) as shown here.
```kotlin
PowerSyncDatabase(
...
logger: Logger? = YourLogger
)
```
If you don't supply a Logger then a default Kermit Logger is created with settings to only show `Warnings` in release and `Verbose` in debug as follows:
```kotlin
val defaultLogger: Logger = Logger
// Severity is set to Verbose in Debug and Warn in Release
if(BuildConfig.isDebug) {
Logger.setMinSeverity(Severity.Verbose)
} else {
Logger.setMinSeverity(Severity.Warn)
}
return defaultLogger
```
You are able to use the Logger anywhere in your code as follows to debug:
```kotlin
import co.touchlab.kermit.Logger
Logger.i("Some information");
Logger.e("Some error");
...
```
## Additional Usage Examples
See [Usage Examples](/client-sdk-references/kotlin-multiplatform/usage-examples) for further examples of the SDK.
## ORM Support
ORM support is not yet available, we are still investigating options. Please [let us know](/resources/contact-us) what your needs around ORMs are.
## Troubleshooting
See [Troubleshooting](/resources/troubleshooting) for pointers to debug common issues.
# Usage Examples
Source: https://docs.powersync.com/client-sdk-references/kotlin-multiplatform/usage-examples
Code snippets and guidelines for common scenarios
## Using transactions to group changes
Use `writeTransaction` to group statements that can write to the database.
```kotlin
database.writeTransaction {
database.execute(
sql = "DELETE FROM list WHERE id = ?",
parameters = listOf(listId)
)
database.execute(
sql = "DELETE FROM todos WHERE list_id = ?",
parameters = listOf(listId)
)
}
```
## Subscribe to changes in data
Use the `watch` method to watch for changes to the dependent tables of any SQL query.
```kotlin
// You can watch any SQL query
fun watchCustomers(): Flow> {
// TODO: implement your UI based on the result set
return database.watch("SELECT * FROM customers", mapper = { cursor ->
User(
id = cursor.getString("id"),
name = cursor.getString("name"),
email = cursor.getString("email")
)
})
}
```
## Insert, update, and delete data in the local database
Use `execute` to run INSERT, UPDATE or DELETE queries.
```kotlin
suspend fun updateCustomer(id: String, name: String, email: String) {
database.execute(
"UPDATE customers SET name = ? WHERE email = ?",
listOf(name, email)
)
}
```
## Send changes in local data to your backend service
Override `uploadData` to send local updates to your backend service. If you are using Supabase, see [SupabaseConnector.kt](https://github.com/powersync-ja/powersync-kotlin/blob/main/connectors/supabase/src/commonMain/kotlin/com/powersync/connector/supabase/SupabaseConnector.kt) for a complete implementation.
```kotlin
/**
* This function is called whenever there is data to upload, whether the device is online or offline.
* If this call throws an error, it is retried periodically.
*/
override suspend fun uploadData(database: PowerSyncDatabase) {
val transaction = database.getNextCrudTransaction() ?: return;
var lastEntry: CrudEntry? = null;
try {
for (entry in transaction.crud) {
lastEntry = entry;
val table = supabaseClient.from(entry.table)
when (entry.op) {
UpdateType.PUT -> {
val data = entry.opData?.toMutableMap() ?: mutableMapOf()
data["id"] = entry.id
table.upsert(data)
}
UpdateType.PATCH -> {
table.update(entry.opData!!) {
filter {
eq("id", entry.id)
}
}
}
UpdateType.DELETE -> {
table.delete {
filter {
eq("id", entry.id)
}
}
}
}
}
transaction.complete(null);
} catch (e: Exception) {
println("Data upload error - retrying last entry: ${lastEntry!!}, $e")
throw e
}
}
```
## Accessing PowerSync connection status information
```kotlin
// Intialize the DB
val db = remember { PowerSyncDatabase(factory, schema) }
// Get the status as a flow
val status = db.currentStatus.asFlow().collectAsState(initial = null)
// Use the emitted values from the flow e.g. to check if connected
val isConnected = status.value?.connected
```
## Wait for the initial sync to complete
Use the `hasSynced` property and register a listener to indicate to the user whether the initial sync is in progress.
```kotlin
val db = remember { PowerSyncDatabase(factory, schema) }
val status = db.currentStatus.asFlow().collectAsState(initial = null)
val hasSynced by remember { derivedStateOf { status.value?.hasSynced } }
when {
hasSynced == null || hasSynced == false -> {
Box(
modifier = Modifier.fillMaxSize().background(MaterialTheme.colors.background),
contentAlignment = Alignment.Center
) {
Text(
text = "Busy with initial sync...",
style = MaterialTheme.typography.h6
)
}
}
else -> {
... show rest of UI
```
For async use cases, use `waitForFirstSync` method which is a suspense function that resolves once the first full sync has completed.
## Report sync download progress
You can show users a progress bar when data downloads using the `syncStatus.downloadProgress` property. This is especially useful for long-running initial syncs. `downloadProgress.downloadedFraction` gives a value from 0.0 to 1.0 representing the total sync progress.
Example (Compose):
```kotlin
import androidx.compose.foundation.background
import androidx.compose.foundation.layout.Arrangement
import androidx.compose.foundation.layout.Column
import androidx.compose.foundation.layout.fillMaxSize
import androidx.compose.foundation.layout.fillMaxWidth
import androidx.compose.foundation.layout.padding
import androidx.compose.material.LinearProgressIndicator
import androidx.compose.material.MaterialTheme
import androidx.compose.material.Text
import androidx.compose.runtime.Composable
import androidx.compose.runtime.getValue
import androidx.compose.ui.Alignment
import androidx.compose.ui.Modifier
import androidx.compose.ui.unit.dp
import com.powersync.PowerSyncDatabase
import com.powersync.bucket.BucketPriority
import com.powersync.compose.composeState
/**
* Shows a progress bar while a sync is active.
*
* The [priority] parameter can be set to, instead of showing progress until the end of the entire
* sync, only show progress until data in the [BucketPriority] is synced.
*/
@Composable
fun SyncProgressBar(
db: PowerSyncDatabase,
priority: BucketPriority? = null,
) {
val state by db.currentStatus.composeState()
val progress = state.downloadProgress?.let {
if (priority == null) {
it
} else {
it.untilPriority(priority)
}
}
if (progress == null) {
return
}
Column(
modifier = Modifier.fillMaxSize().background(MaterialTheme.colors.background),
horizontalAlignment = Alignment.CenterHorizontally,
verticalArrangement = Arrangement.Center,
) {
LinearProgressIndicator(
modifier = Modifier.fillMaxWidth().padding(8.dp),
progress = progress.fraction,
)
if (progress.downloadedOperations == progress.totalOperations) {
Text("Applying server-side changes...")
} else {
Text("Downloaded ${progress.downloadedOperations} out of ${progress.totalOperations}.")
}
}
}
```
Also see:
* [SyncDownloadProgress API](https://powersync-ja.github.io/powersync-kotlin/core/com.powersync.sync/-sync-download-progress/index.html)
* [Demo component](https://github.com/powersync-ja/powersync-kotlin/blob/main/demos/supabase-todolist/shared/src/commonMain/kotlin/com/powersync/demos/components/GuardBySync.kt)
# Node.js client (alpha)
Source: https://docs.powersync.com/client-sdk-references/node
SDK reference for using PowerSync in Node.js clients.
This page describes the PowerSync *client* SDK for Node.js.
If you're interested in using PowerSync for your Node.js backend, no special package is required.
Instead, follow our guides on [app backend setup](/installation/app-backend-setup).
This SDK is distributed via NPM [\[External link\].](https://www.npmjs.com/package/@powersync/node)
Refer to packages/node in the powersync-js repo on GitHub.
Full API reference for the PowerSync SDK [\[External link\].](https://powersync-ja.github.io/powersync-js/node-sdk)
Gallery of example projects/demo apps built with Node.js and PowerSync.
This SDK is currently in an [**alpha** release](/resources/feature-status). It is not suitable for production use as breaking changes may still occur.
### SDK Features
* **Real-time streaming of database changes**: Changes made by one user are instantly streamed to all other users with access to that data. This keeps clients automatically in sync without manual polling or refresh logic.
* **Direct access to a local SQLite database**: Data is stored locally, so apps can read and write instantly without network calls. This enables offline support and faster user interactions.
* **Asynchronous background execution**: The SDK performs database operations in the background to avoid blocking the application’s main thread. This means that apps stay responsive, even during heavy data activity.
* **Query subscriptions for live updates**: The SDK supports query subscriptions that automatically push real-time updates to client applications as data changes, keeping your UI reactive and up to date.
* **Automatic schema management**: PowerSync syncs schemaless data and applies a client-defined schema using SQLite views. This architecture means that PowerSync SDKs can handle schema changes gracefully without requiring explicit migrations on the client-side.
## Quickstart
Add the [PowerSync Node NPM package](https://www.npmjs.com/package/@powersync/node) to your project:
```bash
npm install @powersync/node
```
```bash
yarn add @powersync/node
```
```bash
pnpm install @powersync/node
```
**Required peer dependencies**
This SDK requires [`@powersync/better-sqlite3`](https://www.npmjs.com/package/@powersync/better-sqlite3) as a peer dependency:
```bash
npm install @powersync/better-sqlite3
```
```bash
yarn add @powersync/better-sqlite3
```
```bash
pnpm install @powersync/better-sqlite3
```
**Common installation issues**
The `@powersync/better-sqlite` package requires native compilation, which depends on certain system tools. This compilation process is handled by `node-gyp` and may fail if required dependencies are missing or misconfigured.
Refer to the [PowerSync Node package README](https://www.npmjs.com/package/@powersync/node) for more details.
Next, make sure that you have:
* Signed up for a PowerSync Cloud account ([here](https://accounts.journeyapps.com/portal/powersync-signup?s=docs)) or [self-host PowerSync](/self-hosting/getting-started).
* [Configured your backend database](/installation/database-setup) and connected it to your PowerSync instance.
### 1. Define the schema
The first step is defining the schema for the local SQLite database.
This schema represents a "view" of the downloaded data. No migrations are required — the schema is applied directly when the local PowerSync database is constructed (as we'll show in the next step).
You can use [this example](https://github.com/powersync-ja/powersync-js/blob/e5a57a539150f4bc174e109d3898b6e533de272f/demos/example-node/src/powersync.ts#L47-L77) as a reference when defining your schema.
**Generate schema automatically**
In the [dashboard](/usage/tools/powersync-dashboard), the schema can be generated based off your sync rules by right-clicking on an instance and selecting **Generate client-side schema**.
Select JavaScript and replace the suggested import with `@powersync/node`.
Similar functionality exists in the [CLI](/usage/tools/cli).
### 2. Instantiate the PowerSync Database
Next, you need to instantiate the PowerSync database — this is the core managed database.
Its primary functions are to record all changes in the local database, whether online or offline. In addition, it automatically uploads changes to your app backend when connected.
**Example**:
```js
import { PowerSyncDatabase } from '@powersync/node';
import { Connector } from './Connector';
import { AppSchema } from './Schema';
export const db = new PowerSyncDatabase({
// The schema you defined in the previous step
schema: AppSchema,
database: {
// Filename for the SQLite database — it's important to only instantiate one instance per file.
dbFilename: 'powersync.db',
// Optional. Directory where the database file is located.'
// dbLocation: 'path/to/directory'
},
});
```
### 3. Integrate with your Backend
The PowerSync backend connector provides the connection between your application backend and the PowerSync client-slide managed SQLite database.
It is used to:
1. Retrieve an auth token to connect to the PowerSync instance.
2. Apply local changes on your backend application server (and from there, to your backend database)
Accordingly, the connector must implement two methods:
1. [PowerSyncBackendConnector.fetchCredentials](https://github.com/powersync-ja/powersync-js/blob/ed5bb49b5a1dc579050304fab847feb8d09b45c7/packages/common/src/client/connection/PowerSyncBackendConnector.ts#L16) - This is called every couple of minutes and is used to obtain credentials for your app backend API. -> See [Authentication Setup](/installation/authentication-setup) for instructions on how the credentials should be generated.
2. [PowerSyncBackendConnector.uploadData](https://github.com/powersync-ja/powersync-js/blob/ed5bb49b5a1dc579050304fab847feb8d09b45c7/packages/common/src/client/connection/PowerSyncBackendConnector.ts#L24) - Use this to upload client-side changes to your app backend.
-> See [Writing Client Changes](/installation/app-backend-setup/writing-client-changes) for considerations on the app backend implementation.
**Example**:
```js
import { UpdateType } from '@powersync/node';
export class Connector implements PowerSyncBackendConnector {
constructor() {
// Setup a connection to your server for uploads
this.serverConnectionClient = TODO;
}
async fetchCredentials() {
// Implement fetchCredentials to obtain a JWT from your authentication service.
// See https://docs.powersync.com/installation/authentication-setup
// If you're using Supabase or Firebase, you can re-use the JWT from those clients, see
// - https://docs.powersync.com/installation/authentication-setup/supabase-auth
// - https://docs.powersync.com/installation/authentication-setup/firebase-auth
return {
endpoint: '[Your PowerSync instance URL or self-hosted endpoint]',
// Use a development token (see Authentication Setup https://docs.powersync.com/installation/authentication-setup/development-tokens) to get up and running quickly
token: 'An authentication token'
};
}
async uploadData(database) {
// Implement uploadData to send local changes to your backend service.
// You can omit this method if you only want to sync data from the database to the client
// See example implementation here: https://docs.powersync.com/client-sdk-references/javascript-web#3-integrate-with-your-backend
}
}
```
With your database instantiated and your connector ready, call `connect` to start the synchronization process:
```js
await db.connect(new Connector());
await db.waitForFirstSync(); // Optional, to wait for a complete snapshot of data to be available
```
## Usage
After connecting the client database, it is ready to be used. The API to run queries and updates is identical to our
[web SDK](/client-sdk-references/javascript-web#using-powersync%3A-crud-functions):
```js
// Use db.get() to fetch a single row:
console.log(await db.get('SELECT powersync_rs_version();'));
// Or db.getAll() to fetch all:
console.log(await db.getAll('SELECT * FROM lists;'));
// Use db.watch() to watch queries for changes:
const watchLists = async () => {
for await (const rows of db.watch('SELECT * FROM lists;')) {
console.log('Has todo lists', rows.rows!._array);
}
};
watchLists();
// And db.execute for inserts, updates and deletes:
await db.execute(
"INSERT INTO lists (id, created_at, name, owner_id) VALUEs (uuid(), datetime('now'), ?, uuid());",
['My new list']
);
```
PowerSync runs queries asynchronously on a background pool of workers and automatically configures WAL to
allow a writer and multiple readers to operate in parallel.
## Configure Logging
```js
import { createBaseLogger, LogLevel } from '@powersync/node';
const logger = createBaseLogger();
// Configure the logger to use the default console output
logger.useDefaults();
// Set the minimum log level to DEBUG to see all log messages
// Available levels: DEBUG, INFO, WARN, ERROR, TRACE, OFF
logger.setLevel(LogLevel.DEBUG);
```
Enable verbose output in the developer tools for detailed logs.
# JavaScript ORM Support
Source: https://docs.powersync.com/client-sdk-references/node/javascript-orm-support
# React Native & Expo
Source: https://docs.powersync.com/client-sdk-references/react-native-and-expo
Full SDK reference for using PowerSync in React Native clients
This SDK is distributed via NPM [\[External link\].](https://www.npmjs.com/package/@powersync/react-native)
Refer to packages/react-native in the powersync-js repo on GitHub.
Full API reference for the PowerSync SDK [\[External link\].](https://powersync-ja.github.io/powersync-js/react-native-sdk)
Gallery of example projects/demo apps built with React Native and PowerSync.
### SDK Features
* **Real-time streaming of database changes**: Changes made by one user are instantly streamed to all other users with access to that data. This keeps clients automatically in sync without manual polling or refresh logic.
* **Direct access to a local SQLite database**: Data is stored locally, so apps can read and write instantly without network calls. This enables offline support and faster user interactions.
* **Asynchronous background execution**: The SDK performs database operations in the background to avoid blocking the application’s main thread. This means that apps stay responsive, even during heavy data activity.
* **Query subscriptions for live updates**: The SDK supports query subscriptions that automatically push real-time updates to client applications as data changes, keeping your UI reactive and up to date.
* **Automatic schema management**: PowerSync syncs schemaless data and applies a client-defined schema using SQLite views. This architecture means that PowerSync SDKs can handle schema changes gracefully without requiring explicit migrations on the client-side.
## Installation
**PowerSync is not compatible with Expo Go.**
PowerSync uses a native plugin and is therefore only compatible with Expo Dev Builds.
Add the [PowerSync React Native NPM package](https://www.npmjs.com/package/@powersync/react-native) to your project:
```bash
npx expo install @powersync/react-native
```
```bash
yarn expo add @powersync/react-native
```
```
pnpm expo install @powersync/react-native
```
**Required peer dependencies**
This SDK requires [@journeyapps/react-native-quick-sqlite](https://www.npmjs.com/package/@journeyapps/react-native-quick-sqlite) as a peer dependency. Install it as follows:
```bash
npx expo install @journeyapps/react-native-quick-sqlite
```
```bash
yarn expo add @journeyapps/react-native-quick-sqlite
```
```
pnpm expo install @journeyapps/react-native-quick-sqlite
```
Alternatively, you can install OP-SQLite with the [PowerSync OP-SQLite package](https://github.com/powersync-ja/powersync-js/tree/main/packages/powersync-op-sqlite) which offers [built-in encryption support via SQLCipher](/usage/use-case-examples/data-encryption) and a smoother transition to React Native's New Architecture.
**Polyfills and additional notes:**
* For async iterator support with watched queries, additional polyfills are required. See the [Babel plugins section](https://www.npmjs.com/package/@powersync/react-native#babel-plugins-watched-queries) in the README.
* By default, this SDK connects to a PowerSync instance via WebSocket (from `@powersync/react-native@1.11.0`) or HTTP streaming (before `@powersync/react-native@1.11.0`). See [Developer Notes](/client-sdk-references/react-native-and-expo#developer-notes) for more details on connection methods and platform-specific requirements.
* When using the OP-SQLite package, we recommend adding this [metro config](https://github.com/powersync-ja/powersync-js/tree/main/packages/react-native#metro-config-optional)
to avoid build issues.
## Getting Started
Before implementing the PowerSync SDK in your project, make sure you have completed these steps:
* Signed up for a PowerSync Cloud account ([here](https://accounts.journeyapps.com/portal/powersync-signup?s=docs)) or [self-host PowerSync](/self-hosting/getting-started).
* [Configured your backend database](/installation/database-setup) and connected it to your PowerSync instance.
* [Installed](/client-sdk-references/react-native-and-expo#installation) the PowerSync React Native SDK.
### 1. Define the Schema
The first step is defining the schema for the local SQLite database.
This schema represents a "view" of the downloaded data. No migrations are required — the schema is applied directly when the PowerSync database is constructed (as we'll show in the next step).
**Generate schema automatically**
In the [dashboard](/usage/tools/powersync-dashboard), the schema can be generated based off your sync rules by right-clicking on an instance and selecting **Generate client-side schema**.
Similar functionality exists in the [CLI](/usage/tools/cli).
The types available are `text`, `integer` and `real`. These should map directly to the values produced by the [Sync Rules](/usage/sync-rules). If a value doesn't match, it is cast automatically. For details on how Postgres types are mapped to the types below, see the section on [Types](/usage/sync-rules/types) in the *Sync Rules* documentation.
**Example**:
**Note**: No need to declare a primary key `id` column - as PowerSync will automatically create this.
```typescript powersync/AppSchema.ts
import { column, Schema, Table } from '@powersync/react-native';
const lists = new Table({
created_at: column.text,
name: column.text,
owner_id: column.text
});
const todos = new Table(
{
list_id: column.text,
created_at: column.text,
completed_at: column.text,
description: column.text,
created_by: column.text,
completed_by: column.text,
completed: column.integer
},
{ indexes: { list: ['list_id'] } }
);
export const AppSchema = new Schema({
todos,
lists
});
// For types
export type Database = (typeof AppSchema)['types'];
export type TodoRecord = Database['todos'];
// OR:
// export type Todo = RowType;
export type ListRecord = Database['lists'];
```
### 2. Instantiate the PowerSync Database
Next, you need to instantiate the PowerSync database — this is the core managed database.
Its primary functions are to record all changes in the local database, whether online or offline. In addition, it automatically uploads changes to your app backend when connected.
**Example**:
For getting started and testing PowerSync use the [@journeyapps/react-native-quick-sqlite](https://github.com/powersync-ja/react-native-quick-sqlite) package.
By default, this SDK requires @journeyapps/react-native-quick-sqlite as a peer dependency.
```typescript powersync/system.ts
import { PowerSyncDatabase } from '@powersync/react-native';
import { AppSchema } from './Schema';
export const powersync = new PowerSyncDatabase({
// The schema you defined in the previous step
schema: AppSchema,
// For other options see,
// https://powersync-ja.github.io/powersync-js/web-sdk/globals#powersyncopenfactoryoptions
database: {
// Filename for the SQLite database — it's important to only instantiate one instance per file.
// For other database options see,
// https://powersync-ja.github.io/powersync-js/web-sdk/globals#sqlopenoptions
dbFilename: 'powersync.db'
}
});
```
If you want to include encryption with SQLCipher use the [@powersync/op-sqlite](https://www.npmjs.com/package/@powersync/op-sqlite) package.
If you've already installed `@journeyapps/react-native-quick-sqlite`, You will have to uninstall it and then install both `@powersync/op-sqlite` and it's peer dependency `@op-engineering/op-sqlite` to use this.
```typescript powersync/system.ts
import { PowerSyncDatabase } from '@powersync/react-native';
import { OPSqliteOpenFactory } from '@powersync/op-sqlite'; // Add this import
import { AppSchema } from './Schema';
// Create the factory
const opSqlite = new OPSqliteOpenFactory({
dbFilename: 'powersync.db'
});
export const powersync = new PowerSyncDatabase({
// For other options see,
schema: AppSchema,
// Override the default database
database: opSqlite
});
```
**SDK versions lower than 1.8.0**
In SDK versions lower than 1.8.0, you will need to use the deprecated [RNQSPowerSyncDatabaseOpenFactory](https://powersync-ja.github.io/powersync-js/react-native-sdk/classes/RNQSPowerSyncDatabaseOpenFactory) syntax to instantiate the database.
Once you've instantiated your PowerSync database, you will need to call the [connect()](https://powersync-ja.github.io/powersync-js/react-native-sdk/classes/AbstractPowerSyncDatabase#connect) method to activate it.
```typescript powersync/system.ts
import { Connector } from './Connector';
export const setupPowerSync = async () => {
// Uses the backend connector that will be created in the next section
const connector = new Connector();
powersync.connect(connector);
};
```
### 3. Integrate with your Backend
The PowerSync backend connector provides the connection between your application backend and the PowerSync client-slide managed SQLite database.
It is used to:
1. Retrieve an auth token to connect to the PowerSync instance.
2. Apply local changes on your backend application server (and from there, to Postgres)
Accordingly, the connector must implement two methods:
1. [PowerSyncBackendConnector.fetchCredentials](https://github.com/powersync-ja/powersync-js/blob/ed5bb49b5a1dc579050304fab847feb8d09b45c7/packages/common/src/client/connection/PowerSyncBackendConnector.ts#L16) - This is called every couple of minutes and is used to obtain credentials for your app backend API. -> See [Authentication Setup](/installation/authentication-setup) for instructions on how the credentials should be generated.
2. [PowerSyncBackendConnector.uploadData](https://github.com/powersync-ja/powersync-js/blob/ed5bb49b5a1dc579050304fab847feb8d09b45c7/packages/common/src/client/connection/PowerSyncBackendConnector.ts#L24) - Use this to upload client-side changes to your app backend.
-> See [Writing Client Changes](/installation/app-backend-setup/writing-client-changes) for considerations on the app backend implementation.
**Example**:
```typescript powersync/Connector.ts
import { PowerSyncBackendConnector, AbstractPowerSyncDatabase, UpdateType } from "@powersync/react-native"
export class Connector implements PowerSyncBackendConnector {
/**
* Implement fetchCredentials to obtain a JWT from your authentication service.
* See https://docs.powersync.com/installation/authentication-setup
* If you're using Supabase or Firebase, you can re-use the JWT from those clients, see:
* https://docs.powersync.com/installation/authentication-setup/supabase-auth
* https://docs.powersync.com/installation/authentication-setup/firebase-auth
*/
async fetchCredentials() {
return {
// The PowerSync instance URL or self-hosted endpoint
endpoint: 'https://xxxxxx.powersync.journeyapps.com',
/**
* To get started quickly, use a development token, see:
* Authentication Setup https://docs.powersync.com/installation/authentication-setup/development-tokens) to get up and running quickly
*/
token: 'An authentication token'
};
}
/**
* Implement uploadData to send local changes to your backend service.
* You can omit this method if you only want to sync data from the database to the client
* See example implementation here:https://docs.powersync.com/client-sdk-references/react-native-and-expo#3-integrate-with-your-backend
*/
async uploadData(database: AbstractPowerSyncDatabase) {
/**
* For batched crud transactions, use data.getCrudBatch(n);
* https://powersync-ja.github.io/powersync-js/react-native-sdk/classes/SqliteBucketStorage#getcrudbatch
*/
const transaction = await database.getNextCrudTransaction();
if (!transaction) {
return;
}
for (const op of transaction.crud) {
// The data that needs to be changed in the remote db
const record = { ...op.opData, id: op.id };
switch (op.op) {
case UpdateType.PUT:
// TODO: Instruct your backend API to CREATE a record
break;
case UpdateType.PATCH:
// TODO: Instruct your backend API to PATCH a record
break;
case UpdateType.DELETE:
//TODO: Instruct your backend API to DELETE a record
break;
}
}
// Completes the transaction and moves onto the next one
await transaction.complete();
}
}
```
## Using PowerSync: CRUD functions
Once the PowerSync instance is configured you can start using the SQLite DB functions.
The most commonly used CRUD functions to interact with your SQLite data are:
* [PowerSyncDatabase.get](/client-sdk-references/react-native-and-expo#fetching-a-single-item) - get (SELECT) a single row from a table.
* [PowerSyncDatabase.getAll](/client-sdk-references/react-native-and-expo#querying-items-powersync-getall) - get (SELECT) a set of rows from a table.
* [PowerSyncDatabase.watch](/client-sdk-references/react-native-and-expo#watching-queries-powersync-watch) - execute a read query every time source tables are modified.
* [PowerSyncDatabase.execute](/client-sdk-references/react-native-and-expo#mutations-powersync-execute) - execute a write (INSERT/UPDATE/DELETE) query.
### Fetching a Single Item
The [get](https://powersync-ja.github.io/powersync-js/react-native-sdk/classes/PowerSyncDatabase#get) method executes a read-only (SELECT) query and returns a single result. It throws an exception if no result is found. Use [getOptional](https://powersync-ja.github.io/powersync-js/react-native-sdk/classes/PowerSyncDatabase#getoptional) to return a single optional result (returns `null` if no result is found).
```js TodoItemWidget.jsx
import { Text } from 'react-native';
import { powersync } from "../powersync/system";
export const TodoItemWidget = ({id}) => {
const [todoItem, setTodoItem] = React.useState([]);
const [error, setError] = React.useState([]);
React.useEffect(() => {
// .get returns the first item of the result. Throws an exception if no result is found.
powersync.get('SELECT * from todos WHERE id = ?', [id])
.then(setTodoItem)
.catch(ex => setError(ex.message))
}, []);
return {error || todoItem.description}
}
```
### Querying Items (PowerSync.getAll)
The [getAll](https://powersync-ja.github.io/powersync-js/react-native-sdk/classes/PowerSyncDatabase#getall) method returns a set of rows from a table.
```js ListsWidget.jsx
import { FlatList, Text} from 'react-native';
import { powersync } from "../powersync/system";
export const ListsWidget = () => {
const [lists, setLists] = React.useState([]);
React.useEffect(() => {
powersync.getAll('SELECT * from lists').then(setLists)
}, []);
return ( ({key: list.id, ...list}))}
renderItem={({item}) => {item.name} }
/>)
}
```
### Watching Queries (PowerSync.watch)
The [watch](https://powersync-ja.github.io/powersync-js/react-native-sdk/classes/PowerSyncDatabase#watch) method executes a read query whenever a change to a dependent table is made. It can be used with an `AsyncGenerator`, or with a callback.
```js ListsWidget.jsx
import { FlatList, Text } from 'react-native';
import { powersync } from "../powersync/system";
export const ListsWidget = () => {
const [lists, setLists] = React.useState([]);
React.useEffect(() => {
const abortController = new AbortController();
// Option 1: Use with AsyncGenerator
(async () => {
for await(const update of powersync.watch('SELECT * from lists', [], {signal: abortController.signal})) {
setLists(update)
}
})();
// Option 2: Use a callback (available since version 1.3.3 of the SDK)
powersync.watch('SELECT * from lists', [], { onResult: (result) => setLists(result) }, { signal: abortController.signal });
return () => {
abortController.abort();
}
}, []);
return ( ({ key: list.id, ...list }))}
renderItem={({ item }) => {item.name} }
/>)
}
```
### Mutations (PowerSync.execute)
The [execute](https://powersync-ja.github.io/powersync-js/react-native-sdk/classes/PowerSyncDatabase#execute) method can be used for executing single SQLite write statements.
```js ListsWidget.jsx
import { Alert, Button, FlatList, Text, View } from 'react-native';
import { powersync } from "../powersync/system";
export const ListsWidget = () => {
// Populate lists with one of methods listed above
const [lists, setLists] = React.useState([]);
return (
({key: list.id, ...list}))}
renderItem={({item}) => (
{item.name}
{
try {
await powersync.execute(`DELETE FROM lists WHERE id = ?`, [item.id])
// Watched queries should automatically reload after mutation
} catch (ex) {
Alert('Error', ex.message)
}
}}
/>
)}
/>
{
try {
await powersync.execute('INSERT INTO lists (id, created_at, name, owner_id) VALUES (uuid(), datetime(), ?, ?) RETURNING *', [
'A list name',
"[The user's uuid]"
])
// Watched queries should automatically reload after mutation
} catch (ex) {
Alert.alert('Error', ex.message)
}
}}
/>
)
}
```
## Configure Logging
```js
import { createBaseLogger, LogLevel } from '@powersync/react-native';
const logger = createBaseLogger();
// Configure the logger to use the default console output
logger.useDefaults();
// Set the minimum log level to DEBUG to see all log messages
// Available levels: DEBUG, INFO, WARN, ERROR, TRACE, OFF
logger.setLevel(LogLevel.DEBUG);
```
Enable verbose output in the developer tools for detailed logs.
## Additional Usage Examples
See [Usage Examples](/client-sdk-references/react-native-and-expo/usage-examples) for further examples of the SDK.
## Developer Notes
### Connection Methods
This SDK supports two methods for streaming sync commands:
1. **WebSocket (Default)**
* The implementation leverages RSocket for handling reactive socket streams.
* Back-pressure is effectively managed through client-controlled command requests.
* Sync commands are transmitted efficiently as BSON (binary) documents.
* This method is **recommended** since it will support the future [BLOB column support](https://roadmap.powersync.com/c/88-support-for-blob-column-types) feature.
2. **HTTP Streaming (Legacy)**
* This is the original implementation method.
* This method will not support the future BLOB column feature.
By default, the `PowerSyncDatabase.connect()` method uses WebSocket. You can optionally specify the `connectionMethod` to override this:
```js
// WebSocket (default)
powerSync.connect(connector);
// HTTP Streaming
powerSync.connect(connector, { connectionMethod: SyncStreamConnectionMethod.HTTP });
```
### Android: Flipper network plugin for HTTP streams
**Not needed when using websockets, which is the default since `@powersync/react-native@1.11.0`.**
If you are connecting to PowerSync using HTTP streams, you require additional configuration on Android. React Native does not support streams out of the box, so we use the [polyfills mentioned](/client-sdk-references/react-native-and-expo#installation). There is currently an open [issue](https://github.com/facebook/flipper/issues/2495) where the Flipper network plugin does not allow Stream events to fire. This plugin needs to be [disabled](https://stackoverflow.com/questions/69235694/react-native-cant-connect-to-sse-in-android/69235695#69235695) in order for HTTP streams to work.
**If you are using Java (Expo \< 50):**
Uncomment the following from `android/app/src/debug/java/com//ReactNativeFlipper.java`
```js
// NetworkFlipperPlugin networkFlipperPlugin = new NetworkFlipperPlugin();
// NetworkingModule.setCustomClientBuilder(
// new NetworkingModule.CustomClientBuilder() {
// @Override
// public void apply(OkHttpClient.Builder builder) {
// builder.addNetworkInterceptor(new FlipperOkhttpInterceptor(networkFlipperPlugin));
// }
// });
// client.addPlugin(networkFlipperPlugin);
```
Disable the dev client network inspector `android/gradle.properties`
```bash
# Enable network inspector
EX_DEV_CLIENT_NETWORK_INSPECTOR=false
```
**If you are using Kotlin (Expo > 50):**
Comment out the following from `onCreate` in `android/app/src/main/java/com//example/MainApplication.kt`
```js
// if (BuildConfig.DEBUG) {
// ReactNativeFlipper.initializeFlipper(this, reactNativeHost.reactInstanceManager)
// }
```
### iOS: use\_frameworks and react-native-quick-sqlite
Using `use_frameworks` (for example, because you are using Google Analytics or Firebase Analytics) will silently break the compilation process of [react-native-quick-sqlite](https://github.com/powersync-ja/react-native-quick-sqlite) on iOS and results in the PowerSync SQLite extension not loading correctly. To solve this, add this to your Podfile:
```rb
pre_install do |installer|
installer.pod_targets.each do |pod|
next unless pod.name.eql?('react-native-quick-sqlite')
def pod.build_type
Pod::BuildType.static_library
end
end
end
```
### Development on iOS simulator
Testing offline mode on an iOS simulator by disabling the host machine's entire internet connection will cause the device to remain offline even after the internet connection has been restored. This issue seems to affect all network requests in an application.
## ORM Support
See [JavaScript ORM Support](/client-sdk-references/javascript-web/javascript-orm/overview) for details.
## Troubleshooting
See [Troubleshooting](/resources/troubleshooting) for pointers to debug common issues.
# API Reference
Source: https://docs.powersync.com/client-sdk-references/react-native-and-expo/api-reference
# Encryption
Source: https://docs.powersync.com/client-sdk-references/react-native-and-expo/encryption
# JavaScript ORM Support
Source: https://docs.powersync.com/client-sdk-references/react-native-and-expo/javascript-orm-support
# React Native Web Support
Source: https://docs.powersync.com/client-sdk-references/react-native-and-expo/react-native-web-support
[React Native for Web](https://necolas.github.io/react-native-web/) enables developers to use the same React Native codebase for both mobile and web platforms.
**Availability**
Support for React Native Web is available since versions 1.12.1 of the PowerSync [React Native SDK](/client-sdk-references/react-native-and-expo) and 1.8.0 if the [JavaScript Web SDK](/client-sdk-references/javascript-web), and is currently in a **beta** release.
A demo app showcasing this functionality is available here:
## Configuring PowerSync in your React Native for Web project
To ensure that PowerSync features are fully supported in your React Native Web project, follow the below steps. This documentation covers necessary web worker configurations, database instantiation, and multi-platform implementations.
### 1. Install Web SDK
The [PowerSync Web SDK](/client-sdk-references/javascript-web), alongside the [PowerSync React Native SDK](/client-sdk-references/react-native-and-expo), is required for Web support.
See installation instructions [here](https://www.npmjs.com/package/@powersync/web).
### 2. Configure Web Workers
For React Native for Web, workers need to be configured when instantiating `PowerSyncDatabase`. An example of this is available [here](https://github.com/powersync-ja/powersync-js/blob/main/demos/react-native-web-supabase-todolist/library/powersync/system.ts).
To do this, copy the contents of `node_modules/@powersync/web/dist` to the root of your project (typically in the `public `directory). To make it easier to manage these files in the `public` directory, it is recommended to place the contents in a nested directory like `@powersync`.
The [`@powersync/web`](https://github.com/powersync-ja/powersync-js/tree/main/packages/web) package includes a CLI utility which can copy the required assets to the `public` directory (configurable with the `--output` option).
```bash
# Places assets into public/@powersync by default. Override with `--output path/from_current_working_dir`.
npx powersync-web copy-assets
# or pnpm powersync-web copy-assets
```
### 3. Instantiate Web Workers
The example below demonstrates how to instantiate the workers (PowerSync requires a database and a sync worker) when instantiating `PowerSyncDatabase`. You can either specify a path to the worker (they are available in the `worker` directory of the `dist` contents), or provide a factory function to create the worker.
```js
const factory = new WASQLiteOpenFactory({
dbFilename: 'sqlite.db',
// Option 1: Specify a path to the database worker
worker: '/@powersync/worker/WASQLiteDB.umd.js'
// Option 2: Or provide a factory function to create the worker.
// The worker name should be unique for the database filename to avoid conflicts if multiple clients with different databases are present.
// worker: (options) => {
// if (options?.flags?.enableMultiTabs) {
// return new SharedWorker(`/@powersync/worker/WASQLiteDB.umd.js`, {
// name: `shared-DB-worker-${options?.dbFilename}`
// });
// } else {
// return new Worker(`/@powersync/worker/WASQLiteDB.umd.js`, {
// name: `DB-worker-${options?.dbFilename}`
// });
// }
// }
});
this.powersync = new PowerSyncDatabaseWeb({
schema: AppSchema,
database: factory,
sync: {
// Option 1: You can specify a path to the sync worker
worker: '/@powersync/worker/SharedSyncImplementation.umd.js'
//Option 2: Or provide a factory function to create the worker.
// The worker name should be unique for the database filename to avoid conflicts if multiple clients with different databases are present.
// worker: (options) => {
// return new SharedWorker(`/@powersync/worker/SharedSyncImplementation.umd.js`, {
// name: `shared-sync-${options?.dbFilename}`
// });
// }
}
});
```
This `PowerSyncDatabaseWeb` database will be used alongside the native `PowerSyncDatabase` to support platform-specific implementations. See the [Instantiating PowerSync](/client-sdk-references/react-native-and-expo/react-native-web-support#implementations) section below for more details.
### 4. Enable multiple platforms
To target both mobile and web platforms, you need to adjust the Metro configuration and handle platform-specific libraries accordingly.
#### Metro config
Refer to the example [here](https://github.com/powersync-ja/powersync-js/blob/main/demos/react-native-web-supabase-todolist/metro.config.js). Setting `config.resolver.resolveRequest` allows Metro to behave differently based on the platform.
```js
config.resolver.resolveRequest = (context, moduleName, platform) => {
if (platform === 'web') {
// Depending on `@powersync/web` for functionality, ignore mobile specific dependencies.
if (['react-native-prompt-android', '@powersync/react-native'].includes(moduleName)) {
return {
type: 'empty'
};
}
const mapping = { 'react-native': 'react-native-web', '@powersync/web': '@powersync/web/dist/index.umd.js' };
if (mapping[moduleName]) {
console.log('remapping', moduleName);
return context.resolveRequest(context, mapping[moduleName], platform);
}
} else {
// Depending on `@powersync/react-native` for functionality, ignore `@powersync/web` dependencies.
if (['@powersync/web'].includes(moduleName)) {
return {
type: 'empty'
};
}
}
// Ensure you call the default resolver.
return context.resolveRequest(context, moduleName, platform);
};
```
#### Implementations
Many `react-native` and `web` packages are implemented with only their specific platform in mind, as such there may be times where you will need to evaluate the platform and provide alternative implementations.
**Instantiating PowerSync**
The following snippet constructs the correct `PowerSyncDatabase` depending on the platform that the code is executing on.
```js
import React from 'react';
import { PowerSyncDatabase as PowerSyncDatabaseNative } from '@powersync/react-native';
import { PowerSyncDatabase as PowerSyncDatabaseWeb } from '@powersync/web';
if (PowerSyncDatabaseNative) {
this.powersync = new PowerSyncDatabaseNative({
schema: AppSchema,
database: {
dbFilename: 'sqlite.db'
}
});
} else {
const factory = new WASQLiteOpenFactory({
dbFilename: 'sqlite.db',
worker: '/@powersync/worker/WASQLiteDB.umd.js'
});
this.powersync = new PowerSyncDatabaseWeb({
schema: AppSchema,
database: factory,
sync: {
worker: '/@powersync/worker/SharedSyncImplementation.umd.js'
}
});
}
```
**Implementations that don't support both mobile and web**
```js
import { Platform } from 'react-native';
import rnPrompt from 'react-native-prompt-android';
// Example conditional implementation
export async function prompt(
title = '',
description = '',
onInput = (_input: string | null): void | Promise => {},
options: { placeholder: string | undefined } = { placeholder: undefined }
) {
const isWeb = Platform.OS === 'web';
let name: string | null = null;
if (isWeb) {
name = window.prompt(`${title}\n${description}`, options.placeholder);
} else {
name = await new Promise((resolve) => {
rnPrompt(
title,
description,
(input) => {
resolve(input);
},
{ placeholder: options.placeholder, style: 'shimo' }
);
});
}
await onInput(name);
}
```
Which can then be used agnostically in a component.
```js
import { Button } from 'react-native';
import { prompt } from 'util/prompt';
{
prompt(
'Add a new Todo',
'',
(text) => {
if (!text) {
return;
}
return createNewTodo(text);
},
{ placeholder: 'Todo description' }
);
}}
/>;
```
### 5. Configure UMD target
React Native Web requires the UMD target of `@powersync/web` (available at `@powersync/web/umd`). To fully support this target version, configure the following in your project:
1. Add `config.resolver.unstable_enablePackageExports = true;` to your `metro.config.js` file.
2. TypeScript projects: In the `tsconfig.json` file specify the `moduleResolution` to be `Bundler`.
```json
"compilerOptions": {
"moduleResolution": "Bundler"
}
```
# Usage Examples
Source: https://docs.powersync.com/client-sdk-references/react-native-and-expo/usage-examples
Code snippets and guidelines for common scenarios
## Using Hooks
A separate `powersync-react` package is available containing React hooks for PowerSync:
See its README for example code.
## Using transactions to group changes
Read and write transactions present a context where multiple changes can be made then finally committed to the DB or rolled back. This ensures that either all the changes get persisted, or no change is made to the DB (in the case of a rollback or exception).
[PowerSyncDatabase.writeTransaction(callback)](https://powersync-ja.github.io/powersync-js/react-native-sdk/classes/PowerSyncDatabase#writetransaction) automatically commits changes after the transaction callback is completed if [tx.rollback()](https://github.com/powersync-ja/powersync-js/blob/ed5bb49b5a1dc579050304fab847feb8d09b45c7/packages/common/src/db/DBAdapter.ts#L53) has not explicitly been called. If an exception is thrown in the callback then changes are automatically rolled back.
```js
// ListsWidget.jsx
import {Alert, Button, FlatList, Text, View} from 'react-native';
export const ListsWidget = () => {
// Populate lists with one of methods listed above
const [lists, setLists] = React.useState([]);
return (
({key: list.id, ...list}))}
renderItem={({item}) => (
{item.name}
{
try {
await PowerSync.writeTransaction(async (tx) => {
// Delete the main list
await tx.execute(`DELETE FROM lists WHERE id = ?`, [item.id]);
// Delete any children of the list
await tx.execute(`DELETE FROM todos WHERE list_id = ?`, [item.id]);
// Transactions are automatically committed at the end of execution
// Transactions are automatically rolled back if an exception occurred
})
// Watched queries should automatically reload after mutation
} catch (ex) {
Alert.alert('Error', ex.message)
}
}}
/>
)}
/>
{
try {
await PowerSync.execute('INSERT INTO lists (id, created_at, name, owner_id) VALUES (uuid(), datetime(), ?, ?) RETURNING *', [
'A list name',
"[The user's uuid]"
])
// Watched queries should automatically reload after mutation
} catch (ex) {
Alert.alert('Error', ex.message)
}
}}
/>
)
}
```
Also see [PowerSyncDatabase.readTransaction(callback)](https://powersync-ja.github.io/powersync-js/react-native-sdk/classes/PowerSyncDatabase#readtransaction).
## Subscribe to changes in data
Use [PowerSyncDatabase.watch](https://powersync-ja.github.io/powersync-js/react-native-sdk/classes/PowerSyncDatabase#watch) to watch for changes in source tables.
The `watch` method can be used with a `AsyncIterable` signature as follows:
```js
async *attachmentIds(): AsyncIterable {
for await (const result of this.powersync.watch(
`SELECT photo_id as id FROM ${TODO_TABLE} WHERE photo_id IS NOT NULL`,
[]
)) {
yield result.rows?._array.map((r) => r.id) ?? [];
}
}
```
As of version **1.3.3** of the SDK, the `watch` method can also be used with a callback:
```js
attachmentIds(onResult: (ids: string[]) => void): void {
this.powersync.watch(
`SELECT photo_id as id FROM ${TODO_TABLE} WHERE photo_id IS NOT NULL`,
[],
{
onResult: (result) => {
onResult(result.rows?._array.map((r) => r.id) ?? []);
}
}
);
}
```
## Insert, update, and delete data in the local database
Use [PowerSyncDatabase.execute](https://powersync-ja.github.io/powersync-js/react-native-sdk/classes/PowerSyncDatabase#execute) to run INSERT, UPDATE or DELETE queries.
```js
const handleButtonClick = async () => {
await db.execute(
'INSERT INTO customers(id, name, email) VALUES(uuid(), ?, ?)',
['Fred', 'fred@example.org']
);
};
return (
+
add
);
```
## Send changes in local data to your backend service
Override [uploadData](https://github.com/powersync-ja/powersync-js/blob/ed5bb49b5a1dc579050304fab847feb8d09b45c7/packages/common/src/client/connection/PowerSyncBackendConnector.ts#L24) to send local updates to your backend service.
```js
// Implement the uploadData method in your backend connector
async function uploadData(database) {
const batch = await database.getCrudBatch();
if (batch === null) return;
for (const op of batch.crud) {
switch (op.op) {
case 'put':
// Send the data to your backend service
// replace `_myApi` with your own API client or service
await _myApi.put(op.table, op.opData);
break;
default:
// TODO: implement the other operations (patch, delete)
break;
}
}
await batch.complete();
}
```
## Accessing PowerSync connection status information
Use [PowerSyncDatabase.connected](https://powersync-ja.github.io/powersync-js/react-native-sdk/classes/PowerSyncDatabase#connected) and register an event listener with [PowerSyncDatabase.registerListener](https://powersync-ja.github.io/powersync-js/react-native-sdk/classes/PowerSyncDatabase#registerlistener) to listen for status changes to your PowerSync instance.
```js
// Example of using connected status to show online or offline
// Tap into connected
const [connected, setConnected] = React.useState(powersync.connected);
React.useEffect(() => {
// Register listener for changes made to the powersync status
return powersync.registerListener({
statusChanged: (status) => {
setConnected(status.connected);
}
});
}, [powersync]);
// Icon to show connected or not connected to powersync
// as well as the last synced time
{
Alert.alert(
'Status',
`${connected ? 'Connected' : 'Disconnected'}. \nLast Synced at ${powersync.currentStatus?.lastSyncedAt.toISOString() ?? '-'
}\nVersion: ${powersync.sdkVersion}`
);
}}
/>;
```
## Wait for the initial sync to complete
Use the [hasSynced](https://powersync-ja.github.io/powersync-js/react-native-sdk/classes/SyncStatus#hassynced) property (available since version 1.4.1 of the SDK) and register an event listener with [PowerSyncDatabase.registerListener](https://powersync-ja.github.io/powersync-js/react-native-sdk/classes/PowerSyncDatabase#registerlistener) to indicate to the user whether the initial sync is in progress.
```js
// Example of using hasSynced to show whether the first sync has completed
// Tap into hasSynced
const [hasSynced, setHasSynced] = React.useState(powerSync.currentStatus?.hasSynced || false);
React.useEffect(() => {
// Register listener for changes made to the powersync status
return powerSync.registerListener({
statusChanged: (status) => {
setHasSynced(!!status.hasSynced);
}
});
}, [powerSync]);
return {hasSynced ? 'Initial sync completed!' : 'Busy with initial sync...'} ;
```
For async use cases, see [PowerSyncDatabase.waitForFirstSync](https://powersync-ja.github.io/powersync-js/react-native-sdk/classes/AbstractPowerSyncDatabase#waitforfirstsync), which returns a promise that resolves once the first full sync has completed (it queries the internal SQL [ps\_buckets](/architecture/client-architecture) table to determine if data has been synced).
## Report sync download progress
You can show users a progress bar when data downloads using the `downloadProgress` property from the [SyncStatus](https://powersync-ja.github.io/powersync-js/react-native-sdk/classes/SyncStatus) class. This is especially useful for long-running initial syncs. `downloadProgress.downloadedFraction` gives you a value from 0.0 to 1.0 representing the total sync progress.
Example:
```jsx
import { useStatus } from '@powersync/react';
import { FC, ReactNode } from 'react';
import { View } from 'react-native';
import { Text, LinearProgress } from '@rneui/themed';
export const SyncProgressBar: FC<{ priority?: number }> = ({ priority }) => {
const status = useStatus();
const progressUntilNextSync = status.downloadProgress;
const progress = priority == null ? progressUntilNextSync : progressUntilNextSync?.untilPriority(priority);
if (progress == null) {
return <>>;
}
return (
{progress.downloadedOperations == progress.totalOperations ? (
Applying server-side changes
) : (
Downloaded {progress.downloadedOperations} out of {progress.totalOperations}.
)}
);
};
```
Also see:
* [SyncStatus API](https://powersync-ja.github.io/powersync-js/react-native-sdk/classes/SyncStatus)
* [Demo component](https://github.com/powersync-ja/powersync-js/blob/main/demos/react-native-supabase-todolist/library/widgets/GuardBySync.tsx)
# Swift
Source: https://docs.powersync.com/client-sdk-references/swift
Refer to the powersync-swift repo on GitHub.
Full API reference for the PowerSync SDK [\[External link\].](https://powersync-ja.github.io/powersync-swift/documentation/powersync)
Gallery of example projects/demo apps built with PowerSync and Swift.
## Kotlin Multiplatform -> Swift SDK
The PowerSync Swift SDK makes use of the [PowerSync Kotlin Multiplatform SDK](https://github.com/powersync-ja/powersync-kotlin) with the API tool [SKIE](https://skie.touchlab.co/) under the hood to help generate and publish a Swift package. The Swift SDK abstracts the Kotlin SDK behind pure Swift Protocols, enabling us to fully leverage Swift's native features and libraries. Our ultimate goal is to deliver a Swift-centric experience for developers.
### SDK Features
* **Real-time streaming of database changes**: Changes made by one user are instantly streamed to all other users with access to that data. This keeps clients automatically in sync without manual polling or refresh logic.
* **Direct access to a local SQLite database**: Data is stored locally, so apps can read and write instantly without network calls. This enables offline support and faster user interactions.
* **Asynchronous background execution**: The SDK performs database operations in the background to avoid blocking the application’s main thread. This means that apps stay responsive, even during heavy data activity.
* **Query subscriptions for live updates**: The SDK supports query subscriptions that automatically push real-time updates to client applications as data changes, keeping your UI reactive and up to date.
* **Automatic schema management**: PowerSync syncs schemaless data and applies a client-defined schema using SQLite views. This architecture means that PowerSync SDKs can handle schema changes gracefully without requiring explicit migrations on the client-side.
## Installation
You can add the PowerSync Swift package to your project using either `Package.swift` or Xcode:
```swift
let package = Package(
//...
dependencies: [
//...
.package(
url: "https://github.com/powersync-ja/powersync-swift",
exact: ""
),
],
targets: [
.target(
name: "YourTargetName",
dependencies: [
.product(
name: "PowerSync",
package: "powersync-swift"
)
]
)
]
)
```
1. Follow [this guide](https://developer.apple.com/documentation/xcode/adding-package-dependencies-to-your-app#Add-a-package-dependency) to add a package to your project.
2. Use `https://github.com/powersync-ja/powersync-swift.git` as the URL
3. Include the exact version (e.g., `1.0.x`)
## Getting Started
Before implementing the PowerSync SDK in your project, make sure you have completed these steps:
* Signed up for a PowerSync Cloud account ([here](https://accounts.journeyapps.com/portal/powersync-signup?s=docs)) or [self-host PowerSync](/self-hosting/getting-started).
* [Configured your backend database](/installation/database-setup) and connected it to your PowerSync instance.
* [Installed](/client-sdk-references/swift#installation) the PowerSync SDK.
### 1. Define the Schema
The first step is defining the schema for the local SQLite database, which is provided to the `PowerSyncDatabase` constructor via the `schema` parameter. This schema represents a "view" of the downloaded data. No migrations are required — the schema is applied directly when the PowerSync database is constructed.
The types available are `text`, `integer` and `real`. These should map directly to the values produced by the [Sync Rules](/usage/sync-rules). If a value doesn't match, it is cast automatically.
**Example**:
```swift
import Foundation
import PowerSync
let LISTS_TABLE = "lists"
let TODOS_TABLE = "todos"
let lists = Table(
name: LISTS_TABLE,
columns: [
// ID column is automatically included
.text("name"),
.text("created_at"),
.text("owner_id")
]
)
let todos = Table(
name: TODOS_TABLE,
// ID column is automatically included
columns: [
.text("list_id"),
.text("photo_id"),
.text("description"),
// 0 or 1 to represent false or true
.integer("completed"),
.text("created_at"),
.text("completed_at"),
.text("created_by"),
.text("completed_by")
],
indexes: [
Index(
name: "list_id",
columns: [
IndexedColumn.ascending("list_id")
]
)
]
)
let AppSchema = Schema(lists, todos)
```
**Note**: No need to declare a primary key `id` column, as PowerSync will automatically create this.
### 2. Instantiate the PowerSync Database
Next, you need to instantiate the PowerSync database — this is the core managed database.
Its primary function is to record all changes in the local database, whether online or offline. In addition, it automatically uploads changes to your app backend when connected.
**Example**:
```swift
let schema = AppSchema // Comes from the AppSchema defined above
let db = PowerSyncDatabase(
schema: schema,
dbFilename: "powersync-swift.sqlite"
)
```
### 3. Integrate with your Backend
Create a connector to integrate with your backend. The PowerSync backend connector provides the connection between your application backend and the PowerSync managed database.
It is used to:
1. Retrieve an auth token to connect to the PowerSync instance.
2. Apply local changes on your backend application server (and from there, to your backend database)
Accordingly, the connector must implement two methods:
1. `PowerSyncBackendConnector.fetchCredentials` - This is called every couple of minutes and is used to obtain credentials for your app's backend API. -> See [Authentication Setup](/installation/authentication-setup) for instructions on how the credentials should be generated.
2. `PowerSyncBackendConnector.uploadData` - Use this to upload client-side changes to your app backend.
-> See [Writing Client Changes](/installation/app-backend-setup/writing-client-changes) for considerations on the app backend implementation.
**Example**:
```swift
import PowerSync
@Observable
class MyConnector: PowerSyncBackendConnector {
override func fetchCredentials() async throws -> PowerSyncCredentials? {
// implement fetchCredentials to obtain the necessary credentials to connect to your backend
// See an example implementation in https://github.com/powersync-ja/powersync-swift/blob/main/Demo/PowerSyncExample/PowerSync/SupabaseConnector.swift
return PowerSyncCredentials(
endpoint: "Your PowerSync instance URL or self-hosted endpoint",
// Use a development token (see Authentication Setup https://docs.powersync.com/installation/authentication-setup/development-tokens)
// to get up and running quickly) to get up and running quickly
token: "An authentication token"
)
}
override func uploadData(database: PowerSyncDatabaseProtocol) async throws {
// Implement uploadData to send local changes to your backend service
// You can omit this method if you only want to sync data from the server to the client
// See an example implementation under Usage Examples (sub-page)
// See https://docs.powersync.com/installation/app-backend-setup/writing-client-changes for considerations.
}
}
```
## Using PowerSync: CRUD functions
Once the PowerSync instance is configured you can start using the SQLite DB functions.
The most commonly used CRUD functions to interact with your SQLite data are:
* [PowerSyncDatabase.get](/client-sdk-references/swift#fetching-a-single-item) - get (SELECT) a single row from a table.
* [PowerSyncDatabase.getOptional](/client-sdk-references/swift#fetching-a-single-item) - get (SELECT) a single row from a table and return `null` if not found.
* [PowerSyncDatabase.getAll](/client-sdk-references/swift#querying-items-powersync-getall) - get (SELECT) a set of rows from a table.
* [PowerSyncDatabase.watch](/client-sdk-references/swift#watching-queries-powersync-watch) - execute a read query every time source tables are modified.
* [PowerSyncDatabase.execute](/client-sdk-references/swift#mutations-powersync-execute) - execute a write (INSERT/UPDATE/DELETE) query.
### Fetching a Single Item ( PowerSync.get / PowerSync.getOptional)
The `get` method executes a read-only (SELECT) query and returns a single result. It throws an exception if no result is found. Use `getOptional` to return a single optional result (returns `null` if no result is found).
```swift
// Find a list item by ID
func getList(_ id: String) async throws {
try await self.db.getAll(
sql: "SELECT * FROM \(LISTS_TABLE) WHERE id = ?",
parameters: [id],
mapper: { cursor in
ListContent(
id: try cursor.getString(name: "id")!,
name: try cursor.getString(name: "name")!,
createdAt: try cursor.getString(name: "created_at")!,
ownerId: try cursor.getString(name: "owner_id")!
)
}
)
}
```
### Querying Items (PowerSync.getAll)
The `getAll` method executes a read-only (SELECT) query and returns a set of rows.
```swift
// Get all lists
func getLists() async throws {
try await self.db.getAll(
sql: "SELECT * FROM \(LISTS_TABLE)",
parameters: [],
mapper: { cursor in
ListContent(
id: try cursor.getString(name: "id")!,
name: try cursor.getString(name: "name")!,
createdAt: try cursor.getString(name: "created_at")!,
ownerId: try cursor.getString(name: "owner_id")!
)
}
)
}
```
### Watching Queries (PowerSync.watch)
The `watch` method executes a read query whenever a change to a dependent table is made.
```swift
// You can watch any SQL query
func watchLists(_ callback: @escaping (_ lists: [ListContent]) -> Void ) async {
do {
for try await lists in try self.db.watch(
sql: "SELECT * FROM \(LISTS_TABLE)",
parameters: [],
mapper: { cursor in
try ListContent(
id: cursor.getString(name: "id"),
name: cursor.getString(name: "name"),
createdAt: cursor.getString(name: "created_at"),
ownerId: cursor.getString(name: "owner_id")
)
}
) {
callback(lists)
}
} catch {
print("Error in watch: \(error)")
}
}
```
### Mutations (PowerSync.execute)
The `execute` method executes a write query (INSERT, UPDATE, DELETE) and returns the results (if any).
```swift
func insertTodo(_ todo: NewTodo, _ listId: String) async throws {
try await db.execute(
sql: "INSERT INTO \(TODOS_TABLE) (id, created_at, created_by, description, list_id, completed) VALUES (uuid(), datetime(), ?, ?, ?, ?)",
parameters: [connector.currentUserID, todo.description, listId, todo.isComplete]
)
}
func updateTodo(_ todo: Todo) async throws {
try await db.execute(
sql: "UPDATE \(TODOS_TABLE) SET description = ?, completed = ?, completed_at = datetime(), completed_by = ? WHERE id = ?",
parameters: [todo.description, todo.isComplete, connector.currentUserID, todo.id]
)
}
func deleteTodo(id: String) async throws {
try await db.writeTransaction(callback: { transaction in
_ = try transaction.execute(
sql: "DELETE FROM \(TODOS_TABLE) WHERE id = ?",
parameters: [id]
)
})
}
```
## Configure Logging
You can include your own Logger that must conform to the [LoggerProtocol](https://powersync-ja.github.io/powersync-swift/documentation/powersync/loggerprotocol) as shown here.
```swift
let logger = DefaultLogger(minSeverity: .debug)
let db = PowerSyncDatabase(
schema: schema,
dbFilename: "powersync-swift.sqlite",
logger: logger
)
```
The `DefaultLogger` supports the following severity levels: `.debug`, `.info`, `.warn`, `.error`.
## Additional Usage Examples
See [Usage Examples](/client-sdk-references/swift/usage-examples) for further examples of the SDK.
## ORM Support
ORM support is not yet available, we are still investigating options. Please [let us know](/resources/contact-us) what your needs around ORMs are.
## Troubleshooting
See [Troubleshooting](/resources/troubleshooting) for pointers to debug common issues.
# Usage Examples
Source: https://docs.powersync.com/client-sdk-references/swift/usage-examples
Code snippets and guidelines for common scenarios in Swift
## Using transactions to group changes
Read and write transactions present a context where multiple changes can be made then finally committed to the DB or rolled back. This ensures that either all the changes get persisted, or no change is made to the DB (in the case of a rollback or exception).
```swift
// Delete a list and its todos in a transaction
func deleteList(db: PowerSyncDatabase, listId: String) async throws {
try await db.writeTransaction { tx in
try await tx.execute(sql: "DELETE FROM lists WHERE id = ?", parameters: [listId])
try await tx.execute(sql: "DELETE FROM todos WHERE list_id = ?", parameters: [listId])
}
}
```
Also see [`readTransaction`](https://powersync-ja.github.io/powersync-swift/documentation/powersync/queries/readtransaction\(callback:\)).
## Subscribe to changes in data
Use `watch` to watch for changes to the dependent tables of any SQL query.
```swift
// Watch for changes to the lists table
func watchLists(_ callback: @escaping (_ lists: [ListContent]) -> Void ) async {
do {
for try await lists in try self.db.watch(
sql: "SELECT * FROM \(LISTS_TABLE)",
parameters: [],
mapper: { cursor in
try ListContent(
id: cursor.getString(name: "id"),
name: cursor.getString(name: "name"),
createdAt: cursor.getString(name: "created_at"),
ownerId: cursor.getString(name: "owner_id")
)
}
) {
callback(lists)
}
} catch {
print("Error in watch: \(error)")
}
}
```
## Insert, update, and delete data in the local database
Use `execute` to run INSERT, UPDATE or DELETE queries.
```swift
// Insert a new TODO
func insertTodo(_ todo: NewTodo, _ listId: String) async throws {
try await db.execute(
sql: "INSERT INTO \(TODOS_TABLE) (id, created_at, created_by, description, list_id, completed) VALUES (uuid(), datetime(), ?, ?, ?, ?)",
parameters: [connector.currentUserID, todo.description, listId, todo.isComplete]
)
}
```
## Send changes in local data to your backend service
Override `uploadData` to send local updates to your backend service.
```swift
class MyConnector: PowerSyncBackendConnector {
override func uploadData(database: PowerSyncDatabaseProtocol) async throws {
let batch = try await database.getCrudBatch()
guard let batch = batch else { return }
for entry in batch.crud {
switch entry.op {
case .put:
// Send the data to your backend service
// Replace `_myApi` with your own API client or service
try await _myApi.put(table: entry.table, data: entry.opData)
default:
// TODO: implement the other operations (patch, delete)
break
}
}
try await batch.complete(writeCheckpoint: nil)
}
}
```
## Accessing PowerSync connection status information
Use [`currentStatus`](https://powersync-ja.github.io/powersync-swift/documentation/powersync/powersyncdatabaseprotocol/currentstatus) and observe changes to listen for status changes to your PowerSync instance.
```swift
import Foundation
import SwiftUI
import PowerSync
struct PowerSyncConnectionIndicator: View {
private let powersync: any PowerSyncDatabaseProtocol
@State private var connected: Bool = false
init(powersync: any PowerSyncDatabaseProtocol) {
self.powersync = powersync
}
var body: some View {
let iconName = connected ? "wifi" : "wifi.slash"
let description = connected ? "Online" : "Offline"
Image(systemName: iconName)
.accessibility(label: Text(description))
.task {
self.connected = powersync.currentStatus.connected
for await status in powersync.currentStatus.asFlow() {
self.connected = status.connected
}
}
}
}
```
## Wait for the initial sync to complete
Use the `hasSynced` property and observe status changes to indicate to the user whether the initial sync is in progress.
```swift
struct WaitForFirstSync: View {
private let powersync: any PowerSyncDatabaseProtocol
@State var didSync: Bool = false
init(powersync: any PowerSyncDatabaseProtocol) {
self.powersync = powersync
}
var body: some View {
if !didSync {
ProgressView().task {
do {
try await powersync.waitForFirstSync()
} catch {
// TODO: Handle errors
}
}
}
}
}
```
For async use cases, use [`waitForFirstSync`](https://powersync-ja.github.io/powersync-swift/documentation/powersync/powersyncdatabaseprotocol/waitforfirstsync\(\)).
## Report sync download progress
You can show users a progress bar when data downloads using the `downloadProgress` property from the [`SyncStatusData`](https://powersync-ja.github.io/powersync-swift/documentation/powersync/syncstatusdata/) object. `downloadProgress.downloadedFraction` gives you a value from 0.0 to 1.0 representing the total sync progress. This is especially useful for long-running initial syncs.
Example:
```swift
struct SyncProgressIndicator: View {
private let powersync: any PowerSyncDatabaseProtocol
private let priority: BucketPriority?
@State private var status: SyncStatusData? = nil
init(powersync: any PowerSyncDatabaseProtocol, priority: BucketPriority? = nil) {
self.powersync = powersync
self.priority = priority
}
var body: some View {
VStack {
if let totalProgress = status?.downloadProgress {
let progress = if let priority = self.priority {
totalProgress.untilPriority(priority: priority)
} else {
totalProgress
}
ProgressView(value: progress.fraction)
if progress.downloadedOperations == progress.totalOperations {
Text("Applying server-side changes...")
} else {
Text("Downloaded \(progress.downloadedOperations) out of \(progress.totalOperations)")
}
}
}.task {
status = powersync.currentStatus
for await status in powersync.currentStatus.asFlow() {
self.status = status
}
}
}
}
```
Also see:
* [SyncStatusData API](https://powersync-ja.github.io/powersync-swift/documentation/powersync/syncstatusdata/)
* [SyncDownloadProgress API](https://powersync-ja.github.io/powersync-swift/documentation/powersync/syncdownloadprogress/)
* [Demo component](https://github.com/powersync-ja/powersync-swift/blob/main/Demo/PowerSyncExample/Components/ListView.swift)
# App Backend Setup
Source: https://docs.powersync.com/installation/app-backend-setup
PowerSync generally assumes that you have some kind of "backend application" as part of your overall application architecture - whether it's Supabase, Node.js, Rails, Laravel, Django, ASP.NET, some kind of serverless cloud functions (e.g. Azure Functions, AWS Lambda, Google Cloud Functions, Cloudflare Workers, etc.), or anything else.
When you integrate PowerSync into your app project, PowerSync relies on that "backend application" for a few purposes:
1. **Allowing client-side write operations to be uploaded** and [applied](/installation/app-backend-setup/writing-client-changes) to the backend database (Postgres, MongoDB or MySQL). When you write to the client-side SQLite database provided by PowerSync, those writes are also placed into an upload queue. The PowerSync Client SDK manages uploading of those writes to your backend using the `uploadData()` function that you defined in the [Client-Side Setup](/installation/client-side-setup/integrating-with-your-backend) part of the implementation. That `uploadData()` function should call your backend application API to apply the writes to your backend database. The reason why we designed PowerSync this way is to give you full control over things like data validation and authorization of writes, while PowerSync itself requires minimal permissions.
2. **Authentication integration:** Your backend is responsible for securely generating the [JWTs](/installation/authentication-setup) used by the PowerSync Client SDK to authenticate with the [PowerSync Service](/architecture/powersync-service).
### Processing Writes from Clients
The next section, [Writing Client Changes](/installation/app-backend-setup/writing-client-changes), provides guidance on how can handle write operations in your backend application.
### Authentication
General authentication for your app users is outside the scope of PowerSync. A service such as [Auth0](https://auth0.com/) or [Clerk](https://clerk.com/) may be used, or any other authentication system.
PowerSync assumes that you have some kind of authentication system already in place that allows you to communicate securely between your client-side app and backend application.
The `fetchCredentials()` function that you defined in the [Client-Side Setup](/installation/client-side-setup/integrating-with-your-backend) can therefore call your backend application API to generate a JWT which can be used by PowerSync Client SDK to authenticate with the [PowerSync Service](/architecture/powersync-service).
See [Authentication Setup](/installation/authentication-setup) for details.
### Backend Implementation Examples
See our [Example Projects](/resources/demo-apps-example-projects#backend-examples) page for examples of custom backend implementations (e.g. Django, Node.js, Rails, etc.)
For Postgres developers, using [Supabase](/integration-guides/supabase-+-powersync) is an easy alternative to a custom backend. Several of our demo apps demonstrate how to use [Supabase](https://supabase.com/) as the Postgres backend.
### Hosted/Managed Option for MongoDB
For developers using MongoDB as a source backend database, an alternative option to running your own backend is to use CloudCode, a serverless cloud functions environment provided by us. We have a template that you can use as a turnkey starting point. See our [documentation here](/usage/tools/cloudcode).
# Writing Client Changes
Source: https://docs.powersync.com/installation/app-backend-setup/writing-client-changes
Your backend application needs to expose an API endpoint to apply write operations to your backend database that are received from the PowerSync Client SDK.
Your backend application receives the write operations based on how you defined your `uploadData()` function in the `PowerSyncBackendConnector` in your client-side app. See [Integrate with your Backend](/installation/client-side-setup/integrating-with-your-backend) in the [Client-Side Setup](/installation/client-side-setup) section for details.
Since you get to define the client-side `uploadData()` function as you wish, you have full control over how to structure your backend application API to accept write operations from the client. For example, you can have:
1. A single API endpoint that accepts a batch of write operations from the client, with minimal client-side processing.
2. Separate API endpoints based on the types of write operations. In your `uploadData()`, you can call the respective endpoints as needed.
3. A combination of the above.
You can also use any API style you want — e.g. REST, GraphQL, gRPC, etc.
It's important that your API endpoint be blocking/synchronous with underlying writes to the backend database (Postgres, MongoDB or MySQL).
In other words, don't place writes into something like a queue for processing later — process them immediately. For more details, see the explainer below.
PowerSync uses a server-authoritative architecture with a checkpoint system for conflict resolution and [consistency](/architecture/consistency). The client advances to a new write checkpoint after uploads have been processed, so if the client believes that the server has written changes into your backend database (Postgres, MongoDB or MySQL), but the next checkpoint does not contain your uploaded changes, those changes will be removed from the client. This could manifest as UI glitches for your end-users, where the changes disappear from the device for a few seconds and then re-appear.
### Write operations recorded on the client
The upload queue on the client stores three types of operations:
| Operation | Purpose | Contents | SQLite Statement |
| --------- | ------------------- | -------------------------------------------------------- | --------------------------------- |
| `PUT` | Create new row | Contains the value for each non-null column | Generated by `INSERT` statements. |
| `PATCH` | Update existing row | Contains the row `id`, and value of each changed column. | Generated by `UPDATE` statements. |
| `DELETE` | Delete existing row | Contains the row `id` | Generated by `DELETE` statements. |
### Recommendations
The PowerSync Client SDK does not prescribe any specific request/response format for your backend application API that accepts the write operations. You can implement it as you wish.
We do however recommend the following:
1. Use a batch endpoint to handle high volumes of write operations.
2. Use an error response (`5xx`) only when the write operations cannot be applied due to a temporary error (e.g. backend database not available). In this scenario, the PowerSync Client SDK can retry uploading the write operation and it should succeed at a later time.
3. For validation errors or write conflicts, you should avoid returning an error response (`4xx`), since it will block the PowerSync client's upload queue. Instead, it is best to return a `2xx` response, and if needed, propagate the validation or other error message(s) back to the client, for example by:
1. Including the error details in the `2xx` response.
2. Writing the error(s) into a separate table/collection that is synced to the client, so that the client/user can handle the error(s).
For details on approaches, see:
For details on handling write conflicts, see:
### Example backend implementations
See our [Example Projects](/resources/demo-apps-example-projects#backend-examples) page for examples of custom backend implementations (e.g. Django, Node.js, Rails, etc.) that you can use as a guide for your implementation.
For Postgres developers, using [Supabase](/integration-guides/supabase-+-powersync) is an easy alternative to a custom backend. Several of our example/demo apps demonstrate how to use [Supabase](https://supabase.com/) as the backend. These examples use the [PostgREST API](https://supabase.com/docs/guides/api) exposed by Supabase to upload write operations. Alternatively, Supabase's [Edge Functions](https://supabase.com/docs/guides/functions) can also be used.
# Authentication Setup
Source: https://docs.powersync.com/installation/authentication-setup
## Overview
PowerSync clients (i.e. apps used by your users that embed the PowerSync Client SDK) authenticate against the server-side [PowerSync Service](/architecture/powersync-service) using [JWTs](https://jwt.io/) (signed tokens) that are generated by your application backend.
Before using PowerSync, an application's existing architecture may look like this:
The [PowerSync Service](/architecture/powersync-service) uses database native credentials and authenticates directly against the [backend database](/installation/database-setup) using the configured credentials:
When the PowerSync client SDK is included in an app project, it uses [existing app-to-backend](/installation/app-backend-setup) authentication to [retrieve a JSON Web Token (JWT)](/installation/authentication-setup):
The PowerSync client SDK uses the retrieved JWT to authenticate directly against the PowerSync Service:
Users are not persisted in PowerSync, and there is no server-to-server communication used for client authentication.
## Common Authentication Providers
PowerSync supports JWT-based authentication from various providers. The table below shows commonly used authentication providers, their JWKS URLs, and any specific configuration requirements.
Scroll the table horizontally.
| Provider | JWKS URL | Configuration Notes | Documentation |
| ----------------------------------------- | ------------------------------------------------------------------------------------------- | ---------------------------------------- | ---------------------------------------------------------------------------------------------------------------------------------------------- |
| **Supabase** | Direct integration available | Uses Supabase's **JWT Secret** | [Supabase Auth Setup](/installation/authentication-setup/supabase-auth) |
| **Firebase Auth / GCP Identity Platform** | `https://www.googleapis.com/service_accounts/v1/jwk/securetoken@system.gserviceaccount.com` | JWT Audience: Firebase project ID | [Firebase Auth Setup](/installation/authentication-setup/firebase-auth) |
| **Auth0** | `https://{auth0-domain}/.well-known/jwks.json` | JWT Audience: PowerSync instance URL | [Auth0 Setup](/installation/authentication-setup/auth0) |
| **Clerk** | `https://{yourClerkDomain}/.well-known/jwks.json` | Additional configuration may be required | [Clerk Documentation](https://clerk.com/docs/backend-requests/making/jwt-templates#create-a-jwt-template) |
| **Stytch** | `https://{live_or_test}.stytch.com/v1/sessions/jwks/{project-id}` | Additional configuration may be required | [Stytch Documentation](https://stytch.com/docs/api/jwks-get) |
| **Keycloak** | `https://{your-keycloak-domain}/auth/realms/{realm-name}/protocol/openid-connect/certs` | Additional configuration may be required | [Keycloak Documentation](https://documentation.cloud-iam.com/how-to-guides/configure-remote-jkws.html) |
| **Amazon Cognito** | `https://cognito-idp.{region}.amazonaws.com/{userPoolId}/.well-known/jwks.json` | Additional configuration may be required | [Cognito Documentation](https://docs.aws.amazon.com/cognito/latest/developerguide/amazon-cognito-user-pools-using-tokens-verifying-a-jwt.html) |
| **Azure AD** | `https://login.microsoftonline.com/{tenantId}/discovery/v2.0/keys` | Additional configuration may be required | [Azure AD Documentation](https://learn.microsoft.com/en-us/entra/identity-platform/access-tokens) |
| **Google Identity** | `https://www.googleapis.com/oauth2/v3/certs` | Additional configuration may be required | [Google Identity Documentation](https://developers.google.com/identity/openid-connect/openid-connect#discovery) |
| **SuperTokens** | `https://{YOUR_SUPER_TOKENS_CORE_CONNECTION_URI}/.well-known/jwks.json` | Additional configuration may be required | [SuperTokens Documentation](https://supertokens.com/docs/quickstart/integrations/aws-lambda/session-verification/using-jwt-authorizer) |
| **WorkOS** | `https://api.workos.com/sso/jwks/{YOUR_CLIENT_ID}` | Additional configuration may be required | [WorkOS Documentation](https://workos.com/docs/reference/user-management/session-tokens/jwks) |
| **Custom JWT** | Your own JWKS endpoint | See custom auth requirements | [Custom Auth Setup](/installation/authentication-setup/custom) |
## Authentication Options
Some authentication providers already generate JWTs for users which PowerSync can verify directly — see the documentation for individual providers (e.g. [Supabase Auth](/installation/authentication-setup/supabase-auth), [Firebase Auth](/installation/authentication-setup/firebase-auth)).
For others, some backend code must be added to your application backend to generate the JWTs needed for PowerSync — see [Custom](/installation/authentication-setup/custom) authentication.
For a quick way to get up and running during development, you can generate [Development Tokens](/installation/authentication-setup/development-tokens) directly from the [PowerSync Dashboard](/usage/tools/powersync-dashboard) (PowerSync Cloud) or locally with a self-hosted setup.
# Auth0
Source: https://docs.powersync.com/installation/authentication-setup/auth0
Setting up Auth0 Authentication with PowerSync
On Auth0, create a new API:
* Name: PowerSync
* Identifier: PowerSync instance URL, e.g. `https://{instance}.powersync.journeyapps.com`
On the PowerSync instance, add the Auth0 JWKS URI: `https://{auth0-domain}/.well-known/jwks.json`
In the application, generate access tokens with the PowerSync instance URL as the audience, and use this to connect to PowerSync.
# Custom
Source: https://docs.powersync.com/installation/authentication-setup/custom
Any authentication provider can be supported by generating custom JWTs for PowerSync.
For a quick way to get started before implementing custom auth, [Development Tokens](/installation/authentication-setup/development-tokens) can be used instead.
The process is as follows:
1. The client authenticates the user using the app's authentication provider and typically gets a session token — either a third-party authentication provider or a custom one.
2. The client makes a backend call (authenticated using the above session token), which generates and signs a JWT for PowerSync.
1. For example implementations of this backend endpoint, see [Custom Backend Examples](/resources/demo-apps-example-projects#backend-examples)
3. The client connects to the PowerSync Service using the above JWT.
4. PowerSync verifies the JWT.
The requirements are:
A key pair (private + public key) is required to sign and verify JWTs. The private key is used to sign the JWT,
and the public key is advertised on a public JWKS URL.
Requirements for the key in the JWKS URL:
1. The URL must be a public URL in the [JWKS](https://auth0.com/docs/secure/tokens/json-web-tokens/json-web-key-sets) format.
1. We have an example endpoint available [here](https://hlstmcktecziostiaplz.supabase.co/functions/v1/powersync-jwks); ensure that your response looks similar.
2. Supported signature schemes: RSA, EdDSA and ECDSA.
3. Key type (`kty`): `RSA`, `OKP` (EdDSA) or `EC` (ECDSA).
4. Algorithm (`alg`):
1. `RS256`, `RS384` or `RS512` for RSA
2. `EdDSA` for EdDSA
3. `ES256`, `ES384` or `ES512` for ECDSA
5. Curve (`crv`) - only relevant for EdDSA and ECDSA:
1. `Ed25519` or `Ed448` for EdDSA
2. `P-256`, `P-384` or `P-512` for ECDSA
6. A `kid` must be specified and must match the `kid` in the JWT.
Requirements for the signed JWT:
1. The JWT must be signed using a key in the JWKS URL.
2. JWT must have a `kid` matching the key in the JWKS URL.
3. The `aud` of the JWT must match the PowerSync instance URL.
1. To get the instance URL of a PowerSync instance when using PowerSync Cloud: In the project tree on the [PowerSync dashboard](https://powersync.journeyapps.com/), click on the "Copy instance URL" icon.
2. Alternatively, specify a custom audience in the instance settings.
4. The JWT must expire in 60 minutes or less. Specifically, both `iat` and `exp` fields must be present, with a difference of 3600 or less between them.
5. The user ID must be used as the `sub` of the JWT.
6. Additional fields can be added which can be referenced in Sync Rules [parameter queries](/usage/sync-rules/parameter-queries).
Refer to [this example](https://github.com/powersync-ja/powersync-jwks-example) for creating and verifying JWTs for PowerSync authentication.
Since there is no way to revoke a JWT once issued without rotating the key, we recommend using short expiration periods (e.g. 5 minutes). JWTs older than 60 minutes are not accepted by PowerSync.
#### Rotating Keys
If a private key is compromised, rotate the key on the JWKS endpoint.
PowerSync refreshes the keys from the endpoint every couple of minutes, after which old tokens will not be accepted anymore.
There is a possibility of false authentication errors until PowerSync refreshes the keys. These errors are typically retried by the client and will have little impact. However, to periodically rotate keys without any authentication failures, follow this process:
1. Add a new key to the JWKS endpoint.
2. Wait an hour (or more) to make sure PowerSync has the new key.
3. Start signing new JWT tokens using the new key.
4. Wait until all existing tokens have expired.
5. Remove the old key from the JWKS endpoint.
# Development Tokens
Source: https://docs.powersync.com/installation/authentication-setup/development-tokens
PowerSync allows generating temporary development tokens for authentication. This is useful for developers who want to get up and running quickly, without a full custom auth implementation. This may also be used to generate a token for a specific user to debug issues.
## Generating a Development Token:
### PowerSync Cloud - Dashboard:
1. **Enable setting**: The "Enable development tokens" setting must be set on the PowerSync instance. It can be set in the instance's config (In the [PowerSync dashboard](https://powersync.journeyapps.com/): Edit instance -> *Client Auth*).
1. **Generate token**: Call the "Generate development token" action for your instance. In the [PowerSync dashboard](https://powersync.journeyapps.com/), this can be done via the command palette (CMD+SHIFT+P / SHIFT+SHIFT), or by selecting it from an instance's options (right-click on an instance for options).
1. Enter token subject / user ID: This is the ID of the user you want to authenticate and is used in [sync rules](/usage/sync-rules) as `request.user_id()` (previously, `token_parameters.user_id`)
1. Copy the generated token. Note that these tokens expire after 12 hours.
### Self-hosted Setup / Local Development
For self-hosted [local development](/self-hosting/local-development), the [powersync-service test client](https://github.com/powersync-ja/powersync-service/tree/main/test-client) contains a script to generate a development token, given a .yaml config file with an HS256 key. Run the following command:
```bash
node dist/bin.js generate-token --config path/to/powersync.yaml --sub test-user
```
For more information on generating development tokens, see the [Generate development tokens tutorial](/tutorials/self-host/generate-dev-token)
## Usage
To use the temporary development token, update the `fetchCredentials()` function in your backend connector to return the generated token (see [Integrate with your Backend](/installation/client-side-setup/integrating-with-your-backend) for more information).
Example:
```js
return PowerSyncCredentials(
endpoint: AppConfig.powersyncUrl,
token: 'temp-token-here');
```
# Firebase Auth
Source: https://docs.powersync.com/installation/authentication-setup/firebase-auth
Setting up Firebase Authentication with PowerSync
Configure authentication on the PowerSync instance with the following settings:
* JWKS URI: [https://www.googleapis.com/service\_accounts/v1/jwk/securetoken@system.gserviceaccount.com](https://www.googleapis.com/service_accounts/v1/jwk/securetoken@system.gserviceaccount.com)
* JWT Audience: Firebase project ID
Firebase signs these tokens using RS256.
PowerSync will periodically refresh the keys using the above JWKS URI, and validate tokens against the configured audience (token `aud` value).
The Firebase user UID will be available as `request.user_id()` (previously `token_parameters.user_id`.). To use a different identifier as the user ID in sync rules (for example user email), use [Custom authentication](/installation/authentication-setup/custom).
# Supabase Auth
Source: https://docs.powersync.com/installation/authentication-setup/supabase-auth
PowerSync can verify Supabase JWTs directly when connected to a Supabase-hosted Postgres database.
You can implement various types of auth:
* Standard [Supabase Auth](https://supabase.com/docs/guides/auth)
* JavaScript [example](https://github.com/powersync-ja/powersync-js/blob/58fd05937ec9ac993622666742f53200ee694585/demos/react-supabase-todolist/src/library/powersync/SupabaseConnector.ts#L87)
* Dart/Flutter [example](https://github.com/powersync-ja/powersync.dart/blob/9ef224175c8969f5602c140bcec6dd8296c31260/demos/supabase-todolist/lib/powersync.dart#L38)
* Kotlin [example](https://github.com/powersync-ja/powersync-kotlin/blob/4f60e2089745dda21b0d486c70f47adbbe24d289/connectors/supabase/src/commonMain/kotlin/com/powersync/connector/supabase/SupabaseConnector.kt#L75)
* Anonymous Sign-Ins
* JavaScript [Example](https://github.com/powersync-ja/powersync-js/blob/58fd05937ec9ac993622666742f53200ee694585/demos/react-multi-client/src/library/SupabaseConnector.ts#L47)
* Fully custom auth
* [Example](https://github.com/powersync-ja/powersync-jwks-example/)
* Experimental: We've also heard from the community that Supabase's newly released [support for external auth providers works](https://supabase.com/blog/third-party-auth-mfa-phone-send-hooks), but we don't have any examples for this yet.
## Enabling Supabase Auth
To implement either **Supabase Auth** or **Anonymous Sign-Ins**, enable the relevant setting on the PowerSync instance, and provide your Supabase JWT Secret. Internally, this setting allows PowerSync to verify and use Supabase JWTs directly using HS256 and the provided secret.
### PowerSync Cloud instances:
1. In the PowerSync Dashboard, right-click on your instance to edit it.
2. Under the **"Client Auth"** tab, enable **"Use Supabase Auth"** and enter your Supabase **JWT Secret** (from the [JWT Keys](https://supabase.com/dashboard/project/_/settings/jwt) section in the Supabase dashboard):
3. Click **"Save and deploy"** to deploy the updates to your instance.
### Self-hosted instances:
This can be enabled via your [`config.yaml`](/self-hosting/installation/powersync-service-setup):
```yaml
client_auth:
# Enable this if using Supabase Auth*
supabase: true
supabase_jwt_secret: your-jwt-secret
```
## Sync Rules
The Supabase user UUID will be available as `request.user_id()` in [Sync Rules](/usage/sync-rules). To use a different identifier as the user ID in sync rules (for example user email), use [Custom authentication](/installation/authentication-setup/custom).
# Stytch + Supabase
Source: https://docs.powersync.com/installation/authentication-setup/supabase-auth/stytch-+-supabase
PowerSync is compatible with both Consumer and B2B SaaS Stytch project types when using [Stytch](https://stytch.com/) for authentication with Supabase projects.
## Consumer Authentication
See this community project for detailed setup instructions: [https://github.com/guillempuche/localfirst\_react\_server](https://github.com/guillempuche/localfirst_react_server)
## B2B SaaS Authentication
The high-level approach is:
* Users authenticate via [Stytch](https://stytch.com/)
* Extract the user and org IDs from the Stytch JWT
* Generate a Supabase JWT by calling a Supabase Edge Function that uses the Supabase JWT Secret for signing a new JWT
* Set the `KID` in the JWT header
* You can obtain this from any other Supabase JWT by extracting the KID value from the header — this value is static, even across database upgrades.
* Set the `AUD` field to `authenticated`
* Set the `SUB` field in the JWT payload to the user ID
* Pass this new JWT into your PowerSync `fetchCredentials` function
Use the below settings in your [PowerSync Dashboard](/usage/tools/powersync-dashboard):
Reach out to us directly on our [Discord server](https://discord.gg/powersync) if you have any issues with setting up auth.
# Client-Side Setup
Source: https://docs.powersync.com/installation/client-side-setup
Include the PowerSync Client SDK in your project
## Overview
If you're following the [Implementation Outline](/installation/quickstart-guide#implementation-outline): after configuring your database, connecting your PowerSync instance to it, and defining basic [Sync Rules](/usage/sync-rules), the next step is to include the appropriate *PowerSync Client SDK* package in your app project. On a high level, this involves the following steps:
1. [Install the Client SDK](#installing-the-client-sdk) (see below)
2. [Define your Client-Side Schema](/installation/client-side-setup/define-your-schema)
* The PowerSync Client SDKs expose a managed SQLite database that your app can read from and write to. The client-side schema refers to the schema for that SQLite database.
3. [Instantiate the PowerSync Database](/installation/client-side-setup/instantiate-powersync-database)
* This instantiates the aforemention managed SQLite database.
4. [Integrate with your Backend](/installation/client-side-setup/integrating-with-your-backend) \[Optional]
* This allows write operations on the client-side SQLite database to be uploaded to your backend and applied to your backend database.
* Integrating with your backend is also part of [authentication](/installation/authentication-setup) integration. For initial development and testing, you can use [Development Tokens](/installation/authentication-setup/development-tokens), and then implement proper authentication integration at a later time.
## Installing the Client SDK
PowerSync offers a variety of client SDKs. Please see the steps based on your app language and framework:
Add the [PowerSync pub.dev package](https://pub.dev/packages/powersync) to your project:
```bash
flutter pub add powersync
```
See the full SDK reference for further details and getting started instructions:
**PowerSync is not compatible with Expo Go.**
PowerSync uses a native plugin and is therefore only compatible with Expo Dev Builds.
Add the [PowerSync React Native NPM package](https://www.npmjs.com/package/@powersync/react-native) to your project:
```bash
npx expo install @powersync/react-native
```
```bash
yarn expo add @powersync/react-native
```
```
pnpm expo install @powersync/react-native
```
**Required peer dependencies**
This SDK requires [@journeyapps/react-native-quick-sqlite](https://www.npmjs.com/package/@journeyapps/react-native-quick-sqlite) as a peer dependency. Install it as follows:
```bash
npx expo install @journeyapps/react-native-quick-sqlite
```
```bash
yarn expo add @journeyapps/react-native-quick-sqlite
```
```
pnpm expo install @journeyapps/react-native-quick-sqlite
```
Alternatively, you can install OP-SQLite with the [PowerSync OP-SQLite package](https://github.com/powersync-ja/powersync-js/tree/main/packages/powersync-op-sqlite) which offers [built-in encryption support via SQLCipher](/usage/use-case-examples/data-encryption) and a smoother transition to React Native's New Architecture.
**Polyfills and additional notes:**
* For async iterator support with watched queries, additional polyfills are required. See the [Babel plugins section](https://www.npmjs.com/package/@powersync/react-native#babel-plugins-watched-queries) in the README.
* By default, this SDK connects to a PowerSync instance via WebSocket (from `@powersync/react-native@1.11.0`) or HTTP streaming (before `@powersync/react-native@1.11.0`). See [Developer Notes](/client-sdk-references/react-native-and-expo#developer-notes) for more details on connection methods and platform-specific requirements.
* When using the OP-SQLite package, we recommend adding this [metro config](https://github.com/powersync-ja/powersync-js/tree/main/packages/react-native#metro-config-optional)
to avoid build issues.
See the full SDK reference for further details and getting started instructions:
Add the [PowerSync Web NPM package](https://www.npmjs.com/package/@powersync/web) to your project:
```bash
npm install @powersync/web
```
```bash
yarn add @powersync/web
```
```bash
pnpm install @powersync/web
```
**Required peer dependencies**
This SDK currently requires [`@journeyapps/wa-sqlite`](https://www.npmjs.com/package/@journeyapps/wa-sqlite) as a peer dependency. Install it in your app with:
```bash
npm install @journeyapps/wa-sqlite
```
```bash
yarn add @journeyapps/wa-sqlite
```
```bash
pnpm install @journeyapps/wa-sqlite
```
By default, this SDK connects to a PowerSync instance via WebSocket (from `@powersync/web@1.6.0`) or HTTP streaming (before `@powersync/web@1.6.0`). See [Developer Notes](/client-sdk-references/javascript-web#developer-notes) for more details on connection methods.
See the full SDK reference for further details and getting started instructions:
Add the [PowerSync SDK](https://central.sonatype.com/artifact/com.powersync/core) to your project by adding the following to your `build.gradle.kts` file:
```gradle
kotlin {
//...
sourceSets {
commonMain.dependencies {
api("com.powersync:core:$powersyncVersion")
// If you want to use the Supabase Connector, also add the following:
implementation("com.powersync:connectors:$powersyncVersion")
}
//...
}
}
```
**CocoaPods configuration (recommended for iOS)**
Add the following to the `cocoapods` config in your `build.gradle.kts`:
```gradle
cocoapods {
//...
pod("powersync-sqlite-core") {
linkOnly = true
}
framework {
isStatic = true
export("com.powersync:core")
}
//...
}
```
The `linkOnly = true` attribute and `isStatic = true` framework setting ensure that the `powersync-sqlite-core` binaries are statically linked.
See the full SDK reference for further details and getting started instructions:
You can add the PowerSync Swift package to your project using either `Package.swift` or Xcode:
```swift
let package = Package(
//...
dependencies: [
//...
.package(
url: "https://github.com/powersync-ja/powersync-swift",
exact: ""
),
],
targets: [
.target(
name: "YourTargetName",
dependencies: [
.product(
name: "PowerSync",
package: "powersync-swift"
)
]
)
]
)
```
1. Follow [this guide](https://developer.apple.com/documentation/xcode/adding-package-dependencies-to-your-app#Add-a-package-dependency) to add a package to your project.
2. Use `https://github.com/powersync-ja/powersync-swift.git` as the URL
3. Include the exact version (e.g., `1.0.x`)
See the full SDK reference for further details and getting started instructions:
Add the [PowerSync Node NPM package](https://www.npmjs.com/package/@powersync/node) to your project:
```bash
npm install @powersync/node
```
```bash
yarn add @powersync/node
```
```bash
pnpm install @powersync/node
```
**Required peer dependencies**
This SDK requires [`@powersync/better-sqlite3`](https://www.npmjs.com/package/@powersync/better-sqlite3) as a peer dependency:
```bash
npm install @powersync/better-sqlite3
```
```bash
yarn add @powersync/better-sqlite3
```
```bash
pnpm install @powersync/better-sqlite3
```
**Common installation issues**
The `@powersync/better-sqlite` package requires native compilation, which depends on certain system tools. This compilation process is handled by `node-gyp` and may fail if required dependencies are missing or misconfigured.
Refer to the [PowerSync Node package README](https://www.npmjs.com/package/@powersync/node) for more details.
See the full SDK reference for further details and getting started instructions:
For desktop/server/binary use-cases and WPF, add the [`PowerSync.Common`](https://www.nuget.org/packages/PowerSync.Common/) NuGet package to your project:
```bash
dotnet add package PowerSync.Common --prerelease
```
For MAUI apps, add both [`PowerSync.Common`](https://www.nuget.org/packages/PowerSync.Common/) and [`PowerSync.Maui`](https://www.nuget.org/packages/PowerSync.Maui/) NuGet packages to your project:
```bash
dotnet add package PowerSync.Common --prerelease
dotnet add package PowerSync.Maui --prerelease
```
Add `--prerelease` while this package is in alpha.
See the full SDK reference for further details and getting started instructions:
## Next Steps
For an overview of the client-side steps required to set up PowerSync in your app, continue reading the next sections.
1. [Define your Client-Side Schema](/installation/client-side-setup/define-your-schema)
2. [Instantiate the PowerSync Database](/installation/client-side-setup/instantiate-powersync-database)
3. [Integrate with your Backend](/installation/client-side-setup/integrating-with-your-backend)
For a walkthrough with example implementations for your platform, see the *Getting Started* section of the corresponding SDK reference linked above.
# Define your Schema
Source: https://docs.powersync.com/installation/client-side-setup/define-your-schema
The PowerSync Client SDKs expose a managed SQLite database that your app can read from and write to. The client-side schema refers to the schema for that SQLite database.
The client-side schema is typically mainly derived from your backend database schema and [Sync Rules](/usage/sync-rules), but can also include other tables such as local-only tables.
Note that schema migrations are not required on the SQLite database due to the schemaless nature of the [PowerSync protocol](/architecture/powersync-protocol): schemaless data is synced to the client-side SQLite database, and the client-side schema is then applied to that data using *SQLite views* to allow for structured querying of the data.
**Generate schema automatically (PowerSync Cloud)**
In the [PowerSync Dashboard](/usage/tools/powersync-dashboard), the schema can be generated based off your [Sync Rules](/usage/sync-rules) by right-clicking on an instance and selecting **Generate client-side schema**.
Similar functionality exists in the PowerSync [CLI](/usage/tools/cli).
**Note:** The generated schema will exclude an `id` column, as the client SDK automatically creates an `id` column of type `text`. Consequently, it is not necessary to specify an `id` column in your schema. For additional information on IDs, refer to [Client ID](/usage/sync-rules/client-id).
## Example implementation
For an example implementation of the client-side schema, see the *Getting Started* section of the SDK reference for your platform:
### Flutter
* [1. Define the Schema](/client-sdk-references/flutter#1-define-the-schema)
### React Native & Expo
* [1. Define the Schema](/client-sdk-references/react-native-and-expo#1-define-the-schema)
### JavaScript Web
* [1. Define the Schema](/client-sdk-references/javascript-web#1-define-the-schema)
### Kotlin Multiplatform
* [1. Define the Schema](/client-sdk-references/kotlin-multiplatform#1-define-the-schema)
### Swift
* [1. Define the Schema](/client-sdk-references/swift#1-define-the-schema)
### Node.js (alpha)
* [1. Define the Schema](/client-sdk-references/node#1-define-the-schema)
### .NET (alpha)
* [1. Define the Schema](/client-sdk-references/dotnet#1-define-the-schema)
## ORM Support
For details on ORM support in PowerSync, refer to [Using ORMs with PowerSync](https://www.powersync.com/blog/using-orms-with-powersync) on our blog.
## Next Step
The next step is to instantiate the client-side PowerSync database:
Instantiate the PowerSync Database →
# Instantiate PowerSync Database
Source: https://docs.powersync.com/installation/client-side-setup/instantiate-powersync-database
This instantiates the client-side managed SQLite database.
PowerSync streams changes from your backend database into the client-side SQLite database, based on your [Sync Rules](/usage/sync-rules).
In your client-side app, you can read from and write to the local SQLite database, whether the user is online or offline. Any writes that are made to the SQLite database are placed into an upload queue by the PowerSync Client SDK and automatically uploaded to your app backend (where you apply those changes to the backend database) when the user is connected. This is explained in the next section, [Integrate with your Backend](/installation/client-side-setup/integrating-with-your-backend).
## Example implementation
For an example implementation of instantiating the client-side database, see the *Getting Started* section of the client SDK reference for your platform:
### Flutter
* [2. Instantiate the PowerSync Database](/client-sdk-references/flutter#2-instantiate-the-powersync-database)
### React Native & Expo
* [2. Instantiate the PowerSync Database](/client-sdk-references/react-native-and-expo#2-instantiate-the-powersync-database)
### JavaScript Web
* [2. Instantiate the PowerSync Database](/client-sdk-references/javascript-web#2-instantiate-the-powersync-database)
### Kotlin Multiplatform
* [2. Instantiate the PowerSync Database](/client-sdk-references/kotlin-multiplatform#2-instantiate-the-powersync-database)
### Swift
* [2. Instantiate the PowerSync Database](/client-sdk-references/swift#2-instantiate-the-powersync-database)
### Node.js (alpha)
* [2. Instantiate the PowerSync Database](/client-sdk-references/node#2-instantiate-the-powersync-database)
### .NET (alpha)
* [2. Instantiate the PowerSync Database](/client-sdk-references/dotnet#2-instantiate-the-powersync-database)
## Additional Examples
For additional implementation examples, see [Example / Demo Apps](/resources/demo-apps-example-projects).
## ORM Support
For details on ORM support in PowerSync, refer to [Using ORMs with PowerSync](https://www.powersync.com/blog/using-orms-with-powersync) on our blog.
## Next Step
The next step is to implement the client-side integration with your backend application:
Integrate with your Backend →
# Integrate with your Backend
Source: https://docs.powersync.com/installation/client-side-setup/integrating-with-your-backend
The 'backend connector' provides the connection between the PowerSync Client SDK and your backend application.
After you've [instantiated](/installation/client-side-setup/instantiate-powersync-database) the client-side PowerSync database, you will call `connect()` on it, which causes the PowerSync Client SDK to connect to the [PowerSync Service](/architecture/powersync-service) for the purpose of syncing data to the client-side SQLite database, *and* to connect to your backend application as needed, for two purposes:
| Purpose | Description |
| ------------------------------------- | ----------------------------------------------------------------------------------------------------------------------------------------------------------------------------------------------------------------------------------------------------------------------------------------------- |
| **Uploading writes to your backend:** | Writes that are made to the client-side SQLite database are uploaded to your backend application, where you control how they're applied to your backend database (Postgres, MongoDB or MySQL). This is how PowerSync achieves bi-directional syncing of data. |
| **Authentication integration:** | PowerSync uses JWTs for authentication between the Client SDK and PowerSync Service. Your backend application should be able to generate JWTs that the PowerSync Client SDK can retrieve and use for authentication against your [PowerSync Service](/architecture/powersync-service) instance. |
Accordingly, you must pass a *backend connector* as an argument when you call `connect()` on the client-side PowerSync database. You must define that backend connector, and it must implement two functions/methods:
| Purpose | Function | Description |
| ------------------------------------- | -------------------- | -------------------------------------------------------------------------------------------------------------------------------------------------------------------------------------------------------------------------------------------------------------------------------------------------------------------------------------------------------------------------------------------------------------------------------------------------------------------------------------------------------------------------------------------------------------------------------------------------------------------------------------------------------------------------------------------------------------------------- |
| **Uploading writes to your backend:** | `uploadData()` | The PowerSync Client SDK automatically calls this function to upload client-side write operations to your backend. Whenever you write to the client-side SQLite database, those writes are also automatically placed into an *upload queue* by the Client SDK, and the Client SDK processes the entries in the upload queue by calling `uploadData()`. You should define your `uploadData()` function to call your backend application API to upload and apply the write operations to your backend database. The Client SDK automatically handles retries in the case of failures. See [Writing Client Changes](/installation/app-backend-setup/writing-client-changes) for considerations on the backend implementation. |
| **Authentication integration:** | `fetchCredentials()` | This is called every couple of minutes and is used to obtain a JWT from your backend. The PowerSync Client SDK uses that JWT to authenticate against the PowerSync Service. See [Authentication Setup](/installation/authentication-setup) for instructions on how the JWTs should be generated. |
## Example implementation
For an example implementation of a PowerSync 'backend connector', see the *Getting Started* section of the SDK reference for your platform:
### Flutter
* [3. Integrate with your Backend](/client-sdk-references/flutter#3-integrate-with-your-backend)
### React Native & Expo
* [3. Integrate with your Backend](/client-sdk-references/react-native-and-expo#3-integrate-with-your-backend)
### JavaScript Web
* [3. Integrate with your Backend](/client-sdk-references/javascript-web#3-integrate-with-your-backend)
### Node.js (alpha)
* [3. Integrate with your Backend](/client-sdk-references/node#3-integrate-with-your-backend)
### Kotlin Multiplatform
* [3. Integrate with your Backend](/client-sdk-references/kotlin-multiplatform#3-integrate-with-your-backend)
### Swift
* [3. Integrate with your Backend](/client-sdk-references/swift#3-integrate-with-your-backend)
## More Examples
For additional implementation examples, see the [Example / Demo Apps](/resources/demo-apps-example-projects) section.
## Next Step
The next step is implement the necessary server-side functionality in your backend application to handle the above:
App Backend Setup →
# Database Connection
Source: https://docs.powersync.com/installation/database-connection
Connect a PowerSync instance to your backend database.
This page covers PowerSync Cloud. For self-hosted PowerSync, refer to [this section](/self-hosting/installation/powersync-service-setup#powersync-configuration).
## Create a PowerSync Instance
1. In the **Overview** workspace of the [PowerSync Dashboard](/usage/tools/powersync-dashboard), you will be prompted to create your first instance:
If you've previously created an instance in your project, you can create an additional instance by navigating to **Manage instances** and clicking **Create new instance**:
You can also create an entirely new [project](/usage/tools/powersync-dashboard#hierarchy%3A-organization%2C-project%2C-instance) with its own set of instances. Click on the PowerSync icon in the top left corner of the Dashboard or on **Admin Portal** at the top of the Dashboard, and then click on **Create Project**.
2. Give your instance a name, such as "Testing".
3. \[Optional] You can change the default cloud region from US to EU, JP (Japan), AU (Australia) or BR (Brazil) if desired.
* Note: Additional cloud regions will be considered on request, especially for customers on our Enterprise plan. Please [contact us](/resources/contact-us) if you need a different region.
4. \[Optional] You can opt in to using the `Next` version of the Service, which may contain early access or experimental features. Always use the `Stable` version in production.
5. Click **Next**.
## Specify Connection Details
Each database provider has their quirks when it comes to specifying connection details, so we have documented database-specific and provider-specific instructions below:
## Postgres Provider Specifics
Select your Postgres hosting provider for steps to connect your newly-created PowerSync instance to your Postgres database:
1. From your Supabase Dashboard, select **Connect** in the top navigation bar (or follow this [link](https://supabase.com/dashboard/project/_?showConnect=true)):
2. In the **Direct connection** section, copy the complete connection string (including the `[YOUR-PASSWORD]` placeholder)
3. Back in the PowerSync Dashboard, paste the connection string into the **URI** field. PowerSync will automatically parse this URI to populate the database connection details.
4. Update the **Username** and **Password** fields to use the `powersync_role` and password you created when configuring your Supabase for PowerSync (see [Source Database Setup](/installation/database-setup#supabase)).
5. Note: PowerSync includes Supabase's CA certificate by default, so you can use `verify-full` SSL mode without additional configuration.
6. Your connection settings should look similar to this:
7. Verify your setup by clicking **Test Connection** and resolve any errors.
8. Click **Next**.
9. PowerSync will detect the Supabase connection and prompt you to enable Supabase auth. To enable it, copy your JWT Secret from your project's settings ([JWT Keys](https://supabase.com/dashboard/project/_/settings/jwt) section in the Supabase dashboard) and paste it here:
10. Click **Enable Supabase auth** to finalize your connection settings.
PowerSync will now create an isolated cloud environment for your instance. This typically takes a minute or two.
You can update your instance settings by navigating to the **Manage instances** workspace, opening your instance options and selecting **Edit instance**.
### Troubleshooting
Supabase is configured with a maximum of 4 logical replication slots, with one often used for Supabase Realtime.
It is therefore easy to run out of replication slots, resulting in an error such as "All replication slots are in use" when deploying. To resolve this, delete inactive replication slots by running this query:
```sql
select slot_name, pg_drop_replication_slot(slot_name) from pg_replication_slots where active = false;
```
1. [Locate the connection details from RDS](https://docs.aws.amazon.com/AmazonRDS/latest/UserGuide/USER_ConnectToPostgreSQLInstance.html):
* Copy the **"Endpoint"** value.
* Paste the endpoint into the "**Host**" field.
* Complete the remaining fields: "**Name**", "**Host**", "**Port**", "**Database name**", "**Username**", "**Password**" and "**SSL Mode"** are required. You can paste a connection string into the "**URI**" field to simplify this.
* "**Name**" can be any name for the connection.
* "**Port**" is 5432 for Postgres databases.
* "**Username**" and "**Password**" maps to the `powersync_role` created in [Source Database Setup](/installation/database-setup).
* PowerSync has the AWS RDS CA certificate pre-configured — `verify-full` SSL mode can be used directly, without any additional configuration required.
* If you want to query your source database via the PowerSync Dashboard, enable "**Allow querying data from the dashboard?**".
2. Click **"Test Connection"** and fix any errors.
3. Click **"Save".**
PowerSync deploys and configures an isolated cloud environment for you, which can take a few minutes to complete.
### Troubleshooting
If you get an error such as "IPs in this range are not supported", the instance is likely not configured to be publicly accessible. A DNS lookup on the host should give a public IP, and not for example `10.x.x.x` or `172.31.x.x`.
1. Fill in your connection details from Azure.
1. "**Name**", "**Host**", "**Port**", "**Database name**", "**Username**", "**Password**" and "**SSL Mode"** are required. You can also paste a connection string into the "**URI**" field to simplify data entry.
2. "**Name**" can be any name for the connection.
3. "**Port**" is 5432 for Postgres databases.
4. "**Username**" and "**Password**" maps to the `powersync_role` created in [Source Database Setup](/installation/database-setup).
5. PowerSync has the Azure CA certificate pre-configured — `verify-full` SSL mode can be used directly, without any additional configuration required.
6. If you want to query your source database via the PowerSync Dashboard, enable "**Allow querying data from the dashboard?**".
2. Click **"Test Connection"** and fix any errors.
* If you encounter the error `"must be superuser or replication role to start walsender"`, ensure that you've followed all the steps for enabling logical replication documented [here](https://learn.microsoft.com/en-us/azure/postgresql/flexible-server/concepts-logical#prerequisites-for-logical-replication-and-logical-decoding).
3. Click **"Save".**
PowerSync deploys and configures an isolated cloud environment for you, which can take a few minutes to complete.
1. Fill in your connection details from Google Cloud SQL.
* "**Name**", "**Host**", "**Port**", "**Database name**", "**Username**", "**Password**" and "**SSL Mode"** are required. You can paste a connection string into the "**URI**" field to simplify data entry.
* "**Name**" can be any name for the connection.
* "**Port**" is 5432 for Postgres databases.
* "**Username**" and "**Password**" maps to the `powersync_role` created in [Source Database Setup](/installation/database-setup).
* The server certificate can be downloaded from Google Cloud SQL.
* If SSL is enforced, a client certificate and key must also be created on Google Cloud SQL, and configured on the PowerSync instance.
* If you want to query your source database via the PowerSync Dashboard, enable "**Allow querying data from the dashboard?**".
2. Click **"Test Connection"** and fix any errors.
3. Click **"Save".**
PowerSync deploys and configures an isolated cloud environment for you, which can take a few minutes to complete.
1. Fill in your connection details from [Neon](https://neon.tech/).
1. "**Name**", "**Host**", "**Port**", "**Database name**", "**Username**", "**Password**" and "**SSL Mode"** are required. You can paste a connection string into the "**URI**" field to simplify data entry.
2. "**Name**" can be any name for the connection.
3. "**Port**" is 5432 for Postgres databases.
4. "**Username**" and "**Password**" maps to the `powersync_role` created in [Source Database Setup](/installation/database-setup).
5. Note that if you're using a self-signed SSL certificate for your database server, click the "Download Certificate" button to dynamically fetch the recommended certificate directly from your server.
6. Also note if you get any error such as `server certificate not trusted: SELF_SIGNED_CERT_IN_CHAIN`, click "Download Certificate" to attempt automatic resolution.
7. If you want to query your source database via the PowerSync Dashboard, enable "**Allow querying data from the dashboard?**".
2. Click **"Test Connection"** and fix any errors.
3. Click **"Save".**
PowerSync deploys and configures an isolated cloud environment for you, which can take a few minutes to complete.
1. Fill in your connection details from [Fly Postgres](https://fly.io/docs/postgres/).
1. "**Name**", "**Host**", "**Port**", "**Database name**", "**Username**", "**Password**" and "**SSL Mode"** are required. You can paste a connection string into the "**URI**" field to simplify data entry.
2. "**Name**" can be any name for the connection.
3. "**Port**" is 5432 for Postgres databases.
4. "**Username**" and "**Password**" maps to the `powersync_role` created in [Source Database Setup](/installation/database-setup).
5. Note that if you're using a self-signed SSL certificate for your database server, click the "Download Certificate" button to dynamically fetch the recommended certificate directly from your server.
6. Also note if you get any error such as `server certificate not trusted: SELF_SIGNED_CERT_IN_CHAIN`, click "Download Certificate" to attempt automatic resolution.
7. If you want to query your source database via the PowerSync Dashboard, enable "**Allow querying data from the dashboard?**".
2. Click **"Test Connection"** and fix any errors.
3. Click **"Save".**
PowerSync deploys and configures an isolated cloud environment for you, which can take a few minutes to complete.
1. Head to your PlanetScale database dashboard page at `https://app.planetscale.com//` and click on the "Connect" button to get your database connection parameters.
1. In the PowerSync dashboard, "**Name**", "**Host**", "**Port**", "**Database name**", "**Username**" and "**Password**" are required.
2. "**Name**" can be any name for the connection.
3. "**Host**" is the `host` connection parameter for your database.
4. "**Port**" is 5432 for Postgres databases.
5. "**Username**" and "**Password**" maps to the `powersync_role` created in [Source Database Setup](/installation/database-setup).
1. Important: PlanetScale requires your branch ID to be appended to your username. The username should be `powersync_role`.\. Your PlanetScale branch ID can be found on the same connection details page.
6. **SSL Mode** can remain the default `verify-full`.
7. If you want to query your source database via the PowerSync Dashboard, enable "**Allow querying data from the dashboard?**".
2. Click **"Test Connection"** and fix any errors.
3. Click **"Save".**
PowerSync deploys and configures an isolated cloud environment for you, which can take a few minutes to complete.
For other providers and self-hosted databases:
1. Fill in your connection details.
2. "**Name**", "**Host**", "**Port**", "**Database name**", "**Username**", "**Password**" and "**SSL Mode"** are required. You can paste a connection string into the "**URI**" field to simplify data entry.
3. "**Name**" can be any name for the connection.
4. "**Port**" is 5432 for Postgres databases.
5. "**Username**" and "**Password**" maps to the `powersync_role` created in [Source Database Setup](/installation/database-setup).
6. Note that if you're using a self-signed SSL certificate for your database server, click the "Download Certificate" button to dynamically fetch the recommended certificate directly from your server.
7. Also note if you get any error such as `server certificate not trusted: SELF_SIGNED_CERT_IN_CHAIN`, click "Download Certificate" to attempt automatic resolution.
8. If you want to query your source database via the PowerSync Dashboard, enable "**Allow querying data from the dashboard?**".
9. Click **"Test Connection"** and fix any errors.
10. Click **"Save".**
PowerSync deploys and configures an isolated cloud environment for you, which can take a few minutes to complete.
## MongoDB Specifics
1. Fill in your connection details from MongoDB:
1. Copy your cluster's connection string and paste it into the PowerSync instance **URI** field. PowerSync will automatically parse this URI to populate other connection details.
* The format should be `mongodb+srv://[username:password@]host/[database]`. For example, `mongodb+srv://admin:@cluster0.abcde1.mongodb.net/powersync`
2. Enter your database user's password into the **Password** field. See the necessary permissions in [Source Database Setup](/installation/database-setup#mongodb).
3. "**Database name**" is the database in your cluster to replicate.
2. Click **"Test Connection"** and fix any errors. If have any issues connecting, reach out to our support engineers on our [Discord server](https://discord.gg/powersync) or otherwise [contact us](/resources/contact-us).
1. Make sure that your database allows access to PowerSync's IPs — see [Security and IP Filtering](/installation/database-setup/security-and-ip-filtering)
3. Click **"Save"**.
PowerSync deploys and configures an isolated cloud environment for you, which can take a few minutes to complete.
Also see:
* [MongoDB Atlas Device Sync Migration Guide](/migration-guides/mongodb-atlas)
* [MongoDB Setup](/installation/database-setup#mongodb)
## MySQL (Alpha) Specifics
1. Fill in your connection details from MySQL:
1. "**Name**" can be any name for the connection.
2. "**Host**" and "**Database name**" is the database to replicate.
3. "**Username**" and "**Password**" maps to your database user.
2. Click **"Test Connection"** and fix any errors. If have any issues connecting, reach out to our support engineers on our [Discord server](https://discord.gg/powersync) or otherwise [contact us](/resources/contact-us).
1. Make sure that your database allows access to PowerSync's IPs — see [Security and IP Filtering](/installation/database-setup/security-and-ip-filtering)
3. Click **"Save".**
PowerSync deploys and configures an isolated cloud environment for you, which can take a few minutes to complete.
# Source Database Setup
Source: https://docs.powersync.com/installation/database-setup
Configure your backend database for PowerSync, including permissions and replication settings.
Jump to: [Postgres](#postgres) | [MongoDB](#mongodb) | [MySQL](#mysql-alpha)
## Postgres
**Version compatibility**: PowerSync requires Postgres version 11 or greater.
Configuring your Postgres database for PowerSync generally involves three tasks:
1. Ensure logical replication is enabled
2. Create a PowerSync database user
3. Create `powersync` logical replication publication
We have documented steps for some hosting providers:
### 1. Ensure logical replication is enabled
No action required: Supabase has logical replication enabled by default.
### 2. Create a PowerSync database user
```sql
-- Create a role/user with replication privileges for PowerSync
CREATE ROLE powersync_role WITH REPLICATION BYPASSRLS LOGIN PASSWORD 'myhighlyrandompassword';
-- Set up permissions for the newly created role
-- Read-only (SELECT) access is required
GRANT SELECT ON ALL TABLES IN SCHEMA public TO powersync_role;
```
To restrict read access to specific tables, explicitly list allowed tables for both the `SELECT` privilege, and for the publication mentioned in the next step (as well as for any other publications that may exist).
### 3. Create "powersync" publication
```sql
-- Create a publication to replicate tables.
-- Specify a subset of tables to replicate if required.
-- The publication must be named "powersync"
CREATE PUBLICATION powersync FOR ALL TABLES;
```
### Prerequisites
The instance must be publicly accessible using an IPv4 address.

Access may be restricted to specific IPs if required — see [IP Filtering](/installation/database-setup/security-and-ip-filtering).
### 1. Ensure logical replication is enabled
Set the `rds.logical_replication` parameter to `1` in the parameter group for the instance:

### 2. Create a PowerSync database user
Create a PowerSync user on Postgres:
```sql
-- SQL to create powersync user
CREATE ROLE powersync_role WITH BYPASSRLS LOGIN PASSWORD 'myhighlyrandompassword';
-- Allow the role to perform replication tasks
GRANT rds_replication TO powersync_role;
-- Set up permissions for the newly created role
-- Read-only (SELECT) access is required
GRANT SELECT ON ALL TABLES IN SCHEMA public TO powersync_role;
```
To restrict read access to specific tables, explicitly list allowed tables for both the `SELECT` privilege, and for the publication (as well as for any other publications that may exist).
### 3. Create "powersync" publication
```sql
-- Create a publication to replicate tables.
-- Specify a subset of tables to replicate if required.
-- The publication must be named "powersync"
CREATE PUBLICATION powersync FOR ALL TABLES;
```
PowerSync supports both "Azure Database for PostgreSQL" and "Azure Database for PostgreSQL Flexible Server".
### Prerequisites
The database must be accessible on the public internet. Once you have created your database, navigate to **Settings** → **Networking** and enable **Public access.**
### 1. Ensure logical replication is enabled
Follow the steps as noted in [this Microsoft article](https://learn.microsoft.com/en-us/azure/postgresql/flexible-server/concepts-logical#prerequisites-for-logical-replication-and-logical-decoding) to allow logical replication.
### 2. Create a PowerSync database user
```sql
-- Create a role/user with replication privileges for PowerSync
CREATE ROLE powersync_role WITH REPLICATION BYPASSRLS LOGIN PASSWORD 'myhighlyrandompassword';
-- Set up permissions for the newly created role
-- Read-only (SELECT) access is required
GRANT SELECT ON ALL TABLES IN SCHEMA public TO powersync_role;
```
To restrict read access to specific tables, explicitly list allowed tables for both the `SELECT` privilege, and for the publication mentioned in the next step (as well as for any other publications that may exist).
### 3. Create "powersync" publication
```sql
-- Create a publication to replicate tables.
-- Specify a subset of tables to replicate if required.
-- The publication must be named "powersync"
CREATE PUBLICATION powersync FOR ALL TABLES;
```
### 1. Ensure logical replication is enabled
In Google Cloud SQL Postgres, enabling the logical replication is done using flags:

### 2. Create a PowerSync database user
```sql
-- Create a role/user with replication privileges for PowerSync
CREATE ROLE powersync_role WITH REPLICATION BYPASSRLS LOGIN PASSWORD 'myhighlyrandompassword';
-- Set up permissions for the newly created role
-- Read-only (SELECT) access is required
GRANT SELECT ON ALL TABLES IN SCHEMA public TO powersync_role;
```
To restrict read access to specific tables, explicitly list allowed tables for both the `SELECT` privilege, and for the publication mentioned in the next step (as well as for any other publications that may exist).
### 3. Create "powersync" publication
```sql
-- Create a publication to replicate tables.
-- Specify a subset of tables to replicate if required.
-- The publication must be named "powersync"
CREATE PUBLICATION powersync FOR ALL TABLES;
```
Neon is a serverless Postgres environment with an innovative pricing model that separates storage and compute.
### 1. Ensure logical replication is enabled
To [Ensure logical replication is enabled](https://neon.tech/docs/guides/logical-replication-postgres#prepare-your-source-neon-database):
1. Select your project in the Neon Console.
2. On the Neon Dashboard, select **Settings**.
3. Select **Logical Replication**.
4. Click **Enable** to Ensure logical replication is enabled.
### 2. Create a PowerSync database user
```sql
-- Create a role/user with replication privileges for PowerSync
CREATE ROLE powersync_role WITH REPLICATION BYPASSRLS LOGIN PASSWORD 'myhighlyrandompassword';
-- Set up permissions for the newly created role
-- Read-only (SELECT) access is required
GRANT SELECT ON ALL TABLES IN SCHEMA public TO powersync_role;
```
To restrict read access to specific tables, explicitly list allowed tables for both the `SELECT` privilege, and for the publication mentioned in the next step (as well as for any other publications that may exist).
### 3. Create "powersync" publication
```sql
-- Create a publication to replicate tables.
-- Specify a subset of tables to replicate if required.
-- The publication must be named "powersync"
CREATE PUBLICATION powersync FOR ALL TABLES;
```
Fly Postgres is a [Fly](https://fly.io/) app with [flyctl](https://fly.io/docs/flyctl/) sugar on top to help you bootstrap and manage a database cluster for your apps.
### 1. Ensure logical replication is enabled
Once you've deployed your Fly Postgres cluster, you can use the following command to Ensure logical replication is enabled:
```bash
fly pg config update --wal-level=logical
```

### 2. Create a PowerSync database user
```sql
-- Create a role/user with replication privileges for PowerSync
CREATE ROLE powersync_role WITH REPLICATION BYPASSRLS LOGIN PASSWORD 'myhighlyrandompassword';
-- Set up permissions for the newly created role
-- Read-only (SELECT) access is required
GRANT SELECT ON ALL TABLES IN SCHEMA public TO powersync_role;
```
To restrict read access to specific tables, explicitly list allowed tables for both the `SELECT` privilege, and for the publication mentioned in the next step (as well as for any other publications that may exist).
### 3. Create "powersync" publication
```sql
-- Create a publication to replicate tables.
-- Specify a subset of tables to replicate if required.
-- The publication must be named "powersync"
CREATE PUBLICATION powersync FOR ALL TABLES;
```
### 1. Ensure logical replication is enabled
No action required: PlanetScale has logical replication (`wal_level = logical`) enabled by default.
### 2. Create a PowerSync database user
```sql
-- Create a role/user with replication privileges for PowerSync
CREATE ROLE powersync_role WITH REPLICATION BYPASSRLS LOGIN PASSWORD 'myhighlyrandompassword';
-- Set up permissions for the newly created role
-- Read-only (SELECT) access is required
GRANT SELECT ON ALL TABLES IN SCHEMA public TO powersync_role;
```
To restrict read access to specific tables, explicitly list allowed tables for both the `SELECT` privilege, and for the publication mentioned in the next step (as well as for any other publications that may exist).
### 3. Create "powersync" publication
```sql
-- Create a publication to replicate tables.
-- PlanetScale does not support ON ALL TABLES so
-- Specify each table you want to sync
-- The publication must be named "powersync"
CREATE PUBLICATION powersync
FOR TABLE public.lists, public.todos;
```
For other providers and self-hosted databases:
Need help? Simply contact us on [Discord](https://discord.gg/powersync) and we'll help you get set up.
### 1. Ensure logical replication is enabled
PowerSync reads the Postgres WAL using logical replication in order to create sync buckets in accordance with the specified PowerSync [Sync Rules](/usage/sync-rules).
If you are managing Postgres yourself, set `wal_level = logical` in your config file:

Alternatively, you can use the below SQL commands to check and Ensure logical replication is enabled:
```sql
-- Check the replication type
SHOW wal_level;
-- Ensure logical replication is enabled
ALTER SYSTEM SET wal_level = logical;
```
Note that Postgres must be restarted after changing this config.
If you're using a managed Postgres service, there may be a setting for this in the relevant section of the service's admin console.
### 2. Create a PowerSync database user
```sql
-- Create a role/user with replication privileges for PowerSync
CREATE ROLE powersync_role WITH REPLICATION BYPASSRLS LOGIN PASSWORD 'myhighlyrandompassword';
-- Set up permissions for the newly created role
-- Read-only (SELECT) access is required
GRANT SELECT ON ALL TABLES IN SCHEMA public TO powersync_role;
```
To restrict read access to specific tables, explicitly list allowed tables for both the `SELECT` privilege, and for the publication mentioned in the next step (as well as for any other publications that may exist).
### 3. Create "powersync" publication
```sql
-- Create a publication to replicate tables.
-- Specify a subset of tables to replicate if required.
-- The publication must be named "powersync"
CREATE PUBLICATION powersync FOR ALL TABLES;
```
### Unsupported Hosted Postgres Providers
Due to the logical replication requirement, not all Postgres hosting providers are supported. Notably, some "serverless Postgres" providers do not support logical replication, and are therefore not supported by PowerSync yet.
## MongoDB
**Version compatibility**: PowerSync requires MongoDB version 6.0 or greater.
### Permissions required - MongoDB Atlas
For MongoDB Atlas databases, the minimum permissions when using built-in roles are:
```
readWrite@._powersync_checkpoints
read@
```
To allow PowerSync to automatically enable [`changeStreamPreAndPostImages`](#post-images) on replicated collections (the default for new PowerSync instances), additionally add the `dbAdmin` permission:
```
readWrite@._powersync_checkpoints
read@
dbAdmin@
```
If you are replicating from multiple databases in the cluster, you need read permissions on the entire cluster, in addition to the above:
```
readAnyDatabase@admin
```
### Privileges required - Self-hosted / Custom roles
For self-hosted MongoDB, or for creating custom roles on MongoDB Atlas, PowerSync requires the following privileges/granted actions:
* On the database being replicated: `listCollections`
* On all collections in the database: `changeStream`
* This must apply to the entire database, not individual collections. Specify `collection: ""`
* If replicating from multiple databases, this must apply to the entire cluster. Specify `db: ""`
* On each collection being replicated: `find`
* On the `_powersync_checkpoints` collection: `createCollection`, `dropCollection`, `find`, `changeStream`, `insert`, `update`, and `remove`
* To allow PowerSync to automatically enable [`changeStreamPreAndPostImages`](#post-images) on
replicated collections, additionally add the `collMod` permission on all replicated collections.
### Post-Images
To replicate data from MongoDB to PowerSync in a consistent manner, PowerSync uses Change Streams with [post-images](https://www.mongodb.com/docs/v6.0/reference/command/collMod/#change-streams-with-document-pre--and-post-images) to get the complete document after each change.
This requires the `changeStreamPreAndPostImages` option to be enabled on replicated collections.
PowerSync supports three configuration options for post-images:
1. **Off**: (`post_images: off`): Uses `fullDocument: 'updateLookup'` for backwards compatibility. This was the default for older instances. However, this may lead to consistency issues, so we strongly recommend enabling post-images instead.
2. **Automatic**: (`post_images: auto_configure`) The **default** for new instances: Automatically enables the `changeStreamPreAndPostImages` option on collections as needed. Requires the permissions/privileges mentioned above. If a collection is removed from [Sync Rules](/usage/sync-rules), developers can manually disable `changeStreamPreAndPostImages`.
3. **Read-only**: (`post_images: read_only`): Uses `fullDocument: 'required'` and requires `changeStreamPreAndPostImages: { enabled: true }` to be set on every collection referenced in the [Sync Rules](/usage/sync-rules). Replication will error if this is not configured. This option is ideal when permissions are restricted.
To manually configure collections for `read_only` mode, run this on each collection:
```js
db.runCommand( {
collMod: ,
changeStreamPreAndPostImages: { enabled: }
} )
```
You can view which collections have the option enabled using:
```js
db.getCollectionInfos().filter(c => c.options?.changeStreamPreAndPostImages?.enabled)
```
Post-images can be configured for PowerSync instances as follows:
Configure the **Post Images** setting in the connection configuration in the Dashboard (right-click on your instance to edit it).
Configure `post_images` in the `config.yaml` file.
### MongoDB Atlas private endpoints using AWS PrivateLink
If you need to use private endpoints with MongoDB Atlas, see [Private Endpoints](/installation/database-setup/private-endpoints) (AWS only).
### Migrating from MongoDB Atlas Device Sync
For more information on migrating from Atlas Device Sync to PowerSync, see our [migration guide](/migration-guides/mongodb-atlas).
## MySQL (Alpha)
This section is a work in progress. More details for MySQL connections are coming soon. In the meantime, ask on our [Discord server](https://discord.gg/powersync) if you have any questions.
**Version compatibility**: PowerSync requires MySQL version 5.7 or greater.
MySQL connections use the [binary log](https://dev.mysql.com/doc/refman/8.4/en/binary-log.html) to replicate changes.
Generally, this requires the following config:
* `gtid_mode` : `ON`
* `enforce_gtid_consistency` : `ON`
* `binlog_format` : `ROW`
PowerSync also requires a user with replication permissions on the database. An example:
```sql
-- Create a user with necessary privileges
CREATE USER 'repl_user'@'%' IDENTIFIED BY 'good_password';
-- Grant replication client privilege
GRANT REPLICATION SLAVE, REPLICATION CLIENT ON *.* TO 'repl_user'@'%';
-- Grant access to the specific database
GRANT ALL PRIVILEGES ON powersync.* TO 'repl_user'@'%';
-- Apply changes
FLUSH PRIVILEGES;
```
## Next Step
Next, connect PowerSync to your database:
Refer to **Database Connection**.
Refer to **PowerSync Service Setup** in the Self-Hosting section.
# Private Endpoints
Source: https://docs.powersync.com/installation/database-setup/private-endpoints
## PowerSync Cloud: AWS Private Endpoints
To avoid exposing a database in AWS to the public internet, using AWS Private Endpoints ([AWS PrivateLink](https://aws.amazon.com/privatelink/)) is an option that provides private networking between the source database and the PowerSync Service. Private Endpoints are currently available on our [Team and Enterprise plans](https://www.powersync.com/pricing).
We use Private Endpoints instead of VPC peering to ensure that no other resources are exposed between the VPCs.
Do not rely on Private Endpoints as the only form of security. Always use strong database passwords, and use client certificates if additional security is required.
## Current Limitations
1. Private Endpoints are currently only supported for Postgres and MongoDB instances. [Contact us](/resources/contact-us) if you need this for MySQL.
2. Self-service is not yet available on the PowerSync side — [contact PowerSync support](/resources/contact-us) to configure the instance.
3. Only AWS is supported currently — other cloud providers are not supported yet.
4. The **"Test Connection"** function on the [PowerSync Dashboard](/usage/tools/powersync-dashboard) is not supported yet - the instance has to be deployed to test the connection.
## Concepts
* [AWS PrivateLink](https://aws.amazon.com/privatelink/) is the overarching feature on AWS.
* VPC/Private Endpoint Service is the service that exposes the database, and lives in the same VPC as the source database. It provides a one-way connection to the database without exposing other resources in the VPC.
* *Endpoint Service Name* is a unique identifier for this Endpoint Service.
* Each Endpoint Service may have multiple Private Endpoints in different VPCs.
* VPC/Private Endpoint is the endpoint in the PowerSync VPC. This is what the PowerSync instance connects to.
For custom Endpoint Services for Postgres:
* Network Load Balancer (NLB) is a load balancer that exposes the source database to the Endpoint Service.
* *Target Group* specifies the IPs and ports for the Network Load Balancer to expose.
* *Listener* for the Network Load Balancer is what describes the incoming port on the Network Load Balancer (the port that the PowerSync instance connects to).
## Private Endpoint Setup
MongoDB Atlas supports creating an Endpoint Service per project for AWS.
Limitations:
1. Only Atlas clusters in AWS are supported.
2. The Atlas cluster must be in one of the PowerSync AWS regions - see the list below. Cross-region endpoints are not yet supported by MongoDB Atlas.
3. This is only supported for Atlas clusters - PowerSync does not support PrivateLink for MongoDB clusters self-hosted in AWS.
### 1. Configure the Endpoint Service
1. In the Atlas project dashboard, go to Network Access → Private Endpoint → Dedicated Cluster.
2. Select "Add Private Endpoint".
3. Select AWS and the relevant AWS region.
4. Wait for the Endpoint Service to be created.
5. "Your VPC ID" and "Your Subnet IDs" are not relevant for PowerSync - leave those blank.
6. Avoid running the command to create the "VPC Interface Endpoint"; this step is handled by PowerSync.
7. Note the Endpoint Service Name. This is displayed in the command to run, as the `--service-name` option.
The Service Name should look something like `com.amazonaws.vpce.us-east-1.vpce-svc-0123456`.
Skip the final step of configuring the VPC Endpoint ID - this will be done later.
### 2. PowerSync Setup
On PowerSync, create a new instance, but do not configure the connection yet. Copy the Instance ID.
[Contact us](/resources/contact-us) and provide:
1. The Endpoint Service Name.
2. The PowerSync Instance ID.
We will then configure the instance to use the Endpoint Service for the database connection, and provide you with a VPC Endpoint ID, in the form `vpce-12346`.
### 3. Finish Atlas Endpoint Service Setup
On the Atlas Private Endpoint Configuration, in the final step, specify the VPC Endpoint ID from above.
If you have already closed the dialog, go through the process of creating a Private Endpoint again. It should have the same Endpoint Service Name as before.
Check that the Endpoint Status changes to *Available*.
### 4. Get the Connection String
1. On the Atlas Cluster, select "Connect".
2. Select "Private Endpoint" as the connection type, and select the provisioned endpoint.
3. Select "Drivers" as the connection method, and copy the connection string.
The connection string should look something like `mongodb+srv://:@your-cluster-pl-0.abcde.mongodb.net/`.
### 5. Deploy
Once the Private Endpoint has been created on the PowerSync side, it will be visible in the instance settings
under the connection details, as "VPC Endpoint Hostname".
Configure the instance the connection string from the previous step, then deploy.
Monitor the logs to ensure the instance can connect after deploying.
To configure a Private Endpoint Service, a network load balancer is required to forward traffic to the database.
This can be used with a Postgres database running on an EC2 instance, or an RDS instance.
For AWS RDS, the guide below does not handle dynamic IPs if the RDS instance's IP changes. This needs additional work to automatically update the IP - see this [AWS blog post](https://aws.amazon.com/blogs/database/access-amazon-rds-across-vpcs-using-aws-privatelink-and-network-load-balancer/) on the topic. This is specifically relevant if using an RDS cluster with failover support.
Use the following steps to configure the Endpoint Service:
### 1. Create a Target Group
1. Obtain the RDS Instance's private IP address. Make sure this points to a writable instance.
2. Create a Target Group with IP addresses as target type, using the IP address from above. Use TCP protocol, and specify the database port (typically `5432` for Postgres).
3. Note: The IP address of your RDS instance may change over time. To maintain a consistent connection, consider implementing automation to monitor and update the target group's IP address as needed. See the [AWS blog post](https://aws.amazon.com/blogs/database/access-amazon-rds-across-vpcs-using-aws-privatelink-and-network-load-balancer/) on the topic.
### 2. Create a Network Load Balancer (NLB)
1. Select the same VPC as your RDS instance.
2. Choose at least two subnets in different availability zones.
3. Configure a TCP listener and pick a port (for example `5432` again).
4. Associate the listener with the target group created earlier.
### 3. Modify the Security Group
1. Modify the security group associated with your RDS instance to permit traffic from the load balancer IP range.
### 4. Create a VPC Endpoint Service
1. In the AWS Management Console, navigate to the VPC service and select Endpoint Services.
2. Click on "Create Endpoint Service".
3. Select the Network Load Balancer created in the previous step.
4. If the load balancer is in one of the PowerSync regions (see below), it is not required to select any "Supported Region". If the load balancer is in a different region, select the region corresponding to your PowerSync instance here. Note that this will incur additional AWS charges for the cross-region support.
5. Decide whether to require acceptance for endpoint connections. Disabling acceptance can simplify the process but may reduce control over connections.
6. Under "Supported IP address types", select both IPv4 and IPv6.
7. After creating the endpoint service, note the Service Name. This identifier will be used when configuring PowerSync to connect via PrivateLink.
8. Configure the Endpoint Service to accept connections from the principal `arn:aws:iam::131569880293:root`. See the [AWS documentation](https://docs.aws.amazon.com/vpc/latest/privatelink/configure-endpoint-service.html#add-remove-permissions) for details.
### 5. PowerSync Setup
On PowerSync, create a new instance, but do not configure the connection yet.
[Contact us](/resources/contact-us) and provide the Service Name from above, as well as the PowerSync instance ID created above. We will then configure the instance to use the Endpoint Service for the database connection.
### 6. Deploy
Once the Private Endpoint has been created on the PowerSync side, it will be visible in the instance settings
under the connection details, as "VPC Endpoint Hostname".
Verify the connection details, and deploy the instance. Monitor the logs to ensure the instance can connect after deploying.
## AWS Regions
PowerSync currently runs in the AWS regions below. Make sure the region matching your PowerSync instance is supported in by the Endpoint Service.
1. US: `us-east-1`
2. EU: `eu-west-1`
3. BR: `sa-east-1`
4. JP: `ap-northeast-1`
5. AU: `ap-southeast-2`
# Security & IP Filtering
Source: https://docs.powersync.com/installation/database-setup/security-and-ip-filtering
## TLS with Postgres
PowerSync always [enforces TLS](/usage/lifecycle-maintenance/postgres-maintenance#tls) on connections to the database, and certificate validation cannot be disabled.
## PowerSync Cloud: IP Filtering
For enhanced security, you can restrict database access to PowerSync Cloud's IP addresses. Below are the IP ranges for each region:
```
50.19.5.255
34.193.39.149
18.234.18.91
18.233.128.219
34.202.251.156
```
```
79.125.70.43
18.200.209.88
18.234.18.91
18.233.128.219
34.202.251.156
```
```
54.248.194.85
57.180.73.135
18.234.18.91
18.233.128.219
34.202.251.156
```
```
52.63.101.65
13.211.184.238
18.234.18.91
18.233.128.219
34.202.251.156
```
```
54.207.21.139
54.232.53.97
18.234.18.91
18.233.128.219
34.202.251.156
```
```
2602:817::/44
```
Do not rely on IP filtering as a primary form of security. Always use strong database passwords, and use client certificates if additional security is required.
## PowerSync Cloud: AWS Private Endpoints
See [Private Endpoints](./private-endpoints) for using a private network to your database using AWS PrivateLink (AWS only).
## See Also
* [Data Encryption](/usage/use-case-examples/data-encryption)
* [Security](/resources/security)
# Quickstart Guide / Installation Overview
Source: https://docs.powersync.com/installation/quickstart-guide
PowerSync is designed to be stack agnostic, and currently supports [Postgres](/installation/database-setup#postgres), [MongoDB](/installation/database-setup#mongodb) and [MySQL](/installation/database-setup#mysql-alpha) (alpha) as the backend source database, and has the following official client-side SDKs available:
* [**Flutter**](/client-sdk-references/flutter) (mobile and [web](/client-sdk-references/flutter/flutter-web-support))
* [**React Native**](/client-sdk-references/react-native-and-expo) (mobile and [web](/client-sdk-references/react-native-and-expo/react-native-web-support))
* [**JavaScript Web**](/client-sdk-references/javascript-web) (including integrations for React & Vue)
* [**Kotlin Multiplatform**](/client-sdk-references/kotlin-multiplatform)
* [**Swift**](/client-sdk-references/swift)
* [**Node.js**](/client-sdk-references/node) (alpha)
* [**.NET**](/client-sdk-references/dotnet) (alpha)
Support for additional platforms is on our [Roadmap](https://roadmap.powersync.com/). If one isn't supported today, please add your vote or submit a new idea on our roadmap, and check back soon.
**Postgres Developers: Using Supabase?** If you are using [Supabase](https://supabase.com/) as your backend, we provide a [PowerSync\<>Supabase](/integration-guides/supabase-+-powersync) integration guide which includes a tutorial and demo app to quickly learn how to use PowerSync with Supabase.
## Implementation Outline
The following outlines our recommended steps to implement PowerSync in your project:
Sign up for a free PowerSync Cloud account [here](https://accounts.journeyapps.com/portal/powersync-signup?s=docs) if you want to use our cloud-hosted service. PowerSync can also be self-hosted — see instructions in step 3.
Configure your source database for PowerSync — see [Source Database Setup](/installation/database-setup).
Connect your database to your instance of the PowerSync Service:
1. Using PowerSync Cloud: See [Database Connection](/installation/database-connection)
2. Using self-hosted PowerSync: Refer to [this section](/self-hosting/installation/powersync-service-setup#powersync-configuration).
Define [Sync Rules](/usage/sync-rules) in PowerSync — this enables dynamic partial replication: syncing just a relevant subset of data to each user/client instead of your entire database.
* Learn about Sync Rules in our introductory [blog post](https://www.powersync.com/blog/sync-rules-from-first-principles-partial-replication-to-sqlite).
* We recommend starting with one or two simple [Global Data](/usage/sync-rules/example-global-data) queries.
Generate a [Development Token](/installation/authentication-setup/development-tokens) so you can get up and running quickly, without implementing full authentication integration yet.
Use our hosted [Diagnostics App](https://github.com/powersync-ja/powersync-js/tree/main/tools/diagnostics-app) to validate that your backend source database is syncing into SQLite as expected based on your Sync Rules.
Implement PowerSync in your app using one of our Client SDKs:
1. At this point, we recommend continuing to use your Development Token from step 5 for simplicity.
2. To get a quick feel for PowerSync, you may want to implement a "Hello World" app as a start. Or you can jump straight into installing the client SDK in your existing app. See [Client-Side Setup](/installation/client-side-setup) or follow end-to-end getting started instructions in the [full SDK reference](/client-sdk-references/introduction).
3. Verify that downloads from your source database are working. Data should reflect in your UI and you can also [inspect the SQLite database](/resources/troubleshooting#inspect-local-sqlite-database).
Implement authentication for clients (JWT-based) — see our [docs here](/installation/authentication-setup).
Implement your [backend application](/installation/app-backend-setup) to accept and process writes from clients.
* We have backend examples available [here](/resources/demo-apps-example-projects#backend-examples) for environments like Node.js, Django and Rails.
## Questions?
Join us on [our community Discord server](https://discord.gg/powersync) where you can browse topics from the PowerSync community and ask questions. Our engineers are there to help, and we also have an AI bot on the [#gpt-help](https://discord.com/channels/1138230179878154300/1304118313093173329) channel that provides decent answers to common questions.
# Deploy PowerSync Service on Coolify
Source: https://docs.powersync.com/integration-guides/coolify
Integration guide for deploying the [PowerSync Service](http://localhost:3333/architecture/powersync-service) on Coolify
[Coolify](https://coolify.io/) is an open-source, self-hosted platform that simplifies the deployment and management of applications, databases, and services on your own infrastructure.
Think of it as a self-hosted alternative to platforms like Heroku or Netlify.
Before following this guide, you should:
* Read through the [PowerSync Service Setup](/self-hosting/installation/powersync-service-setup)
guide to understand the requirements and configuration options. This guide assumes you have already done so, and will only cover the Coolify specific setup.
* Have Coolify installed and running.
# Background
For the PowerSync Service to function correctly, you will need:
* A database,
* Authentication service, and
* Data upload service.
The easiest way to get started is to use **Supabase** as it provides all three. However, you can also use a different database, and custom authentication and data upload services.
# Steps
Add the [`Compose file`](/integration-guides/coolify#base-docker-compose-yaml-file) as a Docker Compose Empty resource to your project.
Update the environment variables and config files.
Instructions for each can be found in the [Configuration options](#configuration-options) section.
Click on the `Deploy` button to deploy the PowerSync Service.
The PowerSync Service will now be available at
* `http://localhost:8080` if default config was used, or
* `http://{your_coolify_domain}:{PS_PORT}` if a custom domain or port was specified.
To check the health of the PowerSync Service, see [Healthchecks](/self-hosting/lifecycle-maintenance/healthchecks).
# Configuration options
The following configuration options should be updated:
* Environment variables
* `sync_rules.yaml` file (according to your data requirements)
* `powersync.yaml` file
Environment Variable
Value
PS\_DATABASE\_TYPE
postgresql
PS\_DATABASE\_URI
**Connection string obtained from Supabase** See step 5 in [Connect PowerSync to Your Supabase](/integration-guides/supabase-+-powersync#connect-powersync-to-your-supabase)
PS\_PORT
**Keep default value (8080)**
PS\_MONGO\_URI
mongodb://mongo:27017
PS\_JWKS\_URL
**Keep default value**
```yaml {5}
...
# Client (application end user) authentication settings
client_auth:
# Enable this if using Supabase Auth
supabase: true
...
```
Environment Variable
Value
PS\_DATABASE\_TYPE
postgresql OR mongodb OR mysql
PS\_DATABASE\_URI
The database connection URI (according to your database type) where your data is stored.
PS\_PORT
**Default value (8080)** You can change this if you want the PowerSync Service to be available on a different port.
PS\_MONGO\_URI
mongodb://mongo:27017
PS\_JWKS\_URL
The URL of the JWKS endpoint of your authentication service.
```yaml {5, 11-15,18, 23}
...
# Client (application end user) authentication settings
client_auth:
# Enable this if using Supabase Auth
supabase: false
# JWKS URIs can be specified here
jwks_uri: !env PS_JWKS_URL
# Optional static collection of public keys for JWT verification
jwks:
keys:
- kty: 'oct'
k: 'use_a_better_token_in_production'
alg: 'HS256'
# JWKS audience
audience: ["powersync-dev", "powersync", "http://localhost:8080"]
api:
tokens:
# These tokens are used for local admin API route authentication
- use_a_better_token_in_production
```
# Base `Compose` file
The following Compose file serves as a universal starting point for deploying the PowerSync Service on Coolify.
```yaml
services:
mongo:
image: mongo:7.0
command: --replSet rs0 --bind_ip_all --quiet
restart: unless-stopped
ports:
- 27017:27017
volumes:
- mongo_storage:/data/db
# Initializes the MongoDB replica set. This service will not usually be actively running
mongo-rs-init:
image: mongo:7.0
depends_on:
- mongo
restart: on-failure
entrypoint:
- bash
- -c
- 'mongosh --host mongo:27017 --eval ''try{rs.status().ok && quit(0)} catch {} rs.initiate({_id: "rs0", version: 1, members: [{ _id: 0, host : "mongo:27017" }]})'''
# PowerSync Service
powersync:
image: journeyapps/powersync-service:latest
container_name: powersync
depends_on:
- mongo-rs-init
command: [ "start", "-r", "unified"]
restart: unless-stopped
environment:
- NODE_OPTIONS="--max-old-space-size=1000"
- POWERSYNC_CONFIG_PATH=/home/config/powersync.yaml
- PS_DATABASE_TYPE=${PS_DEMO_BACKEND_DATABASE_TYPE:-postgresql}
- PS_DATABASE_URI=${PS_DATABASE_URI:-postgresql://postgres:postgres@localhost:5432/postgres}
- PS_PORT=${PS_PORT:-8080}
- PS_MONGO_URI=${PS_MONGO_URI:-mongodb://mongo:27017}
- PS_SUPABASE_AUTH=${USE_SUPABASE_AUTH:-false}
- PS_JWKS_URL=${PS_JWKS_URL:-http://localhost:6060/api/auth/keys}
ports:
- ${PS_PORT}:${PS_PORT}
volumes:
- ./volumes/config:/home/config
- type: bind
source: ./volumes/config/sync_rules.yaml
target: /home/config/sync_rules.yaml
content: |
bucket_definitions:
user_lists:
# Separate bucket per To-Do list
parameters: select id as list_id from lists where owner_id = request.user_id()
data:
- select * from lists where id = bucket.list_id
- select * from todos where list_id = bucket.list_id
- type: bind
source: ./volumes/config/powersync.yaml
target: /home/config/powersync.yaml
content: |
# yaml-language-server: $schema=../schema/schema.json
# Note that this example uses YAML custom tags for environment variable substitution.
# Using `!env [variable name]` will substitute the value of the environment variable named
# [variable name].
# migrations:
# # Migrations run automatically by default.
# # Setting this to true will skip automatic migrations.
# # Migrations can be triggered externally by altering the container `command`.
# disable_auto_migration: true
# Settings for telemetry reporting
# See https://docs.powersync.com/self-hosting/telemetry
telemetry:
# Opt out of reporting anonymized usage metrics to PowerSync telemetry service
disable_telemetry_sharing: false
# Settings for source database replication
replication:
# Specify database connection details
# Note only 1 connection is currently supported
# Multiple connection support is on the roadmap
connections:
- type: !env PS_DATABASE_TYPE
# The PowerSync server container can access the Postgres DB via the DB's service name.
# In this case the hostname is pg-db
# The connection URI or individual parameters can be specified.
# Individual params take precedence over URI params
uri: !env PS_BACKEND_DATABASE_URI
# Or use individual params
# hostname: pg-db # From the Docker Compose service name
# port: 5432
# database: postgres
# username: postgres
# password: mypassword
# SSL settings
sslmode: disable # 'verify-full' (default) or 'verify-ca' or 'disable'
# 'disable' is OK for local/private networks, not for public networks
# Required for verify-ca, optional for verify-full
# This should be the certificate(s) content in PEM format
# cacert: !env PS_PG_CA_CERT
# Include a certificate here for HTTPs
# This should be the certificate content in PEM format
# client_certificate: !env PS_PG_CLIENT_CERT
# This should be the key content in PEM format
# client_private_key: !env PS_PG_CLIENT_PRIVATE_KEY
# This is valid if using the `mongo` service defined in `ps-mongo.yaml`
# Connection settings for sync bucket storage
storage:
type: mongodb
uri: !env PS_MONGO_URI
# Use these if authentication is required. The user should have `readWrite` and `dbAdmin` roles
# username: my-mongo-user
# password: my-password
# The port which the PowerSync API server will listen on
port: !env PS_PORT
# Specify sync rules
sync_rules:
path: /home/config/sync_rules.yaml
# Client (application end user) authentication settings
client_auth:
# Enable this if using Supabase Auth
supabase: true
# JWKS URIs can be specified here
jwks_uri: !env PS_JWKS_URL
# Optional static collection of public keys for JWT verification
# jwks:
# keys:
# - kty: 'RSA'
# n: !env PS_JWK_N
# e: !env PS_JWK_E
# alg: 'RS256'
# kid: !env PS_JWK_KID
# JWKS audience
audience: ["powersync-dev", "powersync"]
api:
tokens:
# These tokens are used for local admin API route authentication
- use_a_better_token_in_production
```
{/* # Steps
Add the PowerSync Service resource to your project by either scrolling through the `Services` section or by searching for `powersync` in the search bar.
The default one-click deployable PowerSync Service uses
* MongoDB for internal storage,
* PostgreSQL for replication, and
* [Sync Rules](/usage/sync-rules) as defined for the To-Do List demo application found in [Demo Apps / Example Projects](/resources/demo-apps-example-projects).
If you are running the demo To-Do List application, you can jump to Step 4 and simply deploy the PowerSync Service.
Navigate to the `Environment Variables` tab and update the environment variables as per your requirements. For more information on what environment variables are available, see
[Environment Variables](/tutorials/self-host/coolify#environment-variables).
Navigate to the `Storages` tab and update the `sync_rules.yaml` and `powersync.yaml` files as needed.
For more information see [Sync Rules](/usage/sync-rules) and
the skeleton config file in [PowerSync Service Setup](/self-hosting/installation/powersync-service-setup).
You can expand the content by dragging the bottom right corner of the editor.
There are two parameters whose values should be changed manually if necessary.
- `disable_telemetry_sharing` in telemetry, and
- `supabase` in client_auth
Click on the `Deploy` button to deploy the PowerSync Service.
The PowerSync Service will now be available at
* `http://localhost:8080` if default config was used, or
* `http://{your_coolify_domain}:{PS_PORT}` if a custom domain or port was specified.
*/}
{/* ## What to do next */}
{/*
Update your backend/client `.env` file with the PowerSync URL from [Step 4](#step-4-deploy-the-powersync-service) above.
For this example we assume we have an environment variable named `POWERSYNC_URL`.
```bash
POWERSYNC_URL=http://localhost:8080
```
*/}
{/* ## Environment Variables
Environment Variable
Description
Example
POWERSYNC_CONFIG_PATH
This is the path (inside the container) to the YAML config file
/home/config/powersync.yaml
PS_DATABASE_TYPE
Database replication type
postgresql
PS_BACKEND_DATABASE_URI
Database connection URI
postgresql://postgres:postgres@localhost:5432/postgres
PS_PORT
The port the PowerSync API is accessible on
8080
PS_MONGO_URI
The MongoDB URI used internally by the PowerSync Service
mongodb://mongo:27017
PS_JWKS_URL
Auth URL
http://localhost:6060/api/auth/keys
*/}
# FlutterFlow + PowerSync
Source: https://docs.powersync.com/integration-guides/flutterflow-+-powersync
Integration guide for creating local-first apps with FlutterFlow and PowerSync with Supabase as the backend.
Used in conjunction with **FlutterFlow**, PowerSync enables developers to build local-first apps that are robust in poor network conditions and that have highly responsive frontends while relying on Supabase for their backend. This guide walks you through configuring PowerSync within your FlutterFlow project that has Supabase integration enabled.
**New and Improved integration**: Welcome to our updated FlutterFlow integration guide. This version introduces a dedicated [PowerSync FlutterFlow Library](https://marketplace.flutterflow.io/item/dm1cuOwYzDv6yQL2QOFb), offering a simpler and more robust solution compared to the [previous version](/integration-guides/flutterflow-+-powersync/powersync-+-flutterflow-legacy) which required extensive custom code.
Key improvements are:
* Uses the new [PowerSync FlutterFlow Library](https://marketplace.flutterflow.io/item/dm1cuOwYzDv6yQL2QOFb)
* Supports Web-based test mode
* Streamlined Setup
* No more dozens of custom actions
* Working Attachments package - learn how to sync attachments [here](/integration-guides/flutterflow-+-powersync/handling-attachments).
Note that using libraries in FlutterFlow requires being on a [paid plan with FlutterFlow](https://www.flutterflow.io/pricing). If this is not an option for you, you can use our [legacy guide](/integration-guides/flutterflow-+-powersync/powersync-+-flutterflow-legacy) with custom code to integrate PowerSync in your FlutterFlow project.
This guide uses **Supabase** as the backend database provider for its seamless integration with PowerSync. However, you can integrate a different backend using custom actions. For more information, refer to the [Custom backend connectors](#custom-backend-connectors) section.
## Guide Overview
Before starting this guide, you'll need:
* A PowerSync account ([sign up here](https://accounts.journeyapps.com/portal/powersync-signup?s=docs)).
* A Supabase account ([sign up here](https://supabase.com/dashboard/sign-up)).
* A [paid plan](https://www.flutterflow.io/pricing) with FlutterFlow for the ability to import a Library into a project.
This guide walks you through building a basic item management app from scratch and takes about 30-40 minutes to complete. You should then be able to use this knowledge to build and extend your own app.
1. Configure Supabase and PowerSync Prerequisites
2. Initialize Your FlutterFlow Project
3. Build a Sign-in Screen
4. Read Data
5. Create Data
6. Update Data (Guide coming soon)
7. Delete Data
8. Sign Out
9. (New) Display Connectivity and Sync Status
10. Secure Your App
11. Enable RLS in Supabase
12. Update Sync Rules in PowerSync
## Configure Supabase
1. Create a new project in Supabase.
2. To set up the Postgres database for our demo app, we will create a `lists` table. The demo app will have access to this table even while offline. Run the below SQL statement in your **Supabase SQL Editor**:
```sql
create table
public.lists (
id uuid not null default gen_random_uuid (),
created_at timestamp with time zone not null default now(),
name text not null,
owner_id uuid not null,
constraint lists_pkey primary key (id),
constraint lists_owner_id_fkey foreign key (owner_id) references auth.users (id) on delete cascade
) tablespace pg_default
```
3. PowerSync uses the Postgres [Write Ahead Log (WAL)](https://www.postgresql.org/docs/current/wal-intro.html) to replicate data changes in order to keep PowerSync SDK clients up to date. Run the below SQL statement in your **Supabase SQL Editor** to create a Postgres role/user with replication privileges:
```sql
-- Create a role/user with replication privileges for PowerSync
CREATE ROLE powersync_role WITH REPLICATION BYPASSRLS LOGIN PASSWORD 'myhighlyrandompassword';
-- Set up permissions for the newly created role
-- Read-only (SELECT) access is required
GRANT SELECT ON ALL TABLES IN SCHEMA public TO powersync_role;
```
To restrict read access to specific tables, explicitly list allowed tables for both the `SELECT` privilege, and for the publication mentioned in the next step (as well as for any other publications that may exist).
4. Create a Postgres publication using the SQL Editor. This will enable data to be replicated from Supabase so that your FlutterFlow app can download it.
```sql
-- Create a publication to replicate tables.
-- Specify a subset of tables to replicate if required.
-- The publication must be named "powersync"
CREATE PUBLICATION powersync FOR ALL TABLES;
```
## Configure PowerSync
### Create a PowerSync Cloud Instance
1. In the **Overview** workspace of the [PowerSync Dashboard](/usage/tools/powersync-dashboard), you will be prompted to create your first instance:
If you've previously created an instance in your project, you can create an additional instance by navigating to **Manage instances** and clicking **Create new instance**:
You can also create an entirely new [project](/usage/tools/powersync-dashboard#hierarchy%3A-organization%2C-project%2C-instance) with its own set of instances. Click on the PowerSync icon in the top left corner of the Dashboard or on **Admin Portal** at the top of the Dashboard, and then click on **Create Project**.
2. Give your instance a name, such as "Testing".
3. \[Optional] You can change the default cloud region from US to EU, JP (Japan), AU (Australia) or BR (Brazil) if desired.
* Note: Additional cloud regions will be considered on request, especially for customers on our Enterprise plan. Please [contact us](/resources/contact-us) if you need a different region.
4. \[Optional] You can opt in to using the `Next` version of the Service, which may contain early access or experimental features. Always use the `Stable` version in production.
5. Click **Next**.
### Connect PowerSync to Your Supabase
1. From your Supabase Dashboard, select **Connect** in the top navigation bar (or follow this [link](https://supabase.com/dashboard/project/_?showConnect=true)):
2. In the **Direct connection** section, copy the complete connection string (including the `[YOUR-PASSWORD]` placeholder)
3. Back in the PowerSync Dashboard, paste the connection string into the **URI** field. PowerSync will automatically parse this URI to populate the database connection details.
4. Update the **Username** and **Password** fields to use the `powersync_role` and password you created when configuring your Supabase for PowerSync (see [Source Database Setup](/installation/database-setup#supabase)).
5. Note: PowerSync includes Supabase's CA certificate by default, so you can use `verify-full` SSL mode without additional configuration.
6. Your connection settings should look similar to this:
7. Verify your setup by clicking **Test Connection** and resolve any errors.
8. Click **Next**.
9. PowerSync will detect the Supabase connection and prompt you to enable Supabase auth. To enable it, copy your JWT Secret from your project's settings ([JWT Keys](https://supabase.com/dashboard/project/_/settings/jwt) section in the Supabase dashboard) and paste it here:
10. Click **Enable Supabase auth** to finalize your connection settings.
PowerSync will now create an isolated cloud environment for your instance. This typically takes a minute or two.
You can update your instance settings by navigating to the **Manage instances** workspace, opening your instance options and selecting **Edit instance**.
### Configure Sync Rules
[Sync Rules](/usage/sync-rules) allow developers to control which data gets synced to which user devices using a SQL-like syntax in a YAML file. For the demo app, we're going to specify that each user can only see their own lists.
1. To update your Sync Rules, open the `sync-rules.yaml` file.
2. Replace the `sync-rules.yaml` file's contents with the below:
```yaml
# This will sync the entire table to all users - we will refine this later
bucket_definitions:
global:
data:
- SELECT * FROM lists
```
3. In the top right, click **"Validate sync rules"** and ensure there are no errors. This validates your sync rules against your Postgres database.
4. In the top right, click **"Deploy sync rules"** and select your instance.
5. Confirm in the dialog and wait a couple of minutes for the deployment to complete.
* For additional information on PowerSync's Sync Rules, refer to the [Sync Rules](/usage/sync-rules) documentation.
* If you're wondering how Sync Rules relate to Supabase Postgres [RLS](https://supabase.com/docs/guides/auth/row-level-security), see [this subsection](/integration-guides/supabase-+-powersync/rls-and-sync-rules).
## Initialize Your FlutterFlow Project
1. Create a new Blank project in FlutterFlow.
2. Under **"App Settings" -> "Integrations"**, enable "Supabase".
1. Enter your Supabase "API URL" and public "Anon Key". You can find these under **"Project Settings" -> "API Keys" -> `anon` `public`** in your Supabase dashboard.
2. Click "Get Schema".
3. Add the [PowerSync Library](https://marketplace.flutterflow.io/item/dm1cuOwYzDv6yQL2QOFb) to your FlutterFlow account.
4. Under **"App Settings" -> "Project Dependencies" -> "FlutterFlow Libraries"** click "Add Library".
1. Select the "PowerSync" library.
2. Add your schema:
1. On the PowerSync Dashboard, right-click on your instance and select "Generate Client-Side Schema" and select "FlutterFlow" as the language.
2. Copy and paste the generated schema into the "PowerSyncSchema" field.
3. Copy and paste your PowerSync instance URL into the "PowerSyncUrl" field.
4. Note: The default path for the "HomePage" field under "Library Pages" can be left as is and ignored. FlutterFlow does not currently provide a way to remove it.
5. Close the library config.
5. Under **"Custom Pub Dependencies"**, add a dependency on `powersync_core:1.3.0`:
This version of `powersync_core` is required for running FlutterFlow on Web.
## Build A Sign-In Screen
1. Under the **"Page Selector"**, click **"Add Page, Component, or Flow"**.
2. Select the "Auth 1" template and name the page `Login`.
3. Delete the *Sign Up*, *Forgot Password* and *Social Login* buttons — we will only be supporting Sign In for this demo app.
4. Under **"App Settings" -> "App Settings" -> "Authentication"**:
1. Enable Authentication.
2. Set "Authentication Type" to "Supabase".
3. Set "Entry Page" to the `Login` page you just created.
4. Set "Logged In Page" to "HomePage".
5. In your Supabase Dashboard, under **"Authentication"**, click on **"Add User" -> "Create new user"** and create a user for yourself to test with:
6. Test your app with test mode:
**Checkpoint:** You should now be able to log into the app using the Supabase user account you just created. After logging in you should see a blank screen.
## Read Data
We will now create our first UI and bind it to the data in the local SQLite database on the device.
There are three ways to read data from the SQLite database using PowerSync's FlutterFlow library:
1. Auto-updating queries for Layout Elements with Dynamic Children e.g. the ListView Element
* This uses the library's `PowerSyncQuery` component.
2. Auto-updating queries for basic Layout Elements e.g. Text Elements.
* This uses the library's `PowerSyncStateUpdater` component.
3. Once-off reads for static data.
* This uses the library's `PowerSyncQueryOnce` custom action.
### Prepare Supabase Tables for Reads
For reading data in FlutterFlow, you need a Custom Function per Supabase table to map Supabase rows to data that can be used by the library. This is because FlutterFlow Libraries do not support Supabase classes.
1. Navigate to **"Custom Code"** and add a Custom Function.
2. Name the function `supabaseRowsToList` (if your Supabase table name is "Customers", you would name this `supabaseRowsToCustomers`).
3. Under **Function Settings** on the right, set the "Return Value" to `Supabase Row`
1. Check "Is List".
2. Uncheck "Nullable".
3. Under "Table Name", select `lists`.
4. Also under Function Settings, click "Add Arguments".
1. Set its "Name" to `supabaseRows`
2. Set its "Type" to "JSON".
3. Check "Is List".
4. Uncheck "Nullable".
5. In the Function Code, paste the following code:
```dart
/// MODIFY CODE ONLY BELOW THIS LINE
return supabaseRows.map((r) => ListsRow(r)).toList();
```
6. Click "Save Function".
### 1. Auto-updating queries for Layout Elements with Dynamic Children
#### Create a Component to display List Items
1. Under the **"Page Selector"**, click **"Add Page, Component, or Flow"**.
2. Select the **"New Component"** tab.
3. Select "Create Blank" and call the component `ListItems`.
4. Under the **"Widget Palette"**, drag a "ListView" widget into the `ListItems` component.
5. Still under the **"Widget Palette"**, drag a "ListTile" into the `ListView` widget.
6. Under the **"Widget Tree"**, select the `ListItems` component.
1. At the top right under "Component Parameters" click "Add Parameters".
2. Click "Add Parameter".
3. Set its "Name" to `lists`.
4. Set its "Type" to `Supabase Row`.
5. Check "Is List".
6. Under "Table Name", select `lists`.
7. Click "Confirm".
7. Still under the **"Widget Tree"**, select the "ListView" widget.
1. Select the **"Generate Dynamic Children"** panel on the right.
2. Set the "Variable Name" to `listItem`.
3. Set the "Value" to the component parameter created in the previous step (`lists`).
4. Click "Confirm".
5. Click "Save".
6. Click "Ok" when being prompted about the widget generating its children dynamically.
8. Still under the **"Widget Tree"**, select the `ListTile` widget.
1. In the **"Properties"** panel on the right, under "Title", click on the settings icon next to "Text".
2. Set as "listItem Item".
3. Under "Available Options", select "Get Row Field".
4. Under "Supabase Row Fields", select "name".
5. Click "Confirm".
9. Repeat Step 8 above for the "Subtitle", setting it to "created\_at".
#### Display the List Component and populate it with Data
1. Under the **"Page Selector"**, select your `HomePage`.
2. Under the **"Widget Palette"**, select the "Components and custom widgets imported from library projects" panel.
3. Drag the `PowerSyncQuery` library component into your page.
4. In the Properties panel on the right, under **"Component Parameters" -> "child"**:
1. Click on "Unknown".
2. Select `ListItems` we previously created.
3. Click on `lists`.
4. Set the "Value" to "Custom Functions" -> `supabaseRowsToList` we created previously.
5. Under the `supabaseRows` argument, set the "Value" to "Widget Builder Parameters" -> `rows`.
6. Click "Confirm".
7. Click "Confirm".
5. Still under "Component Parameters" add the SQL query to fetch all list items from the SQLite database:
1. Paste the following into the "sql \[String]" field:
`select * from lists order by created_at;`
2. For this query there are no parameters - this will be covered further down in the guide.
6. Still under "Component Parameters", check "watch \[Boolean]". This ensures that the query auto-updates.
#### Test your App
1. Check that there are no project issues or errors.
2. Reload your app or start another test session.
3. Notice that your homepage is still blank. This is because the `lists` table is empty in Supabase. Create a test row in the table by clicking on "Insert" -> "Insert Row" in your Supabase Table Editor.
1. Leave `id` and `created_at` blank.
2. Enter a name such as "Test from Supabase".
3. Click "Select Record" for `owner_id` and select your test user.
**Checkpoint:** You should now see your single test row magically appear in your app:
### 2. Auto-updating queries for basic Layout Elements
In this section, we will be making the `ListView` component clickable and navigate the user to a page which will eventually display the list's To-Do items. This page will show the selected list's name in the title bar ("AppBar"). This uses Page State and the `PowerSyncStateUpdater` library component.
#### Create a Page Parameter
This parameter will store the selected list's ID.
1. Under the **"Page Selector"**, click **"Add Page, Component, or Flow"**.
2. Create a blank page and name it `Todos`.
3. Under the **"Widget Tree"**, select your `Todos` page.
4. At the top right of the **"Properties"** panel on the right, click on the plus icon for Page Parameters.
5. Click "Add Parameter".
6. Set the "Parameter Name" to `id`.
7. Set the "Type" to "String".
8. Click "Confirm".
#### Create a Local Page State Variable
This variable will store the selected list row.
1. Still in the **"Widget Tree"** with the `Todos` page selected:
2. Select the **"State Management Panel"** on the right.
3. Click on "Add Field".
4. Set "Field Name" to `list`.
5. Set the "Type" to "Supabase Row".
6. Under "Table Name", select `lists`.
7. Click "Confirm".
#### Bind the Page Title to the Page State
1. Under the **"Widget Palette"**, select the "Components and custom widgets imported from library projects" panel.
2. Drag the `PowerSyncStateUpdater` library component into your page.
3. Under the **"Widget Tree"**, select the `PowerSyncStateUpdater` component.
4. In the **"Properties"** panel on the right, under "Component Parameters":
1. Add the SQL query to fetch the selected list from the SQLite database. Paste the following into the "sql \[String]" field:
`select * from lists where id = :id;`
2. Click on "parameters \[Json]" select "Create Map (JSON)" as the variable.
1. Under "Add Map Entries", click "Add Key Value Pair".
2. Set the "Key" to `id`.
3. Set the "Value" to the page parameter created previously called `id`.
4. Check "watch \[Boolean]". This ensures that the query auto-updates.
5. Click "Confirm".
5. Still under "Component Parameters", configure the "onData" action:
1. Open the "Action Flow Editor".
2. Select the "Callback" trigger type.
3. Click "Add Action".
4. Search for "update page" and select "Update Page State".
5. Click "Add Field".
6. Select your `list` page state variable.
7. Set "Select Update Type" to "Set Value".
8. Set "Value to set" to "Custom Functions" -> `supabaseRowsToList`.
9. Set the "Value" to "Callback Parameters" -> `rows`
10. Click "Confirm".
11. Under "Available Options", select "Item at Index".
12. Set "List Index Options" to "First"
13. Click "Confirm".
14. Close the Action Flow Editor.
6. Still under the **"Widget Tree"**, select the "AppBar" -> "Text" widget.
1. In the **"Properties"** panel on the right, click on settings icon next to "Text".
2. Click on "Page State" -> "List".
3. Set "Supabase Row Fields" to "name".
4. (Optional) Set the "Default Variable Value" to `List Name`.
5. Click "Confirm".
#### Make the `ListView` Component Clickable
1. Under the **"Page Selector"**, select your `ListItems` component.
2. Under the **"Widget Tree"**, select the `ListTile` widget.
3. In the **"Actions"** panel on the right, click "Add Action". "On Tap" should be selected by default.
4. In the "Navigation" subsection, select "Navigate To".
5. Select the "Todos" page.
6. Under "Parameters" click "Pass".
7. "id" should be auto-selected, click on it.
8. Click on the settings icon next to "Value"
9. Set it to "listItem Item".
10. Under "Available Options" select "Get Row Field"
11. Under "Supabase Row Fields" select "id".
12. Click "Confirm".
13. (Optional) Enable the back button to navigate back:
1. Under the **"Page Selector"**, select your `Todos` page.
2. Under the **"Widget Tree"**, select the "AppBar" component.
3. In the **"Properties"** panel on the right, enable "Show Default Button".
#### Test your App
Instant Reload your app or start another test session.
**Checkpoint:** You should now be able to click on a list item and it should navigate you to a new page showing the name of the list in the title bar:
### 3. Once off reads for static data
This section is a work in progress. Please reach out on [our Discord](https://discord.gg/powersync) if you have any questions.
## Create Data
You will now update the app so that we can capture new list entries.
1. Under the **"Page Selector"**, select your `HomePage` page.
2. Under the **"Widget Palette"**, search for "float" and drag the "FAB" widget onto your page.
3. In the **"Actions"** panel on the right, click "Add Action".
1. Under "Custom Action" -> "PowerSync", select "powersyncWrite".
2. Under the "Set Action Arguments" -> "sql" section, add the SQL query to create a new list item. For the purpose of this guide we are hardcoding the list's name, normally you would build UI for this.
1. Paste the following into the "Value" field:
`INSERT INTO lists(id, created_at, name, owner_id) VALUES(uuid(), datetime(), 'new item', :userId);`
3. Under the "parameters" section, set the `userId` parameter we're using the above query:
1. Click on "UNSET".
2. Select "Create Map (JSON)" as the variable.
3. Under "Add Map Entries", click "Add Key Value Pair".
4. Set the "Key" to `userId`.
5. Set the "Value" to "Authenticated User" -> "User ID".
6. Click "Confirm".
**Checkpoint:** Reload your app and click on the + floating action button. A new list item should appear, which also automatically syncs to Supabase:
## Update Data
Updating data is possible today using the `powersyncWrite` helper of the Library, and a guide will be published soon. In the mean time, use the section below about [Deleting Data](#delete-data) as a reference. Please reach out on [our Discord](https://discord.gg/powersync) if you have any questions.
## Delete Data
In this section we will add the ability to swipe on a `ListTile` to delete it.
1. Under the **"Page Selector"**, select your `ListItems` component.
2. Under the **"Widget Tree"**, select the `ListTile` widget.
3. In the **"Properties"** panel on the right, enable "Slidable".
4. Click "Open Slidable".
5. Select the "SlidableActionWidget".
6. In the **"Actions"** panel on the right, click "Add Action".
1. Under "Custom Action" -> "PowerSync", select "powersyncWrite".
2. Under the "Set Action Arguments" -> "sql" section, add the SQL query to delete the list item.
1. Paste the following into the "Value" field:
`delete from lists where id = :id;`
3. Under the "parameters" section, set the `id` parameter we're using the above query:
1. Click on "UNSET".
2. Select "Create Map (JSON)" as the variable.
3. Under "Add Map Entries", click "Add Key Value Pair".
4. Set the "Key" to `id`.
5. Set the "Value" to "listItem Item".
6. Under "Available Options" select "Get Row Field".
7. Under "Supabase Row Fields" select "id".
8. Click "Confirm".
9. Click "Confirm".
**Checkpoint:** Reload your app and swipe on a list item. Delete it, and note how it is deleted from the list as well as from Supabase.
## Sign Out
1. Navigate to **"Custom Code"** and create a new Custom Action called `signOut` without Arguments or Return Values and paste the below code:
In the below code, `power_sync_b0w5r9` is the project ID of the PowerSync library. Update it if it changes.
```dart
// Automatic FlutterFlow imports
import '/backend/supabase/supabase.dart';
import "package:power_sync_b0w5r9/backend/schema/structs/index.dart"
as power_sync_b0w5r9_data_schema;
import 'package:ff_theme/flutter_flow/flutter_flow_theme.dart';
import '/flutter_flow/flutter_flow_util.dart';
import '/custom_code/actions/index.dart'; // Imports other custom actions
import '/flutter_flow/custom_functions.dart'; // Imports custom functions
import 'package:flutter/material.dart';
// Begin custom action code
// DO NOT REMOVE OR MODIFY THE CODE ABOVE!
import 'package:power_sync_b0w5r9/custom_code/actions/initialize_power_sync.dart'
as ps;
Future signOut() async {
final database = await ps.getOrInitializeDatabase();
//await database.disconnectAndClear(); // this will completely delete all the local data, use with caution as there may be items still in the upload queue
await database
.disconnect(); //this will simply disconnect from the PowerSync Service and preserve all local data
}
// Set your action name, define your arguments and return parameter,
// and then add the boilerplate code using the green button on the right!
```
2. Click "Save Action".
3. Under the **"Page Selector"**, select your `HomePage` page.
4. Under the **"Widget Palette"**, drag a "Button" onto the right of your "AppBar".
5. In the **"Properties"** panel on the right, rename the "Button Text" to `Sign Out`.
6. Switch to the **"Actions"** panel and open the **"Action Flow Editor"**.
7. Select "On Tap" as the action trigger.
8. Click "Add Action" and add a call to the `signOut` Custom Action.
9. Chain another Action and call to "Supabase Authentication" -> "Log Out":
10. Click "Close".
**Checkpoint:** You should now be able to reload your app and sign out and in again.
## (Optional) Display Connectivity and Sync Status
The PowerSync library provides a built-in component that displays real-time connectivity and synchronization status. Since the sync state is available globally as part of your app state, you can easily monitor the database status throughout your application. To add this status indicator:
1. Under the **Widget Palette**, select the "Components and custom widgets imported from library projects" panel.
2. Drag the `PowerSyncConnectivity` component into your home page's "AppBar".
## Secure Your App
PowerSync's [Sync Rules](/usage/sync-rules) and Supabase's support for [Row Level Security (RLS)](https://supabase.com/docs/guides/auth/row-level-security) can be used in conjunction. Here are some high level similarities and differences:
* RLS should be used as the authoritative set of security rules applied to your users' CRUD operations that reach Postgres.
* Sync Rules are only applied for data that is to be downloaded to clients — they do not apply to uploaded data.
* Sync Rules can typically be considered to be complementary to RLS, and will generally mirror your RLS setup.
### Enable RLS in Supabase
Run the below in your Supabase console to ensure that only list owners can perform actions on the lists table where `owner_id` matches their user id:
```sql
alter table public.lists
enable row level security;
create policy "owned lists" on public.lists for ALL using (
auth.uid() = owner_id
)
```
### Update Sync Rules
Currently all lists are synced to all users, regardless of who the owner of the list is. You will now update this so that only a user's lists are synced to their device:
1. Navigate to the [PowerSync Dashboard](https://powersync.journeyapps.com/) and open your `sync-rules.yaml` file.
2. Delete the existing content and paste the below contents:
```yaml
bucket_definitions:
user_lists:
parameters: select request.user_id() as user_id
data:
- select * from lists where owner_id = bucket.user_id
```
3. Click on **"Validate"**.
4. Click on **"Deploy sync rules"**.
5. Wait for the deploy to complete.
**Checkpoint:** Your app should continue running seamlessly as before.
## Arrays, JSON and Other Types
For column values, PowerSync supports three basic types: Integers, doubles, and strings. These types have been chosen because
they're natively supported by SQLite while also being easy to transport as JSON.
Of course, you may want to to store other values in your Postgres database as well. When syncing a value that doesn't
fit into the three fundamental types, PowerSync will [encode it as a JSON string](/usage/use-case-examples/custom-types-arrays-and-json#custom-types).
To use those values in your app, you'll need to apply a mapping so that you display the correct values and use the
correct representation when uploading data.
As an example, let's consider an added `tags` column on the `lists` table used in this guide. These tags will be
encoded as a string array in Postgres:
```SQL
CREATE TABLE public.lists (
# ... existing columns,
tags text[] DEFAULT '{"default", "tags"}'
);
```
Like all array values, PowerSync will transport this as a JSON string. For instance, a row with the default tags would
be represented as this string: `["default", "tags"]`.
FlutterFlow does not support extracting a list from that string, so the [custom functions](#read-data) responsible
for mapping SQLite rows to FlutterFlow classes needs to be aware of the transformation and reverse it:
```dart
/// MODIFY CODE ONLY BELOW THIS LINE
return supabaseRows.map((r) {
return ListsRow({
...r,
'tags': jsonDecode(r['tags'] as String),
});
}).toList();
```
This transforms the `'["default", "tags"]'` value as it appears into `["default", "tags"]`, the list value expected
for this row.
A similar approach is necessary when making local writes. The local database should be consistent with the
data synced with PowerSync. So all [local writes](#create-data) should write array and JSON values as strings by
encoding them as JSON.
Finally, the PowerSync mapping also needs to be reverted when uploading rows to Postgres. For a
`text[]` column for instance, the local string value would not be accepted by Supabase.
For this reason, the upload behavior for columns with advanced types needs to be customized.
**New feature:** This option has been added in version `0.0.7` of the PowerSync FlutterFlow library.
Please make sure you're using that version or later.
To customize the uploading behavior, create a new custom action (e.g. `applyPowerSyncOptions`). After the
default imports, put this snippet:
```dart
import 'package:power_sync_b0w5r9/custom_code/actions/initialize_power_sync.dart';
Future applyPowerSyncOptions() async {
// Add your function code here!
powerSyncOptions.transformData = (table, data) {
switch (table) {
case 'lists':
data['tags'] = jsonDecode(data['tags'] as String);
}
};
}
```
Also, add this function to your `main.dart` as a final action.
When setting `powersyncOptions.transformData`, a callback is invoked every time a created or updated row
is uploaded to Supabase.
This allows you to customize how individual values are represented for Postgres. In this case, the `tags`
column of the `lists` table is decoded as JSON so that it's uploaded as a proper array while being stored
as a list locally.
## Custom Backend Connectors
To enable an easy setup, the PowerSync FlutterFlow library integrates with Supabase by default. This means
that as long as you use Supabase for authentication in your app, PowerSync will automatically connect as
soon as users log in, and can automatically upload local writes to a Supabase database.
For apps that don't use Supabase, you can disable this default behavior and instead rely on your own
backend connectors.
For this, create your own custom action (e.g. `applyPowerSyncOptions`). It's important that this action runs
before anything else in your app uses PowerSync, so add this action to your `main.dart` as a final action.
```dart
import 'package:power_sync_b0w5r9/custom_code/actions/initialize_power_sync.dart';
import 'package:powersync/powersync.dart' as ps;
Future applyPowerSyncOptions() async {
// Disable the default Supabase integration
powerSyncOptions.useSupabaseConnector = false;
final db = await getOrInitializeDatabase();
// TODO: Write your own connector and call connect/disconnect when a user logs
// in.
db.connect(connector: _MyCustomConnector());
}
final class _MyCustomConnector extends ps.PowerSyncBackendConnector {
@override
Future fetchCredentials() {
// TODO: implement fetchCredentials
throw UnimplementedError();
}
@override
Future uploadData(ps.PowerSyncDatabase database) {
// TODO: implement uploadData
throw UnimplementedError();
}
}
```
For more information on writing backend connectors, see [integrating with your backend](/client-sdk-references/flutter#3-integrate-with-your-backend).
## Known Issues, Limitations and Gotchas
Below is a list of known issues and limitations.
1. Deploying to the Apple App Store currently requires some workarounds due to limitations in FlutterFlow:
1. Download the code from FlutterFlow.
2. Open the `Podfile` located in the `ios/` directory.
3. The following option in the `Podfile` needs to be updated from `use_frameworks! :linkage => :static` to `use_frameworks!` (remove everything after the exclamation sign).
4. After removing that option, clean the build folder and build the project again.
5. You should now be able to submit to the App Store.
2. Exporting the code from FlutterFlow using the "Download Code" action in FlutterFlow requires the same workaround listed above.
3. Other common issues and troubleshooting techniques are documented here: [Troubleshooting](/resources/troubleshooting).
# Flutter Web
Source: https://docs.powersync.com/integration-guides/flutterflow-+-powersync/flutter-web
PowerSync supports Flutter Web.
This section is a work in progress — reach out to us on our [Discord](https://discord.gg/powersync) if you need assistance in the meantime.
# Full-Text Search
Source: https://docs.powersync.com/integration-guides/flutterflow-+-powersync/full-text-search
PowerSync supports [Full-Text Search](/usage/use-case-examples/full-text-search) on all Flutter platforms.
This section is a work in progress — reach out to us on our [Discord](https://discord.gg/powersync) if you need assistance in the meantime.
# Handling Attachments
Source: https://docs.powersync.com/integration-guides/flutterflow-+-powersync/handling-attachments
Learn how to sync attachments such as images and PDFs with PowerSync, FlutterFlow and Supabase Storage.
You can synchronize attachments, such as images and PDFs, between user devices and a remote storage provider using the [`powersync_attachments_helper`](https://pub.dev/packages/powersync_attachments_helper) package for Flutter. This guide uses Supabase Storage as the remote storage provider to store and serve photos. Other media types, like [PDFs](/tutorials/client/attachments-and-files/pdf-attachment), are also supported.
At a high level, the \[`powersync_attachments_helper`] package syncs attachments by:
* Storing files locally on the device in a structured way, linking them to specific database records.
* Maintaining attachment metadata in the local SQLite database to track the sync state of each attachment.
* Managing uploads, downloads, and retries through a local attachment queue to ensure local files stay in sync with remote storage.
* Providing a file operations API with methods to add, remove, and retrieve attachments.
## Prerequisites
To follow this guide, ensure you have completed the [FlutterFlow + PowerSync integration guide](/integration-guides/flutterflow-+-powersync). At minimum, you should have implemented everything up to step 4, which involves reading data where your app's `lists` are displayed and clickable.
## Update schema to track attachments
Here we add a `photo_id` column to the `lists` table to link a photo to a list.
### Update Supabase schema
1. In your Supabase dashboard, run the below SQL statement in your Supabase SQL Editor to add the `photo_id` column to the `lists` table:
```sql
ALTER TABLE public.lists
ADD COLUMN photo_id text;
```
2. In FlutterFlow, under **"App Settings" -> "Integrations"**, click "Get Schema".
### Update PowerSync schema
The schema of the local SQLite database should now be updated to include the new `photo_id` column. Additionally, we need to set up a local-only table to store the metadata of photos which is being managed by the helper package.
1. In the PowerSync Dashboard, generate your updated client-side schema: Right-click on your instance and select "Generate Client-Side Schema" and select "FlutterFlow" as the language.
2. In FlutterFlow, under "App Settings" -> "Project Dependencies" -> "FlutterFlow Libraries", click "View Details" of the PowerSync library.
3. Copy and paste the generated schema into the "PowerSyncSchema" field.
## Configure Supabase Storage
1. To configure Supabase Storage for your app, navigate to the **Storage** section of your Supabase project and create a new bucket:
2. Give the storage bucket a name, such as **media**, and hit "Save".
3. Next, configure a policy for this bucket. For the purpose of this demo, we will allow all user operations on the media bucket.
4. Create a new policy for the **media** bucket:
2. Give the new policy a name, and allow SELECT, INSERT, UPDATE, and DELETE.
3. Proceed to review and save the policy.
4) Finally, back in FlutterFlow, create an App Constant to store the bucket name:
1. Under **"App Values" -> "Constants"**, click "Add App Constant".
2. Set "Constant Name" to `supabaseStorageBucket`.
3. Click "Create".
4. Set the "Value" to the name of your Supabase Storage bucket, e.g. `media`.
## Add the PowerSync Attachments Helper to your project
1. Under **"App Settings" -> "Project Dependencies" -> "Custom Pub Dependencies"** click "Add Pub Dependency".
2. Enter `powersync_attachments_helper: ^0.6.18`.
3. Click "Add".
## Create `setUpAttachments` Custom Action
This creates an attachment queue which is responsible for tracking, storing and synching attachment metadata and CRUD operations.
1. Navigate to **"Custom Code"** and add a Custom Action.
2. Name the action `setUpAttachments`.
3. Add the following code:
In the below code, `power_sync_b0w5r9` is the project ID of the PowerSync library. Update it if it changes.
```dart
// DO NOT REMOVE OR MODIFY THE CODE ABOVE!
import 'dart:async';
import 'dart:io';
import 'package:powersync/powersync.dart' as powersync;
import 'package:powersync_attachments_helper/powersync_attachments_helper.dart';
import 'package:power_sync_b0w5r9/custom_code/actions/initialize_power_sync.dart'
show db;
Future setUpAttachments() async {
// Add your function code here!
await _initializeAttachmentQueue(db);
}
PhotoAttachmentQueue? attachmentQueue;
final _remoteStorage = SupabaseStorageAdapter();
class SupabaseStorageAdapter implements AbstractRemoteStorageAdapter {
@override
Future uploadFile(String filename, File file,
{String mediaType = 'text/plain'}) async {
_checkSupabaseBucketIsConfigured();
try {
await Supabase.instance.client.storage
.from(FFAppConstants.supabaseStorageBucket)
.upload(filename, file,
fileOptions: FileOptions(contentType: mediaType));
} catch (error) {
throw Exception(error);
}
}
@override
Future downloadFile(String filePath) async {
_checkSupabaseBucketIsConfigured();
try {
return await Supabase.instance.client.storage
.from(FFAppConstants.supabaseStorageBucket)
.download(filePath);
} catch (error) {
throw Exception(error);
}
}
@override
Future deleteFile(String filename) async {
_checkSupabaseBucketIsConfigured();
try {
await Supabase.instance.client.storage
.from(FFAppConstants.supabaseStorageBucket)
.remove([filename]);
} catch (error) {
throw Exception(error);
}
}
void _checkSupabaseBucketIsConfigured() {
if (FFAppConstants.supabaseStorageBucket.isEmpty) {
throw Exception(
'Supabase storage bucket is not configured in App Constants');
}
}
}
/// Function to handle errors when downloading attachments
/// Return false if you want to archive the attachment
Future onDownloadError(Attachment attachment, Object exception) async {
if (exception.toString().contains('Object not found')) {
return false;
}
return true;
}
class PhotoAttachmentQueue extends AbstractAttachmentQueue {
PhotoAttachmentQueue(db, remoteStorage)
: super(
db: db,
remoteStorage: remoteStorage,
onDownloadError: onDownloadError);
@override
init() async {
if (FFAppConstants.supabaseStorageBucket.isEmpty) {
log.info(
'No Supabase bucket configured, skip setting up PhotoAttachmentQueue watches');
return;
}
await super.init();
}
@override
Future saveFile(String fileId, int size,
{mediaType = 'image/jpeg'}) async {
String filename = '$fileId.jpg';
Attachment photoAttachment = Attachment(
id: fileId,
filename: filename,
state: AttachmentState.queuedUpload.index,
mediaType: mediaType,
localUri: getLocalFilePathSuffix(filename),
size: size,
);
return attachmentsService.saveAttachment(photoAttachment);
}
@override
Future deleteFile(String fileId) async {
String filename = '$fileId.jpg';
Attachment photoAttachment = Attachment(
id: fileId,
filename: filename,
state: AttachmentState.queuedDelete.index);
return attachmentsService.saveAttachment(photoAttachment);
}
@override
StreamSubscription watchIds({String fileExtension = 'jpg'}) {
log.info('Watching photos in lists table...');
return db.watch('''
SELECT photo_id FROM lists
WHERE photo_id IS NOT NULL
''').map((results) {
return results.map((row) => row['photo_id'] as String).toList();
}).listen((ids) async {
List idsInQueue = await attachmentsService.getAttachmentIds();
List relevantIds =
ids.where((element) => !idsInQueue.contains(element)).toList();
syncingService.processIds(relevantIds, fileExtension);
});
}
}
Future _initializeAttachmentQueue(powersync.PowerSyncDatabase db) async {
final queue = attachmentQueue = PhotoAttachmentQueue(db, _remoteStorage);
await queue.init();
}
```
4. Click "Save Action".
## Add Final Actions to your `main.dart`
We need to call `initializePowerSync` from the Library to create the PowerSync database, and then call `setUpAttachments` to create the attachments queue. These actions need to happen in this specific order since `setUpAttachments` depends on having the database ready.
1. Still under **Custom Code**, select `main.dart`. Under **File Settings -> Final Actions**, click the plus icon.
2. Select `initializePowerSync`.
3. Click the plus icon again, and select `setUpAttachments`.
4. Save your changes.
**Continue by using Local Run**
Due to a known FlutterFlow limitation, web test mode will crash when both Supabase integration is enabled and actions are added to `main.dart`. Please continue by using Local Run to test your app.
## Create `resolveItemPicture` Custom Action (downloads)
This action handles downloads by taking an attachment ID and returning an `UploadedFile`, which is FLutterFlow's representation of an in-memory file asset. This action calls `attachmentQueue.getLocalUri()` and reads contents from the underlying file.
1. Create another Custom Action and name it `resolveItemPicture`.
2. Add the following code:
```dart
// DO NOT REMOVE OR MODIFY THE CODE ABOVE!
import 'dart:io';
import 'set_up_attachments.dart';
Future resolveItemPicture(String? id) async {
if (id == null) {
return null;
}
final name = '$id.jpg';
final path = await attachmentQueue?.getLocalUri(name);
if (path == null) {
return null;
}
final file = File(path);
if (!await file.exists()) {
return null;
}
return FFUploadedFile(
name: name,
bytes: await file.readAsBytes(),
);
}
```
3. Under **Action Settings -> Define Arguments** on the right, click "Add Arguments".
1. Set the "Name" to `id`.
4. Click "Save Action".
5. Click "Yes" when prompted about parameters in the settings not matching parameters in the code editor.
## Create `setItemPicture` Custom Action (uploads)
This action handles uploads by passing the `UploadedFile` to local storage and then to the upload queue.
1. Create another Custom Action and name it `setItemPicture`.
2. Add the following code:
In the below code, `power_sync_b0w5r9` is the project ID of the PowerSync library. Update it if it changes.
```dart
// DO NOT REMOVE OR MODIFY THE CODE ABOVE!
import 'package:power_sync_b0w5r9/custom_code/actions/initialize_power_sync.dart'
show db;
import 'package:powersync/powersync.dart' as powersync;
import 'set_up_attachments.dart' show attachmentQueue;
Future setItemPicture(
FFUploadedFile? picture,
Future Function(String? photoId) applyToDatabase,
) async {
if (picture == null) {
await applyToDatabase(null);
return;
}
final queue = attachmentQueue;
if (queue == null) {
return;
}
String photoId = powersync.uuid.v4();
final storageDirectory = await queue.getStorageDirectory();
await queue.localStorage
.saveFile('$storageDirectory/$photoId.jpg', picture.bytes!);
queue.saveFile(photoId, picture.bytes!.length);
await applyToDatabase(photoId);
}
```
3. Under **Action Settings -> Define Arguments** on the right, click "Add Arguments".
1. Set the "Name" to `picture`.
2. Under "Type" select "UploadedFile".
4. Click "Add Arguments" again.
1. Set the "Name" to `applyToDatabase`.
2. Under "Type" select "Action".
3. Add an Action Parameter.
4. Set the "Name" to `photoId`.
5. Set its "Type" to "String".
5. Click "Save Action".
6. Click "Yes" when prompted about parameters in the settings not matching parameters in the code editor.
7. Check the Custom Actions for any errors.
**Compilation errors:**
If, at this stage, you receive errors for any of the custom actions, test your app and ensure there are no errors in your Device Logs. FlutterFlow does occasionally show false compilation errors which can safely be ignored.
## Create a Custom Component to display and upload photos
Next, we'll create a custom component that displays an image and includes a button to upload or replace the image file. You can use this component throughout your app wherever you need to display and update images.
### Create the UI widgets of the component
1. Under the **"Page Selector"**, click "Add Page, Component, or Flow".
2. Select the "New Component" tab.
3. Select "Create Blank" and call the component `ListImage`.
4. Under the **"Widget Tree"**, click on "Add a child to this widget".
1. Add the "Image" widget.
2. Expand the width of the image to fill the available space.
5. Click on "Add a child to this widget" for the `ListImage` again.
1. Add the "Button" widget.
2. Select "Wrap in Column" when prompted.
### Set component parameters and state variables
1. Still under the **"Widget Tree"**, select the `ListImage` component.
1. At the top right under "Component Parameters" click "Add Parameters".
2. Click "Add Parameter".
3. Set its "Name" to `listId`.
4. Set its "Type" to `String`.
5. Click "Confirm".
2. In the same panel, add Local Component State Variables:
1. Define a variable to store the image file:
1. Click "Add Field".
2. Set its "Field Name" to `image`.
3. Set its "Type" to `Uploaded File`.
2. Define a variable that stores the ID of the image:
1. Click "Add Field" again.
2. Set its "Field Name" to `photoId`.
3. Set its "Type" to `String`.
4. Check "Nullable.
3. Define a variable that indicates whether an image is loaded or not. We'll use this to set conditional visibility of the component:
1. Click "Add Field" again.
2. Set its "Field Name" to `imageLoaded`.
3. Set its "Type" to `Boolean`.
4. Toggle "Initial Field Value" on and off (click it twice) to set it to false.
4. Click "Confirm".
### Set conditional visibility and state
1. Back under the **"Widget Tree"**, select the `Image` widget.
1. In the **"Properties"** panel on the right, enable "Conditional" under "Visibility".
1. Click on "Unset".
2. Select the "Component State" -> `imageLoaded` state variable.
3. Click "Confirm".
2. Further down in the **"Properties"** panel, set the "Image Type" to "Uploaded File".
1. Select the "Component State" -> `image` state variable.
2. Click "Confirm".
### Define the Image widget logic
1. Under the **"Widget Tree"**, select the "Column" component within your `ListImage` component.
1. Click "Add a child to this widget".
2. Add the "Container" widget.
3. In the **"Properties"** panel on the right, set its "Width" and "Height" to 0 respectively. This container can be hidden.
4. Back under the **"Widget Tree"**, click "Add a child to this widget" for the "Container".
5. Select the "Select the "Components and custom widgets imported from library projects" panel, and select the `PowerSyncStateUpdater` component.
6. In the **"Properties"** panel on the right, under the "Component Properties" section:
1. Under the "sql" section, add the SQL query to set the photo:
`select * from lists where id = :id;`
2. Under the "parameters" section, set the `id` parameter we're using the above query:
3. Click on "UNSET".
4. Select "Create Map (JSON)" as the variable.
5. Under "Add Map Entries", click "Add Key Value Pair".
6. Set the "Key" to `id`.
7. Set the Value to "Component Parameters" -> `listId`.
8. Click "Confirm".
9. Check "watch \[Boolean]". This ensures that the query auto-updates.
10. Configure the "onData" action:
1. Open the "Action Flow Editor".
2. Select the "Callback" trigger type.
3. Click "Add Action".
1. Search for "update com" and select "Update Component State".
2. Click "Add Field".
3. Select your `photoId` state variable.
4. Set "Select Update Type" to "Set Value".
5. Set "Value to set" to "Callback Parameters" -> `rows`.
6. Under "Available Options", select "Item at Index".
7. Under "List Index Options" select "First".
8. Under "Available Options" select "JSON Path".
9. Set "JSON Path" to `$.photo_id`.
10. Click "Confirm".
11. Set "Update Type" to "No Rebuild".
4. Chain another action and select the `resolveItemPicture` custom action.
1. Under "Set Action Arguments", click on the settings icon next to "Value".
2. Select "Callback Parameters" -> `rows`.
3. Under "Available Options", select "Item at Index".
4. Under "List Index Options" select "First".
5. Under "Available Options" select "JSON Path".
6. Set "JSON Path" to `$.photo_id`.
7. Click "Confirm".
8. Set "Action Output Variable Name" to `picture`.
5. Chain another action, search for "update com" and select "Update Component State".
1. Click on "Add Field".
2. Select the "image - Uploaded File" state variable.
3. Under "Select Update Type", select "Set Value".
4. Set the "Value to set" to the "Action Outputs" -> `picture` variable.
5. Click "Confirm".
6. Click on "Add Field" again.
7. Select the "imageLoaded" state variable.
8. Under "Select Update Type", select "Set Value".
9. Click on the settings icon next to "Value to set" and select "Code Expression".
10. Select "Code Expression".
11. Click on "Add argument".
12. Select the "var1" placeholder argument.
13. Set its "Name" to `photoId`.
14. Check "Nullable".
15. Set the "Value" to the "Component State" -> `photoId` state variable.
16. Set the "Expression" to `photoId != null && photoId != 'null'`.
17. Ensure there are no errors.
18. Click "Confirm".
6. Close the Action Flow Editor.
### Define the Button widget logic
1. Under the **"Widget Tree"**, select the "Button" widget.
2. In the **"Properties"** panel on the right, under "Button Text", update the text to `Add/replace image`.
3. Switch to the **"Actions"** panel and open the **"Action Flow Editor"**.
4. Select the "On Tap" trigger type.
5. Add an action, search for "media" and select "Upload/Save Media".
6. Under "Upload Type" select "Local Upload (Widget State).
7. Chain another action and select the `setItemPicture` custom action.
8. Under "Set Action Arguments", under the "picture" argument, set the "Value", to the "Widget State" -> "Uploaded Local File" variable.
9. Click "Confirm".
10. Under the "applyToDatabase" argument, add an action and under "Custom Action" -> "PowerSync", select "powersyncWrite".
11. Under the "Set Action Arguments" -> "sql" section, add the SQL query to update the photo.
1. Paste the following into the "Value" field:
`update lists set photo_id = :photo where id = :id;`
2. Under the "parameters" section, set the `photo` parameter and `id` parameters we're using the above query:
3. Click on "UNSET".
4. Select "Create Map (JSON)" as the variable.
5. Under "Add Map Entries", click "Add Key Value Pair".
6. Set the "Key" to `photo`.
7. Set the "Value" to "Action Parameter" -> `photoId`.
8. Click "Confirm".
9. Add another Key Value Pair.
10. Set the "Key" to `id`.
11. Set the Value to "Component Parameters" -> `listId`.
12. Click "Confirm".
## Add the `ListImage` Custom Component to your page
1. Under the **"Page Selector"**, select the `Todos` page.
2. Under the **"Widget Tree"**, right-click on the `PowerSyncStateUpdater` library component.
1. Select "Wrap Widget".
2. Select the "Container" widget.
3. In the **"Properties"** panel on the right, set the Container's "Width" and "Height" to 0 respectively. This container can be hidden.
3. Back under the **"Widget Tree"**, add a child to the "Column" widget.
1. Select the "Components and custom widgets defined in this project" panel, and select the `ListImage` component.
2. In the `ListImage` **"Properties"** panel on the right, under "Component Parameters", click on the settings icons next to "listId \[String]".
3. Select the "Page Parameter" -> `id` variable.
4. Click "Confirm".
**Test your app:**
You should now be able to test your app, select a list item and add or replace an image on the next page:
In Supabase, notice how the image is uploaded to your bucket in Supabase Storage, and the corresponding list has the `photo_id` column set with a reference to the file.
# FlutterFlow + PowerSync Legacy Guide
Source: https://docs.powersync.com/integration-guides/flutterflow-+-powersync/powersync-+-flutterflow-legacy
Legacy integration guide for creating local-first apps with FlutterFlow and PowerSync with Supabase as the backend.
This guide demonstrates our previous FlutterFlow integration approach that uses custom actions. For a simpler and more robust solution, we recommend following our [updated guide](/integration-guides/flutterflow-+-powersync) which leverages the official PowerSync FlutterFlow library.
VIDEO
Used in conjunction with **FlutterFlow**, PowerSync enables developers to build local-first apps that are robust in poor network conditions and that have highly responsive frontends while relying on Supabase for their backend. This guide provides instructions for how to configure PowerSync for use with your FlutterFlow project that has Supabase integration enabled.
## Guide Overview
Before you proceed, this guide assumes that you have already signed up for free accounts with both Supabase and PowerSync. If you haven't signed up for a **PowerSync** account yet, [click here](https://accounts.journeyapps.com/portal/powersync-signup?s=docs) (and if you haven't signed up for Supabase yet, [click here](https://supabase.com/dashboard/sign-up)). This guide also assumes that you already have **Flutter** set up.
This guide also requires [FlutterFlow Local Run](https://flutterflow.io/desktop), so be sure to download and install that.
This guide takes 30-40 minutes to complete.
1. Configure Supabase and PowerSync prerequisites
2. Initialize your FlutterFlow project
3. Build a sign-in screen
4. Initialize PowerSync
5. Reading data
6. Creating data
7. Deleting data
8. Signing out
9. Securing your app
1. Enable RLS in Supabase
2. Update Sync Rules in PowerSync
## Configure Supabase
1. Create a new project in Supabase.
2. PowerSync uses the Postgres [Write Ahead Log (WAL)](https://www.postgresql.org/docs/current/wal-intro.html) to replicate data changes in order to keep PowerSync SDK clients up to date.
Run the below SQL statement in your **Supabase SQL Editor**:
```sql
create table
public.lists (
id uuid not null default gen_random_uuid (),
created_at timestamp with time zone not null default now(),
name text not null,
owner_id uuid not null,
constraint lists_pkey primary key (id),
constraint lists_owner_id_fkey foreign key (owner_id) references auth.users (id) on delete cascade
) tablespace pg_default
```
1. Create a Postgres publication using the SQL Editor. This will enable data to be replicated from Supabase so that your FlutterFlow app can download it.
```sql
create publication powersync for table public.lists;
```
**Note:** this guide uses the default `postgres` user in your Supabase account for replicating changes to PowerSync, since elevating custom roles to replication [has been disabled](https://github.com/orgs/supabase/discussions/9314) in Supabase. If you want to use a custom role for this purpose, contact the Supabase support team.
**Note**: this is a static list of tables. If you add additional tables to your schema, they must also be added to this publication.
## Configure PowerSync
### Create a PowerSync Cloud Instance
1. In the **Overview** workspace of the [PowerSync Dashboard](/usage/tools/powersync-dashboard), you will be prompted to create your first instance:
If you've previously created an instance in your project, you can create an additional instance by navigating to **Manage instances** and clicking **Create new instance**:
You can also create an entirely new [project](/usage/tools/powersync-dashboard#hierarchy%3A-organization%2C-project%2C-instance) with its own set of instances. Click on the PowerSync icon in the top left corner of the Dashboard or on **Admin Portal** at the top of the Dashboard, and then click on **Create Project**.
2. Give your instance a name, such as "Testing".
3. \[Optional] You can change the default cloud region from US to EU, JP (Japan), AU (Australia) or BR (Brazil) if desired.
* Note: Additional cloud regions will be considered on request, especially for customers on our Enterprise plan. Please [contact us](/resources/contact-us) if you need a different region.
4. \[Optional] You can opt in to using the `Next` version of the Service, which may contain early access or experimental features. Always use the `Stable` version in production.
5. Click **Next**.
### Connect PowerSync to Your Supabase
1. From your Supabase Dashboard, select **Connect** in the top navigation bar (or follow this [link](https://supabase.com/dashboard/project/_?showConnect=true)):
2. In the **Direct connection** section, copy the complete connection string (including the `[YOUR-PASSWORD]` placeholder)
3. Back in the PowerSync Dashboard, paste the connection string into the **URI** field. PowerSync will automatically parse this URI to populate the database connection details.
4. Update the **Username** and **Password** fields to use the `powersync_role` and password you created when configuring your Supabase for PowerSync (see [Source Database Setup](/installation/database-setup#supabase)).
5. Note: PowerSync includes Supabase's CA certificate by default, so you can use `verify-full` SSL mode without additional configuration.
6. Your connection settings should look similar to this:
7. Verify your setup by clicking **Test Connection** and resolve any errors.
8. Click **Next**.
9. PowerSync will detect the Supabase connection and prompt you to enable Supabase auth. To enable it, copy your JWT Secret from your project's settings ([JWT Keys](https://supabase.com/dashboard/project/_/settings/jwt) section in the Supabase dashboard) and paste it here:
10. Click **Enable Supabase auth** to finalize your connection settings.
PowerSync will now create an isolated cloud environment for your instance. This typically takes a minute or two.
You can update your instance settings by navigating to the **Manage instances** workspace, opening your instance options and selecting **Edit instance**.
### Configure Sync Rules
[Sync Rules](/usage/sync-rules) allow developers to control which data gets synced to which user devices using a SQL-like syntax in a YAML file. For the demo app, we're going to specify that each user can only see their own to-do lists and list items.
1\. To update your Sync Rules, open the `sync-rules.yaml` file.
1. Replace the `sync-rules.yaml` file's contents with the below:
```yaml This will sync the entire table to all users - we will refine this later
bucket_definitions:
global:
data:
- SELECT * FROM lists
```
For additional information on PowerSync's Sync Rules, refer to the [Sync Rules](/usage/sync-rules) documentation.
If you're wondering how Sync Rules relate to Supabase Postgres [RLS](https://supabase.com/docs/guides/auth/row-level-security), see [this subsection](/integration-guides/supabase-+-powersync/rls-and-sync-rules).
## Initialize Your FlutterFlow Project
1. Create a new Blank app, give it a name, and disable Firebase.
2. Under **"App Settings" -> "Integrations"**, enable Supabase. Enter your **"API URL"** (from the [Project URL](https://supabase.com/dashboard/project/_/settings/api) section in the Supabase dashboard) and **"Anon Key"** ([API Keys](https://supabase.com/dashboard/project/_/settings/api-keys) section in the Supabase dashboard) and click **"Get Schema".**
3. Under **"App Values" -> "Constants"**, click **"Add App Constant".**
1. For **Constant Name**, enter `PowerSyncUrl`.
2. For **Constant Value**, copy and paste your instance URL from the PowerSync Dashboard:
You should now see this under App Constants:
## Build A Sign-In Screen
1. Under Pages, click **"Add Page, Component or Flow".**
2. Select the Auth1 template and name the page "Login".
3. Delete the *Sign Up*, *Forgot Password* and *Social Login* buttons — we will only be supporting Login for this demo app.
4. Under **"App Settings" -> "App Settings" -> "Authentication"**:
1. Enable Authentication.
2. Set Supabase as the Authentication Type.
3. Set the Login page you just created as the Entry Page.
4. Set HomePage as the Logged In Page:
5. In your Supabase Dashboard, under **"Authentication"**, click on **"Add User" -> "Create new user"** and create a user for yourself to test with:
6. Launch your app on a physical or simulator device:
**Checkpoint:** you should now be able to log into the app using the Supabase user account you just created. After logging in you should see a blank screen.
For once, a blank screen means success:
## Initialize PowerSync
1. Click on **"Custom Code" -> "Add" -> "Action".**
2. Name the Custom Action `initpowersync`.
1. **NOTE:** use all lowercase for this Custom Action is important due to naming conversion that FF performs behind the scenes.
3. Copy and paste the custom action code from here:[https://github.com/powersync-ja/powersync-flutterflow-template/blob/flutterflow/lib/custom\_code/actions/initpowersync.dart](https://github.com/powersync-ja/powersync-flutterflow-template/blob/flutterflow/lib/custom_code/actions/initpowersync.dart)
4. Import your schema:
1. On the PowerSync Dashboard, right-click on your instance and select **"Generate Client-Side Schema"** and select Dart as the language.
2. Paste this into your Custom Action code on line 27 after the equals sign.
3. Due to a limitation in FF, you now need to prefix each instance of `Schema`, `Column` and `Table` with `powersync`.
4. Your custom action schema definition should now look like this:
5. Under **"Action Settings"** on the right, add this dependency into "Pubspec Dependencies": `powersync: ^1.8.4`
1. FlutterFlow imports an old version of sqflite by default and it's not possible to remove it, so you also need to add this dependency: `sqflite: ^2.3.3`
2. Your dependencies should now look as follows:
1. Save your new custom action
2. Still in Custom Actions, under **"Custom Files"** click on `main.dart` and set your new Custom Action as a Final Action and click Save.
**Checkpoint:** You should now be able to validate that PowerSync is initializing correctly by taking these steps:
1. Stop any running simulator app sessions
2. Restart the app by clicking "Test", and sign in
3. Click on "Open Device Logs"
4. You should see this kind of log message:
```
flutter: [PowerSync] FINE: 2024-04-16 13:47:52.259974: Credentials: PowerSyncCredentials
flutter: [PowerSync] FINE: 2024-04-16 13:47:52.607802: Applied checkpoint 2
```
## Reading Data
We will now create our first UI and bind it to the data in the local SQLite database on the device.
### Create a Custom Action to Stream all Lists
For watched (real-time) queries in FlutterFlow, you need 2x Custom Actions per table. For delete, update and insert queries you only need 1x Custom Action. We are working to see if we can alleviate this constraint.
1. Create a new Custom Action and call it `watchLists` and paste the below code:
```dart
// Automatic FlutterFlow imports
import '/backend/supabase/supabase.dart';
import '/flutter_flow/flutter_flow_theme.dart';
import '/flutter_flow/flutter_flow_util.dart';
import '/custom_code/actions/index.dart'; // Imports other custom actions
import '/flutter_flow/custom_functions.dart'; // Imports custom functions
import 'package:flutter/material.dart';
// Begin custom action code
// DO NOT REMOVE OR MODIFY THE CODE ABOVE!
import 'package:powersync/powersync.dart' as powersync;
import '/custom_code/actions/initpowersync.dart';
import 'package:supabase_flutter/supabase_flutter.dart';
import 'dart:async';
Future watchLists(
Future Function(List? result) callback) async {
var stream = db.watch('SELECT * FROM lists');
listsSubscription?.cancel(); //it's important to clean up any existing subscriptions otherwise app performance will degrade
listsSubscription = stream.listen((data) {
callback(
data.map((json) => ListsRow(Map.from(json))).toList());
});
}
```
2. Hit Save and click "Yes" on the popup to set the Action Arguments for you:
3. Your Action Arguments should now look as follows:
4. Create the second Custom Action called `getLists` and paste the following code into it:
```dart
// Automatic FlutterFlow imports
import '/backend/supabase/supabase.dart';
import '/flutter_flow/flutter_flow_theme.dart';
import '/flutter_flow/flutter_flow_util.dart';
import '/custom_code/actions/index.dart'; // Imports other custom actions
import '/flutter_flow/custom_functions.dart'; // Imports custom functions
import 'package:flutter/material.dart';
// Begin custom action code
// DO NOT REMOVE OR MODIFY THE CODE ABOVE!
import 'package:powersync/powersync.dart' as powersync;
import '/custom_code/actions/initpowersync.dart';
import 'package:supabase_flutter/supabase_flutter.dart';
Future?> getLists(List? results) async {
return results;
}
```
1. Hit Save and click "Yes" on the popup to set the Action Arguments for you:
2. Your Action Arguments should now look as follows:
3. On the HomePage page, you will create a placeholder Page State variable required for the next step.
1. Click on State Management.
2. Add a dummy variable called "notused" or similar and click Confirm:
4. Still on the HomePage page, select Actions and open **"Action Flow Editor".**
1. Add the `watchLists` Custom Action.
2. Click "Open" to edit the `callback` Argument for `watchLists`.
3. Add the `getLists` Custom Action and set the `results` Action Argument to `result` and click **"Confirm":**
4. Set the **"Action Output Variable Name"** to `allLists` and you should now see this:
5. Add a second action to the chain, and set it to **"Update Page State"** and "**Rebuild Current Page"**. This is to ensure the page gets redrawn when the database updates. Your callback action should now look like this:
6. Click "Close" to exit the Action Flow Editor.
7. In the UI Builder on the HomePage page, add a ListView component and add a ListTile inside the ListView.
8. On the ListView component, click **"Generate Dynamic Children"**. Enter a variable name of `boundLists` and set its value to `allLists` (no further changes). Click Save.
9. On the ListTile component, set the Title field to **"Set from Variable"** and then get the `name` field from the `boundLists` variable:
10. Do the same for the Subtitle field of the ListTile component, and set it to `created_at`.
11. Hot reload your app and the screen will still be blank. This is because the `lists` table is empty in Supabase. Create a test row in the table by clicking on **"Insert" -> "Insert Row"** in your Supabase Table Editor.
12. Leave `id` and `created_at` blank.
13. Enter a name such as "Test from Supabase".
14. Click "Select Record" for `owner_id` and select your test user.
Checkpoint: you should now see your single test row magically appear in your app
## Creating Data
You will now update the app so that we can capture new list entries.
1. Create a new Custom Action called `createListItem` and paste the following code:
```dart
// Automatic FlutterFlow imports
import '/backend/supabase/supabase.dart';
import '/flutter_flow/flutter_flow_theme.dart';
import '/flutter_flow/flutter_flow_util.dart';
import '/custom_code/actions/index.dart'; // Imports other custom actions
import '/flutter_flow/custom_functions.dart'; // Imports custom functions
import 'package:flutter/material.dart';
// Begin custom action code
// DO NOT REMOVE OR MODIFY THE CODE ABOVE!
// Set your action name, define your arguments and return parameter,
// and then add the boilerplate code using the green button on the right!
import 'package:powersync/powersync.dart' as powersync;
import '/custom_code/actions/initpowersync.dart';
import 'package:supabase_flutter/supabase_flutter.dart';
Future createListItem(String name) async {
var supaUserId = await Supabase.instance.client.auth.currentUser?.id;
final results = await db.execute('''
INSERT INTO
lists(id, created_at, name, owner_id)
VALUES(uuid(), datetime(), ?, ?)
''', [name, supaUserId]);
}
```
1. Hit Save and click "Yes" on the popup to set the Action Arguments for you:
2. There should now be one argument for the Custom Action called `name` of type String and not nullable.
3. In the Widget Tree view, select the HomePage page and navigate to State Management.
4. Create a new State Field called `fabClicked` and set the type to boolean and toggle the **"Initial Field Value"** toggle twice to initialize the field to false.
5.
6. In the Widget Tree view, drop a Floating Action Button (FAB) onto the page.
7. Click on the FAB and Open the Action Flow Editor.
8. Add an action to Update Page State.
9. Set the `fabClicked` value to `true` and click Close.
10. On the Widget Palette again, add a Container child to the Column Widget.
11. Now add a Column Widget to this Container.
12. Add a TextField and a Button to this Column Widget.
13. Your homepage layout should now look like this:
11. Set the Container and TextField widgets to have a width of 100%.
12. Click on the Container and enable Conditional Visibility for `fabClicked`.
13. Change the Button text to "Add".
14. Open the Action Flow Editor for the Add button:
15. Add a Custom Action call to `createListItem`.
16. Set the "name" Argument to Widget State -> TextField 1.
17. Chain another Action of "Clear Text Fields / PIN Codes" to clear the TextField\_1 field.
18. Chain another Action to Update Page State and set `fabClicked` to false.
19. Your Action Editor should now look like this:
**Checkpoint:** you should now be able hot reload your app, click on the FAB button and the TextField should appear. Enter a name and click Add. The new row should appear in the ListView and the TextField should be hidden again.
## Deleting Data
In this section we will add the ability to swipe on a ListTile to delete it.
1. Create a new Custom Action called `deleteListItem` and paste the below code:
```dart
// Automatic FlutterFlow imports
import '/backend/supabase/supabase.dart';
import '/flutter_flow/flutter_flow_theme.dart';
import '/flutter_flow/flutter_flow_util.dart';
import '/custom_code/actions/index.dart'; // Imports other custom actions
import '/flutter_flow/custom_functions.dart'; // Imports custom functions
import 'package:flutter/material.dart';
// Begin custom action code
// DO NOT REMOVE OR MODIFY THE CODE ABOVE!
import 'package:powersync/powersync.dart' as powersync;
import '/custom_code/actions/initpowersync.dart';
import 'package:supabase_flutter/supabase_flutter.dart';
Future deleteListItem(ListsRow row) async {
await db.execute('DELETE FROM lists WHERE id = ?', [row.id]);
}
```
1. Hit Save and click "Yes" on the popup to set the Action Arguments for you:
2. The Custom Action Arguments should now look as follows:
3. In the Widget Tree select the ListTile and enable Slidable.
4. Select the SlidableActionWidget from the Widget Tree and set the values to the following:
5. Click on Action Editor and click Add Action, passing in `boundLists` to `deleteListItem` as follows:
**Checkpoint:** Stop and relaunch the app (Hot Reload won't work after adding the slidable package) and you should be able to swipe on items to delete them. Note that they are also magically deleted from Supabase!
## Updating Data
In this section we will add the ability to update a list item. It entails:
* A custom action to handle updating the data
* Setting and using state fields to show/hide UI dynamically and reference the list item to edit
* A button to edit a list item (set up similar to the Delete button in the previous section)
* UI to enter and save the new item name (set up similar to the Create functionality we covered earlier)
1. Create a new Custom Action called `updateListItem` and paste the below code:
```dart
// Automatic FlutterFlow imports
import '/backend/supabase/supabase.dart';
import '/flutter_flow/flutter_flow_theme.dart';
import '/flutter_flow/flutter_flow_util.dart';
import '/custom_code/actions/index.dart'; // Imports other custom actions
import '/flutter_flow/custom_functions.dart'; // Imports custom functions
import 'package:flutter/material.dart';
// Begin custom action code
// DO NOT REMOVE OR MODIFY THE CODE ABOVE!
// Set your action name, define your arguments and return parameter,
// and then add the boilerplate code using the green button on the right!
import 'package:powersync/powersync.dart' as powersync;
import '/custom_code/actions/initpowersync.dart';
import 'package:supabase_flutter/supabase_flutter.dart';
Future updateListItem(String name, ListsRow row) async {
await db.execute('UPDATE lists SET name = ? WHERE id = ?', [name, row.id]);
}
```
1. Hit Save and click "Yes" on the popup to set the Action Arguments for you:
1. The Custom Action Arguments should now look as follows:
1. In the Widget Tree view, select the HomePage page and navigate to State Management.
2. Create a new State Field called `editClicked`, set the type to Boolean and toggle the **"Initial Field Value"** toggle twice to initialize the field to false.
3. Create another new State Field called `listItemIndex`, set the type to Integer. Click Confirm.
4. In the Widget Tree select the ListTile.
5. Under Slidable Properties click Add Action.
6. Select the new SlidableActionWidget from the Widget Tree and set its properties to the following:
7. Open the Action Flow Editor.
8. Add an action to Update Page State.
9. Add Field: Set the `editClicked` value to `true`.
10. Add Field: Set the value of `listItemIndex` to the "Index in List" of the `boundLists` Item and click Close.
1. Chain another Action to "Set Form Field" -> TextField\_2. This will initialize the text field to the current list item's name.
1. Set the variable to the boundLists Item
2. Under Available Options, select "Get Row Field"
3. Under Supabase Row Field, select "name"
4. Your action should look like this:
2. On the Widget Palette again, add a Container child to the Column Widget.
1. Now add a Column Widget to this Container.
2. Add a TextField and a Button to this Column Widget.
3. Your homepage layout should now look like this:
3. Set the Container and TextField widgets to have a width of 100%.
4. Click on the Container and enable Conditional Visibility for `editClicked`.
5. Change the Button text to "Save"
6. Open the Action Flow Editor for the Save button.
1. Add a Custom Action call to `updateListItem`.
2. Set the "name" Argument to Widget State -> TextField 2.
3. Set the "row" Argument:
1. Select Action Outputs -> allLists.
2. Under Available Options select "Item at Index".
3. Under List Index Options select "Specific Index".
4. Set the Index value to the `listItemIndex` Page State variable
5. Click Confirm
6. Chain another Action of "Clear Text Fields / PIN Codes" to clear the TextField\_2 field.
7. Chain another Action to "Update Page State".
8. Add Field: Set `editClicked` to false.
9. Add Field: Set `listItemIndex` to Reset Value.
10. Your Action Editor should now look like this:
7. Close the Action Flow Editor.
**Checkpoint:** you should now be able hot reload your app, slide on an item to edit it. Enter the new item name into the text field that appears, and hit Save. The update should then reflect in Supabase.
## Signing Out
1. Create a new Custom Action called `signOut` without Arguments or Return Values and paste the below code:
```dart
// Automatic FlutterFlow imports
import '/backend/supabase/supabase.dart';
import '/flutter_flow/flutter_flow_theme.dart';
import '/flutter_flow/flutter_flow_util.dart';
import '/custom_code/actions/index.dart'; // Imports other custom actions
import '/flutter_flow/custom_functions.dart'; // Imports custom functions
import 'package:flutter/material.dart';
// Begin custom action code
// DO NOT REMOVE OR MODIFY THE CODE ABOVE!
// Set your action name, define your arguments and return parameter,
// and then add the boilerplate code using the green button on the right!
import 'package:powersync/powersync.dart' as powersync;
import '/custom_code/actions/initpowersync.dart';
Future signOut() async {
listsSubscription?.cancel(); //close any open subscriptions from watch() queries
await db.disconnectAndClear();
}
```
1. Click Save Action.
2. In the Widget Tree, drag a Button onto the right of your App Bar.
3. Rename the button text to "Sign Out".
4. Open Action Editor and click Open to launch the editor.
5. Add a call to the `signOut`Custom Action.
6. Chain another call to Auth -> Log Out:
7. Click Close
**Checkpoint:** You should now be able to hot reload your app and sign out and in again.
## Securing Your App
PowerSync's [Sync Rules](/usage/sync-rules) and Supabase's support for [Row Level Security (RLS)](https://supabase.com/docs/guides/auth/row-level-security) can be used in conjunction. Here are some high level similarities and differences:
* RLS should be used as the authoritative set of security rules applied to your users' CRUD operations that reach Postgres.
* Sync Rules are only applied for data that is to be downloaded to clients — they do not apply to uploaded data.
* Sync Rules can typically be considered to be complementary to RLS, and will generally mirror your RLS setup.
### Enable RLS in Supabase
Run the below in your Supabase console to ensure that only list owners can perform actions on the lists table where `owner_id` matches their user id:
```sql
alter table public.lists
enable row level security;
create policy "owned lists" on public.lists for ALL using (
auth.uid() = owner_id
)
```
### Update Sync Rules
Currently all lists are synced to all users, regardless of who the owner of the list is. You will now update this so that only a user's lists are synced to their device:
1. Navigate to the [PowerSync Dashboard](/usage/tools/powersync-dashboard) and open your `sync-rules.yaml` file.
2. Delete the existing content and paste the below contents:
```yaml
bucket_definitions:
user_lists:
parameters: select request.user_id() as user_id
data:
- select * from lists where owner_id = bucket.user_id
```
1. Click on **"Validate".**
2. Click on **"Deploy sync rules".**
3. Wait for the deploy to complete.
**Checkpoint:** Your app should continue running seamlessly as before.
## Known Issues, Limitations and Gotchas
Below is a list of known issues and limitations.
1. It's not currently possible to use the FlutterFlow Web Editor to test your app due to limitations with FlutterFlow.
2. When trying to compile any of the PowerSync Custom Actions, you will see errors — these can be safely ignored:
3. Using `watch()` queries creates a [StreamSubscription](https://api.flutter.dev/flutter/dart-async/StreamSubscription-class.html) and it's important to regularly call `.cancel()` on these to avoid multiple subscriptions for the same query running.
4. Deploying to the Apple App Store currently requires some workarounds due to limitations in FlutterFlow:
1. Download the code from FlutterFlow
2. Open the `Podfile` located in the `ios/`directory
3. The following option in the `Podfile` needs to be updated from `use_frameworks! :linkage => :static` to `use_frameworks!` (remove everything after the exclamation sign)
4. After removing that option, clean the build folder and build the project again.
5. You should now be able to submit to the App Store
5. Exporting the code from FlutterFlow using the "Download Code" action in FlutterFlow requires the same workaround listed in 4. above.
6. Other common issues and troubleshooting techniques are documented here: [Troubleshooting](/resources/troubleshooting)
# Integrations Overview
Source: https://docs.powersync.com/integration-guides/integrations-overview
Learn how to integrate PowerSync with your favorite tools.
Currently, the following integration guides are available:
If you'd like to see an integration that is not currently available, [let us know on Discord](https://discord.gg/powersync).
# Railway + PowerSync
Source: https://docs.powersync.com/integration-guides/railway-+-powersync
Integration guide for deploying a Postgres database and custom backend using Railway for Postgres and Node.js hosting.
Railway is an attractive alternative to managed solutions such as Supabase, well suited to users looking for more control without going the full IaaS route.
## Deploying to Railway
### Step 1: Deploy on Railway
Find the PowerSync template on the Railway Marketplace, or click below:
### Step 2: Configure Your Database
* Create a `powersync` publication as described in the [Source Database Setup](/installation/database-setup) section.
* Optionally filter the publication table list to only include tables that you want clients to download
* \[Optional] Create a Postgres user for PowerSync to use as described in the [Source Database Setup](/installation/database-setup) section.
### Step 3: Configure Railway and PowerSync
* Once your project is deployed, clone the repo that Railway created and follow the instructions to generate the JWT config for these environment variables:
* `POWERSYNC_JWT_PRIVATEKEY`
* `POWERSYNC_JWT_PUBLICKEY`
* Sign up for a [PowerSync](https://www.powersync.com/) account
* Follow the steps to create a PowerSync instance as documented here: [Database Connection](/installation/database-connection)
* Generate a server certificate (in PEM format) via the following command:
`echo | openssl s_client -showcerts -starttls postgres -connect : -servername 2>/dev/null | sed -n '/BEGIN CERTIFICATE/,/END CERTIFICATE/p' | awk '/BEGIN/{i++}i==2' > railway.pem`
* Replacing `` and `` values with your own.
* In your Dashboard's connection details form, select "**verify-ca**" as the SSL mode, and upload the "railway.pem" file into the "Server Certificate" field.
* Once your instance has been provisioned, copy its instance URL (find the copy icon in the Project tree).
* Set this as the `POWERSYNC_URL` environment variable in Railway
### Step 4: Build Out Your Database
This typically consists of the below activities:
* Create your schema
* Add any new tables to the `powersync` publication previously created
* Load some test data
### Step 5: Build Out Your Backend
See the Node.js backend app for instructions:
[https://github.com/powersync-ja/powersync-railway-nodejs-template](https://github.com/powersync-ja/powersync-railway-nodejs-template)
An example implementation using Firebase for auth is available here:
[https://github.com/powersync-ja/powersync-nodejs-firebase-backend-todolist-demo](https://github.com/powersync-ja/powersync-nodejs-firebase-backend-todolist-demo)
### Step 6: Connect Your Client
See these docs for instructions to connect your app to your backend and PowerSync: [Client-Side Setup](/installation/client-side-setup)
# Supabase + PowerSync
Source: https://docs.powersync.com/integration-guides/supabase-+-powersync
Tutorial-style integration guide for creating offline-first apps with Supabase and PowerSync, using a demo to-do list app in Flutter, React Native, Web, Kotlin Multiplatform and Swift.
VIDEO
Used in conjunction with **Supabase**, PowerSync enables developers to build local-first & offline-first apps that are robust in poor network conditions and that have highly responsive frontends while relying on [Supabase](https://supabase.com/) for their backend. This guide provides instructions for how to configure PowerSync for use with your Supabase project.
Before you proceed, this guide assumes that you have already signed up for free accounts with both Supabase and PowerSync Cloud (our cloud-hosted offering). If you haven't signed up for a **PowerSync** (Cloud) account yet, [click here](https://accounts.journeyapps.com/portal/powersync-signup?s=docs) (and if you haven't signed up for Supabase yet, [click here](https://supabase.com/dashboard/sign-up)).
For mobile/desktop apps, this guide assumes that you already have **Flutter / React Native / Kotlin Multiplatform / Xcode** set up.
For web apps, this guide assumes that you have [pnpm](https://pnpm.io/installation#using-npm) installed.
This guide takes 10-15 minutes to complete.
## Architecture
Upon successful integration of Supabase + PowerSync, your system architecture will look like this: (click to enlarge image)
The local SQLite database embedded in the PowerSync SDK is automatically kept in sync with the Supabase Postgres database (based on configured sync rules as you will see later in this guide). Client-side data modifications are persisted in the local SQLite database as well as stored in an upload queue that gets processed via the Supabase client library when network connectivity is available. Therefore reads and writes can happen in the app regardless of whether the user is online or offline, by using the local SQLite database.
For more details on PowerSync's general architecture, [see here](/architecture/architecture-overview).
## Integration Guide/Tutorial Overview
We will follow these steps to get an offline-first 'To-Do List' demo app up and running:
* Create the demo database schema
* Create the Postgres user and publication
* Create connection to Supabase
* Configure Sync Rules
Test the configuration using our provided PowerSync-Supabase 'To-Do List' demo app with your framework of choice.
## Configure Supabase
Create a new Supabase project (or use an existing project if you prefer) and follow the below steps.
### Create the Demo Database Schema
To set up the Postgres database for our *To-Do List* demo app, we will create two new tables: `lists` and `todos`. The demo app will have access to these tables even while offline.
Run the below SQL statements in your **Supabase SQL Editor**:
```sql
create table
public.lists (
id uuid not null default gen_random_uuid (),
created_at timestamp with time zone not null default now(),
name text not null,
owner_id uuid not null,
constraint lists_pkey primary key (id),
constraint lists_owner_id_fkey foreign key (owner_id) references auth.users (id) on delete cascade
) tablespace pg_default;
create table
public.todos (
id uuid not null default gen_random_uuid (),
created_at timestamp with time zone not null default now(),
completed_at timestamp with time zone null,
description text not null,
completed boolean not null default false,
created_by uuid null,
completed_by uuid null,
list_id uuid not null,
constraint todos_pkey primary key (id),
constraint todos_created_by_fkey foreign key (created_by) references auth.users (id) on delete set null,
constraint todos_completed_by_fkey foreign key (completed_by) references auth.users (id) on delete set null,
constraint todos_list_id_fkey foreign key (list_id) references lists (id) on delete cascade
) tablespace pg_default;
```
### Create a PowerSync Database User
PowerSync uses the Postgres [Write Ahead Log (WAL)](https://www.postgresql.org/docs/current/wal-intro.html) to replicate data changes in order to keep PowerSync SDK clients up to date.
Run the below SQL statement in your **Supabase SQL Editor** to create a Postgres role/user with replication privileges:
```sql
-- Create a role/user with replication privileges for PowerSync
CREATE ROLE powersync_role WITH REPLICATION BYPASSRLS LOGIN PASSWORD 'myhighlyrandompassword';
-- Set up permissions for the newly created role
-- Read-only (SELECT) access is required
GRANT SELECT ON ALL TABLES IN SCHEMA public TO powersync_role;
```
To restrict read access to specific tables, explicitly list allowed tables for both the `SELECT` privilege, and for the publication mentioned in the next step (as well as for any other publications that may exist).
### Create the Postgres Publication
Run the below SQL statement in your **Supabase SQL Editor** to create a Postgres publication:
```sql
-- Create a publication to replicate tables.
-- Specify a subset of tables to replicate if required.
-- The publication must be named "powersync"
CREATE PUBLICATION powersync FOR ALL TABLES;
```
## Configuring PowerSync
### Create a PowerSync Cloud Instance
1. In the **Overview** workspace of the [PowerSync Dashboard](/usage/tools/powersync-dashboard), you will be prompted to create your first instance:
If you've previously created an instance in your project, you can create an additional instance by navigating to **Manage instances** and clicking **Create new instance**:
You can also create an entirely new [project](/usage/tools/powersync-dashboard#hierarchy%3A-organization%2C-project%2C-instance) with its own set of instances. Click on the PowerSync icon in the top left corner of the Dashboard or on **Admin Portal** at the top of the Dashboard, and then click on **Create Project**.
2. Give your instance a name, such as "Testing".
3. \[Optional] You can change the default cloud region from US to EU, JP (Japan), AU (Australia) or BR (Brazil) if desired.
* Note: Additional cloud regions will be considered on request, especially for customers on our Enterprise plan. Please [contact us](/resources/contact-us) if you need a different region.
4. \[Optional] You can opt in to using the `Next` version of the Service, which may contain early access or experimental features. Always use the `Stable` version in production.
5. Click **Next**.
### Connect PowerSync to Your Supabase
1. From your Supabase Dashboard, select **Connect** in the top navigation bar (or follow this [link](https://supabase.com/dashboard/project/_?showConnect=true)):
2. In the **Direct connection** section, copy the complete connection string (including the `[YOUR-PASSWORD]` placeholder)
3. Back in the PowerSync Dashboard, paste the connection string into the **URI** field. PowerSync will automatically parse this URI to populate the database connection details.
4. Update the **Username** and **Password** fields to use the `powersync_role` and password you created when configuring your Supabase for PowerSync (see [Source Database Setup](/installation/database-setup#supabase)).
5. Note: PowerSync includes Supabase's CA certificate by default, so you can use `verify-full` SSL mode without additional configuration.
6. Your connection settings should look similar to this:
7. Verify your setup by clicking **Test Connection** and resolve any errors.
8. Click **Next**.
9. PowerSync will detect the Supabase connection and prompt you to enable Supabase auth. To enable it, copy your JWT Secret from your project's settings ([JWT Keys](https://supabase.com/dashboard/project/_/settings/jwt) section in the Supabase dashboard) and paste it here:
10. Click **Enable Supabase auth** to finalize your connection settings.
PowerSync will now create an isolated cloud environment for your instance. This typically takes a minute or two.
You can update your instance settings by navigating to the **Manage instances** workspace, opening your instance options and selecting **Edit instance**.
### Configure Sync Rules
[Sync Rules](/usage/sync-rules) allow developers to control which data gets synced to which user devices using a SQL-like syntax in a YAML file. For the demo app, we're going to specify that each user can only see their own to-do lists and list items.
1. The final step is to replace the Sync Rules file's contents with the below:
```yaml
bucket_definitions:
user_lists:
# Separate bucket per To-Do list
parameters: select id as list_id from lists where owner_id = request.user_id()
data:
- select * from lists where id = bucket.list_id
- select * from todos where list_id = bucket.list_id
```
2. Click **"Validate sync rules"** and ensure there are no errors. This validates your sync rules against your Postgres database.
3. Click **"Save and deploy"** to deploy your Sync Rules.
* Your Sync Rules can be updated by navigating to the **Manage instances** workspace and selecting the `sync-rules.yaml` file.
* For additional information on PowerSync's Sync Rules, refer to the [Sync Rules](/usage/sync-rules) documentation.
* If you're wondering how Sync Rules relate to Supabase Postgres [RLS](https://supabase.com/docs/guides/auth/row-level-security), see [this subsection](/integration-guides/supabase-+-powersync/rls-and-sync-rules).
## Test Everything (Using Our Demo App)
In this step you'll test your setup using a 'To-Do List' demo app provided by PowerSync.
#### Clone the demo app
Clone the demo app based on your framework:
```bash Flutter
git clone https://github.com/powersync-ja/powersync.dart.git
cd powersync.dart/demos/supabase-todolist/
```
```bash React Native
git clone https://github.com/powersync-ja/powersync-js.git
cd powersync-js/demos/react-native-supabase-todolist
```
```bash JavaScript Web
git clone https://github.com/powersync-ja/powersync-js.git
cd powersync-js/demos/react-supabase-todolist
```
```bash Kotlin
git clone https://github.com/powersync-ja/powersync-kotlin.git
# Open `demos/supabase-todolist` in Android Studio
```
```bash Swift
git clone https://github.com/powersync-ja/powersync-swift.git
# Open the Demo directory in XCode and follow the README instructions.
```
#### Configure the demo app to use your PowerSync instance
Locate the relevant config file for your framework:
```bash Flutter
cp lib/app_config_template.dart lib/app_config.dart
# Edit `lib/app_config.dart` and insert the necessary credentials as detailed below.
```
```bash React Native
# Edit the `.env` file and insert the necessary credentials as detailed below.
```
```bash JavaScript Web
cp .env.local.template .env.local
# Edit `.env.local` and insert the necessary credentials as detailed below.
```
```bash Kotlin
# Make a `local.properties` file in the root and fill in the relevant variables (see points below for further details):
# local.properties
sdk.dir=/path/to/android/sdk
# Enter your PowerSync instance URL
POWERSYNC_URL=https://foo.powersync.journeyapps.com
# Enter your Supabase project's URL and public anon key
SUPABASE_URL=https://foo.supabase.co # from https://supabase.com/dashboard/project/_/settings/api
SUPABASE_ANON_KEY=foo # from https://supabase.com/dashboard/project/_/settings/api-keys
```
```bash Swift
# Edit the `_Secrets` file and insert the necessary credentials as detailed below.
```
1. In the relevant config file, replace the values for `supabaseUrl` (from the [Project URL](https://supabase.com/dashboard/project/_/settings/api) section in the Supabase dashboard) and `supabaseAnonKey` (from the [API Keys](https://supabase.com/dashboard/project/_/settings/api-keys) section in the Supabase dashboard)
2. For the value of `powersyncUrl`, click the copy icon on your instance to copy its URL:
#### Run the app
```bash Flutter
# Ensure you have [melos](https://melos.invertase.dev/~melos-latest/getting-started) installed.
melos bootstrap
flutter run
```
```bash React Native
# In the repo root directory:
pnpm install
pnpm build:packages
# In `demos/react-native-supabase-todolist`:
# Run on iOS
pnpm ios
# Run on Android
pnpm android
```
```bash JavaScript Web
# In the repo root directory:
pnpm install
pnpm build:packages
# In `demos/react-supabase-todolist`:
pnpm dev
```
```bash Kotlin
# Run the app on Android or iOS in Android Studio using the Run widget.
```
```bash Swift
# Run the app using XCode.
```
For ease of use of the demo app, you can disable email confirmation in your Supabase Auth settings. In your Supabase project, go to "Authentication" -> "Providers" -> "Email" and then disable "Confirm email". If you keep email confirmation enabled, the Supabase user confirmation email will reference the default Supabase Site URL of`http://localhost:3000` — you can ignore this.
Once signed in to the demo app, you should see a blank list of to-do lists, so go ahead and create a new list. Try placing your device into airplane mode to test out the offline capabilities. Once the device is back online, you should see the data automatically appear in your Supabase dashboard (e.g. in the Table Editor).
For more information, explore the [PowerSync docs](/) or join us on [our community Discord](https://discord.gg/powersync) where our team is always available to answer questions.
## Bonus: Optional Extras
If you plan on sharing this demo app with other people, you may want to set up demo data triggers so that new user signups don't see an empty screen.
It's useful to have some data when a user signs up to the demo app. The below trigger automatically creates some sample data when a user registers (you can run it in the Supabase SQL Editor). See [Supabase: Managing User Data](https://supabase.com/docs/guides/auth/managing-user-data#using-trigger) for more details.
```sql
create function public.handle_new_user_sample_data()
returns trigger as $$
declare
new_list_id uuid;
begin
insert into public.lists (name, owner_id)
values ('Shopping list', new.id)
returning id into new_list_id;
insert into public.todos(description, list_id, created_by)
values ('Bread', new_list_id, new.id);
insert into public.todos(description, list_id, created_by)
values ('Apples', new_list_id, new.id);
return new;
end;
$$ language plpgsql security definer;
create trigger new_user_sample_data after insert on auth.users for each row execute procedure public.handle_new_user_sample_data();
```
# Handling Attachments
Source: https://docs.powersync.com/integration-guides/supabase-+-powersync/handling-attachments
Examples of syncing attachments between a client app and Supabase Storage.
## React Native Example
Our React Native [To-Do List demo app](https://github.com/powersync-ja/powersync-js/tree/main/demos/react-native-supabase-todolist) showcases how to sync attachments (such as photos) using the [@powersync/attachments](https://www.npmjs.com/package/@powersync/attachments) library, the PowerSync Service, and Supabase.
In this example, we are syncing photos, however other media types, such as [PDFs](/tutorials/client/attachments-and-files/pdf-attachment), are also supported.
The library and this example implementation can be used as a reference for implementing similar functionality for a Postgres backend without Supabase.
The below assumes you have completed the steps outlined in the [To-Do List app Readme](https://github.com/powersync-ja/powersync-js/tree/main/demos/react-native-supabase-todolist). This includes installing and running the PowerSync React Native SDK; setting up a Supabase project; setting up a PowerSync instance and connecting it with Supabase.
### Configure Storage in Supabase
In this demo app, [Supabase Storage](https://supabase.com/docs/guides/storage) is used to store and serve attachments.
1. To configure Supabase Storage for your app, navigate to the **Storage** section of your Supabase project and create a new bucket:
2. Give the storage bucket a name, such as **media**, and hit "Save".
3. Next, configure a policy for this bucket. For the purpose of this demo, we will allow all user operations on the media bucket.
4. Create a new policy for the **media** bucket:
2. Give the new policy a name, and allow SELECT, INSERT, UPDATE, and DELETE.
3. Proceed to review and save the policy.
Finally, link this storage bucket to your app by opening up the **AppConfig.ts** file and adding the bucket name as the value to the `supabaseBucket` key:
This concludes the necessary configuration for handling attachments in the To-Do List demo app. When running the app now, a photo can be taken for a to-do list item, and PowerSync will ensure that the photo syncs to Supabase and other devices (if sync rules allow).
Read on to learn more about how this works under the hood.
### Implementation Details
The [@powersync/attachments](https://www.npmjs.com/package/@powersync/attachments) library is used in conjunction with the PowerSync Service to sync photos. Refer to the library's [README](https://www.npmjs.com/package/@powersync/attachments) for an overview of the main components. In summary, they are:
* `AttachmentRecord` to store the metadata of attachments.
* `AttachmentState` to track the sync state of an `AttachmentRecord`.
* `AbstractAttachmentQueue` class to manage and sync `AttachmentRecord`s:
* Track and sync attachment metadata.
* Watch for changes and handle CRUD operations on `AttachmentRecord`s.
* Store attachment data on the user's local storage, using file URIs on the device.
The UI of the demo app supports taking photos as follows:
* [CameraWidget](https://github.com/powersync-ja/powersync-js/blob/main/demos/react-native-supabase-todolist/library/widgets/CameraWidget.tsx) uses `expo-camera` to allow users to capture a photo.
* The photo is stored on the user's local storage.
* See the [savePhoto()](https://github.com/powersync-ja/powersync-js/blob/main/demos/react-native-supabase-todolist/library/powersync/PhotoAttachmentQueue.ts) method.
* The app includes a basic prompt for the user to grant permission to use the device's camera.
The [app's schema](https://github.com/powersync-ja/powersync-js/blob/main/demos/react-native-supabase-todolist/library/powersync/AppSchema.ts) was modified to link a photo to a to-do item:
* A `photo_id` was added as a column to the `todos` table to link a photo to a to-do item.
* A local-only `attachments` table is instantiated to store the metadata of photos.
* See [new AttachmentTable()](https://github.com/powersync-ja/powersync-js/blob/main/demos/react-native-supabase-todolist/library/powersync/AppSchema.ts)
The [PhotoAttachmentQueue](https://github.com/powersync-ja/powersync-js/blob/main/demos/react-native-supabase-todolist/library/powersync/PhotoAttachmentQueue.ts) class extends the `AbstractAttachmentQueue` abstract class and:
* Uses a PowerSync query to gather the relevant photo IDs (see `attachmentIds()`)
* Creates `AttachmentRecord`s to store photo metadata. (see `newAttachmentRecord()`)
* Uses the `savePhoto()` method to save photos into local storage and add them to the sync queue.
#### How Syncing Works
Refer to [this section](https://www.npmjs.com/package/@powersync/attachments#syncing-attachments) in the library's README to learn more about the various sync states and operations.
### Future Improvements
The following improvements can be considered for this implementation.
* An easier way to set up the local-only `attachments` table and related schema.
* Better tooling/APIs for retrying/resuming uploads or downloads when transitioning from an offline into an online state.
## Flutter Example
Our Flutter [To-Do List demo app](https://github.com/powersync-ja/powersync.dart/tree/master/demos/supabase-todolist) showcases how to sync attachments (such as photos) using our [powersync\_attachments\_helper](https://pub.dev/packages/powersync_attachments_helper) package for Flutter.
## Kotlin Example
Our Kotlin [To-Do List demo app](https://github.com/powersync-ja/powersync-kotlin/tree/main/demos/android-supabase-todolist) showcases how to sync attachments using built-in attachments helpers.
## Swift Example
Our Swift [To-Do List demo app](https://github.com/powersync-ja/powersync-swift/tree/main/Demo) showcases how to sync attachments using built-in attachments helpers.
## See Also
* [Attachments / Files](/usage/use-case-examples/attachments-files)
# Local Development
Source: https://docs.powersync.com/integration-guides/supabase-+-powersync/local-development
Local development with Supabase and PowerSync.
Developers using [Supabase local dev](https://supabase.com/docs/guides/cli) might prefer being able to develop against PowerSync locally too, for use cases such as running end-to-end integration tests.
Local development is possible with either self-hosted PowerSync or PowerSync Cloud instances. [Self-hosting PowerSync](/self-hosting/getting-started) for local development is the recommended workflow as it's more user-friendly.
## Self-hosted Supabase & PowerSync (via Docker)
An example implementation and demo is available here:
See the README for instructions.
## Self-hosted Supabase & PowerSync Cloud (via ngrok)
This guide describes an example local dev workflow that uses ngrok and the PowerSync CLI.
This guide assumes that you have both ngrok and the Supabase CLI installed
This guide only covers using ngrok. Other configurations such as an NGINX reverse proxy are also possible.
### Configure Supabase for SSL
```bash
# start supabase
supabase start
# get the name of the supabase-db container
docker ps -f name=supabase-db --format '{{.Names}}'
# The rest of the script assumes it's "supabase-db_supabase-test"
# bash in the container
docker exec -it supabase-db_supabase-test /bin/bash
# Now run in the container:
cd /etc/postgresql-custom
# Create a cert
openssl req -days 3650 -new -text -nodes -subj '/C=US/O=Dev/CN=supabase_dev' -keyout server.key -out server.csr
openssl req -days 3650 -x509 -text -in server.csr -key server.key -out server.cert
chown postgres:postgres server.*
# Enable ssl
echo -e '\n\nssl = on\nssl_ciphers = '\''HIGH:MEDIUM:+3DES:!aNULL'\''\nssl_prefer_server_ciphers = on\nssl_cert_file = '\''/etc/postgresql-custom/server.cert'\''\nssl_key_file = '\''/etc/postgresql-custom/server.key'\''' >> supautils.conf
# Now Ctrl+D to exit bash, and restart the container:
docker restart supabase-db_supabase-test
# Check logs for any issues:
docker logs supabase-db_supabase-test
# (optional, for debugging) validate SSL is enabled
psql -d postgres postgres
postgres=> show ssl; # should return "on"
```
### Start ngrok
Here we obtain the local port that supabase is listening on and initialize ngrok using it.
```bash
# look for the PORTS value of the supabase-db_supabase-test container
docker ps -f name=supabase-db --format '{{.Ports}}'
# should see something like 0.0.0.0:54322->5432/tcp
# use the first port
ngrok tcp 54322
# should then see something like this:
Forwarding tcp://4.tcp.us-cal-1.ngrok.io:19263 -> localhost:54322
```
Make a note of the hostname (`4.tcp.us-cal-1.ngrok.io` and port number `19263`), your values will differ.
### Connect PowerSync (GUI)
1. Configure your PowerSync instance using the hostname and port number you noted previously. The default postgres password is "postgres", you may want to change this. NOTE: make sure that the `Host` field does not contain the `tcp://` URI Scheme outputted by ngrok
2. Set the SSL Mode to `verify-ca` and click Download certificate
3. Click "**Test Connection**"
4. Click "**Save**" to provision your instance
### Connect PowerSync (CLI)
Refer to: [CLI (Beta)](/usage/tools/cli)
### Integration Test Example
Coming soon. Reach us on [Discord](https://discord.gg/powersync) in the meantime if you have any questions about testing.
# Real-time Streaming
Source: https://docs.powersync.com/integration-guides/supabase-+-powersync/realtime-streaming
If your app uses Supabase Realtime to subscribe to database changes (via e.g. [Stream](https://supabase.com/docs/reference/dart/stream) in the Supabase Flutter client library), it's fairly simple to obtain the same behavior using PowerSync.
Postgres changes are constantly streamed to the [PowerSync Service](/architecture/powersync-service) via the logical replication publication.
When the PowerSync client SDK is online, the behavior is as follows:
1. Data changes are streamed from the PowerSync Service to the SDK client over HTTPS
2. Using the `watch()` API, on-device SQLite database changes can be streamed to your app UI
When the SDK is offline, the streaming stops, but automatically resumes when connectivity is restored.
Example implementations of `watch()` can be found below
* [React Native example](https://github.com/powersync-ja/powersync-js/blob/92384f75ec95c64ee843e2bb7635a16ca4142945/demos/django-react-native-todolist/library/stores/ListStore.ts#L5)
* [Flutter example](https://github.com/powersync-ja/powersync.dart/blob/master/demos/supabase-todolist/lib/models/todo_list.dart#L46)
# RLS and Sync Rules
Source: https://docs.powersync.com/integration-guides/supabase-+-powersync/rls-and-sync-rules
PowerSync's [Sync Rules](/usage/sync-rules) and Supabase's support for [Row Level Security (RLS)](https://supabase.com/docs/guides/auth/row-level-security) can be used in conjunction. Here are some high level similarities and differences:
* RLS should be used as the authoritative set of security rules applied to your users' CRUD operations that reach Postgres.
* Sync Rules are only applied for data that is to be downloaded to clients — they do not apply to uploaded data.
* Sync Rules can typically be considered to be complementary to RLS, and will generally mirror your RLS setup.
Supabase tables are often created with auto-increment IDs. For easiest use of PowerSync, make sure to convert them to text IDs as detailed [**here**](/usage/sync-rules/client-id)**.**
### Example
Continuing with the schema set up during the guide, below are the RLS policies for the to-do list app:
```sql
alter table public.lists
enable row level security;
alter table public.todos
enable row level security;
create policy "owned lists" on public.lists for ALL using (
auth.uid() = owner_id
);
create policy "todos in owned lists" on public.todos for ALL using (
auth.uid() IN (
SELECT lists.owner_id FROM lists WHERE (lists.id = todos.list_id)
)
);
```
`auth.uid()` in a Supabase RLS policy is the same as `request.user_id()` (previously `token_parameters.user_id`) in [Sync Rules](/usage/sync-rules).
If you compare these to your Sync Rules configuration in `sync-rules.yaml`, you'll see they are quite similar.
If you have any questions, join us on [our community Discord](https://discord.gg/powersync) where our team is always available to help.
# PowerSync Overview
Source: https://docs.powersync.com/intro/powersync-overview
Sync engine for keeping backend databases in sync with in-app SQLite.
[PowerSync](https://www.powersync.com/) is a service and set of client SDKs that keeps backend databases in sync with on-device embedded SQLite databases.
It lets you avoid the complexities of using APIs to move app state [over the network](https://www.powersync.com/blog/escaping-the-network-tarpit), and enables real-time reactive [local-first](/resources/local-first-software) & offline-first apps that remain available even when network connectivity is poor or non-existent.
If you can't find what you are looking for in these docs, use the search bar or navigation. Otherwise, ask your question on our community [Discord](https://discord.gg/powersync) where our team is ready to help! There's also an AI bot on the [#gpt-help](https://discord.com/channels/1138230179878154300/1304118313093173329) channel on Discord which gives decent answers.
### Supported Backend Databases
PowerSync is designed to be backend database agnostic, and currently supports:
### Supported Client SDKs
PowerSync is also designed to be client-side stack agnostic, and currently has client SDKs available for:
Follow the links for the full SDK references, including getting started instructions and usage examples. Looking for an SDK that's not listed above? Upvote it or submit it on [our roadmap](https://roadmap.powersync.com/).
## Get Started with PowerSync
Learn how to install PowerSync in your project.
Get started with PowerSync. Includes an outline of installation instructions.
Follow a 15 minute tutorial to quickly learn how to use PowerSync with Supabase.
Follow a tutorial to learn how to use PowerSync with FlutterFlow.
## PowerSync Usage & Resources
Learn how to fully implement PowerSync in your project.
Sync rules control which data gets synchronized to users' devices - learn everything you need to know about sync rules.
This section covers use cases that will arise throughout the lifetime of your application.
Learn how to implement common use cases with PowerSync.
## Self-Hosting
This applies to self-hosting of the [Open Edition](https://www.powersync.com/pricing) or [Enterprise Self-Hosted Edition](https://www.powersync.com/pricing).
1-minute video summary of self-hosting PowerSync.
Get a feel for self-hosting PowerSync or use as a reference to self-host for development purposes only.
Learn how to use Docker Compose to simplify your local development stack.
Run the PowerSync Service in a production environment.
## Examples & Tutorials
Explore and learn from example implementations and common use cases.
Find links to example projects built with PowerSync.
Learn how to implement common use cases with PowerSync.
Solve specific problems with our growing collection of tutorials.
## Troubleshooting
Explore and learn from example implementations and common use cases with PowerSync.
Summary of current tools and strategies.
How to monitor activity and configure issue and usage metric alerts for your instance.
Expected performance and limitations of the PowerSync Service.
Find answers to frequently asked questions.
Contact us to get help, or share feedback or ideas.
## Learn More about PowerSync
Understand the architecture of the various PowerSync components and how consistency is ensured.
Learn about the philosophy behind PowerSync and why we built it.
# PowerSync Philosophy
Source: https://docs.powersync.com/intro/powersync-philosophy
Our vision is that a local-first or offline-first app architecture should be easier for the developer than cloud-first, and give a better experience for the end-user — even when they're online.
### What PowerSync means for end-users
The app just works, whether fully online, fully offline, or with spotty connectivity.
The app is always [fast and responsive](https://www.powersync.com/blog/local-first-is-a-big-deal-especially-for-the-web#to-the-user-everything-feels-instant-no-loading-spinners) — no need to wait for network requests.
### What PowerSync means for the developer
PowerSync lets you avoid the complexities of using APIs to move app state [over the network](https://www.powersync.com/blog/escaping-the-network-tarpit). Its goal is to solve the hard problems of keeping data in sync, without getting in your way.
You use a standard Postgres, MongoDB or MySQL \[[1](#footnotes)] database on the server, a standard SQLite database on the client, and your [own backend](/installation/app-backend-setup) to process writes. PowerSync simply keeps the SQLite database in sync with your backend/server database.
#### State Management
Once you have a local SQLite database that is always in sync, [state management](https://www.powersync.com/blog/local-first-state-management-with-sqlite) becomes much easier:
* No need for custom caching logic, whether in-memory or persisted.
* No need for maintaining in-memory state across the application.
[All state is in the local database](https://www.powersync.com/blog/local-first-state-management-with-sqlite). Queries are reactive — updating whenever the underlying data changes.
#### Flexibility
PowerSync allows you to fully customize what data is synced to the client. Syncing the entire database is extremely simple, but it is just as easy to use our [Sync Rules](/usage/sync-rules) to transform and filter data for each client (dynamic partial replication).
Writing back to the backend database [is in full control of the developer](/installation/app-backend-setup/writing-client-changes) — use your own authentication, validation, and constraints.
Our goal is also to be stack-agnostic: whether you are switching from MySQL to Postgres, from Flutter to React Native, or using multiple different stacks — our aim is to maintain maximum engineering optionality for developers.
#### Performance
[SQLite is *fast*](https://www.powersync.com/blog/sqlite-optimizations-for-ultra-high-performance). It can perform tens of thousands of updates per second, even faster reads, with seamless support for concurrent reads. Once you get to filtering through thousands of rows in queries, [indexes](/installation/client-side-setup/define-your-schema) keep the queries fast.
#### Simplicity
You use plain Postgres, MongoDB or MySQL on the server — no extensions, and no significant change in your schema required \[[2](#footnotes)]. PowerSync [uses](/installation/database-setup) Postgres logical replication, MongoDB change streams or the MySQL binlog to replicate changes to the [PowerSync Service](/architecture/powersync-service), where data is transformed and partitioned according to [Sync Rules](/usage/sync-rules), and persisted in a way that allows efficiently streaming incremental changes to each client.
PowerSync has been used in apps with hundreds of tables. There are no complex migrations to run: You define your [Sync Rules](/usage/sync-rules) and [client-side schema](/installation/client-side-setup/define-your-schema), and the data is automatically kept in sync. If you [change Sync Rules](/usage/lifecycle-maintenance/implementing-schema-changes), the entire new set of data is applied atomically on the client. When you do need to make schema changes on the server while still supporting older clients, we [have the processes in place](/usage/lifecycle-maintenance/implementing-schema-changes) to do that without hassle.
No need for CRDTs \[3]. PowerSync is a server-client sync platform: since no peer-to-peer syncing is involved, CRDTs can be overkill. Instead, we use a server reconciliation architecture with a default approach of "last write wins", with capability to [customize the conflict resolution if required](/usage/lifecycle-maintenance/handling-update-conflicts) — the developer is in [full control of the write process](/installation/app-backend-setup/writing-client-changes). Our [strong consistency guarantees](/architecture/consistency) give you peace of mind for the integrity of data on the client.
### See Also
* [Local-First Software](/resources/local-first-software)
* [Local-First Software is a Big Deal, Especially for the Web](https://www.powersync.com/blog/local-first-is-a-big-deal-especially-for-the-web)
* [PowerSync Architecture](/architecture/architecture-overview)
### Footnotes
* \[1] Support for more databases planned. See [our roadmap](https://roadmap.powersync.com/) for details.
* \[2] In some cases denormalization is required to effectively partition the data to sync to different users.
* \[3] If you want to use CRDTs for fine-grained collaboration like text editing, we have [examples](/usage/use-case-examples/crdts) of how to do that in conjunction with PowerSync, storing CRDT data in Postgres.
# MongoDB Atlas Device Sync Migration Guide
Source: https://docs.powersync.com/migration-guides/mongodb-atlas
This guide lays out all the steps of migrating from MongoDB Atlas Device Sync to PowerSync.
## Introduction
Moving to PowerSync allows you to benefit from efficient data synchronization using open and proven technologies. Users get always-available, instantly-responsive offline-first apps that also stream data updates in real-time when online.
## Why PowerSync?
PowerSync’s history goes as far back as 2009, when the original version of the sync engine was developed as part of an app development platform used by some of the world’s largest industrial companies to provide employees with offline-capable business apps deployed in harsh environments ([learn more](https://www.powersync.com/company) about PowerSync’s history).
PowerSync was spun off as a standalone product in 2023, and gives engineering teams a proven, open and robust sync engine with a familiar **server-client** [architecture](/architecture/architecture-overview#architecture-overview).
PowerSync’s MongoDB connector has been **developed in collaboration with MongoDB** to provide an easy setup process. It reached **General Availability (GA) status** with its [V1 release](https://www.powersync.com/blog/powersyncs-mongodb-connector-hits-ga-with-version-1-0) and is fully supported for production use. Multiple MongoDB customers currently use PowerSync in production environments.
The server-side [PowerSync Service](/architecture/powersync-service#powersync-service) connects to MongoDB and pre-processes and pre-indexes data to be efficiently synced to users based on defined "Sync Rules". Client applications connect to the PowerSync Service to sync data relevant to each user. Incremental updates in MongoDB are synced to clients in real-time.
Client applications can read and write data to the local client-side database. PowerSync provides for bi-directional syncing so that writes in the local client-side databases are automatically synced back to the source MongoDB database. If users are offline or have patchy connectivity, PowerSync automatically manages network failures and retries.
By introducing PowerSync as a sync engine, you get:
* **Predictable sync behavior** that syncs relevant data to each user.
* **Consistency guarantees** ensuring consistent state of the client-side database.
* **Real-time multi-user applications** as data updates are streamed to connected clients in real-time.
* **Instantly responsive user experience** as the user interaction with the app is unaffected by the network.
* **Offline-first capabilities** enabling apps to continue to work regardless of network conditions.
Please review this guide to understand the required changes and prerequisites. Following the provided steps will help your team transition smoothly.
If you need further assistance at any point, you can:
* [Set up a call](https://calendly.com/powersync/powersync-chat) with PowerSync engineers.
* Ask us anything on our [Discord server](https://discord.gg/powersync).
* [Contact us](mailto:hello@powersync.com) through email.
## Architecture: Before and After
If you have MongoDB Atlas Device Sync deployed today, at a high level your architecture will look something like this:
Migrating to PowerSync results in this architecture: (new components in green)
Here is a quick overview of the resulting PowerSync architecture:
* **PowerSync Service** is available as a cloud-hosted service ([PowerSync Cloud](https://powersync.com/pricing)), or you can self-host using our Open Edition.
* **Authentication**: PowerSync piggybacks off your app’s existing authentication, and JWTs are used to authenticate between clients and the PowerSync Service. If you are using Atlas Device SDKs for authentication, you will need to implement an authentication provider.
* **PowerSync Client SDKs** use **SQLite** under the hood. Even though MongoDB is a "NoSQL" document database, PowerSync’s use of SQLite works well with MongoDB, since the [PowerSync protocol](/architecture/powersync-protocol) is schemaless (it syncs schemaless JSON data) and we dynamically apply a [client-side schema](/installation/client-side-setup/define-your-schema) to the data in SQLite using SQLite views. Client-side queries can be written in SQL or you can make use of an ORM (we provide a few [ORM integrations](https://www.powersync.com/blog/using-orms-with-powersync))
* **Reads vs Writes**: PowerSync handles syncing of reads differently from writes.
* **Reads**: The PowerSync Service connects to your MongoDB database and replicates data in real-time to PowerSync clients. Reads are configured using PowerSync’s ["Sync Rules"](/usage/sync-rules/). Sync Rules are more flexible than MongoDB Realm Flexible Sync, but are defined on the server-side, not on the client-side.
* **Writes**: The client-side application can perform writes directly on the local SQLite database. The writes are also automatically placed into an upload queue by the PowerSync Client SDK. The SDK then uses a developer-defined `uploadData()` function to manage the uploading of those writes sequentially to the backend.
* **Authorization**: Authorization is controlled separately for reads vs. writes.
* **Reads**: The [Sync Rules](/usage/sync-rules/) control which users can access which data.
* **Writes**: The backend controls authorization for how users can modify data.
* **Backend**: PowerSync requires a backend API interface to upload writes to MongoDB. There are currently two options:
* **Custom self-hosted backend**: If you already have a backend application as part of your stack, you should use your existing backend. If you don’t yet have one: We have [example implementations](/resources/demo-apps-example-projects#backend-examples) available (e.g. Node.js, Django, Rails).
* **Serverless cloud functions (hosted/managed)**: An alternative option is to use CloudCode, a serverless cloud functions environment provided by PowerSync. We have a template available that you can use as a turnkey starting point.
## Migration Steps
Follow the steps below to migrate a MongoDB Atlas Device Sync app to PowerSync.
It is not necessary to remove Realm in order to install PowerSync. It is possible to initially run Realm and PowerSync in parallel, and remove Realm once PowerSync has been set up.
### 1. Create PowerSync account and instance
To get started quickly with PowerSync, sign up for a free PowerSync Cloud account [here](https://accounts.journeyapps.com/portal/powersync-signup?s=mongodb-migration-guide).
It is also possible to self-host PowerSync. An end-to-end demo app using Docker Compose is available [here](https://github.com/powersync-ja/self-host-demo/tree/main/demos/nodejs-mongodb).
### 2. Connect PowerSync to MongoDB
Once your account is set up, [create a new PowerSync instance](/installation/database-connection#create-a-powersync-cloud-instance) and configure the instance to connect to your source [MongoDB database](/installation/database-connection#mongodb-specifics).
### 3. Define Sync Rules
Sync Rules allow you to control which data gets synced to which users/devices. Each PowerSync Service instance has a Sync Rules definition that consists of SQL-like queries in a YAML file.
To get a good understanding of how Sync Rules operate, have a look at our blog post: [Sync Rules from First Principles: Partial Replication to SQLite](https://www.powersync.com/blog/sync-rules-from-first-principles-partial-replication-to-sqlite).
If you have a PowerSync Service instance set up and connected, open the `sync-rules.yaml` file associated with your PowerSync project and edit the SQL-like queries based on your database schema. Below is a simple Sync Rules example using a simple database schema. Sync Rules involve organizing data into ["buckets"](/usage/sync-rules/organize-data-into-buckets) (a bucket is a grouping of data). The example below uses a ["global bucket"](/usage/sync-rules/example-global-data) as a simple starting point — data in a "global bucket" will be synced to all users.
Note that MongoDB uses "\_id" as the name of the ID field in collections whereas PowerSync uses "id" in its client-side database. This is why `SELECT _id as id` should always be used in the data queries when pairing PowerSync with MongoDB.
```yaml
bucket_definitions:
# This is the name of the bucket, in this case the global bucket synced to all users.
global:
# This is the query used to determine the data in each bucket
data:
# Note that we select the MongoDB _id field as id
- SELECT _id as id, * FROM lists
- SELECT _id as id, * FROM todos
```
To filter data based on the user and other more advanced use cases, refer to the [Sync Rules documentation](/usage/sync-rules).
### 4. Add PowerSync to your app
Add PowerSync to your app project by following the instructions for the relevant PowerSync Client SDK.
* Visit our [Client SDK directory](/client-sdk-references/introduction) for instructions specific to your platform.
### 5. Define your client-side schema
The PowerSync client-side schema represents a "view" of the data synced from the PowerSync Service to the client app. No migrations are required — the schema is applied directly when the local PowerSync SQLite database is constructed.
To make this step easy for you, the [PowerSync Dashboard](/usage/tools/powersync-dashboard) allows automatically generating the client-side schema based on the Sync Rules defined for a PowerSync instance. To generate the schema, go to the [dashboard](https://powersync.journeyapps.com/), right-click on the instance, and select "Generate Client Schema". Alternatively you can use the PowerSync [CLI](/usage/tools/cli) to generate the schema.
Here is an example of a client-side schema for PowerSync using a simple `todos` table:
```typescript TypeScript - React Native
import { column, Schema, Table } from '@powersync/react-native';
const todos = new Table(
{
list_id: column.text,
created_at: column.text,
completed_at: column.text,
description: column.text,
created_by: column.text,
completed_by: column.text,
completed: column.integer
},
{ indexes: { list: ['list_id'] } }
);
export const AppSchema = new Schema({
todos
});
```
```typescript TypeScript - Web
import { column, Schema, Table } from '@powersync/web';
const todos = new Table(
{
list_id: column.text,
created_at: column.text,
completed_at: column.text,
description: column.text,
created_by: column.text,
completed_by: column.text,
completed: column.integer
},
{ indexes: { list: ['list_id'] } }
);
export const AppSchema = new Schema({
todos
});
```
```typescript TypeScript - Node.js
// Our Node.js SDK is currently in an alpha release
import { column, Schema, Table } from '@powersync/node';
const todos = new Table(
{
list_id: column.text,
created_at: column.text,
completed_at: column.text,
description: column.text,
created_by: column.text,
completed_by: column.text,
completed: column.integer
},
{ indexes: { list: ['list_id'] } }
);
export const AppSchema = new Schema({
todos
});
```
```java Kotlin
import com.powersync.db.schema.Column
import com.powersync.db.schema.Index
import com.powersync.db.schema.IndexedColumn
import com.powersync.db.schema.Schema
import com.powersync.db.schema.Table
val AppSchema: Schema = Schema(
listOf(
Table(
name = "todos",
columns = listOf(
Column.text('list_id'),
Column.text('created_at'),
Column.text('completed_at'),
Column.text('description'),
Column.integer('completed'),
Column.text('created_by'),
Column.text('completed_by')
),
// Index to allow efficient lookup within a list
indexes = listOf(
Index("list", listOf(IndexedColumn.descending("list_id")))
)
)
)
)
```
```swift Swift
import PowerSync
let todos = Table(
name: "todos",
columns: [
Column.text("list_id"),
Column.text("description"),
Column.integer("completed"),
Column.text("created_at"),
Column.text("completed_at"),
Column.text("created_by"),
Column.text("completed_by")
],
indexes: [
Index(
name: "list_id",
columns: [IndexedColumn.ascending("list_id")]
)
]
)
let AppSchema = Schema(todos)
```
```dart Flutter
import 'package:powersync/powersync.dart';
const schema = Schema(([
Table('todos', [
Column.text('list_id'),
Column.text('created_at'),
Column.text('completed_at'),
Column.text('description'),
Column.integer('completed'),
Column.text('created_by'),
Column.text('completed_by'),
], indexes: [
Index('list', [IndexedColumn('list_id')])
])
]));
```
```typescript .NET (Coming soon)
// Our .NET SDK is currently in an alpha release.
```
A few things to note regarding the PowerSync client-side schema:
* The schema does not explicitly specify an `id` column, since PowerSync automatically creates an `id` column of type `text`.
* SQLite has very simple data types which are [used by](/usage/sync-rules/types#types) PowerSync.
* For MongoDB specific data types, refer to [MongoDB Type Mapping](/usage/sync-rules/types#mongodb-type-mapping).
* PowerSync also supports [syncing attachments or files](/usage/use-case-examples/attachments-files) using helper packages.
### 6. Instantiate PowerSync client database
Now that we have our Sync Rules and client-side schema defined, we can instantiate the PowerSync database on the client-side. This will allow the app to start syncing data. For more details, see [Instantiate PowerSync Database](/installation/client-side-setup/instantiate-powersync-database).
```typescript TypeScript - React Native
import { PowerSyncDatabase } from '@powersync/react-native';
import { Connector } from './Connector';
import { AppSchema } from './Schema';
export const db = new PowerSyncDatabase({
schema: AppSchema,
database: {
dbFilename: 'powersync.db'
}
});
export const setupPowerSync = async () => {
const connector = new Connector();
db.connect(connector);
};
```
```typescript TypeScript - Web
import { PowerSyncDatabase } from '@powersync/web';
import { Connector } from './Connector';
import { AppSchema } from './Schema';
export const db = new PowerSyncDatabase({
schema: AppSchema,
database: {
dbFilename: 'powersync.db'
}
});
export const setupPowerSync = async () => {
const connector = new Connector();
db.connect(connector);
};
```
```typescript TypeScript - Node.js
// Our Node.js SDK is currently in an alpha release
import { PowerSyncDatabase } from '@powersync/node';
import { Connector } from './Connector';
import { AppSchema } from './Schema';
export const db = new PowerSyncDatabase({
schema: AppSchema,
database: {
dbFilename: 'powersync.db'
}
});
export const setupPowerSync = async () => {
const connector = new Connector();
db.connect(connector);
};
```
```java Kotlin
// 1: Create platform specific DatabaseDriverFactory to be used by the PowerSyncBuilder to create the SQLite database driver.
// commonMain
import com.powersync.DatabaseDriverFactory
import com.powersync.PowerSyncDatabase
// Android
val driverFactory = DatabaseDriverFactory(this)
// iOS & Desktop
val driverFactory = DatabaseDriverFactory()
// 2: Build a PowerSyncDatabase instance using the PowerSyncBuilder and the DatabaseDriverFactory. The schema you created in a previous step is provided as a parameter:
// commonMain
val database = PowerSyncDatabase({
factory: driverFactory, // The factory you defined above
schema: AppSchema, // The schema you defined in the previous step
dbFilename: "powersync.db"
// logger: Logger? = YourLogger // Optionally include your own Logger that must conform to Kermit Logger
// dbDirectory: "path/to/directory" // Optional. Directory path where the database file is located. This parameter is ignored for iOS.
});
// 3: Connect the PowerSyncDatabase to the backend connector:
// commonMain
// Uses the backend connector that will be created in the next step
database.connect(MyConnector())
```
```swift Swift
let schema = AppSchema
let connector = Connector(); // This connector must conform to PowerSyncBackendConnector
let db = PowerSyncDatabase(
schema: schema,
dbFilename: "powersync.sqlite"
)
await db.connect(connector: connector);
```
```dart Flutter
import 'package:powersync/powersync.dart';
import 'package:path_provider/path_provider.dart';
import 'package:path/path.dart';
openDatabase() async {
final dir = await getApplicationSupportDirectory();
final path = join(dir.path, 'powersync-dart.db');
db = PowerSyncDatabase(schema: schema, path: path);
await db.initialize();
}
```
```typescript .NET (Coming soon)
```
### 7. Reading and writing data
Reading data in the application which uses PowerSync is very simple: we use SQLite syntax to query data in our local database.
```typescript TypeScript - React Native, Web & Node.js
// Reading Data
export const getTodos = async () => {
const results = await db.getAll('SELECT * FROM todos');
return results;
}
```
```java Kotlin
// Reading Data
export const getTodos = async () => {
const results = await db.getAll('SELECT * FROM todos');
return results;
}
```
```swift Swift
// Reading Data
func getTodos() async throws {
try await self.db.getAll(
sql: "SELECT * FROM todos",
mapper: { cursor in
TodoContent(
list_id: try cursor.getString(name: "list_id"),
description: try cursor.getString(name: "description"),
completed: try cursor.getBooleanOptional(name: "completed"),
created_by: try cursor.getString(name: "created_by"),
completed_by: try cursor.getStringOptional(name: "completed_by"),
completed_at: try cursor.getStringOptional(name: "completed_at")
)
}
)
}
```
```dart Flutter
/// Reading Data
Future getTodos() async {
final result = await db.get('SELECT * FROM todos');
return TodoList.fromRow(result);
}
```
```typescript .NET (Coming soon)
```
The same applies to writing data: `INSERT`, `UPDATE` and `DELETE` statements are used to create, update and delete rows.
```typescript TypeScript - React Native, Web & Node.js
// Writing Data
export const insertTodo = async (listId: string, description: string) => {
await db.execute('INSERT INTO todos (id, created_at, list_id, description) VALUES (uuid(), date(), ?, ?)', [listId, description]);
}
```
```java Kotlin
// Writing Data
suspend fun insertTodo(listId: String, description: String) {
database.writeTransaction {
database.execute(
sql = "INSERT INTO todos (id, created_at, list_id, description) VALUES (uuid(), date(), ?, ?)",
parameters = listOf(listId, description)
)
}
}
```
```swift Swift
// Writing Data
func insertTodo(_ listId: String, _ description: String) async throws {
try await db.execute(
sql: "INSERT INTO todos (id, created_at, list_id, description) VALUES (uuid(), date(), ?, ?)",
parameters: [listId, description]
)
}
```
```dart Flutter
/// Writing Data
await db.execute(
'INSERT INTO todos (id, created_at, list_id, description) VALUES (uuid(), date(), ?, ?)',
['ID', 'Description'],
);
```
```typescript .NET (Coming soon)
```
The best way to ensure referential integrity in your database is to use UUIDs when inserting new rows on the client side. Since UUIDs can be generated offline/locally, they allowing for unique identification of records created in the client database before they are synced to the server.
#### Live queries
PowerSync supports "live queries" or "watch queries" which automatically refresh when data in the SQLite database is updated (e.g. as a result of syncing from the server). This allows for real-time reactivity of your app UI. See the [Client SDK documentation](/client-sdk-references/introduction) for your specific platform for more details.
### 8. Accept uploads on the backend
MongoDB Atlas Device Sync provides built-in writes/uploads to the backend MongoDB database.
PowerSync offers full customizability regarding how writes are applied. This gives you control to apply your own business logic, data validations, authorization and conflict resolution logic.
There are two options:
* **Serverless cloud functions (hosted/managed)**: PowerSync offers serverless cloud functions hosted on the same infrastructure as PowerSync Cloud which can used for the needed backend functionality needed. We provide a MongoDB-specific template for this which can be used as a turnkey solution.
* **Custom self-hosted backend**: Alternatively, writes can be processed through your own backend.
#### Using PowerSync’s serverless cloud functions
PowerSync provides serverless cloud functions for backend functionality, with a template available for MongoDB. See the [step-by-step instructions](/usage/tools/cloudcode) on how to use the template. The template can be customized, or it can be used as-is.
The template provides [turnkey conflict resolution](https://www.powersync.com/blog/turnkey-backend-functionality-conflict-resolution-for-powersync#turnkey-conflict-resolution) which roughly matches the built-in conflict resolution behavior provided by MongoDB Atlas Device Sync.
PowerSync's serverless cloud functions require a bit of "white glove" assistance from our team. If you want to use this option, please [get in touch with us](https://www.powersync.com/contact) so we can get you set up.
For more information, see our blog post: [Turnkey Backend Functionality & Conflict Resolution for PowerSync](https://www.powersync.com/blog/turnkey-backend-functionality-conflict-resolution-for-powersync).
#### Using your own custom backend API
This option gives you complete control over the backend. The simplest backend implementation is to simply apply writes to MongoDB as they are received, which results in a last-write-wins conflict resolution strategy (same as the "turnkey backend functionality" option above). See [Writing Client Changes](/installation/app-backend-setup/writing-client-changes) for more details.
On the client-side, you need to wire up the `uploadData()` function in the "backend connector" to use your own backend API. The [App Backend Setup](/installation/app-backend-setup) section of our docs provides step-by-step instructions for this.
Also see the section on [how to set up a simple backend API](https://www.powersync.com/blog/migrating-a-mongodb-atlas-device-sync-app-to-powersync#backend-api-setup) in our practical MongoDB migration [example](https://www.powersync.com/blog/migrating-a-mongodb-atlas-device-sync-app-to-powersync) on our blog.
We also have [example backend implementations](/resources/demo-apps-example-projects#backend-examples) available (e.g. Node.js, Django, Rails)
## Questions? Need help?
[Get in touch](https://www.powersync.com/contact) with us.
# WatermelonDB Migration Guide
Source: https://docs.powersync.com/migration-guides/watermelondb
This section is a work in progress. Please check back soon, or alternatively reach out to us on our Discord: [https://discord.gg/powersync ](https://discord.gg/powersync)
# AI Tools
Source: https://docs.powersync.com/resources/ai-tools
Resources for working with PowerSync with AI-powered coding tools
# PowerSync and AI Coding Tools
This is a growing collection of resources designed to help you work with PowerSync using AI-powered IDE tools like Cursor, Claude, or Windsurf. These tools can help you implement PowerSync features faster and more efficiently.
## AI-Accessible Documentation
### Markdown Version of Documentation Pages
For any page within our documentation, you can obtain the Markdown version, which is more easily readable by LLMs. There are several methods to do this:
1. Press **CTRL/CMD+C** to copy the page in Markdown.
2. Use the context menu on a page to view or copy the page in Markdown:
3. Append `.md` to the URL to view the Markdown version, for example:
```
https://docs.powersync.com/client-sdk-references/javascript-web.md
```
### Feed a Page to ChatGPT or Claude Directly
Use the context menu on a page to directly send it to ChatGPT or Claude for ingestion:
### Full Documentation Text
We provide text versions of our documentation that LLMs can easily ingest:
* **Full Documentation**: [https://docs.powersync.com/llms-full.txt](https://docs.powersync.com/llms-full.txt)
* Our entire documentation site in a single text file
* Perfect for giving your AI assistant complete context about PowerSync
* **Page Outline**: [https://docs.powersync.com/llms.txt](https://docs.powersync.com/llms.txt)
* All documentation pages in a single text file
* This helps AI assistants in indexing our documentation
## Community Resources
Join our [Discord community](https://discord.com/invite/powersync) to share your experiences in using AI tools with PowerSync and to learn from other developers.
# Blog
Source: https://docs.powersync.com/resources/blog
{/* Even though we have the URL above, which users will follow when clicking this entry from the sidebar We need the below think as well, because when clicking this page from the search bar this page opens */}
# Contact Us
Source: https://docs.powersync.com/resources/contact-us
## Need help or have questions?
### Discord community
Join our [Discord](https://discord.gg/powersync) server where you can browse topics from our community, ask questions, share feedback, or just say hello :)
### Support for Pro, Team & Enterprise customers
If you are a customer on our Pro, Team or Enterprise (Cloud or Self-Hosted) [plans](https://www.powersync.com/pricing), you can contact us using the support details provided to you during onboarding.
You are also welcome to use our [Discord](https://discord.gg/powersync) community for questions, but please note that [support SLAs](https://www.powersync.com/legal/commercial-license-and-services-agreement#appendix-c) (Team and Enterprise plans) are not available for Discord support.
## Found a bug?
Bugs can be logged as [GitHub issues](https://github.com/powersync-ja) on the respective repo.
## Feedback or ideas?
* [Submit an idea](https://roadmap.powersync.com/tabs/5-roadmap/submit-idea) via our public roadmap
* Or [schedule a chat](https://calendly.com/powersync/powersync-chat) with someone from our product team.
## Pricing or commercial questions?
Please [shoot us an email](mailto:help@powersync.com) to get in touch.
# Demo Apps & Example Projects
Source: https://docs.powersync.com/resources/demo-apps-example-projects
Gallery of projects showcasing PowerSync implementations across platforms and frameworks.
This page showcases example projects organized by platform and backend technology. You can adapt any example to work with your preferred backend as documented in our [Backend Setup Guide](/installation/app-backend-setup).
We continuously expand our collection of example projects. If you need an example that isn't available yet, [let us know on Discord](https://discord.gg/powersync).
#### Supabase Backend
* [To-Do List App](https://github.com/powersync-ja/powersync.dart/tree/master/demos/supabase-todolist)
* Includes [Full-Text Search](/usage/use-case-examples/full-text-search) capabilities
* Demonstrates [File/Attachment Handling](/integration-guides/supabase-+-powersync/handling-attachments)
* [To-Do List App + Drift](https://github.com/powersync-ja/powersync.dart/tree/master/demos/supabase-todolist-drift)
* [To-Do List App with Local-Only Tables](https://github.com/powersync-ja/powersync.dart/tree/main/demos/supabase-todolist-optional-sync) - Shows data persistence without syncing
* [Simple Chat App](https://github.com/powersync-ja/powersync.dart/tree/master/demos/supabase-simple-chat)
* [Trello Clone App](https://github.com/powersync-ja/powersync-supabase-flutter-trello-demo)
#### Node.js Custom Backend
* [To-Do List App with Firebase Auth](https://github.com/powersync-ja/powersync.dart/tree/main/demos/firebase-nodejs-todolist)
* Corresponding backend: [Node.js Backend with Firebase Auth](https://github.com/powersync-ja/powersync-nodejs-firebase-backend-todolist-demo)
#### Rails Custom Backend
* [GoToFun App](https://github.com/powersync-ja/powersync-rails-flutter-demo)
* This repo contains both the Flutter app and Rails backend
#### Django Custom Backend
* [To-Do List App](https://github.com/powersync-ja/powersync.dart/tree/master/demos/django-todolist)
* Corresponding backend: [Django Backend](https://github.com/powersync-ja/powersync-django-backend-todolist-demo)
#### Supabase Backend
* [To-Do List App](https://github.com/powersync-ja/powersync-js/tree/main/demos/react-native-supabase-todolist)
* Demonstrates [File/Attachment Handling](/integration-guides/supabase-+-powersync/handling-attachments)
* [PowerChat - Group Chat App](https://github.com/powersync-ja/powersync-js/tree/main/demos/react-native-supabase-group-chat)
#### Django Custom Backend
* [To-Do List App](https://github.com/powersync-ja/powersync-js/tree/main/demos/django-react-native-todolist)
* Corresponding backend: [Django Backend](https://github.com/powersync-ja/powersync-django-backend-todolist-demo)
#### Other
* [OP-SQLite integration](https://github.com/powersync-ja/powersync-js/tree/main/demos/react-native-barebones-opsqlite)
#### Supabase Backend
* [React To-Do List App](https://github.com/powersync-ja/powersync-js/tree/main/demos/react-supabase-todolist)
* Includes [Full-Text Search](/usage/use-case-examples/full-text-search) capabilities
* [React To-Do List App with Local-Only Tables](https://github.com/powersync-ja/powersync-js/tree/main/demos/react-supabase-todolist-optional-sync) - Shows data persistence without syncing
* [React Multi-Client Widget](https://github.com/powersync-ja/powersync-js/tree/main/demos/react-multi-client)
* Featured on the [PowerSync homepage](https://www.powersync.com/) demonstrating real-time data flow between clients
* [Vue To-Do List App](https://github.com/powersync-ja/powersync-js/tree/main/demos/vue-supabase-todolist)
* [Angular To-Do List App](https://github.com/powersync-ja/powersync-js/tree/main/demos/angular-supabase-todolist)
* [Yjs CRDT Text Collaboration Demo](https://github.com/powersync-ja/powersync-js/tree/main/demos/yjs-react-supabase-text-collab)
#### Framework Integration Examples
* [Electron](https://github.com/powersync-ja/powersync-js/tree/main/demos/example-electron) - PowerSync in an Electron web app (renderer process)
* Also see [Node.js + Electron](https://github.com/powersync-ja/powersync-js/tree/main/demos/example-electron-node) for PowerSync in the main process
* [Capacitor](https://github.com/powersync-ja/powersync-js/tree/main/demos/example-capacitor) - PowerSync in a Capacitor app
* [Next.js](https://github.com/powersync-ja/powersync-js/blob/main/demos/example-nextjs/README.md) - Minimal setup with Next.js
* [Webpack](https://github.com/powersync-ja/powersync-js/blob/main/demos/example-webpack/README.md) - Bundling with Webpack
* [Vite](https://github.com/powersync-ja/powersync-js/blob/main/demos/example-vite/README.md) - Bundling with Vite
* [Vite with Encryption](https://github.com/powersync-ja/powersync-js/blob/main/demos/example-vite-encryption/README.md) - Web database encryption demo
#### Examples
* [CLI Example](https://github.com/powersync-ja/powersync-js/tree/main/demos/example-node) - Node.js CLI client connecting to PowerSync and running live queries
* [Electron Main Process](https://github.com/powersync-ja/powersync-js/tree/main/demos/example-electron-node) - PowerSync in Electron's main process using the Node.js SDK
#### Supabase Backend
* [Hello PowerSync](https://github.com/powersync-ja/powersync-kotlin/tree/main/demos/hello-powersync) - Minimal starter app
* Supports Android, iOS, and Desktop (JVM) targets
* [To-Do List App](https://github.com/powersync-ja/powersync-kotlin/tree/main/demos/supabase-todolist)
* Supports Android, iOS, and Desktop (JVM) targets
* Includes a guide for [implementing background sync on Android](https://github.com/powersync-ja/powersync-kotlin/blob/main/demos/supabase-todolist/docs/BackgroundSync.md)
* [Native Android To-Do List App](https://github.com/powersync-ja/powersync-kotlin/tree/main/demos/android-supabase-todolist)
* Demonstrates [File/Attachment Handling](/usage/use-case-examples/attachments-files)
#### Supabase Backend
* [To-Do List App](https://github.com/powersync-ja/powersync-swift/tree/main/Demo)
* Demonstrates [File/Attachment Handling](/usage/use-case-examples/attachments-files)
#### Examples
* [CLI Application](https://github.com/powersync-ja/powersync-dotnet/tree/main/demos/CommandLine)
* Includes an optional [Supabase connector](https://github.com/powersync-ja/powersync-dotnet/blob/main/demos/CommandLine/SupabaseConnector.cs)
* [WPF To-Do List App](https://github.com/powersync-ja/powersync-dotnet/tree/main/demos/WPF)
* A Windows desktop to-do list app built with WPF.
* [MAUI To-Do List App](https://github.com/powersync-ja/powersync-dotnet/tree/main/demos/MAUITodo)
* A cross-platform to-do list app for Android, iOS, and Windows.
#### Django
* [Django Backend for To-Do List App](https://github.com/powersync-ja/powersync-django-backend-todolist-demo)
* For use with:
* React Native [To-Do List App](https://github.com/powersync-ja/powersync-js/tree/main/demos/django-react-native-todolist)
* Flutter [To-Do List App](https://github.com/powersync-ja/powersync.dart/tree/master/demos/django-todolist)
#### Node.js
* [Node.js Backend for To-Do List App](https://github.com/powersync-ja/powersync-nodejs-backend-todolist-demo)
* [Node.js Backend with Firebase Auth](https://github.com/powersync-ja/powersync-nodejs-firebase-backend-todolist-demo)
* For use with: Flutter [To-Do List App with Firebase Auth](https://github.com/powersync-ja/powersync.dart/tree/main/demos/firebase-nodejs-todolist)
#### Rails
* [Rails Backend for GoToFun App](https://github.com/powersync-ja/powersync-rails-flutter-demo/tree/main/gotofun-backend)
* For use with: Flutter [GoToFun App](https://github.com/powersync-ja/powersync-rails-flutter-demo/tree/main/gotofun-app)
#### .NET
* [.NET Backend for To-Do List App](https://github.com/powersync-ja/powersync-dotnet-backend-demo)
#### Complete Stacks with Docker Compose
* [To-Do List App with Docker Compose](https://github.com/powersync-ja/self-host-demo) - Various backend configurations:
* [Postgres + Node.js](https://github.com/powersync-ja/self-host-demo/tree/main/demos/nodejs-postgres-bucket-storage)
* [Postgres + Postgres Sync Bucket Storage + Node.js](https://github.com/powersync-ja/self-host-demo/tree/main/demos/nodejs)
* [MongoDB + Node.js](https://github.com/powersync-ja/self-host-demo/tree/main/demos/nodejs-mongodb)
* [MySQL + Node.js](https://github.com/powersync-ja/self-host-demo/tree/main/demos/nodejs-mysql)
* [Supabase (Postgres) + Local Development](https://github.com/powersync-ja/self-host-demo/tree/main/demos/supabase)
* [Django](https://github.com/powersync-ja/self-host-demo/tree/main/demos/django)
#### Custom Backends
* Laravel Backend
* [https://github.com/IsmailAshour/powersync-laravel-backend](https://github.com/IsmailAshour/powersync-laravel-backend)
#### Flutter Projects
* Flutter Instagram Clone with Supabase + Firebase
* [https://github.com/Gambley1/flutter-instagram-offline-first-clone](https://github.com/Gambley1/flutter-instagram-offline-first-clone)
* Jepsen PowerSync Testing - Formal consistency validation framework
* [https://github.com/nurturenature/jepsen-powersync](https://github.com/nurturenature/jepsen-powersync)
#### JavaScript & TypeScript Projects
* SolidJS Hooks for PowerSync Queries
* [https://github.com/aboviq/powersync-solid](https://github.com/aboviq/powersync-solid)
* Effect + Kysely + Stytch Integration
* [https://github.com/guillempuche/localfirst\_react\_server](https://github.com/guillempuche/localfirst_react_server)
* Tauri + Shadcn UI
* [https://github.com/romatallinn/powersync-tauri](https://github.com/romatallinn/powersync-tauri)
* Expo Web Integration
* [https://github.com/ImSingee/powersync-web-workers](https://github.com/ImSingee/powersync-web-workers)
* Note: Our [React Native Web support](/client-sdk-references/react-native-and-expo/react-native-web-support) now eliminates the need to patch the `@powersync/web` module
## Additional Resources
Also explore our growing collection of use case examples and tutorials:
# FAQ
Source: https://docs.powersync.com/resources/faq
Frequently Asked Questions about PowerSync.
**PowerSync uses near real-time streaming of changes to the client (\< 1s delay).**
A persistent connection is used to continuously stream changes to the client.
This implemented using a standard HTTP/2 request with a streaming response, or WebSockets.
A polling API will also be available for cases where the client only needs to update data periodically, and prefer to not keep a connection open.
The real-time streaming is not designed for "update as you type" — it still depends on explicitly saving changes. Real-time collaboration is supported as long as users do not edit the same data (same columns of the same rows) at the same time.
Concurrently working on text documents is not supported out of the box. This is solved better by CRDTs — see the [CRDTs](/usage/use-case-examples/crdts) section.
See the section on [Performance and Limits](/resources/performance-and-limits).
If no sync rule changes were deployed in this period, the user will only need to download the incremental changes that happened since the user was last connected.
*For example, a new record should not be displayed until the server received it, or it should be displayed as pending, or the entire screen must block with a spinner.*
**While PowerSync does not have out-of-the-box support for this due to the great variety of requirements, this is easy to build on top of the sync system.** A simple approach is to store a "status" or "pending changes" column on the table, and set that whenever the client makes a change. When the server receives the change, it then sets it to "processed" / "no pending changes". So when the server has processed the change, the client automatically syncs that status back.For more granular information, record individual changes in a separate table, as explained in [Custom Conflict Resolution](/usage/lifecycle-maintenance/handling-update-conflicts/custom-conflict-resolution).Note: Blocking the entire screen with a spinner is not recommended, since the change may take a very long time to be processed if the user is offline.
**Right now, we don’t have support for replicating data via APIs.** A workaround would be to have custom code to replicate the data from the API to a PostgreSQL instance, then sync that with PowerSync. We may add a way in the future to replicate the data directly from an API to the PowerSync Service, without a database in between.
**Yes.** The PowerSync client SDKs support real-time streaming of changes, and can automatically rerun a query if the underlying data changed.It does not support incrementally updating the result set yet, but it should be fast if the query is indexed appropriately, and the result set is small enough.
See [Troubleshooting](/resources/troubleshooting)
**Client-side transactions are supported**, and use standard SQLite locking to avoid conflicts.**Client-server transactions are not supported.** This would require online connectivity to detect conflicts and retry the transaction, which is not possible for changes made offline. Instead, it is recommended to model the data to allow atomic changes (see previous sections on conflict detection).
**This is generally not recommended, but it can be used in some cases, with caveats.**
See the section on [client ID](/usage/sync-rules/client-id) for details.
**An attachment sync or caching system can be built on top of PowerSync.**
See the section on [Attachments](/usage/use-case-examples/attachments-files) for details.
Currently, PowerSync can only read from Postgres databases directly. GraphQL or REST APIs can be used for the write path by the PowerSync SDK
By default PowerSync is not susceptible to SQL injection. The PowerSync execute API is parameterized, and as long as developers use that, SQL injection is not possible. It is however the developer's responsibility to ensure that they use the parameterized API and don't directly insert user-provided data into underlying SQLite tables.
[getCrudBatch()](https://pub.dev/documentation/powersync/latest/powersync/PowerSyncDatabase/getCrudBatch.html) [getNextCrudTransaction()](https://pub.dev/documentation/powersync/latest/powersync/PowerSyncDatabase/getNextCrudTransaction.html)
Use getCrudBatch() when you don't care about atomic transactions, and want to do bulk updates for performance reasons.
PowerSync will only sync the difference (buckets added or removed).
# Feature Status
Source: https://docs.powersync.com/resources/feature-status
PowerSync feature states and their implications for factors such as API stability and support.
Features in PowerSync are introduced through a phased release cycle to ensure quality and stability. Below is an overview of the four release stages namely Closed Alpha, Open Alpha, Beta and V1:
| **Stage** | **Production Readiness** | **API Stability** | **Support** | **Documentation** |
| ---------------- | --------------------------------------------------------------------------- | ----------------------------------------------------------------------------------------------------------- | ----------------------- | ----------------------------------------------- |
| **Closed Alpha** | Not production-ready; purpose is early feedback and testing of new ideas. | Subject to breaking changes. | Not covered under SLAs. | Limited or placeholder documentation. |
| **Open Alpha** | Not production-ready; purpose is broader testing and wider public feedback. | Subject to changes based on feedback. | Not covered under SLAs. | Basic documentation provided. |
| **Beta** | Production-ready for tested use cases. | Fully stable; breaking changes clearly communicated. | Covered under SLAs. | Documentation provided; may contain known gaps. |
| **V1** | Production-ready for all main use cases. | Fully stable; backwards compatibility maintained as far as possible; breaking changes clearly communicated. | Covered under SLAs. | Comprehensive and finalized documentation. |
# Service Release Channels
PowerSync Service features are deployed to different release channels throughout their lifecycle.
## Open Edition
The latest stable PowerSync Docker image is available under the latest tag and can be pulled using:
```bash
docker pull journeyapps/powersync-service:latest
```
Development images may be released for bleeding edge feature additions or hotfix testing purposes. These images are usually versioned as a `0.0.0-dev-XXXXXXXXXXXXXX` prereleases.
## PowerSync Cloud
In the PowerSync Dashboard, developers can configure the service version channel for each instance under the `General` tab in the `Edit Instance` dialog.
### Stable
The Stable channel provides the most reliable release of the PowerSync service. It includes features that may be in the `V1`, `Beta`, or `Open Alpha` stages. `Open Alpha` features in this channel are typically mature but may still have bugs or known issues.
### Next
The Next channel builds on the Stable channel and includes new features, fixes, or modifications to existing stable functionality that may require additional testing or validation.
# Feature Status Summary
Below is a summary of the current main PowerSync features and their release states:
| **Category / Item** | **Status** |
| ------------------------ | ------------ |
| **Database Connectors** | |
| MySQL | Alpha |
| MongoDB | V1 |
| Postgres | V1 |
| | |
| **PowerSync Service** | |
| Open Edition | Beta |
| Enterprise Self-Hosted | Closed Alpha |
| Postgres Bucket Storage | Beta |
| | |
| **Client SDKs** | |
| .NET SDK | Alpha |
| Node.js SDK | Alpha |
| Swift SDK | V1 |
| Kotlin Multiplatform SDK | V1 |
| JavaScript/Web SDK | V1 |
| Flutter SDK | V1 |
| React Native SDK | V1 |
| TanStack Query | Alpha |
| OP-SQLite Support | Beta |
| Flutter Web Support | Beta |
| React Native Web Support | Beta |
| Flutter SQLCipher | Beta |
| Vue Composables | Beta |
| React Hooks | V1 |
| | |
| **ORMs** | |
| Drift (Flutter) | Alpha |
| Drizzle (JS) | Alpha |
| Kysely (JS) | Beta |
| | |
| **Attachment Helpers** | |
| Kotlin | Alpha |
| Swift | Alpha |
| JavaScript | V1 |
| Flutter | V1 |
| | |
| **Other** | |
| CLI | Beta |
Also see:
* [PowerSync Roadmap](https://roadmap.powersync.com)
# Local-First Software
Source: https://docs.powersync.com/resources/local-first-software
How does PowerSync fit in to the local-first software movement?
## What is local-first software?
### The vision of local-first
Local-first software is a term coined by the research lab [Ink & Switch](https://www.inkandswitch.com/) in its [2019 manifesto essay](https://www.inkandswitch.com/local-first/).
Ink & Switch's rationale for local-first is to get the best of both worlds of stand-alone desktop apps (so-called "old-fashioned" software) and cloud software:
> *"We would like both the convenient cross-device access and real-time collaboration provided by cloud apps, and also the personal ownership of your own data embodied by ‘old-fashioned’ software".*
The manifesto proceeds to defines local-first as software that:
> *"prioritizes the use of local storage (the disk built into your computer) and local networks (such as your home WiFi) over servers in remote data centers".*
It also puts emphasis on the primacy of the local copy of data:
> "In local-first applications \[...] we treat the copy of the data on your local device \[...] as the primary copy. Servers still exist, but they hold secondary copies of your data in order to assist with access from multiple devices."
Expanding on this, the manifesto identifies [7 ideals](https://www.inkandswitch.com/local-first/#seven-ideals-for-local-first-software) "to strive for in local-first software", which we will explore further below.
**Much more theoretical research is still needed** to practically build software that conforms to all of the ideals of local-first software as envisioned by Ink & Switch, since it will need a fully decentralized architecture and needs many complex requirements to be addressed (see [here](https://www.powersync.com/blog/local-first-software-origins-and-evolution#why-are-the-ideals-of-local-first-difficult-to-achieve) for more details). In the meantime, the manifesto essay does provide [practical guidance](https://www.inkandswitch.com/local-first/#for-practitioners) on things that developers can do to bring their software closer to the ideals.
### Local-first in practice today
Most implementations that are referred to as "local-first" today conform to only a subset of the local-first ideals envisioned by Ink & Switch. We argue that a practical definition of most local-first implementations today is the following:
> Local-first implementation today generally refers to apps that work with a local client database which syncs automatically with a backend database in the background. All reads and writes go to the local database first.
This kind of architecture already enables large benefits for both end-users (speed, network resilience, real-time collaboration, offline usage) as well for developers (reduced backend complexity, simplified state management, etc.). Refer to [References](/resources/local-first-software#references) for more on this.
## Does PowerSync allow building local-first software?
### High-level concepts
Here's how building software with [PowerSync](https://www.powersync.com/) as its sync engine stacks up in terms of the high-level definitions of local-first software mentioned above:
| Local-First Concept / Definition | Does PowerSync Enable This? |
| -------------------------------------------------------------------------------------------------------------------------------- | --------------------------------------------------------------------------------------------------------------------------------------------------------------------------------------------------------------------------------------------------------------------------------------------------------------------------------------------------------------------------------------------------------------------------------------------------------------------------------------------------------------------- |
| Software that prioritizes the use of local storage. All reads and writes go to the local database first. | Yes. PowerSync allows developers to build software that uses a local database for reads and writes. |
| Software that treats the data on the user's local device as the primary copy of the data. | Yes, generally. PowerSync allows the developer to treat the data in the local end-user's database as the primary copy of the data. PowerSync does use a server-authoritative architecture where the server can [resolve conflicts](/usage/lifecycle-maintenance/handling-update-conflicts) and all clients then update to match the server state. But the client [will not update](/architecture/consistency) its local state to the server state until all pending client changes have been processed by the server. |
| Software with a decentralized architecture, which allows the software "to outlive any backend services managed by their vendors" | No. PowerSync does not use a decentralized architecture. PowerSync uses a server-authoritative architecture. However, there are ways to ensure a degree of longevity of software built using PowerSync (see below). |
### The 7 ideals of local-first
Here's how applications built using PowerSync can be brought closer to the [7 ideals of local-first](https://www.inkandswitch.com/local-first/#seven-ideals-for-local-first-software) in the Ink & Switch manifesto essay:
| 7 Ideals of Local-First | PowerSync Perspective |
| ------------------------------------------------------------------------------------------------------------------------------------------------------------ | ---------------------------------------------------------------------------------------------------------------------------------------------------------------------------------------------------------------------------------------------------------------------------------------------------------------------------------------------------------------------------------------------------------------------------------------------------------------------------------------------------------------------------------------------------------------------------------------------------------------------------------------------------------------------------------------------------- |
| **Fast**: By accessing data locally, the software should be able to respond near-instantaneously to user input | PowerSync inherently provides this: All reads and writes use a local SQLite database, resulting in near-zero latency for accessing data. |
| **Multi-Device**: Data should be synchronized across all of the devices on which a user does their work. | PowerSync automatically syncs data to different user devices. |
| **Offline**: The user should be able to read and write their data anytime, even while offline. | PowerSync allows for offline usage of applications for arbitrarily long periods of time. Developers can also optionally create apps as [offline-only](/usage/use-case-examples/offline-only-usage) and turn on syncing of data when it suits them, including on a per-user basis.When syncing is configured, data is synced to users based on the [Sync Rules](/usage/sync-rules) configuration for offline access. Mutations to data while the user is offline are placed in an upload queue and periodically attempted to be [uploaded](/installation/client-side-setup/integrating-with-your-backend) when connectivity is available (this is automatically managed by the PowerSync client SDK). |
| **Collaboration**: The ideal is to support real-time collaboration that is on par with the best cloud apps today. | PowerSync allows building collaborative applications either with [custom conflict resolution](/usage/lifecycle-maintenance/handling-update-conflicts/custom-conflict-resolution), or [using CRDT](/usage/use-case-examples/crdts) data structures stored as blob data for fine-grained collaboration. |
| **Longevity**: Work the user did with the software should continue to be accessible indefinitely, even after the company that produced the software is gone. | PowerSync relies on open-source and source-available software, meaning that the end-user can self-host Postgres (open-source) and the [PowerSync Service](/architecture/powersync-service) (source-available) should they wish to continue using PowerSync to sync data after the software producer shuts down backend services. There is also an onus on the software developer to ensure longevity, such as allowing exporting of data and avoiding reliance on other proprietary backend services. |
| **Privacy**: The software should use end-to-end encryption so that servers that store a copy of users’ files only hold encrypted data that they cannot read. | For details on end-to-end encryption with PowerSync, refer to our [Encryption](/usage/use-case-examples/data-encryption) section. |
| **User Control:** No company should be able to restrict what a user is allowed to do with the software. | In theory, the server-authoritative architecture of PowerSync allows the vendor's backend to override the user's local data (once all pending changes by the user have been [processed by the server](/architecture/consistency)). However, this is ultimately in the control over the developer. |
## References
* [Local-First Software: Origins and Evolution](https://www.powersync.com/blog/local-first-software-origins-and-evolution)
* [Local-First Software is a Big Deal, Especially for the Web](https://www.powersync.com/blog/local-first-is-a-big-deal-especially-for-the-web)
# Performance and Limits
Source: https://docs.powersync.com/resources/performance-and-limits
Expected performance and limits for PowerSync Cloud.
[PowerSync Cloud plans](https://www.powersync.com/pricing) have the limits and performance expectations outlined below.
The PowerSync Cloud **Team** and **Enterprise** plans allow several of these limits to be customized based on your specific needs.
## Limits
| **Component** | **Limit** | **Details** |
| ----------------------------- | ----------------------------------------- | --------------------------------------------------------------------------------------------------------------------------------------------------------------------------------------------------------------------------------------------------------- |
| **Synced buckets per user** | 1,000 | Sync requests exceeding this will fail with an error. We plan to increase this limit in the future. |
| **Maximum row/document size** | 15MB | Applies to both source database rows and transformed rows synced to clients. |
| **Concurrent connections** | Maximum: configurable (50k+ per instance) | PowerSync Service instances have default limits configured based on the [Pricing plan](https://www.powersync.com/pricing). These limits can be increased upon request for Team and Enterprise customers, and currently scale to over 50,000 per instance. |
| **Data hosted** | Maximum: configurable | PowerSync Service instances have default limits configured based on the [Pricing plan](https://www.powersync.com/pricing). These limits can be increased upon request for Enterprise customers. |
| **Columns per table** | 1,999 | Hard limit of the client schema, excluding the `id` column. |
| **Number of users** | No limit | No hard limit on unique users. |
| **Number of tables** | No limit | Hundreds of tables may impact startup and sync performance. |
## Performance Expectations
### Database Replication (Source DB → PowerSync Service)
* **Small rows**: 2,000-4,000 operations per second
* **Large rows**: Up to 5MB per second
* **Transaction processing**: \~60 transactions per second for smaller transactions
* **Reprocessing**: Same rates apply when reprocessing sync rules or adding new tables
### Sync (PowerSync Service → Client)
* **Rows per client**: Over 1 million rows supported with no hard limit
* Database size and initial sync time may impose practical limits on the number of rows
* **Sync speed**: Expect a rate of 2,000-20,000 operations per second per client, depending on the client
# Release Notes
Source: https://docs.powersync.com/resources/release-notes
{/* Even though we have the URL above, which users will follow when clicking this entry from the sidebar We need the below think as well, because when clicking this page from the search bar this page opens */}
# Roadmap
Source: https://docs.powersync.com/resources/roadmap
{/* Even though we have the URL above, which users will follow when clicking this entry from the sidebar We need the below think as well, because when clicking this page from the search bar this page opens */}
# Security
Source: https://docs.powersync.com/resources/security
Details on PowerSync Cloud's cybersecurity posture
At PowerSync, we take security very seriously and everything we do is designed to be secure throughout the entire software development lifecycle.
### PowerSync Cloud Security
* Customer data is encrypted at rest, access to that data by support staff is strictly controlled by access control mechanisms and robust write-only logging is present across the entire stack.
* All HTTP connections are encrypted using TLS.
* Additionally, customers on our [Enterprise plan](https://www.powersync.com/pricing) can request their data to be housed in managed, isolated tenants.
* SOC 2 Type 2 audit results are available to customers on our [Enterprise plan](https://www.powersync.com/pricing). On our most recent annual SOC 2 audit, we had zero exceptions.
### PowerSync Cloud: AWS Private Endpoints
See [Private Endpoints](/installation/database-setup/private-endpoints) for using a private network to your database using AWS PrivateLink.
We use Private Endpoints instead of VPC peering, to ensure that no other resources are exposed between VPCs.
### Client-Side Security
Refer to: [Data Encryption](/usage/use-case-examples/data-encryption)
### See Also
* Database Setup → [Security & IP Filtering](/installation/database-setup/security-and-ip-filtering)
* Usage Examples → [Data Encryption](/usage/use-case-examples/data-encryption)
# Supported Hardware and Operating Systems
Source: https://docs.powersync.com/resources/supported-hardware
# Hardware
## Desktop
**Supported**: minimum of 2GB RAM, Core i3 CPU.
**Recommended**: 4GB RAM or more.
## Mobile
### Android
**Supported**: Minimum of 1.5GB RAM and 1.4GHz dual-core CPU.
**Recommended**: Minimum of 4GB RAM and 1.4GHz quad-core CPU. Using a device with a recent Android version that receives regular security updates is recommended.
### iOS
**Supported**: iPhone 7, iPad 4 and newer.
**Recommended**: iPhone 12, iPad 7 and iPad mini 5 and newer.
# Operating Systems
## Android
**Recommended**: The latest 3 Android versions.
## iOS
**Recommended**: The latest three iOS/iPadOS versions.
## Windows
**Recommended**: Windows 10 or later.
## Other
PowerSync is not extensively tested on other operating systems, but we'll work with customers to resolve any issues on a case by case basis.
# Troubleshooting
Source: https://docs.powersync.com/resources/troubleshooting
Summary of common issues, troubleshooting tools and pointers.
## Common issues
### `SqliteException: Could not load extension` or similar
This client-side error or similar typically occurs when PowerSync is used in conjunction with either another SQLite library or the standard system SQLite library. PowerSync is generally not compatible with multiple SQLite sources. If another SQLite library exists in your project dependencies, remove it if it is not required. In some cases, there might be other workarounds. For example, in Flutter projects, we've seen this issue with `sqflite 2.2.6`, but `sqflite 2.3.3+1` does not throw the same exception.
Tip: Asking the AI bot on the [#gpt-help](https://discord.com/channels/1138230179878154300/1304118313093173329) channel on our [Discord server](https://discord.com/invite/powersync) is a good way to troubleshoot common issues.
## Tools
Troubleshooting techniques depend on the type of issue:
1. **Connection issues between client and server:** See the tools below.
2. **Expected data not appearing on device:** See the tools below.
3. **Data lagging behind on PowerSync Service:** Data on the PowerSync Service instance cannot currently directly be inspected. This is something we are investigating.
4. **Writes to the backend database are failing:** PowerSync is not actively involved: use normal debugging techniques (server-side logging; client and server-side error tracking).
5. **Updates are slow to sync, or queries run slow**: See [Performance](/resources/troubleshooting#performance)
### Diagnostics app
Access the diagnostics app here: [https://diagnostics-app.powersync.com](https://diagnostics-app.powersync.com)
This is a standalone web app that presents data from the perspective of a specific user. It can be used to:
* See stats about the user's local database.
* Inspect tables, rows and sync buckets on the device.
* Query the local SQL database.
* Identify common issues. E.g. too many sync buckets.
See the [Readme](https://github.com/powersync-ja/powersync-js/tree/main/tools/diagnostics-app) for further details.
### Instance Logs
See [Monitoring and Alerting](/usage/tools/monitoring-and-alerting).
### Diagnostics API
We also provide diagnostics via an API on the client. Examples include the connection status, last completed sync time, and local upload queue size.
If for example, a change appears to be missing on the client, you can check if the last completed sync time is greater than the time the change occurred.
The JavaScript SDKs ([React Native](/client-sdk-references/react-native-and-expo), [web](/client-sdk-references/javascript-web)) also log the contents of sync bucket changes to `console.debug` if verbose logging is enabled. This should log which `PUT`/`PATCH`/`DELETE` operations have been applied from the server.
### Inspect local SQLite Database
Another useful debugging tool as a developer is to open the SQLite file and inspect the contents. We share an example of how to do this on iOS from macOS in this video:
VIDEO
Essentially, run the following to grab the SQLite file:
`find ~/Library/Developer/CoreSimulator/Devices -name "mydb.sqlite"`
`adb pull data/data/com.mydomain.app/files/mydb.sqlite`
Our [diagnostics app](/resources/troubleshooting#diagnostics-app) and several of our [demo apps](/resources/demo-apps-example-projects) also contain a SQL console view to inspect the local database contents. Consider implementing similar functionality in your app. See a React example [here](https://github.com/powersync-ja/powersync-js/blob/main/tools/diagnostics-app/src/app/views/sql-console.tsx).
### Client-side Logging
Our client SDKs support logging to troubleshoot issues. Here's how to enable logging in each SDK:
* **JavaScript-based SDKs** (Web, React Native, and Node.js) - You can use our built-in logger based on [js-logger](https://www.npmjs.com/package/js-logger) for logging. Create the base logger with `const logger = createBaseLogger()` and enable with `logger.useDefaults()` and set level with `logger.setLevel(LogLevel.DEBUG)`. For the Web SDK, you can also enable the `debugMode` flag to log SQL queries on Chrome's Performance timeline.
* **Flutter SDK** - Logging is enabled by default since version 1.1.2 and outputs logs to the console in debug mode.
* **Kotlin Multiplatform SDK** - Uses [Kermit Logger](https://kermit.touchlab.co/docs/). By default shows `Warnings` in release and `Verbose` in debug mode.
* **Swift SDK** - Supports configurable logging with `DefaultLogger` and custom loggers implementing `LoggerProtocol`. Supports severity levels: `.debug`, `.info`, `.warn`, and `.error`.
* **.NET SDK** - Uses .NET's `ILogger` interface. Configure with `LoggerFactory` to enable console logging and set minimum log level.
## Performance
When running into issues with data sync performance, first review our expected [Performance and Limits](/resources/performance-and-limits).
These are some common pointers when it comes to diagnosing and understanding performance issues:
1. You will notice differences in performance based on the **row size** (think 100 byte rows vs 8KB rows)
2. The **initial sync** on a client can take a while in cases where the operations history is large. See [Compacting Buckets](/usage/lifecycle-maintenance/compacting-buckets) to optimizes sync performance.
3. You can get big performance gains by using **transactions & batching** as explained in this [blog post](https://www.powersync.com/blog/flutter-database-comparison-sqlite-async-sqflite-objectbox-isar).
### Web: Logging queries on the performance timeline
Enabling the `debugMode` flag in the [Web SDK](/client-sdk-references/javascript-web) logs all SQL queries on the Performance timeline in Chrome's Developer Tools (after recording). This can help identify slow-running queries.
This includes:
* PowerSync queries from client code.
* Internal statements from PowerSync, including queries saving sync data, and begin/commit statements.
This excludes:
* The time waiting for the global transaction lock, but includes all overhead in worker communication. This means you won't see concurrent queries in most cases.
* Internal statements from `powersync-sqlite-core`.
Enable this mode when instantiating `PowerSyncDatabse`:
```js
export const db = new PowerSyncDatabase({
schema: AppSchema,
database: {
dbFilename: 'powersync.db',
debugMode: true // Defaults to false. To enable in development builds, use
// debugMode: process.env.NODE_ENV !== 'production'
}
});
```
# Error Codes Reference
Source: https://docs.powersync.com/resources/troubleshooting/error-codes
Complete list of PowerSync error codes with explanations and troubleshooting guidance.
This reference documents PowerSync error codes organized by component, with troubleshooting suggestions for developers. Use the search bar to look up specific error codes (e.g., `PSYNC_R0001`).
# PSYNC\_Rxxxx: Sync rules issues
* **PSYNC\_R0001**:
Catch-all sync rules parsing error, if no more specific error is available
## PSYNC\_R11xx: YAML syntax issues
## PSYNC\_R12xx: YAML structure (schema) issues
## PSYNC\_R21xx: SQL syntax issues
## PSYNC\_R22xx: SQL supported feature issues
## PSYNC\_R23xx: SQL schema mismatch issues
## PSYNC\_R24xx: SQL security warnings
# PSYNC\_Sxxxx: Service issues
* **PSYNC\_S0001**:
Internal assertion.
If you see this error, it might indicate a bug in the service code.
* **PSYNC\_S0102**:
TEARDOWN was not acknowledged.
This happens when the TEARDOWN argument was not supplied when running
the service teardown command. The TEARDOWN argument is required since
this is a destructive command.
Run the command with `teardown TEARDOWN` to confirm.
## PSYNC\_S1xxx: Replication issues
* **PSYNC\_S1002**:
Row too large.
There is a 15MB size limit on every replicated row - rows larger than
this cannot be replicated.
* **PSYNC\_S1003**:
Sync rules have been locked by another process for replication.
This error is normal in some circumstances:
1. In some cases, if a process was forcefully terminated, this error may occur for up to a minute.
2. During rolling deploys, this error may occur until the old process stops replication.
If the error persists for longer, this may indicate that multiple replication processes are running.
Make sure there is only one replication process apart from rolling deploys.
* **PSYNC\_S1004**:
JSON nested object depth exceeds the limit of 20.
This may occur if there is very deep nesting in JSON or embedded documents.
## PSYNC\_S11xx: Postgres replication issues
* **PSYNC\_S1101**:
Replication assertion error.
If you see this error, it might indicate a bug in the service code.
* **PSYNC\_S1103**:
Aborted initial replication.
This is not an actual error - it is expected when the replication process
is stopped, or if replication is stopped for any other reason.
* **PSYNC\_S1104**:
Explicit cacert is required for `sslmode: verify-ca`.
Use either verify-full, or specify a certificate with verify-ca.
* **PSYNC\_S1105**:
`database` is required in connection config.
Specify the database explicitly, or in the `uri` field.
* **PSYNC\_S1106**:
`hostname` is required in connection config.
Specify the hostname explicitly, or in the `uri` field.
* **PSYNC\_S1107**:
`username` is required in connection config.
Specify the username explicitly, or in the `uri` field.
* **PSYNC\_S1108**:
`password` is required in connection config.
Specify the password explicitly, or in the `uri` field.
* **PSYNC\_S1109**:
Invalid database URI.
Check the URI scheme and format.
* **PSYNC\_S1110**:
Invalid port number.
Only ports in the range 1024 - 65535 are supported.
* **PSYNC\_S1141**:
Publication does not exist.
Run: `CREATE PUBLICATION powersync FOR ALL TABLES` on the source database.
* **PSYNC\_S1142**:
Publication does not publish all changes.
Create a publication using `WITH (publish = "insert, update, delete, truncate")` (the default).
* **PSYNC\_S1143**:
Publication uses publish\_via\_partition\_root.
* **PSYNC\_S1144**:
Invalid Postgres server configuration for replication and sync bucket storage.
The same Postgres server, running an unsupported version of Postgres, has been configured for both replication and sync bucket storage.
Using the same Postgres server is only supported on Postgres 14 and above.
This error typically indicates that the Postgres version is below 14.
Either upgrade the Postgres server to version 14 or above, or use a different Postgres server for sync bucket storage.
## PSYNC\_S12xx: MySQL replication issues
## PSYNC\_S13xx: MongoDB replication issues
* **PSYNC\_S1301**:
Generic MongoServerError.
* **PSYNC\_S1302**:
Generic MongoNetworkError.
* **PSYNC\_S1303**:
MongoDB internal TLS error.
If connection to a shared cluster on MongoDB Atlas, this could be an IP Access List issue.
Check that the service IP is allowed to connect to the cluster.
* **PSYNC\_S1304**:
MongoDB connection DNS error.
Check that the hostname is correct.
* **PSYNC\_S1305**:
MongoDB connection timeout.
Check that the hostname is correct, and that the service IP is allowed to connect to the cluster.
* **PSYNC\_S1306**:
MongoDB authentication error.
Check the username and password.
* **PSYNC\_S1307**:
MongoDB authorization error.
Check that the user has the required privileges.
* **PSYNC\_S1341**:
Sharded MongoDB Clusters are not supported yet.
* **PSYNC\_S1342**:
Standalone MongoDB instances are not supported - use a replica-set.
* **PSYNC\_S1343**:
PostImages not enabled on a source collection.
Use `post_images: auto_configure` to configure post images automatically, or enable manually:
```
db.runCommand({
collMod: 'collection-name',
changeStreamPreAndPostImages: { enabled: true }
});
```
* **PSYNC\_S1344**:
The MongoDB Change Stream has been invalidated.
Possible causes:
* Some change stream documents do not have postImages.
* startAfter/resumeToken is not valid anymore.
* The replication connection has changed.
* The database has been dropped.
Replication will be stopped for this Change Stream. Replication will restart with a new Change Stream.
* **PSYNC\_S1345**:
Failed to read MongoDB Change Stream due to a timeout.
This may happen if there is a significant delay on the source database in reading the change stream.
If this is not resolved after retries, replication may need to be restarted from scratch.
* **PSYNC\_S1346**:
Failed to read MongoDB Change Stream.
See the error cause for more details.
## PSYNC\_S14xx: MongoDB storage replication issues
* **PSYNC\_S1402**:
Max transaction tries exceeded.
## PSYNC\_S2xxx: Service API
* **PSYNC\_S2001**:
Generic internal server error (HTTP 500).
See the error details for more info.
* **PSYNC\_S2002**:
Route not found (HTTP 404).
* **PSYNC\_S2003**:
503 service unavailable due to restart.
Wait a while then retry the request.
* **PSYNC\_S2004**:
415 unsupported media type.
This code always indicates an issue with the client.
## PSYNC\_S21xx: Auth errors originating on the client.
This does not include auth configuration errors on the service.
* **PSYNC\_S2101**:
Generic authentication error.
* **PSYNC\_S2102**:
Could not verify the auth token signature.
Typical causes include:
1. Token kid is not found in the keystore.
2. Signature does not match the kid in the keystore.
* **PSYNC\_S2103**:
Token has expired. Check the expiry date on the token.
* **PSYNC\_S2104**:
Token expiration period is too long. Issue shorter-lived tokens.
* **PSYNC\_S2105**:
Token audience does not match expected values.
Check the aud value on the token, compared to the audience values allowed in the service config.
* **PSYNC\_S2106**:
No token provided. An auth token is required for every request.
The Authorization header must start with "Token" or "Bearer", followed by the JWT.
## PSYNC\_S22xx: Auth integration errors
* **PSYNC\_S2201**:
Generic auth configuration error. See the message for details.
* **PSYNC\_S2202**:
IPv6 support is not enabled for the JWKS URI.
Use an endpoint that supports IPv4.
* **PSYNC\_S2203**:
IPs in this range are not supported.
Make sure to use a publically-accessible JWKS URI.
* **PSYNC\_S2204**:
JWKS request failed.
## PSYNC\_S23xx: Sync API errors
* **PSYNC\_S2302**:
No sync rules available.
This error may happen if:
1. Sync rules have not been deployed.
2. Sync rules have been deployed, but is still busy processing.
View the replicator logs to see if the sync rules are being processed.
* **PSYNC\_S2304**:
Maximum active concurrent connections limit has been reached.
* **PSYNC\_S2305**:
Too many buckets.
There is currently a limit of 1000 buckets per active connection.
## PSYNC\_S23xx: Sync API errors - MongoDB Storage
* **PSYNC\_S2401**:
Could not get clusterTime.
## PSYNC\_S23xx: Sync API errors - Postgres Storage
## PSYNC\_S3xxx: Service configuration issues
## PSYNC\_S31xx: Auth configuration issues
* **PSYNC\_S3102**:
Invalid jwks\_uri.
* **PSYNC\_S3103**:
Only http(s) is supported for jwks\_uri.
## PSYNC\_S32xx: Replication configuration issue.
* **PSYNC\_S3201**:
Failed to validate module configuration.
## PSYNC\_S4000: Management / Dev APIs
* **PSYNC\_S4001**:
Internal assertion error.
This error may indicate a bug in the service code.
* **PSYNC\_S4104**:
No active sync rules.
* **PSYNC\_S4105**:
Sync rules API disabled.
When a sync rules file is configured, the dynamic sync rules API is disabled.
# Usage & Billing
Source: https://docs.powersync.com/resources/usage-and-billing
Usage & billing for PowerSync Cloud (our cloud-hosted offering).
## How billing works
When using [PowerSync Cloud](https://www.powersync.com/pricing), your organization may contain multiple projects. Each project can contain multiple instances. For example:
* **Organization**: Acme Corporation
* **Project**: Travel App
* **Instance**: Staging
* **Instance**: Production
* **Project**: Admin App
* **Instance**: Staging
* **Instance**: Production
Read more: [Hierarchy: Organization, project, instance](/usage/tools/powersync-dashboard#hierarchy-organization-project-instance)
Your organization only has a single subscription with a single plan (Free, Pro, Team or Enterprise).
Usage quotas (e.g. data processing, storage, sync operations) apply to your entire organization, regardless of the number of projects.
Upgrading to a paid plan unlocks all benefits for every project in your organization. For example, no instances in a "Pro" organization will be paused. See our [pricing page](https://www.powersync.com/pricing) for plan details.
### Invoicing
Usage for all projects in your organization is aggregated in a monthly billing cycle. These totals are reflected in your monthly invoice.
On our paid plans, the base fee (plus applicable tax) is charged at the start of every billing cycle.
If your month's usage exceeds your plan's limits, the overage will be charged at the end of the billing cycle.
Your current billing cycle's usage and upcoming invoice total can be tracked in the Admin Portal - learn more in [View and manage your subscription](/resources/usage-and-billing#view-and-manage-your-subscription).
Invoices will be automatically charged to your provided payment card. Learn more in [Spending caps](/resources/usage-and-billing#spending-caps).
## View and manage your subscription
Your PowerSync usage and billing can be tracked and managed in the [Admin Portal](https://accounts.journeyapps.com/portal/admin/).
We are gradually rolling out this functionality to users. If you are not seeing your subscription details at this time, please [reach out to us](/resources/contact-us) and we'll enable it for you.
### Subscriptions
In the "**Subscriptions**" tab you can:
1. View your active subscription
2. View your usage for the current billing cycle
3. View the amount of your upcoming invoice
4. Upgrade or cancel your [PowerSync subscription](https://www.powersync.com/pricing)
### Billing settings
In the "**Billing"** tab you can:
1. Update billing details, such as your billing organization name, address and email address which should receive invoices and receipts.
2. Manage your credit card(s) used for payments.
* Credit card details are never stored on our servers; all billing is securely processed by our payment provider, [Stripe](https://stripe.com/).
### Spending caps
Alerts and spending caps are currently in development, and will be available in a future release.
In the meantime, Pro plan invoices over `$100` and Team plan invoices over `$1,000` will not immediately be charged. In these cases, we will reach out to the organization owner for review. This threshold amount can be customized per organization — [let us know](/resources/contact-us) if you need a higher or lower amount configured.
## Limits
Usage limits for PowerSync Cloud are specified on our [Pricing page](https://www.powersync.com/pricing).
### Inactive instances
Instances on the Free plan that have had no deploys or client connections for over 7 days will be paused. This helps us optimize our cloud resources and ensure a better experience for all users.
If your instance is paused, you can easily restart it from the [Dashboard](/usage/tools/powersync-dashboard) or [CLI](/usage/tools/cli) by deploying a sync rules update to it.
For projects in production we recommend subscribing to a [paid plan](https://www.powersync.com/pricing) to avoid any interruptions. To upgrade to a paid plan, visit the Subscriptions tab in your [Admin Portal](https://accounts.journeyapps.com/portal/admin/).
# FAQ & Troubleshooting
Source: https://docs.powersync.com/resources/usage-and-billing-faq
Usage and billing FAQs and troubleshooting strategies.
# Usage Metrics FAQs
You can track usage in two ways:
* Individual instances: Visit the [Usage metrics](/usage/tools/monitoring-and-alerting#usage-metrics) workspace in the PowerSync Dashboard.
* Organization-wide usage: Check the **Subscriptions** tab in the [Admin Portal](https://accounts.journeyapps.com/portal/admin/) for aggregated metrics across all instances in your current billing cycle.
A sync operation occurs when a single row is synced from the PowerSync Service to a user device.
The PowerSync Service maintains a history of operations for each row to ensure efficient streaming and data integrity. This means:
* Every change to a row (insert, update, delete) creates a new operation
* The history of operations builds up over time
* New clients need to download this entire history when they first sync
* Existing clients only download new operations since their last sync
As a result, sync operation counts may significantly exceed the number of actual data mutations, especially for frequently updated rows. This is normal behavior, but you can manage it through:
* Daily automatic compacting (built into PowerSync Cloud)
* Regular defragmentation (recommended for frequently updated data)
See the [Usage Troubleshooting](#usage-troubleshooting) section for more details on managing operations history.
A concurrent connection represents one client actively connected to the PowerSync Service. When a user device runs an app using PowerSync and calls `.connect()`, it establishes one long-lived connection for streaming real-time updates.
Some key points about concurrent connections:
* Billing is based on peak concurrent connections (highest number of simultaneous connections) during the billing cycle
* The PowerSync Cloud Pro plan is limited to 3,000 concurrent connections, and the PowerSync Cloud Team plan is limited to 10,000 concurrent connections by default
* PowerSync Cloud Free plans are limited to 50 peak concurrent connections
* When connection limits are reached, new connection attempts receive a 429 HTTP response while existing connections continue syncing. The client will continuously retry failed connection attempts, after a delay. Clients should eventually be connected once connection capacity is available.
Data processing is calculated as the total uncompressed size of:
* Data replicated from your source database(s) to PowerSync Service instances
* Data synced from PowerSync Service instances to user devices
These values are available in your [Usage metrics](/usage/tools/monitoring-and-alerting#usage-metrics) as "Data replicated per day/hour" and "Data synced per day/hour".
Data/operations replicated refers to activity from your backend database (Postgres/MongoDB or MySQL database) to the PowerSync Service, whereas data/operations synced refer to activity from the PowerSync Service to client devices.
# Billing FAQs
Head over to the **Subscriptions** tab of the [Admin Portal](https://accounts.journeyapps.com/portal/admin/). Here you can view your total usage (aggregated across all projects in your organization) and upcoming invoice total for your current billing cycle. Data in this view updates once a day.
You can update your billing details in the **Billing** tab of the [Admin Portal](https://accounts.journeyapps.com/portal/admin/).
We are planning to surface these in the Admin Portal, but this is not yet available. In the meantime, you can review your historic invoices directly in the Stripe Customer Portal, by signing in with your billing email [here](https://billing.stripe.com/p/login/7sI6pU48L42cguc7ss).
# Usage Troubleshooting
If you're seeing unexpected spikes in your usage metrics, here's how to diagnose and fix common issues:
## Concurrent connections
The most common cause of seeing excessive concurrent connections is opening multiple copies of `PowerSyncDatabase`, and calling `.connect()` on each. Debug your connection handling by reviewing your code and [Instance logs](/usage/tools/monitoring-and-alerting#instance-logs). Make sure you're only opening one connection per user/session.
## Sync operations
While sync operations typically correspond to data mutations on synced rows (those in your Sync Rules), there are several scenarios that can affect your operation count:
### Key Scenarios to Watch For
1. **New App Installations:**
When a new user installs your app, PowerSync needs to sync the complete operations history. We help manage this by:
* Running automatic daily compacting on Cloud instances
* Providing manual defragmentation options (in the PowerSync Dashboard)
2. **Existing Users:**
While compacting and defragmenting reduces the operations history, they trigger additional sync operations for existing users.
* Want to optimize this? Check out our [defragmenting guide](/usage/lifecycle-maintenance/compacting-buckets#defragmenting)
3. **Sync Rule Deployments:**
When you deploy changes to Sync Rules, PowerSync recreates the sync buckets from scratch. This has two effects:
* New app installations will sync fewer operations since the operations history is reset.
* Existing users will temporarily experience increased sync operations as they need to re-sync the updated buckets.
We are planning [incremental sync rule reprocessing](https://roadmap.powersync.com/c/85-more-efficient-sync-reprocessing), which will allow PowerSync to only reprocess buckets whose definitions have changed, rather than all buckets.
4. **Unsynced Columns:**
Any row update triggers a new operation in the logical replication stream, regardless of which columns changed. In other words, PowerSync tracks changes at the row level, not the column level. This means:
* Updates to columns not included in your Sync Rules still create sync operations.
* Even a no-op update like `UPDATE mytable SET id = id` generates a new operation for each affected row.
While selectively syncing columns helps with data access control and reducing data transfer size, it doesn't reduce the number of sync operations.
## Data hosted
The PowerSync Service hosts:
1. A current copy of the data, which should be roughly equal to the subset of your source data that is covered by your sync rules configuration;
2. A history of all operations on data in buckets. This can be bigger than the source, since it includes the history, and one row can be in multiple buckets; and
3. Data for parameter lookups. This should be fairly small in most cases.
Because of this structure, your hosted data size may be larger than your source database size.
# Troubleshooting Strategies
1. **Identify Timing**
* Use [Usage Metrics](/usage/tools/monitoring-and-alerting#usage-metrics) to pinpoint usage spikes.
2. **Review Logs**
* Use [Instance Logs](/usage/tools/monitoring-and-alerting#instance-logs) to review sync service logs during the spike(s).
* Enable the **Metadata** option.
* Search for "Sync stream complete" entries (use your browser's search function) to review:
* How many operations synced
* The size of data transferred
* Which clients/users were involved

3. **Compare Metrics**
Use the [Diagnostics app](https://github.com/powersync-ja/powersync-js/tree/main/tools/diagnostics-app) to compare total rows vs. operations synced to the user device. If you are seeing a much higher number of operations, you might benefit from [defragmentation](/usage/lifecycle-maintenance/compacting-buckets#defragmenting).
4. **Detailed Sync Operations**
* Use the [test-client](https://github.com/powersync-ja/powersync-service/blob/main/test-client/src/bin.ts)'s `fetch-operations` command with the `--raw` flag:
```bash
node dist/bin.js fetch-operations --raw --token your-jwt --endpoint https://12345.powersync.journeyapps.com
```
This returns the individual operations for a user in JSON. Example response:
```bash
{
"by_user[\"0b32a7cb-26fb-4993-9c60-9291a430337e\"]": [
{
"op_id": "0",
"op": "CLEAR",
"checksum": 2082236117
},
{
"op_id": "1145383",
"op": "PUT",
"object_type": "todos",
"object_id": "69688ea0-d3f6-46c9-81a2-cdbe54eeb54d",
"checksum": 3246341700,
"subkey": "6752f74f8176c1b5ba851480/fcb2cd3c-dcef-5c46-8b17-7b83d31fda2b",
"data": "{\"id\":\"69688ea0-d3f6-46c9-81a2-cdbe54eeb54d\",\"created_at\":\"2024-09-16 10:16:35.352665Z\",\"description\":\"Buy groceries\",\"user_id\":\"0b32a7cb-26fb-4993-9c60-9291a430337e\"}"
},
{
"op_id": "1145387",
"op": "PUT",
"object_type": "todos",
"object_id": "7e4a4550-af3b-4876-a01a-10dc0084f0a6",
"checksum": 1103209588,
"subkey": "6752f74f8176c1b5ba851480/75bbc91d-cfc9-5b22-9f85-ea31a8720bf8",
"data": "{\"id\":\"7e4a4550-af3b-4876-a01a-10dc0084f0a6\",\"created_at\":\"2024-10-07 16:17:37Z\",\"description\":\"Plant tomatoes\",\"user_id\":\"0b32a7cb-26fb-4993-9c60-9291a430337e\"}"
}
]
}
```
# Accident Forgiveness
Accidentally ran up a high bill? No problem — we've got your back. Reach out to us at [support@powersync.com](mailto:support@powersync.com) and we'll work with you to resolve the issue and prevent it from happening again.
# Pricing Example
Source: https://docs.powersync.com/resources/usage-and-billing/pricing-example
Practical example of how pricing is calculated on the Pro or Team plan of PowerSync Cloud (usage-based pricing)
## Chat app example
Use this real-world example of a basic chat app to gauge your PowerSync usage and costs, on the [Pro plan](https://www.powersync.com/pricing) of PowerSync Cloud. This is not an exact estimate, but it can help you better understand how your PowerSync usage would be billed on the Pro plan.
This use case has the peculiarity that all data is user-generated and necessarily shared with other users (in the form of messages). More typical use cases might sync the same server-side data with many different users and have less user-generated data to sync.
### Overview: Costs by usage (Pro plan)
To illustrate typical costs, consider an example chat app, where users can initiate chats with other users. Users can see their active chats in a list, read messages, and send messages.
For this app, all messages are stored on a backend database like Postgres. PowerSync is used as a sync layer to make sure users see new messages in real-time, and can access or create messages even when their devices are offline.
#### Assumptions
User base assumptions:
* **Daily Active Users (DAUs) are 10% of total app installations.** These are the users that actively open and use your app on a given day, which is typically a small subset of your total app installations. For the calculations below, we estimated DAUs as 10% of the total number of app installations. We use this assumption as an input to calculate the total number of messages sent and received every day.
* **Peak concurrent connections are 10% of DAUs.** This is the maximum number of users actively using your app at exactly the same time as other users, which is typically a small subset of your Daily Active Users. For the calculations below, we estimated peak concurrent connections as 10% of the total number of app installations.
Data size, transfer and storage assumptions:
* **Messages are 0.25 KB in size on average.** 1KB can store around half a page’s worth of text. We assume the average message size on this app will be a quarter of that.
* **DAUs send and receive a combined total of 100 messages per day,** generating 100 rows in the messages table each day\*\*.\*\*
* **Message data is only stored on local databases for three months.** Using PowerSync’s [sync rules](/usage/sync-rules), only messages sent and received in the last 3 months are stored in the local database embedded within a user’s app.
* **No attachments synced through PowerSync.** Attachments like files or photos are not synced through PowerSync.
* **One PowerSync instance.** The backend database connects to a single PowerSync instance. A more typical setup may use 2 PowerSync instances: one for syncing from the staging database and one for the production database. Since staging data volumes are often negligible, we’ve ignored that in this example.
#### Table of Assumptions
| DAUs as % of all installs | 10% |
| ------------------------------------------ | ------------------ |
| Peak concurrent connections as % of DAUs | 10% |
| Messages sent and received per day per DAU | 100 |
| Message average size | 0.25 KB |
| Messages kept on local database for | 3 months (90 days) |
For 50,000 app installs (5,000 Daily Active Users): **\$56/month** on the Pro plan
## Data Processing
| | |
| ---------------------------------------------------------- | ------------------------------------------------------------------- |
| Data replicated from Postgres to PowerSync Service / month | 100 messages / day \* 5,000 DAUs \* 0.25 KB \* 30 = 3.75 GB / month |
| Data replicated from PowerSync Service to app / month | 100 messages / day \* 5,000 DAUs \* 0.25 KB \* 30 = 3.75 GB / month |
| Total data processing costs / month | |
| ----------------------------------- | -------------------------- |
| Usage: | 3.75 GB + 3.75 GB = 7.5 GB |
| Less included usage: | (30 GB) |
| Cost for additional usage: | \$0 |
| **Total usage costs** | **\$0** |
## Sync operations
| | |
| ----------------------------- | --------------------------------------------------------------------------- |
| Total sync operations / month | 100 messages / day \* 5,000 DAUs \* 30 = 15,000,000 sync operations / month |
| Total sync operation costs /month | |
| --------------------------------- | -------------------------- |
| Usage: | 15,000,000 |
| Less included usage: | (10,000,000) |
| Cost for additional usage: | 5,000,000 \* \$1/1,000,000 |
| **Total usage costs** | **\$5 / month** |
## Replicated data cached on PowerSync Service
| | |
| ----------------------------------------------------- | ----------------------------------------------------------------- |
| Total size of replicated data to be cached and synced | 100 messages / day \* 5,000 DAUs \* 0.25 KB \* 90 days = 11.25 GB |
| Total replicated data caching costs / month | |
| ------------------------------------------- | ---------------- |
| Usage: | 11.25 GB |
| Less included usage: | (10 GB) |
| Cost for additional usage: | 2 GB \* \$1 / GB |
| **Total usage costs** | **\$2 / month** |
## Peak concurrent connections
| | |
| ------------------------------------------- | --------------------------------------------------- |
| Total number of peak concurrent connections | 5,000 DAUs \* 10% = 500 peak concurrent connections |
| Total peak concurrent connections costs / month | |
| ----------------------------------------------- | --------------- |
| Usage: | 500 |
| Less included usage: | (1,000) |
| Cost for additional usage: | \$0 |
| **Total usage costs** | **\$0 / month** |
| Total monthly costs | |
| --------------------------- | ---------------- |
| Pro Plan | \$49 / month |
| Data processing | \$ 0 / month |
| Sync operations | \$ 5 / month |
| Replicated data caching | \$ 2 / month |
| Peak concurrent connections | \$ 0 / month |
| **Total monthly costs** | **\$56 / month** |
For 1,000,000 app installs (100,000 Daily Active Users): **\$707/month** on the Pro plan
## Data Processing
| | |
| ----------------------------------------------------- | ------------------------------------------------------------------- |
| Data replicated from Postgres to sync service / month | 100 messages / day \* 100,000 DAUs \* 0.25 KB \* 30 = 75 GB / month |
| Data replicated from sync service to app / month | 100 messages / day \* 100,000 DAUs \* 0.25 KB \* 30 = 75 GB / month |
| Total data processing costs / month | |
| ----------------------------------- | ---------------------- |
| Usage: | 75 GB + 75 GB = 150 GB |
| Less included usage: | (30 GB) |
| Cost for additional usage: | 120 GB \* \$0.15 / GB |
| **Total usage costs** | **\$18 / month** |
## Sync operations
| | |
| ----------------------------- | ------------------------------------------------------------------------------ |
| Total sync operations / month | 100 messages / day \* 100,000 DAUs \* 30 = 300,000,000 sync operations / month |
| Total sync operation costs /month | |
| --------------------------------- | ---------------------------- |
| Usage: | 300,000,000 |
| Less included usage: | (10,000,000) |
| Cost for additional usage: | 290,000,000 \* \$1/1,000,000 |
| **Total usage costs** | **\$290 / month** |
## Replicated data cached on sync service
| | |
| ----------------------------------------------------- | ----------------------------------------------------------------- |
| Total size of replicated data to be cached and synced | 100 messages / day \* 100,000 DAUs \* 0.25 KB \* 90 days = 225 GB |
| Total replicated data caching costs / month | |
| ------------------------------------------- | ------------------ |
| Usage: | 225 GB |
| Less included usage: | (10 GB) |
| Cost for additional usage: | 215 GB \* \$1 / GB |
| **Total usage costs** | **\$215 / month** |
## Peak concurrent connections
| | |
| ------------------------------------------- | -------------------------------------------------------- |
| Total number of peak concurrent connections | 100,000 DAUs \* 10% = 10,000 peak concurrent connections |
| Total peak concurrent connections costs / month | |
| ----------------------------------------------- | --------------------- |
| Usage: | 10,000 |
| Less included usage: | (1,000) |
| Cost for additional usage: | 9,000 \* \$15 / 1,000 |
| **Total usage costs** | **\$135 / month** |
| Total monthly costs | |
| --------------------------- | ----------------- |
| Pro Plan | \$ 49 / month |
| Data processing | \$ 18 / month |
| Sync operations | \$290 / month |
| Replicated data caching | \$215 / month |
| Peak concurrent connections | \$135 / month |
| **Total monthly costs** | **\$707 / month** |
For 10,000,000 app installs (1,000,000 Daily Active Users): **\$6,984.50/month** on the Pro plan
## Data Processing
| | |
| ----------------------------------------------------- | ---------------------------------------------------------------------- |
| Data replicated from Postgres to sync service / month | 100 messages / day \* 1,000,000 DAUs \* 0.25 KB \* 30 = 750 GB / month |
| Data replicated from sync service to app / month | 100 messages / day \* 1,000,000 DAUs \* 0.25 KB \* 30 = 750 GB / month |
| Total data processing costs / month | |
| ----------------------------------- | -------------------------- |
| Usage: | 750 GB + 750 GB = 1,500 GB |
| Less included usage: | (30 GB) |
| Cost for additional usage: | 1,470 GB \* \$0.15 / GB |
| **Total usage costs** | **\$220.50 / month** |
## Sync operations
| | |
| ----------------------------- | ---------------------------------------------------------------------------------- |
| Total sync operations / month | 100 messages / day \* 1,000,000 DAUs \* 30 = 3,000,000,000 sync operations / month |
| Total sync operation costs /month | |
| --------------------------------- | ------------------------------ |
| Usage: | 3,000,000,000 |
| Less included usage: | (10,000,000) |
| Cost for additional usage: | 2,990,000,000 \* \$1/1,000,000 |
| **Total usage costs** | **\$2,990 / month** |
## Replicated data cached on sync service
| | |
| ----------------------------------------------------- | --------------------------------------------------------------------- |
| Total size of replicated data to be cached and synced | 100 messages / day \* 1,000,000 DAUs \* 0.25 KB \* 90 days = 2,250 GB |
| Total replicated data caching costs / month | |
| ------------------------------------------- | -------------------- |
| Usage: | 2,250 GB |
| Less included usage: | (10 GB) |
| Cost for additional usage: | 2,240 GB \* \$1 / GB |
| **Total usage costs** | **\$2,240 / month** |
## Peak concurrent connections
| | |
| ------------------------------------------- | ----------------------------------------------------------- |
| Total number of peak concurrent connections | 1,000,000 DAUs \* 10% = 100,000 peak concurrent connections |
| Total peak concurrent connections costs / month | |
| ----------------------------------------------- | ---------------------- |
| Usage: | 100,000 |
| Less included usage: | (1,000) |
| Cost for additional usage: | 99,000 \* \$15 / 1,000 |
| **Total usage costs** | **\$1,485 / month** |
|Total monthly costs
\| |
\| --- | --- |
\| Pro Plan | $49.00 / month | | Data processing |$ 22.50 / month |
\| Sync operations | $2,990,00 / month | | Replicated data caching | $2,240.00 / month |
\| Peak concurrent connections | $1,485.00 / month | | **Total monthly costs** | **$6,984.50 / month\*\* |
# Appendix
Source: https://docs.powersync.com/self-hosting/appendix
# Database Connection
Source: https://docs.powersync.com/self-hosting/appendix/database-connection
This section is a work in progress.
Below, you can find provider-specific instructions to obtain connection details that you need to specify in your configuration file (see [PowerSync Service Setup](/self-hosting/installation/powersync-service-setup)).
1. In your Supabase Dashboard, click **Connect** in the top bar:
* Under **Direct connection**, copy the connection string. The hostname should be `db..supabase.co`, and not, for example, `aws-0-us-west-1.pooler.supabase.com`.
* Paste this URI into the `uri` field under `replication` > `connections` in your configuration file, for example:
```yaml
# config.yaml
replication:
connections:
- type: postgresql
uri: postgresql://postgres:[YOUR-PASSWORD]@db.abc.supabase.co:5432/postgres
```
2. Replace `[YOUR-PASSWORD]` with the password for the `postgres` user in your Supabase database.
* Supabase also [refers to this password](https://supabase.com/docs/guides/database/managing-passwords) as the *database password* or *project password*.
3. PowerSync has the Supabase CA certificate pre-configured — `verify-full` SSL mode can be used directly, without any custom certificates.
4. Under `client_auth` enable Supabase Authentication:
```yaml
client_auth:
supabase: true
supabase_jwt_secret: [secret]
```
For more details, see [Supabase Auth](/installation/authentication-setup/supabase-auth).
Add your connection details under `replication` > `connections` in your configuration file.
Notes:
1. The Username and Password is the `powersync_role` created in [Source Database Setup](/installation/database-setup).
2. PowerSync has the AWS RDS CA certificate pre-configured — `verify-full` SSL mode can be used directly, without any additional configuration required.
Add your connection details under `replication` > `connections` in your configuration file.
Notes:
* The Username and Password is the `powersync_role` created in [Source Database Setup](/installation/database-setup).
* PowerSync has the relevant Azure CA certificates pre-configured — `verify-full` SSL mode can be used directly, without any additional configuration required.
Add your connection details under `replication` > `connections` in your configuration file.
Notes:
* The Username and Password is the `powersync_role` created in [Source Database Setup](/installation/database-setup).
* The server certificate can be downloaded from Google Cloud SQL.
* If SSL is enforced, a client certificate and key must also be created on Google Cloud SQL, and added to your `powersync.yaml` file.
Add your connection details under `replication` > `connections` in your configuration file.
The Username and Password is the `powersync_role` created in [Source Database Setup](/installation/database-setup).
Add your connection details under `replication` > `connections` in your configuration file.
The Username and Password is the `powersync_role` created in [Source Database Setup](/installation/database-setup).
For other providers and self-hosted databases:
Add your connection details under `replication` > `connections` in your configuration file.
The Username and Password is the `powersync_role` created in [Source Database Setup](/installation/database-setup).
# Enterprise
Source: https://docs.powersync.com/self-hosting/enterprise
Self-hosting of PowerSync is also available in an Enterprise Self-Hosted Edition with[ dedicated support plans, extra functionality and custom pricing](https://www.powersync.com/pricing).
To get started on the Enterprise Self-Hosted Edition please [contact us](mailto:support@powersync.com).
# Getting Started
Source: https://docs.powersync.com/self-hosting/getting-started
Self-host PowerSync in your own infrastructure (PowerSync Open Edition or PowerSync Enterprise Self-Hosted Edition).
The PowerSync Open Edition is currently considered a beta release as it still requires more detailed documentation and guides.
From a stability perspective the Open Edition is production-ready as it uses the same codebase as our Cloud version.
Please reach out on our [Discord](https://discord.gg/powersync) if you have any questions not yet covered in these docs.
The [PowerSync Service](https://github.com/powersync-ja/powersync-service) can be self-hosted using Docker. It is published to Docker Hub as [journeyapps/powersync-service](https://hub.docker.com/r/journeyapps/powersync-service)
Note that the [PowerSync Dashboard](/usage/tools/powersync-dashboard) is currently not available in the PowerSync Open Edition.
We have five starting points, detailed below:
## Overview Video (1 minute)
This video provides a quick introduction to the [PowerSync Open Edition](https://www.powersync.com/blog/powersync-open-edition-release):
VIDEO
## Demo Project (5 minutes)
The quickest way to get a feel for the system is to run our example project on your development machine using Docker Compose. You can find it [here](https://github.com/powersync-ja/self-host-demo):
## Local Development With Docker Compose (variable)
If you plan to self-host for development purposes only, we have a section describing how to easily do this using Docker Compose:
[Local Development](/self-hosting/local-development)
## Deploy PowerSync on Coolify (30 minutes)
See our [integration guide](/integration-guides/coolify) for deploying the PowerSync Service on Coolify. This can simplify the setup and management of the deployment.
## Full Installation (1 hour)
See our [Installation](/self-hosting/installation) section for instructions to run the PowerSync Service in a production environment.
# Installation
Source: https://docs.powersync.com/self-hosting/installation
Deploy PowerSync on your own infrastructure (PowerSync Open Edition or PowerSync Enterprise Self-Hosted Edition).
The typical components of a self-hosted production environment are:

The self-hosted deployment is run via Docker. A Docker image is distributed via [Docker Hub](https://hub.docker.com/r/journeyapps/powersync-service). Run PowerSync using:
```bash
docker run \
-p 8080:80 \
-e POWERSYNC_CONFIG_B64="$(base64 -i ./config.yaml)" \
--network my-local-dev-network \
--name my-powersync journeyapps/powersync-service:latest
```
In the above example, the service configuration is injected as an environment variable (which contains the base64 encoding of a config YAML file), but it's also possible to use a config file mounted on a volume or specified as a command line parameter. Both YAML and JSON config files are supported.
See [here](https://github.com/powersync-ja/self-host-demo/blob/main/config/powersync.yaml) for detailed comments on the config file options.
In order to run the PowerSync Service, the following activities are required:
# App Backend Setup
Source: https://docs.powersync.com/self-hosting/installation/app-backend-setup
# Client-Side Setup
Source: https://docs.powersync.com/self-hosting/installation/client-side-setup
We recommend splitting up your client-side implementation into four phases:
## 1. Generate Development Token
The recommended approach is to initially use a short-lived development token and then wire up production auth at a later stage.
1. Generate a temporary private/public key-pair (RS256) or shared key (HS256) for JWT signing and verification.
2. Add the key to your PowerSync Service configuration file, e.g.:
```yaml
# config.yaml
client_auth:
# static collection of public keys for JWT verification
jwks:
keys:
- kty: oct
alg: 'HS256'
kid: 'powersync-dev'
k: '[secret]'
```
1. Generate a signed JWT. We have two options to get you started:
1. If you have a `.yaml` configuration file and HS256 key, we recommending using the `generate-token` script from the Test Client in the [powersync-service repo](https://github.com/powersync-ja/powersync-service/tree/main/test-client), as described here [Self-hosted Setup / Local Development](/installation/authentication-setup/development-tokens#self-hosted-setup-local-development). You need to clone this repo to use this option.
2. Alternatively:
1. Save the private key into a `.env` file.
2. Generate a JWT, loading the `.env` file and inputting a user UUID. See example script:
```js
import * as jose from 'jose';
// get this from .env
const powerSyncPrivateKey = {
alg: 'RS256',
k: '[secret]'
...
};
const powerSyncKey = (await jose.importJWK(powerSyncPrivateKey)) as jose.KeyLike;
const token = await new jose.SignJWT({})
.setProtectedHeader({
alg: powerSyncPrivateKey.alg!,
kid: powerSyncPrivateKey.kid
})
.setSubject('b29a2678-91c3-406a-9109-2cb99bcc6a01') // set user id, maybe as cli arg
.setIssuedAt()
// .setIssuer()
.setAudience('powersync-dev')
.setExpirationTime('12h')
.sign(powerSyncKey);
console.log(token);
```
## 2. Run the Diagnostics app using a development token
With the [Diagnostics web app](https://github.com/powersync-ja/powersync-js/tree/main/tools/diagnostics-app) you can quickly inspect a user's local database. By using this you can confirm that the PowerSync Service configuration and sync rules behave as expected without needing to set up authentication or app UI.
The app is currently available at [https://diagnostics-app.powersync.com](https://diagnostics-app.powersync.com/)
It can also be run as a local standalone web app - see the [README](https://github.com/powersync-ja/powersync-js/tree/main/tools/diagnostics-app) for instructions on running it locally.
### Sign into app
Enter the generated token into the app's sign in screen.
Enter your PowerSync Service endpoint (see the port number specified in your config file e.g. `http://localhost:8080`).
**Checkpoint:**
Inspect your global bucket and synced table (from the [PowerSync Service Setup](/self-hosting/installation/powersync-service-setup) section) in the diagnostics app — these should match the sync rules you [defined previously](/self-hosting/installation/powersync-service-setup#1.sync-rules).
## 3. Use the Client SDK with a development token
Install the PowerSync client SDK in your app. Refer to the client-side installation instructions here: [Client-Side Setup](/installation/client-side-setup)
Hardcode the development token you generated above in the `fetchCredentials` method, which you'll implement as part of [Integrate with your Backend](/installation/client-side-setup/integrating-with-your-backend)
## 4. Implement authentication
Read about how authentication works in PowerSync here: [Authentication Setup](/installation/authentication-setup)
If you are using Supabase or Firebase authentication, PowerSync can verify JWTs for users directly:
### Supabase Auth
Under `client_auth` in your config file, enable Supabase authentication:
```yaml
# config.yaml
client_auth:
# Enable this if using Supabase Auth
supabase: true
supabase_jwt_secret: your-secret
```
For more details, see [Supabase Auth](/installation/authentication-setup/supabase-auth).
### Firebase Auth
Under `client_auth` in your config file, add your Firebase JWKS URI and audience.
* JWKS URI: [https://www.googleapis.com/service\_accounts/v1/jwk/securetoken@system.gserviceaccount.com](https://www.googleapis.com/service_accounts/v1/jwk/securetoken@system.gserviceaccount.com)
* JWT Audience: Your Firebase project ID
```yaml
# config.yaml
client_auth:
# JWKS URIs can be specified here.
jwks_uri:
'https://www.googleapis.com/service_accounts/v1/jwk/securetoken@system.gserviceaccount.com'
audience: ['']
```
For more details, see [Firebase Auth](/installation/authentication-setup/firebase-auth).
### Custom auth
Refer to: [Custom](/installation/authentication-setup/custom)
PowerSync supports both RS256 and HS256. Insert your auth details into your configuration file:
```yaml
# config.yaml
client_auth:
# JWKS URIs can be specified here.
jwks_uri: http://demo-backend:6060/api/auth/keys
# Optional static collection of public keys for JWT verification
# jwks:
# keys:
# - kty: 'RSA'
# n: '${PS_JWK_N}'
# e: '${PS_JWK_E}'
# alg: 'RS256'
# kid: '${PS_JWK_KID}'
audience: ['powersync-dev', 'powersync']
```
# Source Database Setup
Source: https://docs.powersync.com/self-hosting/installation/database-setup
# PowerSync Service Setup
Source: https://docs.powersync.com/self-hosting/installation/powersync-service-setup
Configuration details for connecting the PowerSync Service to your database
After configuring your source database for PowerSync, you'll need to setup your [PowerSync Service](/architecture/powersync-service).
This entails:
1. Configuring sync bucket storage
2. Defining your PowerSync config
1. Defining connections to your source database, and sync bucket storage database
2. Defining your [Sync Rules](/usage/sync-rules)
3. Defining your auth method
Examples of the above can be found in our demo application [here](https://github.com/powersync-ja/self-host-demo/tree/main/config). Below we go through these in more detail.
**Deploy PowerSync on Coolify:** See our [integration guide](/integration-guides/coolify) for deploying the PowerSync Service on Coolify. This can simplify the setup and management of the deployment.
## Configure Sync Bucket Storage
The PowerSync Service requires a storage backend for sync buckets. You can use either MongoDB or Postgres for this purpose. The storage backend is separate from your source database.
### MongoDB Storage
MongoDB requires at least one replica set node. A single node is fine for development/staging environments, but a 3-node replica set is recommended [for production](/self-hosting/lifecycle-maintenance).
[MongoDB Atlas](https://www.mongodb.com/products/platform/atlas-database) enables replica sets by default for new clusters.
However, if you're using your own environment you can enable this manually by running:
```bash
mongosh "mongodb+srv://powersync.abcdef.mongodb.net/" --apiVersion 1 --username myuser --eval 'try{rs.status().ok && quit(0)} catch {} rs.initiate({_id: "rs0", version: 1, members: [{ _id: 0, host : "mongo:27017" }]})'
```
If you are rolling your own Docker environment, you can include this init script in your docker-compose file to configure a replica set as once-off operation:
```yaml
# Initializes the MongoDB replica set. This service will not usually be actively running
mongo-rs-init:
image: mongo:7.0
depends_on:
- mongo
restart: "no"
entrypoint:
- bash
- -c
- 'sleep 10 && mongosh --host mongo:27017 --eval ''try{rs.status().ok && quit(0)} catch {} rs.initiate({_id: "rs0", version: 1, members: [{ _id: 0, host : "mongo:27017" }]})'''
```
### Postgres Storage (Beta)
Available since version 1.3.8 of [`journeyapps/powersync-service`](https://hub.docker.com/r/journeyapps/powersync-service), you can use Postgres as an alternative storage backend for sync buckets. This feature is currently in [beta](/resources/feature-status).
#### Database Setup
You'll need to create a dedicated user and schema for PowerSync storage. You can either:
1. Let PowerSync create the schema (recommended):
```sql
CREATE USER powersync_storage_user WITH PASSWORD 'secure_password';
-- The user should only have access to the schema it created
GRANT CREATE ON DATABASE postgres TO powersync_storage_user;
```
2. Or manually create the schema:
```sql
CREATE USER powersync_storage_user WITH PASSWORD 'secure_password';
CREATE SCHEMA IF NOT EXISTS powersync AUTHORIZATION powersync_storage_user;
GRANT CONNECT ON DATABASE postgres TO powersync_storage_user;
GRANT USAGE ON SCHEMA powersync TO powersync_storage_user;
GRANT ALL PRIVILEGES ON ALL TABLES IN SCHEMA powersync TO powersync_storage_user;
```
**Demo app:** A demo app with Postgres bucket storage is available [here](https://github.com/powersync-ja/self-host-demo/tree/main/demos/nodejs-postgres-bucket-storage).
## PowerSync Configuration
The PowerSync Service is configured using key/value pairs in a config file, and supports the following configuration methods:
1. Inject config as an environment variable (which contains the base64 encoding of a config file)
2. Use a config file mounted on a volume
3. Specify the config as a command line parameter (again base64 encoded)
Both YAML and JSON config files are supported, and you can see examples of the above configuration methods in our demo app's [docker-compose](https://github.com/powersync-ja/self-host-demo/blob/d61cea4f1e0cc860599e897909f11fb54420c3e6/docker-compose.yaml#L46) file.
A detailed `config.yaml` example with additional comments can be found here:
The config file schema is also available here:
Below is a skeleton config file you can copy and paste to edit locally:
```yaml
# config.yaml
# Settings for source database replication
replication:
# Specify database connection details
# Note only 1 connection is currently supported
# Multiple connection support is on the roadmap
connections:
- type: postgresql
# The PowerSync server container can access the Postgres DB via the DB's service name.
# In this case the hostname is pg-db
# The connection URI or individual parameters can be specified.
uri: postgresql://postgres:mypassword@pg-db:5432/postgres
# SSL settings
sslmode: disable # 'verify-full' (default) or 'verify-ca' or 'disable'
# Note: 'disable' is only suitable for local/private networks, not for public networks
# Connection settings for sync bucket storage (MongoDB and Postgres are supported)
storage:
# Option 1: MongoDB Storage
type: mongodb
uri: mongodb://mongo:27017/powersync_demo
# Use these if authentication is required. The user should have `readWrite` and `dbAdmin` roles
# username: myuser
# password: mypassword
# Option 2: Postgres Storage
# type: postgresql
# This accepts the same parameters as a Postgres replication source connection
# uri: postgresql://powersync_storage_user:secure_password@storage-db:5432/postgres
# sslmode: disable
# The port which the PowerSync API server will listen on
port: 80
# Specify sync rules
sync_rules:
content: |
bucket_definitions:
global:
data:
- SELECT * FROM lists
- SELECT * FROM todos
# Settings for client authentication
client_auth:
# Enable this if using Supabase Auth
# supabase: true
# supabase_jwt_secret: your-secret
# JWKS URIs can be specified here.
jwks_uri: http://demo-backend:6060/api/auth/keys
# JWKS audience
audience: ['powersync-dev', 'powersync']
# Settings for telemetry reporting
# See https://docs.powersync.com/self-hosting/telemetry
telemetry:
# Opt out of reporting anonymized usage metrics to PowerSync telemetry service
disable_telemetry_sharing: false
```
Specify the connection to Postgres in the `replication` section. Retrieving your database connection string / individual parameters differs by database hosting provider. See [Database Connection](/self-hosting/appendix/database-connection) for further details.
If you are using hosted Supabase, you will need to enable IPv6 for Docker as per [https://docs.docker.com/config/daemon/ipv6/](https://docs.docker.com/config/daemon/ipv6/)
If your host OS does not support Docker IPv6 e.g. macOS, you will need to run Supabase locally.
This is because Supabase only allows direct database connections over IPv6 — PowerSync cannot connect using the connection pooler.
Specify the connection to your sync bucket storage provider (Postgres or MongoDB) in the `storage` section.
### Postgres Storage
Separate Postgres servers are required for replication connections and sync bucket storage **if using Postgres versions below 14**.
| Postgres Version | Server configuration |
| ---------------- | ------------------------------------------------------------------------------------------------------------------------------------------------------------------------------------------------------------------------ |
| Below 14 | Separate servers are required for the source and sync bucket storage. Replication will be blocked if the same server is detected. |
| 14 and above | The source database and sync bucket storage database can be on the same server. Using the same database (with separate schemas) is supported but may lead to higher CPU usage. Using separate servers remains an option. |
### Environment Variables
The config file uses custom tags for environment variable substitution.
Using `!env [variable name]` will substitute the value of the environment variable named `[variable name]`.
Only environment variables with names starting with `PS_` can be substituted.
See examples here:
### Sync Rules
Your project's [sync rules](/self-hosting/installation/powersync-service-setup#sync-rules) can either be specified within your configuration file directly, or in a separate file that is referenced.
```yaml
# config.yaml
# Define sync rules:
sync_rules:
content: |
bucket_definitions:
global:
data:
- SELECT * FROM lists
- SELECT * FROM todos
# Alternatively, reference a sync rules file
# sync_rules:
# path: sync_rules.yaml
```
We recommend starting with syncing a single table in a [global bucket](/usage/sync-rules/example-global-data). Choose a table and sync it by adding the following to your sync rules:
```yaml
sync_rules:
content: |
bucket_definitions:
global:
data:
# Sync all mytable
- SELECT * FROM mytable
```
For more information about sync rules see:
[Sync Rules](/usage/sync-rules)
**Checkpoint**
To verify that your sync rules are functioning correctly, inspect the contents of your sync bucket in MongoDB.
If you are running MongoDB in Docker, run the following:
```bash
docker exec -it {MongoDB container name} mongosh "mongodb://{MongoDB service host}/{MongoDB database name}" --eval "db.bucket_data.find().pretty()"
# Example
docker exec -it self-host-demo-mongo-1 mongosh "mongodb://localhost:27017/powersync_demo" --eval "db.bucket_data.find().pretty()"
```
# Lifecycle / Maintenance
Source: https://docs.powersync.com/self-hosting/lifecycle-maintenance
Self-hosting setup and maintenance
## Minimal Setup
A minimal "development" setup (e.g. for a staging or a QA environment) is:
1. A single PowerSync "compute" container (API + replication) with 512MB memory, 1 vCPU.
2. A single MongoDB node in replica set mode, 2GB memory, 1 vCPU. M10+ when using Atlas.
3. Load balancer for TLS.
This setup has no redundancy. If the replica set fails, you may need to recreate it from scratch which will re-sync all clients.
## Production
For production, we recommend running a high-availability setup:
1. 1x PowerSync replication container, 1GB memory, 1 vCPU
2. 2+ PowerSync API containers, 1GB memory each, 1vCPU each.
3. A 3-node MongoDB replica set, 2+GB memory each. Refer to the MongoDB documentation for deployment requirements. M10+ when using Atlas.
4. A load balancer with redundancy.
5. Run a daily compact job.
For scaling up, add 1x PowerSync API container per 100 connections. The MongoDB replica set should be scaled based on CPU and memory usage.
### Replication Container
The replication container handles replicating from the source database to PowerSync's bucket storage.
The replication process is run using the docker command `start -r sync`, for example `docker run powersync start -r sync`.
Only one process can replicate at a time. If multiple are running concurrently, you may see an error `[PSYNC_S1003] Sync rules have been locked by another process for replication`.
If you use rolling deploys, it is normal to see this error for a short duration while multiple processes are running.
Memory and CPU usage of the replication container is primarily driven by write load on the source database. A good starting point is 1GB memory and 1 vCPU for the container, but this may be scaled down depending on the load patterns.
Set the environment variable `NODE_OPTIONS=--max-old-space-size=800` for 800MB, or set to 80% of the total assigned memory if scaling up or down.
### API Containers
The API container handles streaming sync connections, as well as any other API calls.
The replication process is run using the docker command `start -r api`, for example `docker run powersync start -r api`.
Each API container is limited to 200 concurrent connections, but we recommend targeting 100 concurrent connections or less per container. This may change as we implement additional performance optimizations.
Memory and CPU usage of API containers are driven by:
1. Number of concurrent connections.
2. Number of buckets per connection.
3. Amount of data synced to each connection.
A good starting point is 1GB memory and 1 vCPU per container, but this may be scaled up or down depending on the specific load patterns.
Set the environment variable `NODE_OPTIONS=--max-old-space-size=800` for 800MB, or set to 80% of the total assigned memory if scaling up or down.
### Compact Job
We recommend running a compact job daily as a cron job, or after any large maintenance jobs. For details, see the documentation on [Compacting Buckets](/usage/lifecycle-maintenance/compacting-buckets).
Run the compact job using the docker command `compact`, for example `docker run powersync compact`.
The compact job uses up to 1GB memory for compacting, if available. Set the environment variable `NODE_OPTIONS=--max-old-space-size=800` for 800MB, or set to 80% of the total assigned memory if scaling up or down.
### Load Balancer
A load balancer is required in front of the API containers to provide TLS support and load balancing. Most cloud providers have built-in options for load balancing, such as ALB on AWS.
It is currently required to host the API container on a dedicated subdomain - we do not support running it on the same subdomain as another service.
For self-hosting, [nginx](https://nginx.org/en/) is always a good option. A basic nginx configuration could look like this:
```yaml
server {
listen 443 ssl;
server_name powersync.example.org;
# SSL configuration here
# Reverse proxy settings
location / {
proxy_pass http://powersync_server_ip:powersync_port; # Replace with your powersync details
proxy_set_header Host $host;
proxy_set_header X-Real-IP $remote_addr;
proxy_set_header X-Forwarded-For $proxy_add_x_forwarded_for;
# Disable proxy response buffering.
# This is not relevant for websocket connections, but is important when using
# HTTP streaming connections (configured in the PowerSync client SDK).
proxy_buffering off;
}
}
```
When using nginx as a Kubernetes ingress, set the proxy buffering option as an annotation on the ingress:
```yaml
nginx.ingress.kubernetes.io/proxy-buffering: "off"
```
### Health Checks
If the load balancer supports health checks, it may be configured to poll the API container at `/probes/liveness`. This endpoint is expected to have a 200 response when the container is healthy. See [Healthchecks](./lifecycle-maintenance/healthchecks) for details.
### Migrations
Occasionally, new versions of the PowerSync service image may require migrations on the underlying storage database. This is also specifically required the first time the service starts up on a new storage database.
By default, migrations are run as part of the replication and API containers. In some cases, a migration may add significant delay to the container startup.
To avoid this startup delay, the migrations may be run as a separate job on each update, before replacing the rest of the containers. To run the migrations, run the docker command `migrate up`, for example `docker run powersync migrate up`.
In this case, disable automatic migrations in the config:
```yaml
# powersync.yaml
migrations:
# Setting this to false (default) enables automatic migrations on startup.
# When set to true, migrations must be triggered manually by modifying the container `command`.
disable_auto_migration: true
```
Note that if you disable automatic migrations, and do not run the migration job manually,
the service may run with an outdated storage schema version. This may lead to unexpected and potentially difficult-to-debug errors in the service.
## Backups
We recommend using Git to backup your configuration files.
None of the containers use any local storage, so no backups are required there.
The sync bucket storage database may be backed up using the recommendations for the storage database system. This is not a strong requirement, since this data can be recovered by re-replicating from the source database.
# Health checks
Source: https://docs.powersync.com/self-hosting/lifecycle-maintenance/healthchecks
## Overview
PowerSync Service provides health check endpoints and configuration options to help you monitor the health and readiness of your deployment. These checks allow you to catch issues before they impact your users.
## Health Check Endpoints
The following HTTP endpoints are available:
* **Startup Probe:**\
`GET /probes/startup`
* `200` – Service has started up correctly
* `400` – Service has **not** yet started
* **Liveness Probe:**\
`GET /probes/liveness`
* `200` – Service is alive
* `400` – Service is **not** alive
## Example: Docker Health Checks
A configuration with Docker Compose might look like:
```yaml
healthcheck:
test: ["CMD", "node", "-e", "fetch('http://localhost:${PS_PORT}/probes/liveness').then(r => r.ok ? process.exit(0) : process.exit(1)).catch(() => process.exit(1))"]
interval: 5s
timeout: 1s
retries: 15
```
You can find a complete example in the [self-host-demo app](https://github.com/powersync-ja/self-host-demo/blob/main/services/powersync.yaml).
## Advanced: Configurable Health Check Probes (v1.12.0+)
Starting with version **1.12.0**, PowerSync Service supports configurable health check probes.\
You can now choose between filesystem-based and HTTP-based probes, or use both, via the config file. This is especially useful for environments with restricted I/O.
**Configuration options:**
```yaml
healthcheck:
probes:
use_filesystem: true # Enables filesystem-based health probes
use_http: true # Enables HTTP-based health probes
```
If no `healthcheck` configuration is provided, the service defaults to the previous behavior for backwards compatibility.
# Migrating between instances
Source: https://docs.powersync.com/self-hosting/lifecycle-maintenance/migrating
Migrating users between PowerSync instances
## Overview
In some cases, you may want to migrate users between PowerSync instances. This may be between cloud and self-hosted instances, or even just to change the endpoint.
If the PowerSync instances use the same source database and have the same basic configuration and sync rules, you can migrate users by just changing the endpoint to the new instance.
To make this process easier, we recommend using an API to retrieve the PowerSync endpoint, instead of hardcoding the endpoint in the client application. If you're using custom authentication, this can be done in the same API call as getting the authentication token.
There should be no downtime for users when switching between endpoints. The client will have to re-sync all data, but this will all happen automatically, and the client will atomically switch between the two. The main effect visible to users will be a delay in syncing new data while the client is re-syncing. All data will remain available to read on the client for the entire process.
# Multiple PowerSync Instances
Source: https://docs.powersync.com/self-hosting/lifecycle-maintenance/multiple-instances
Scaling using multiple instances
## Overview
Multiple instances are not required in most cases. See the [Overview](self-hosting/lifecycle-maintenance) for details on standard horizontal scaling setups.
When exceeding a couple thousand concurrent connections, the standard PowerSync setup may not scale sufficiently to handle the load. In this case, we recommend you [contact us](/resources/contact-us) to discuss the options. However, we give a basic overview of using multiple PowerSync instances to scale here.
Each PowerSync "instance" is a single endpoint (URL), that is backed by:
1. One replication container.
2. Multiple API containers, scaling horizontally.
3. One bucket storage database.
This setup is described in the [Overview](self-hosting/lifecycle-maintenance).
To scale further, multiple copies of this setup can be run, using the same source database.
## Mapping users to PowerSync endpoints
Since each PowerSync instance maintains its own copy of the bucket data, the exact list of operations and associated checksum will be different between them. This means the same client must connect to the same endpoint every time, otherwise they will have to re-sync all their data every time they switch. Multiple PowerSync instances cannot be load-balanced behind the same subdomain.
To ensure the same user always connects to the same endpoint, we recommend:
1. Do an API lookup from the client application to get the PowerSync endpoint, don't hardcode it in the application.
2. Either store the endpoint associated with each user, or compute it automatically using a hash function on the user id e.g. `hash(user_id) % n` where `n` is your number of instances.
# Securing Your Deployment
Source: https://docs.powersync.com/self-hosting/lifecycle-maintenance/securing-your-deployment
From a security perspective, the primary activity required will be placing a load balancer with TLS in front of PowerSync.
This section is a work in progress. Please reach out on [our Discord](https://discord.gg/powersync) if you have specific questions.
Below is an architecture diagram of a successful deployment:
Data doesn't always flow in the direction of your firewall rules, so the below table documents which components are making connections to others:
| Request Originator | Request Destination | Protocol |
| ------------------ | -------------------------- | ----------- |
| PowerSync Service | Postgres | TCP |
| PowerSync Service | MongoDB | TCP |
| PowerSync Service | OpenTelemetry Collector | TCP or UDP |
| PowerSync Service | JWKS Endpoint | TCP (HTTPS) |
| App Client | PowerSync Service (via LB) | TCP (HTTPS) |
| App Client | App Backend | TCP (HTTPS) |
| App Backend | Postgres | TCP |
# Telemetry
Source: https://docs.powersync.com/self-hosting/lifecycle-maintenance/telemetry
PowerSync integrates with OpenTelemetry
## Overview
PowerSync uses OpenTelemetry to gather metrics about usage and health.
This telemetry is shared with the PowerSync team unless you opt-out. This allows us to gauge adoption and usage patterns across deployments so that so that we can better allocate R\&D capacity and ultimately better serve our customers (including you!). The metrics are linked to a random UUID and are therefore completely anonymous.
## What is Collected
Below are the data points collected every few minutes and associated with a random UUID representing your instance:
| dimension | type |
| --------------------------------- | ------- |
| data\_replicated\_bytes | counter |
| data\_synced\_bytes | counter |
| rows\_replicated\_total | counter |
| transactions\_replicated\_total | counter |
| chunks\_replicated\_total | counter |
| operations\_synced\_total | counter |
| replication\_storage\_size\_bytes | gauge |
| operation\_storage\_size\_bytes | gauge |
| parameter\_storage\_size\_bytes | gauge |
| concurrent\_connections | gauge |
See [https://github.com/powersync-ja/powersync-service/blob/main/packages/service-core/src/metrics/Metrics.ts](https://github.com/powersync-ja/powersync-service/blob/main/packages/service-core/src/metrics/Metrics.ts) for additional details.
### Opting Out
To disable the sending of telemetry to PowerSync, set the `disable_telemetry_sharing` key in your [configuration file](/self-hosting/installation/powersync-service-setup#powersync-configuration) (`config.yaml` or `config.json`) to `true`:
```yaml
// config.yaml
...
telemetry:
# Opt out of reporting anonymized usage metrics to PowerSync telemetry service
disable_telemetry_sharing: true
```
# Local Development
Source: https://docs.powersync.com/self-hosting/local-development
Using Docker Compose to simplify your local development stack
It's possible to host the full PowerSync Service stack on your development machine using pure Docker, but Docker Compose can simplify things.
Below is a minimal Docker Compose setup for self-hosting PowerSync on your development machine. Note that Docker Compose is primarily designed for development and testing environments.
1. Create a new folder to work in:
```bash
mkdir powersync-service && cd powersync-service
```
1. Create a `docker-compose.yml` file with the below contents:
```yaml
services:
powersync:
restart: unless-stopped
depends_on:
mongo-rs-init:
condition: service_completed_successfully
postgres: # This is not required, but is nice to have
condition: service_healthy
image: journeyapps/powersync-service:latest
command: ["start", "-r", "unified"]
volumes:
- ./config/config.yaml:/config/config.yaml
environment:
POWERSYNC_CONFIG_PATH: /config/config.yaml
ports:
- 8080:8080
postgres:
image: postgres:latest
restart: always
environment:
- POSTGRES_USER=postgres
- POSTGRES_DB=postgres
- POSTGRES_PASSWORD=postgres
- PGPORT=5432
volumes:
- pg_data:/var/lib/postgresql/data
ports:
- "5432:5432"
command: ["postgres", "-c", "wal_level=logical"]
healthcheck:
test: ["CMD-SHELL", "pg_isready -U postgres -d postgres"]
interval: 5s
timeout: 5s
retries: 5
# MongoDB Service used internally
mongo:
image: mongo:7.0
command: --replSet rs0 --bind_ip_all --quiet
restart: unless-stopped
ports:
- 27017:27017
volumes:
- mongo_storage:/data/db
# Initializes the MongoDB replica set. This service will not usually be actively running
mongo-rs-init:
image: mongo:7.0
depends_on:
- mongo
restart: on-failure
entrypoint:
- bash
- -c
- 'mongosh --host mongo:27017 --eval ''try{rs.status().ok && quit(0)} catch {} rs.initiate({_id: "rs0", version: 1, members: [{ _id: 0, host : "mongo:27017" }]})'''
volumes:
mongo_storage:
pg_data:
```
1. Create a config volume that contains a `config.yaml` file, this configured the PowerSync Service itself
```bash
mkdir config && cd config
```
Put the below into `/config/config.yaml` :
```yaml
replication:
connections:
- type: postgresql
uri: postgresql://postgres:postgres@postgres:5432/postgres
# SSL settings
sslmode: disable # 'verify-full' (default) or 'verify-ca' or 'disable'
# Connection settings for sync bucket storage
storage:
type: mongodb
uri: mongodb://mongo:27017/powersync_demo
# The port which the PowerSync API server will listen on
port: 8080
# Specify sync rules
sync_rules:
# TODO use specific sync rules here
content: |
bucket_definitions:
global:
data:
- SELECT * FROM lists
- SELECT * FROM todos
# Settings for client authentication
client_auth:
# Enable this if using Supabase Auth
supabase: false
# JWKS URIs can be specified here.
jwks_uri: [TODO]
# JWKS audience
audience: ['powersync-dev', 'powersync']
# Settings for telemetry reporting
# See https://docs.powersync.com/self-hosting/telemetry
telemetry:
# Opt out of reporting anonymized usage metrics to PowerSync telemetry service
disable_telemetry_sharing: false
```
For some additional details on this file, see [PowerSync Service Setup](/self-hosting/installation/powersync-service-setup).
Next, the `client_auth` sections needs to be completed.
The PowerSync Service can verify JWTs from client applications using either HMAC (HS\*) or RSA (RS\*) based algorithms. It can also obtain the necessary settings from Supabase automatically if you are using it.
1. In the case of Supabase, simply set the `supabase` key to `true`
2. In the case of HS\* algorithms, specify the secret as base64 encoded in the `k`field.
3. In the case of RS\* based algorithms, the public key(s) can be specified either by supplying a JWKS URI or hard coding the public key in the config file.
1. If using a JWKS URI, we have an example endpoint available [here](https://hlstmcktecziostiaplz.supabase.co/functions/v1/powersync-jwks); ensure that your response looks similar.
2. If hardcoding, see the syntax below. We also have an example [key generator](https://github.com/powersync-ja/self-host-demo/tree/main/key-generator) script.
example of hard coded HS256 config
```yaml
client_auth:
jwks:
keys:
- kty: 'RSA'
n: 't-3d9e6XGtVsDB49CxVPn6P4OK6ir-wHP0CtTTq3VK6ofz2TWNrcHbCks6MszyWuBN1qb1ir_qudwwIeS69InEFm9WOYG1jIp6OBUNY4LPvkWfhSqcU6BasRAkYllC65CnSiVuTs4TlVgE-CBZQwQCvyrYgQgczC-GnI2HEB2SGTnXnBTXmAFEAd7xh_IROURZm1C6RnD2fXmiR1PxJsBn1w2hWYk0L8rQPlkthXwHNKd964rDir2qSTzVaHVvrFaxKiTlTe8uP4PR6OZT4pE0NDI2KNkyPauIeXp8HrwpZiUd8Znc8LQ-mj-hxfxtynYhxvcd6O_jyxa_41wjPeeQ'
e: 'AQAB'
alg: 'RS256'
kid: 'powersync-0abb8a873a'
```
# Use AWS S3 for attachment storage
Source: https://docs.powersync.com/tutorials/client/attachments-and-files/aws-s3-storage-adapter
In this tutorial, we will show you how to replace Supabase Storage with AWS S3 for handling attachments in the [React Native To-Do List demo app](https://github.com/powersync-ja/powersync-js/tree/main/demos/react-native-supabase-todolist).
# Introduction
The AWS credentials should never be exposed directly on the client - it could expose access to the entire S3 bucket to the user.
For this tutorial we have therefore decided to use the following workflow:
1. Client makes an API call to the app backend, using the client credentials (a [Supabase Edge Function](https://supabase.com/docs/guides/functions)).
2. The backend API has the S3 credentials. It signs a S3 upload/download URL, and returns that to the client.
3. The client uploads/downloads using the pre-signed S3 URL.
The following updates to the [React Native To-Do List demo app](https://github.com/powersync-ja/powersync-js/tree/main/demos/react-native-supabase-todolist) are therefore required:
1. Create Supabase Edge Functions, and
2. Update the demo app to use the AWS S3 storage adapter
The following pre-requisites are required to complete this tutorial:
* Clone the [To-Do List demo app](https://github.com/powersync-ja/powersync-js/tree/main/demos/react-native-supabase-todolist) repo
* Follow the instructions in the [README](https://github.com/powersync-ja/powersync-js/blob/main/demos/react-native-supabase-todolist/README.md) and ensure that the app runs locally
* A running PowerSync Service (can be self-hosted)
# Steps
This tutorial assumes that you have an AWS account. If you do not have an AWS account, you can create one [here](https://aws.amazon.com/).
To enable attachment storage using AWS S3, set up an S3 bucket by following these steps:
1. Go to the [S3 Console](https://s3.console.aws.amazon.com/s3) and click `Create bucket`.
2. Enter a unique bucket name and select your preferred region.
3. Under `Object Ownership`, set ACLs disabled and ensure the bucket is private.
4. Enable Bucket Versioning if you need to track changes to files (optional).
Go to the Permissions tab and set up the following:
1. A bucket policy for access control
* Click Bucket policy and enter a policy allowing the necessary actions (e.g., s3:PutObject, s3:GetObject) for the specific users or roles.
2. **(Optional)** Configure CORS (Cross-Origin Resource Sharing) if your app requires it
1. Go to the [IAM Console](https://console.aws.amazon.com/iam) and create a new user with programmatic access.
2. Attach an AmazonS3FullAccess policy to this user, or create a custom policy with specific permissions for the bucket.
3. Save the Access Key ID and Secret Access Key.
We need to create 3 Supabase Edge Functions to handle the S3 operations:
1. Upload,
2. Download, and
3. Delete
Before we create the Edge Functions, we need to set up the environment variables for the AWS S3 credentials. Create an `.env` file in the root of your Supabase project, add and update
the values with your AWS S3 configuration created in [Step 1](#step-1-aws-s3-setup):
```bash .env
AWS_ACCESS_KEY_ID=***
AWS_SECRET_ACCESS_KEY=***
AWS_S3_REGION=#region
AWS_S3_BUCKET_NAME=#bucket_name
```
For more information on getting started with a Supabase Edge Function, see the Supabase [Getting Started Guide](https://supabase.com/docs/guides/functions/quickstart).
**Security Note**
The filename specified in each edge function request can pose security risks, such as enabling a user to overwrite another user’s files by using the same filename.
To mitigate this, a common approach is to generate a random prefix or directory for each file.
While it’s likely fine to omit this safeguard in the demo — since users can already read and delete any file — this should be addressed in a **production environment**.
Create the `s3-upload` Edge Function by running the following in your Supabase project:
```bash
supabase functions new s3-upload
```
```typescript index.ts
import { PutObjectCommand, S3Client } from "npm:@aws-sdk/client-s3";
import { getSignedUrl } from "npm:@aws-sdk/s3-request-presigner";
import "jsr:@supabase/functions-js/edge-runtime.d.ts";
const AWS_ACCESS_KEY_ID = Deno.env.get('AWS_ACCESS_KEY_ID')!;
const AWS_SECRET_ACCESS_KEY = Deno.env.get('AWS_SECRET_ACCESS_KEY')!;
const AWS_REGION = Deno.env.get('AWS_S3_REGION')!;
const AWS_BUCKET_NAME = Deno.env.get('AWS_S3_BUCKET_NAME')!;
const accessControlAllowOrigin = "*";
Deno.serve(async (req) => {
if (req.method !== 'POST') {
return new Response(JSON.stringify({ error: 'Only POST requests are allowed' }), {
status: 405,
});
}
const { fileName, mediaType, expiresIn } = await req.json();
if (!fileName || !mediaType) {
return new Response(
JSON.stringify({ error: 'Missing required fields: fileName, mediaType or data' }),
{ status: 400 }
);
}
try {
const s3Client = new S3Client({
region: AWS_REGION,
credentials: {
accessKeyId: AWS_ACCESS_KEY_ID,
secretAccessKey: AWS_SECRET_ACCESS_KEY
}
});
const expiry = expiresIn || 900;
const command = new PutObjectCommand({
Bucket: AWS_BUCKET_NAME,
Key: fileName,
ContentType: mediaType
});
const uploadUrl = await getSignedUrl(s3Client, command, { expiresIn: expiry })
return new Response(
JSON.stringify({
message: `UploadURL for ${fileName} created successfully.`,
uploadUrl: uploadUrl
}),
{ status: 200, headers: { "Content-Type": "application/json", 'Access-Control-Allow-Origin': accessControlAllowOrigin } }
);
} catch (err) {
return new Response(JSON.stringify({ error: `Error uploading file ${fileName}: ${err}`}), {
headers: { "Content-Type": "application/json" },
status: 500,
});
}
});
```
Create the `s3-download` Edge Function by running the following in your Supabase project:
```bash
supabase functions new s3-download
```
```typescript index.ts
import { GetObjectCommand, S3Client } from "npm:@aws-sdk/client-s3";
import { getSignedUrl } from "npm:@aws-sdk/s3-request-presigner";
import "jsr:@supabase/functions-js/edge-runtime.d.ts";
const AWS_ACCESS_KEY_ID = Deno.env.get('AWS_ACCESS_KEY_ID')!;
const AWS_SECRET_ACCESS_KEY = Deno.env.get('AWS_SECRET_ACCESS_KEY')!;
const AWS_REGION = Deno.env.get('AWS_S3_REGION')!;
const AWS_BUCKET_NAME = Deno.env.get('AWS_S3_BUCKET_NAME')!;
const accessControlAllowOrigin = "*";
Deno.serve(async (req) => {
if (req.method !== 'POST') {
return new Response(JSON.stringify({ error: 'Only POST requests are allowed' }), {
status: 405,
});
}
const { fileName, expiresIn } = await req.json();
if (!fileName) {
return new Response(
JSON.stringify({ error: 'Missing required field: fileName' }),
{ status: 400 }
);
}
try {
const s3Client = new S3Client({
region: AWS_REGION,
credentials: {
accessKeyId: AWS_ACCESS_KEY_ID,
secretAccessKey: AWS_SECRET_ACCESS_KEY
}
});
const expiry = expiresIn || 900;
const command = new GetObjectCommand({
Bucket: AWS_BUCKET_NAME,
Key: fileName
});
const downloadUrl = await getSignedUrl(s3Client, command, { expiresIn: expiry });
return new Response(
JSON.stringify({
message: `DownloadURL for ${fileName} created successfully.`,
downloadUrl: downloadUrl
}),
{ status: 200, headers: { "Content-Type": "application/json", 'Access-Control-Allow-Origin': accessControlAllowOrigin }}
);
} catch (err) {
return new Response(JSON.stringify({ error: `Error downloading file ${fileName}: ${err}`}), {
headers: { "Content-Type": "application/json" },
status: 500,
});
}
});
```
Create the `s3-delete` Edge Function by running the following in your Supabase project:
```bash
supabase functions new s3-delete
```
```typescript index.ts
import { DeleteObjectCommand, S3Client } from "npm:@aws-sdk/client-s3";
import "jsr:@supabase/functions-js/edge-runtime.d.ts";
const AWS_ACCESS_KEY_ID = Deno.env.get('AWS_ACCESS_KEY_ID')!;
const AWS_SECRET_ACCESS_KEY = Deno.env.get('AWS_SECRET_ACCESS_KEY')!;
const AWS_REGION = Deno.env.get('AWS_S3_REGION')!;
const AWS_BUCKET_NAME = Deno.env.get('AWS_S3_BUCKET_NAME')!;
Deno.serve(async (req) => {
if (req.method !== 'POST') {
return new Response(JSON.stringify({ error: 'Only POST requests are allowed' }), {
status: 405,
});
}
const { fileName } = await req.json();
if (!fileName) {
return new Response(
JSON.stringify({ error: 'Missing required field: fileName' }),
{ status: 400 }
);
}
try {
const s3Client = new S3Client({
region: AWS_REGION,
credentials: {
accessKeyId: AWS_ACCESS_KEY_ID,
secretAccessKey: AWS_SECRET_ACCESS_KEY
}
});
const command = new DeleteObjectCommand({
Bucket: AWS_BUCKET_NAME,
Key: fileName
});
await s3Client.send(command);
return new Response(JSON.stringify({ message: `${fileName} deleted successfully from ${AWS_BUCKET_NAME}.` }), {
headers: { "Content-Type": "application/json" },
status: 200,
});
} catch (err) {
return new Response(JSON.stringify({ error: `Error deleting ${fileName} from ${AWS_BUCKET_NAME}: ${err}`}), {
headers: { "Content-Type": "application/json" },
status: 500,
});
}
});
```
Create a `AWSStorageAdapter.ts` file in the `demos/react-native-supabase-todolist/library/storage` directory and add the following contents:
```typescript AWSStorageAdapter.ts
import * as FileSystem from 'expo-file-system';
import { decode as decodeBase64 } from 'base64-arraybuffer';
import { StorageAdapter } from '@powersync/attachments';
import { SupabaseClient } from '@supabase/supabase-js';
interface S3Upload {
message: string;
uploadUrl: string;
}
interface S3Download {
message: string;
downloadUrl: string;
}
interface S3Delete {
message: string;
}
export class AWSStorageAdapter implements StorageAdapter {
constructor( public client: SupabaseClient ) {}
async uploadFile(
filename: string,
data: ArrayBuffer,
options?: {
mediaType?: string;
}
): Promise {
const response = await this.client.functions.invoke('s3-upload', {
body: {
fileName: filename,
mediaType: options?.mediaType
}
});
if (response.error || !response.data) {
throw new Error(`Failed to reach upload edge function, code=${response.error}`);
}
const { uploadUrl } = response.data;
try {
const body = new Uint8Array(data);
const response = await fetch(uploadUrl, {
method: "PUT",
headers: {
"Content-Length": body.length.toString(),
"Content-Type": options?.mediaType,
},
body: body,
});
console.log(`File: ${filename} uploaded successfully.`);
} catch (error) {
console.error('Error uploading file:', error);
throw error;
}
}
async downloadFile(filePath: string): Promise {
const response = await this.client.functions.invoke('s3-download', {
body: {
fileName: filePath
}
});
if (response.error || !response.data) {
throw new Error(`Failed to reach download edge function, code=${response.error}`);
}
const { downloadUrl } = response.data;
try {
const downloadResponse = await fetch(downloadUrl, {
method: "GET",
});
return await downloadResponse.blob();
} catch (error) {
console.error('Error downloading file:', error);
throw error;
}
}
async deleteFile(uri: string, options?: { filename?: string }): Promise {
if (await this.fileExists(uri)) {
await FileSystem.deleteAsync(uri);
}
const { filename } = options ?? {};
if (!filename) {
return;
}
try {
const response = await this.client.functions.invoke('s3-delete', {
body: {
fileName: options?.filename,
}
});
if (response.error || !response.data) {
throw new Error(`Failed to reach delete edge function, code=${response.error}`);
}
const { message } = response.data;
console.log(message);
} catch (error) {
console.error(`Error deleting ${filename}:`, error);
}
}
async readFile(
fileURI: string,
options?: { encoding?: FileSystem.EncodingType; mediaType?: string }
): Promise {
const { encoding = FileSystem.EncodingType.UTF8 } = options ?? {};
const { exists } = await FileSystem.getInfoAsync(fileURI);
if (!exists) {
throw new Error(`File does not exist: ${fileURI}`);
}
const fileContent = await FileSystem.readAsStringAsync(fileURI, options);
if (encoding === FileSystem.EncodingType.Base64) {
return this.base64ToArrayBuffer(fileContent);
}
return this.stringToArrayBuffer(fileContent);
}
async writeFile(
fileURI: string,
base64Data: string,
options?: {
encoding?: FileSystem.EncodingType;
}
): Promise {
const { encoding = FileSystem.EncodingType.UTF8 } = options ?? {};
await FileSystem.writeAsStringAsync(fileURI, base64Data, { encoding });
}
async fileExists(fileURI: string): Promise {
const { exists } = await FileSystem.getInfoAsync(fileURI);
return exists;
}
async makeDir(uri: string): Promise {
const { exists } = await FileSystem.getInfoAsync(uri);
if (!exists) {
await FileSystem.makeDirectoryAsync(uri, { intermediates: true });
}
}
async copyFile(sourceUri: string, targetUri: string): Promise {
await FileSystem.copyAsync({ from: sourceUri, to: targetUri });
}
getUserStorageDirectory(): string {
return FileSystem.documentDirectory!;
}
async stringToArrayBuffer(str: string): Promise {
const encoder = new TextEncoder();
return encoder.encode(str).buffer;
}
/**
* Converts a base64 string to an ArrayBuffer
*/
async base64ToArrayBuffer(base64: string): Promise {
return decodeBase64(base64);
}
}
```
The `AWSStorageAdapter` class implements a storage adapter for AWS S3, allowing file operations (upload, download, delete) with an S3 bucket.
```typescript
async uploadFile(filename: string, data: ArrayBuffer, options?: { mediaType?: string; }): Promise
```
* Invokes the `s3-upload` Edge Function to get a pre-signed URL to upload the file
```typescript
const response = await this.client.functions.invoke('s3-upload', {
body: {
fileName: filename,
mediaType: options?.mediaType
}
});
// error handling
const { uploadUrl } = response.data;
```
* Converts the input ArrayBuffer to an Uint8Array for S3 compatibility
```typescript
const body = new Uint8Array(data);
```
* Uploads the file with metadata (content type) to the pre-signed upload URL
```typescript
await fetch(uploadUrl, {
method: "PUT",
headers: {
"Content-Length": body.length.toString(),
"Content-Type": options?.mediaType,
},
body: body,
});
```
```typescript
async downloadFile(filePath: string): Promise
```
* Invokes the `s3-download` Edge Function to get a pre-signed URL to download the file
```typescript
const response = await this.client.functions.invoke('s3-download', {
body: {
fileName: filePath
}
});
// error handling
const { downloadUrl } = response.data;
```
* Fetch the file from S3 using the pre-signed URL and converts the response to a Blob for client-side usage
```typescript
const downloadResponse = await fetch(downloadUrl, {
method: "GET",
});
return await downloadResponse.blob();
```
```typescript
async deleteFile(uri: string, options?: { filename?: string }): Promise
```
Two-step deletion process:
1. Delete local file if it exists (using Expo's FileSystem)
2. Delete remote file from S3 by invoking the `s3-delete` Edge Function
```typescript
const response = await this.client.functions.invoke('s3-delete', {
body: {
fileName: options?.filename,
}
});
```
Update the `system.ts` file in the `demos/react-native-supabase-todolist/library/config` directory to use the new `AWSStorageAdapter` class (the highlighted lines are the only changes needed):
```typescript system.ts {12, 18, 26}
import '@azure/core-asynciterator-polyfill';
import { PowerSyncDatabase, createBaseLogger } from '@powersync/react-native';
import React from 'react';
import { type AttachmentRecord } from '@powersync/attachments';
import { KVStorage } from '../storage/KVStorage';
import { AppConfig } from '../supabase/AppConfig';
import { SupabaseConnector } from '../supabase/SupabaseConnector';
import { AppSchema } from './AppSchema';
import { PhotoAttachmentQueue } from './PhotoAttachmentQueue';
import { AWSStorageAdapter } from '../storage/AWSStorageAdapter';
createBaseLogger().useDefaults();
export class System {
kvStorage: KVStorage;
storage: AWSStorageAdapter;
supabaseConnector: SupabaseConnector;
powersync: PowerSyncDatabase;
attachmentQueue: PhotoAttachmentQueue | undefined = undefined;
constructor() {
this.kvStorage = new KVStorage();
this.supabaseConnector = new SupabaseConnector(this);
this.storage = new AWSStorageAdapter(this.supabaseConnector.client);
this.powersync = new PowerSyncDatabase({
schema: AppSchema,
database: {
dbFilename: 'sqlite.db'
}
});
/**
* The snippet below uses OP-SQLite as the default database adapter.
* You will have to uninstall `@journeyapps/react-native-quick-sqlite` and
* install both `@powersync/op-sqlite` and `@op-engineering/op-sqlite` to use this.
*
* import { OPSqliteOpenFactory } from '@powersync/op-sqlite'; // Add this import
*
* const factory = new OPSqliteOpenFactory({
* dbFilename: 'sqlite.db'
* });
* this.powersync = new PowerSyncDatabase({ database: factory, schema: AppSchema });
*/
if (AppConfig.supabaseBucket) {
this.attachmentQueue = new PhotoAttachmentQueue({
powersync: this.powersync,
storage: this.storage,
// Use this to handle download errors where you can use the attachment
// and/or the exception to decide if you want to retry the download
onDownloadError: async (attachment: AttachmentRecord, exception: any) => {
if (exception.toString() === 'StorageApiError: Object not found') {
return { retry: false };
}
return { retry: true };
}
});
}
}
async init() {
await this.powersync.init();
await this.powersync.connect(this.supabaseConnector);
if (this.attachmentQueue) {
await this.attachmentQueue.init();
}
}
}
export const system = new System();
export const SystemContext = React.createContext(system);
export const useSystem = () => React.useContext(SystemContext);
```
Ensure that all references to`AppConfig.supabaseBucket` is replaced with the S3 bucket name in the [React Native To-Do List demo app](https://github.com/powersync-ja/powersync-js/tree/main/demos/react-native-supabase-todolist).
Obtaining the S3 bucket name in the client can be done by creating another Supabsae Edge Function that returns the bucket name. This ensures that all S3 information are
kept on the server.
You can now run the app and test the attachment upload and download functionality.
## The complete client files used in this tutorial can be found below
```typescript AWSStorageAdapter.ts
import * as FileSystem from 'expo-file-system';
import { decode as decodeBase64 } from 'base64-arraybuffer';
import { StorageAdapter } from '@powersync/attachments';
import { AppConfig } from '../supabase/AppConfig';
import { SupabaseClient } from '@supabase/supabase-js';
interface S3Upload {
message: string;
uploadUrl: string;
}
interface S3Download {
message: string;
downloadUrl: string;
}
interface S3Delete {
message: string;
}
export class AWSStorageAdapter implements StorageAdapter {
constructor( public client: SupabaseClient ) {}
async uploadFile(
filename: string,
data: ArrayBuffer,
options?: {
mediaType?: string;
}
): Promise {
const response = await this.client.functions.invoke('s3-upload', {
body: {
fileName: filename,
mediaType: options?.mediaType
}
});
if (response.error || !response.data) {
throw new Error(`Failed to reach upload edge function, code=${response.error}`);
}
const { uploadUrl } = response.data;
try {
const body = new Uint8Array(data);
const response = await fetch(uploadUrl, {
method: "PUT",
headers: {
"Content-Length": body.length.toString(),
"Content-Type": options?.mediaType,
},
body: body,
});
console.log(`File: ${filename} uploaded successfully.`);
} catch (error) {
console.error('Error uploading file:', error);
throw error;
}
}
async downloadFile(filePath: string): Promise {
const response = await this.client.functions.invoke('s3-download', {
body: {
fileName: filePath
}
});
if (response.error || !response.data) {
throw new Error(`Failed to reach download edge function, code=${response.error}`);
}
const { downloadUrl } = response.data;
try {
const downloadResponse = await fetch(downloadUrl, {
method: "GET",
});
return await downloadResponse.blob();
} catch (error) {
console.error('Error downloading file:', error);
throw error;
}
}
async deleteFile(uri: string, options?: { filename?: string }): Promise {
if (await this.fileExists(uri)) {
await FileSystem.deleteAsync(uri);
}
const { filename } = options ?? {};
if (!filename) {
return;
}
try {
const response = await this.client.functions.invoke('s3-delete', {
body: {
fileName: options?.filename
}
});
if (response.error || !response.data) {
throw new Error(`Failed to reach delete edge function, code=${response.error}`);
}
const { message } = response.data;
console.log(message);
} catch (error) {
console.error(`Error deleting ${filename}:`, error);
}
}
async readFile(
fileURI: string,
options?: { encoding?: FileSystem.EncodingType; mediaType?: string }
): Promise {
const { encoding = FileSystem.EncodingType.UTF8 } = options ?? {};
const { exists } = await FileSystem.getInfoAsync(fileURI);
if (!exists) {
throw new Error(`File does not exist: ${fileURI}`);
}
const fileContent = await FileSystem.readAsStringAsync(fileURI, options);
if (encoding === FileSystem.EncodingType.Base64) {
return this.base64ToArrayBuffer(fileContent);
}
return this.stringToArrayBuffer(fileContent);
}
async writeFile(
fileURI: string,
base64Data: string,
options?: {
encoding?: FileSystem.EncodingType;
}
): Promise {
const { encoding = FileSystem.EncodingType.UTF8 } = options ?? {};
await FileSystem.writeAsStringAsync(fileURI, base64Data, { encoding });
}
async fileExists(fileURI: string): Promise {
const { exists } = await FileSystem.getInfoAsync(fileURI);
return exists;
}
async makeDir(uri: string): Promise {
const { exists } = await FileSystem.getInfoAsync(uri);
if (!exists) {
await FileSystem.makeDirectoryAsync(uri, { intermediates: true });
}
}
async copyFile(sourceUri: string, targetUri: string): Promise {
await FileSystem.copyAsync({ from: sourceUri, to: targetUri });
}
getUserStorageDirectory(): string {
return FileSystem.documentDirectory!;
}
async stringToArrayBuffer(str: string): Promise {
const encoder = new TextEncoder();
return encoder.encode(str).buffer;
}
/**
* Converts a base64 string to an ArrayBuffer
*/
async base64ToArrayBuffer(base64: string): Promise {
return decodeBase64(base64);
}
}
```
```typescript system.ts
import '@azure/core-asynciterator-polyfill';
import { PowerSyncDatabase, createBaseLogger } from '@powersync/react-native';
import React from 'react';
import { type AttachmentRecord } from '@powersync/attachments';
import { KVStorage } from '../storage/KVStorage';
import { AppConfig } from '../supabase/AppConfig';
import { SupabaseConnector } from '../supabase/SupabaseConnector';
import { AppSchema } from './AppSchema';
import { PhotoAttachmentQueue } from './PhotoAttachmentQueue';
import { AWSStorageAdapter } from '../storage/AWSStorageAdapter';
createBaseLogger().useDefaults();
export class System {
kvStorage: KVStorage;
storage: AWSStorageAdapter;
supabaseConnector: SupabaseConnector;
powersync: PowerSyncDatabase;
attachmentQueue: PhotoAttachmentQueue | undefined = undefined;
constructor() {
this.kvStorage = new KVStorage();
this.supabaseConnector = new SupabaseConnector(this);
this.storage = new AWSStorageAdapter(this.supabaseConnector.client);
this.powersync = new PowerSyncDatabase({
schema: AppSchema,
database: {
dbFilename: 'sqlite.db'
}
});
/**
* The snippet below uses OP-SQLite as the default database adapter.
* You will have to uninstall `@journeyapps/react-native-quick-sqlite` and
* install both `@powersync/op-sqlite` and `@op-engineering/op-sqlite` to use this.
*
* import { OPSqliteOpenFactory } from '@powersync/op-sqlite'; // Add this import
*
* const factory = new OPSqliteOpenFactory({
* dbFilename: 'sqlite.db'
* });
* this.powersync = new PowerSyncDatabase({ database: factory, schema: AppSchema });
*/
if (AppConfig.supabaseBucket) {
this.attachmentQueue = new PhotoAttachmentQueue({
powersync: this.powersync,
storage: this.storage,
// Use this to handle download errors where you can use the attachment
// and/or the exception to decide if you want to retry the download
onDownloadError: async (attachment: AttachmentRecord, exception: any) => {
if (exception.toString() === 'StorageApiError: Object not found') {
return { retry: false };
}
return { retry: true };
}
});
}
}
async init() {
await this.powersync.init();
await this.powersync.connect(this.supabaseConnector);
if (this.attachmentQueue) {
await this.attachmentQueue.init();
}
}
}
export const system = new System();
export const SystemContext = React.createContext(system);
export const useSystem = () => React.useContext(SystemContext);
```
# Overview
Source: https://docs.powersync.com/tutorials/client/attachments-and-files/overview
A collection of tutorials exploring storage strategies.
# PDF attachments
Source: https://docs.powersync.com/tutorials/client/attachments-and-files/pdf-attachment
In this tutorial we will show you how to modify the [PhotoAttachmentQueue](https://github.com/powersync-ja/powersync-js/blob/main/demos/react-native-supabase-todolist/library/powersync/PhotoAttachmentQueue.ts) for PDF attachments.
# Introduction
The current version of the [To-Do List demo app](https://github.com/powersync-ja/powersync-js/tree/main/demos/react-native-supabase-todolist) implements a `PhotoAttachmentQueue` class which
enables photo attachments (specifically a `jpeg`) to be synced. This tutorial will guide you on the changes needed to support PDF attachments.
An overview of the required changes are:
1. Update the app schema by adding a `pdf_id` column to the todos table to link a pdf to a to-do item.
2. Add a `PdfAttachmentQueue` class
3. Initialize the `PdfAttachmentQueue` class
The following pre-requisites are required to complete this tutorial:
* Clone the [To-Do List demo app](https://github.com/powersync-ja/powersync-js/tree/main/demos/react-native-supabase-todolist) repo
* Follow the instructions in the [README](https://github.com/powersync-ja/powersync-js/blob/main/demos/react-native-supabase-todolist/README.md) and ensure that the app runs locally
* A running PowerSync Service and Supabase (can be self-hosted)
* [Storage configuration in Supabase](/integration-guides/supabase-+-powersync/handling-attachments#configure-storage-in-supabase)
# Steps
You can add a *nullable text* `pdf_id` column to the to-do table via either the `Table Editor` or `SQL Editor` in Supabase.
## Table Editor
## SQL Editor
* Navigate to the `SQL Editor` tab:
* Execute the following SQL:
```sql
ALTER TABLE public.todos ADD COLUMN pdf_id text NULL;
```
You can now update the [AppSchema](https://github.com/powersync-ja/powersync-js/blob/main/demos/react-native-supabase-todolist/library/powersync/AppSchema.ts) to include the newly created column.
```typescript AppSchema.ts
export interface TodoRecord {
// existing code
pdf_id?: string;
}
export const AppSchema = new Schema([
new Table({
name: 'todos',
columns: [
// existing columns
new Column({ name: 'pdf_id', type: ColumnType.TEXT })
]
})
// existing code
]);
```
The `PdfAttachmentQueue` class below updates the existing [PhotoAttachmentQueue](https://github.com/powersync-ja/powersync-js/blob/main/demos/react-native-supabase-todolist/library/powersync/PhotoAttachmentQueue.ts)
found in the demo app. The highlighted lines indicate which lines have been updated. For more information on attachments, see the [attachments package](https://github.com/powersync-ja/powersync-js/tree/main/packages/attachments).
```typescript {7, 10, 20, 26-27, 29, 31, 37-40, 45, 48} PdfAttachmentQueue.ts
import * as FileSystem from 'expo-file-system';
import { randomUUID } from 'expo-crypto';
import { AppConfig } from '../supabase/AppConfig';
import { AbstractAttachmentQueue, AttachmentRecord, AttachmentState } from '@powersync/attachments';
import { TODO_TABLE } from './AppSchema';
export class PdfAttachmentQueue extends AbstractAttachmentQueue {
async init() {
if (!AppConfig.supabaseBucket) {
console.debug('No Supabase bucket configured, skip setting up PdfAttachmentQueue watches');
// Disable sync interval to prevent errors from trying to sync to a non-existent bucket
this.options.syncInterval = 0;
return;
}
await super.init();
}
onAttachmentIdsChange(onUpdate: (ids: string[]) => void): void {
this.powersync.watch(`SELECT pdf_id as id FROM ${TODO_TABLE} WHERE pdf_id IS NOT NULL`, [], {
onResult: (result) => onUpdate(result.rows?._array.map((r) => r.id) ?? [])
});
}
async newAttachmentRecord(record?: Partial): Promise {
const pdfId = record?.id ?? randomUUID();
const filename = record?.filename ?? `${pdfId}.pdf`;
return {
id: pdfId,
filename,
media_type: 'application/pdf',
state: AttachmentState.QUEUED_UPLOAD,
...record
};
}
async saveAttachment(base64Data: string): Promise {
const attachment = await this.newAttachmentRecord();
attachment.local_uri = this.getLocalFilePathSuffix(attachment.filename);
const localUri = this.getLocalUri(attachment.local_uri);
await this.storage.writeFile(localUri, base64Data, { encoding: FileSystem.EncodingType.Base64 });
const fileInfo = await FileSystem.getInfoAsync(localUri);
if (fileInfo.exists) {
attachment.size = fileInfo.size;
}
return this.saveToQueue(photoAttachment);
}
}
```
We start by importing the `PdfAttachmentQueue` and adding an `attachmentPdfQueue` class variable.
```typescript
// Additional imports
import { PdfAttachmentQueue } from './PdfAttachmentQueue';
export class System {
// Existing class variables
attachmentPdfQueue: PdfAttachmentQueue | undefined = undefined;
...
}
```
The `attachmentPdfQueue` can then be initialized in the constructor, where a new instance of PdfAttachmentQueue is created and assigned to `attachmentPdfQueue` if the `supabaseBucket` is configured.
```typescript
constructor() {
// init code
if (AppConfig.supabaseBucket) {
// init PhotoAttachmentQueue
this.attachmentPdfQueue = new PdfAttachmentQueue({
powersync: this.powersync,
storage: this.storage,
// Use this to handle download errors where you can use the attachment
// and/or the exception to decide if you want to retry the download
onDownloadError: async (attachment: AttachmentRecord, exception: any) => {
if (exception.toString() === 'StorageApiError: Object not found') {
return { retry: false };
}
return { retry: true };
}
});
}
}
```
We can then update the `init` method to include the initialization of the `attachmentPdfQueue`.
```typescript
await init() {
// init powersync
if (this.attachmentPdfQueue) {
await this.attachmentPdfQueue.init();
}
}
```
The complete updated `system.ts` file can be found below with highlighted lines indicating the changes made above.
```typescript system.ts {14, 24, 63-75, 86-88}
import '@azure/core-asynciterator-polyfill';
import { PowerSyncDatabase, createBaseLogger } from '@powersync/react-native';
import React from 'react';
import { SupabaseStorageAdapter } from '../storage/SupabaseStorageAdapter';
import { type AttachmentRecord } from '@powersync/attachments';
import { KVStorage } from '../storage/KVStorage';
import { AppConfig } from '../supabase/AppConfig';
import { SupabaseConnector } from '../supabase/SupabaseConnector';
import { AppSchema } from './AppSchema';
import { PhotoAttachmentQueue } from './PhotoAttachmentQueue';
import { PdfAttachmentQueue } from './PdfAttachmentQueue';
createBaseLogger().useDefaults();
export class System {
kvStorage: KVStorage;
storage: SupabaseStorageAdapter;
supabaseConnector: SupabaseConnector;
powersync: PowerSyncDatabase;
attachmentQueue: PhotoAttachmentQueue | undefined = undefined;
attachmentPdfQueue: PdfAttachmentQueue | undefined = undefined;
constructor() {
this.kvStorage = new KVStorage();
this.supabaseConnector = new SupabaseConnector(this);
this.storage = this.supabaseConnector.storage;
this.powersync = new PowerSyncDatabase({
schema: AppSchema,
database: {
dbFilename: 'sqlite.db'
}
});
/**
* The snippet below uses OP-SQLite as the default database adapter.
* You will have to uninstall `@journeyapps/react-native-quick-sqlite` and
* install both `@powersync/op-sqlite` and `@op-engineering/op-sqlite` to use this.
*
* import { OPSqliteOpenFactory } from '@powersync/op-sqlite'; // Add this import
*
* const factory = new OPSqliteOpenFactory({
* dbFilename: 'sqlite.db'
* });
* this.powersync = new PowerSyncDatabase({ database: factory, schema: AppSchema });
*/
if (AppConfig.supabaseBucket) {
this.attachmentQueue = new PhotoAttachmentQueue({
powersync: this.powersync,
storage: this.storage,
// Use this to handle download errors where you can use the attachment
// and/or the exception to decide if you want to retry the download
onDownloadError: async (attachment: AttachmentRecord, exception: any) => {
if (exception.toString() === 'StorageApiError: Object not found') {
return { retry: false };
}
return { retry: true };
}
});
this.attachmentPdfQueue = new PdfAttachmentQueue({
powersync: this.powersync,
storage: this.storage,
// Use this to handle download errors where you can use the attachment
// and/or the exception to decide if you want to retry the download
onDownloadError: async (attachment: AttachmentRecord, exception: any) => {
if (exception.toString() === 'StorageApiError: Object not found') {
return { retry: false };
}
return { retry: true };
}
});
}
}
async init() {
await this.powersync.init();
await this.powersync.connect(this.supabaseConnector);
if (this.attachmentQueue) {
await this.attachmentQueue.init();
}
if (this.attachmentPdfQueue) {
await this.attachmentPdfQueue.init();
}
}
}
export const system = new System();
export const SystemContext = React.createContext(system);
export const useSystem = () => React.useContext(SystemContext);
```
# Usage Example
The newly created `attachmentPdfQueue` can now be used in a component by using the `useSystem` hook created in [step-3](#step-3-initialize-the-pdfattachmentqueue-class) above
The code snippet below illustrates how a pdf could be saved when pressing a button. It uses a [DocumentPicker](https://www.npmjs.com/package/react-native-document-picker) UI component
to allow the user to select a pdf. When the button is pressed, `savePdf` is called.
The `saveAttachment` method in the `PdfAttachmentQueue` class expects a base64 encoded string. We can therefore use
[react-native-fs](https://www.npmjs.com/package/react-native-fs) to read the file and return the base64 encoded string which is passed to `saveAttachment`.
If your use-case generates a pdf file, ensure that you return a base64 encoded string.
```typescript
import DocumentPicker from 'react-native-document-picker';
import RNFS from 'react-native-fs';
// Within some component
// useSystem is imported from system.ts
const system = useSystem();
const savePdf = async (id: string) => {
if (system.attachmentPdfQueue) {
const res = await DocumentPicker.pick({
type: [DocumentPicker.types.pdf]
});
console.log(`Selected PDF: ${res[0].uri}`);
const base64 = await RNFS.readFile(res[0].uri, 'base64');
const { id: attachmentId } = await system.attachmentPdfQueue.saveAttachment(base64);
await system.powersync.execute(`UPDATE ${TODO_TABLE} SET pdf_id = ? WHERE id = ?`, [attachmentId, id]);
}
};
```
# Notes
Although this tutorial adds a new `pdf_id` column, the approach you should take strongly depends on your requirements.
An alternative approach could be to replace the `photo_id` with an `attachment_id` and have one `AttachmentQueue` class that handles all attachment types instead of having a class per attachment type.
# Cascading Delete
Source: https://docs.powersync.com/tutorials/client/data/cascading-delete
In this tutorial we will show you how to perform a cascading delete on the client.
# Introduction
Since PowerSync utilizes SQLite views instead of standard tables, SQLite features like constraints, foreign keys, or cascading deletes are not available.
Currently, there is no direct support for cascading deletes on the client. However, you can achieve this by either:
1. Manually deleting all the relevant tables within a **single transaction**, OR
Every local mutation performed against SQLite via the PowerSync SDK will be returned in `uploadData`. So as long as you are using `.execute()` for the mutation,
the operation will be present in the upload queue.
2. Implementing triggers (which is more complex)
You create triggers on the [internal tables](https://docs.powersync.com/architecture/client-architecture#schema) (not the views defined by the client schema), similar to what is
done [here](https://github.com/powersync-ja/powersync-js/blob/e77b1abfbed91988de1f4c707c24855cd66b2219/demos/react-supabase-todolist/src/app/utils/fts_setup.ts#L50)
# Example
The following example is taken from the [React Native To-Do List demo app](https://github.com/powersync-ja/powersync-js/tree/main/demos/react-native-supabase-todolist).
It showcases how to delete a `list` and all its associated `todos` in a single transaction.
```typescript
const deleteList = async (id: string) => {
await system.powersync.writeTransaction(async (tx) => {
// Delete associated todos
await tx.execute(`DELETE FROM ${TODO_TABLE} WHERE list_id = ?`, [id]);
// Delete list record
await tx.execute(`DELETE FROM ${LIST_TABLE} WHERE id = ?`, [id]);
});
};
```
An important thing to note is that the local SQLite database will always match the backend database, as long as the tables are in the publication, when online.
For example, if you delete a record from the local `lists` table and Supabase cascade deletes a record from the `todo` table, PowerSync will also delete the local `todo` record when online.
# Overview
Source: https://docs.powersync.com/tutorials/client/data/overview
A collection of tutorials showcasing various data management strategies and use cases.
# Sequential ID Mapping
Source: https://docs.powersync.com/tutorials/client/data/sequential-id-mapping
In this tutorial we will show you how to map a local UUID to a remote sequential (auto-incrementing) ID.
# Introduction
When auto-incrementing / sequential IDs are used on the backend database, the ID can only be generated on the backend database, and not on the client while offline.
To handle this, you can use a secondary UUID on the client, then map it to a sequential ID when performing an update on the backend database.
This allows using a sequential primary key for each record, with a UUID as a secondary ID.
This mapping must be performed wherever the UUIDs are referenced, including for every foreign key column.
To illustrate this, we will use the [React To-Do List demo app](https://github.com/powersync-ja/powersync-js/tree/main/demos/react-supabase-todolist) and modify it to use UUIDs
on the client and map them to sequential IDs on the backend database (Supabase in this case).
### Overview
Before we get started, let's outline the changes we will have to make:
Update the `lists` and `todos` tables
Add two triggers that will map the UUID to the integer ID and vice versa.
Update the Sync Rules to use the new integer ID instead of the UUID column.
The following components/files will have to be updated:
* *Files*:
* `AppSchema.ts`
* `fts_setup.ts`
* `SupabaseConnector.ts`
* *Components*:
* `lists.tsx`
* `page.tsx`
* `SearchBarWidget.tsx`
* `TodoListsWidget.tsx`
# Schema
In order to map the UUID to the integer ID, we need to update the
* `lists` table by adding a `uuid` column, which will be the secondary ID, and
* `todos` table by adding a `uuid` column, and a `list_uuid` foreign key column which references the `uuid` column in the `lists` table.
```sql schema {3, 13, 21, 26}
create table public.lists (
id serial,
uuid uuid not null unique,
created_at timestamp with time zone not null default now(),
name text not null,
owner_id uuid not null,
constraint lists_pkey primary key (id),
constraint lists_owner_id_fkey foreign key (owner_id) references auth.users (id) on delete cascade
) tablespace pg_default;
create table public.todos (
id serial,
uuid uuid not null unique,
created_at timestamp with time zone not null default now(),
completed_at timestamp with time zone null,
description text not null,
completed boolean not null default false,
created_by uuid null,
completed_by uuid null,
list_id int not null,
list_uuid uuid not null,
constraint todos_pkey primary key (id),
constraint todos_created_by_fkey foreign key (created_by) references auth.users (id) on delete set null,
constraint todos_completed_by_fkey foreign key (completed_by) references auth.users (id) on delete set null,
constraint todos_list_id_fkey foreign key (list_id) references lists (id) on delete cascade,
constraint todos_list_uuid_fkey foreign key (list_uuid) references lists (uuid) on delete cascade
) tablespace pg_default;
```
With the schema updated, we now need a method to synchronize and map the `list_id` and `list_uuid` in the `todos` table, with the `id` and `uuid` columns in the `lists` table.
We can achieve this by creating SQL triggers.
# Create SQL Triggers
We need to create triggers that can look up the integer ID for the given UUID and vice versa.
These triggers will maintain consistency between `list_id` and `list_uuid` in the `todos` table by ensuring that they remain synchronized with the `id` and `uuid` columns in the `lists` table;
even if changes are made to either field.
We will create the following two triggers that cover either scenario of updating the `list_id` or `list_uuid` in the `todos` table:
1. `update_integer_id`, and
2. `update_uuid_column`
The `update_integer_id` trigger ensures that whenever a `list_uuid` value is inserted or updated in the `todos` table,
the corresponding `list_id` is fetched from the `lists` table and updated automatically. It also validates that the `list_uuid` exists in the `lists` table; otherwise, it raises an exception.
```sql
CREATE OR REPLACE FUNCTION func_update_integer_id()
RETURNS TRIGGER AS $$
BEGIN
IF TG_OP = 'INSERT' THEN
-- Always update list_id on INSERT
SELECT id INTO NEW.list_id
FROM lists
WHERE uuid = NEW.list_uuid;
IF NOT FOUND THEN
RAISE EXCEPTION 'UUID % does not exist in lists', NEW.list_uuid;
END IF;
ELSIF TG_OP = 'UPDATE' THEN
-- Only update list_id if list_uuid changes
IF NEW.list_uuid IS DISTINCT FROM OLD.list_uuid THEN
SELECT id INTO NEW.list_id
FROM lists
WHERE uuid = NEW.list_uuid;
IF NOT FOUND THEN
RAISE EXCEPTION 'UUID % does not exist in lists', NEW.list_uuid;
END IF;
END IF;
END IF;
RETURN NEW;
END;
$$ LANGUAGE plpgsql;
CREATE TRIGGER update_integer_id
BEFORE INSERT OR UPDATE ON todos
FOR EACH ROW
EXECUTE FUNCTION func_update_integer_id();
```
The `update_uuid_column` trigger ensures that whenever a `list_id` value is inserted or updated in the todos table, the corresponding `list_uuid` is fetched from the
`lists` table and updated automatically. It also validates that the `list_id` exists in the `lists` table.
```sql update_uuid_column
CREATE OR REPLACE FUNCTION func_update_uuid_column()
RETURNS TRIGGER AS $$
BEGIN
IF TG_OP = 'INSERT' THEN
-- Always update list_uuid on INSERT
SELECT uuid INTO NEW.list_uuid
FROM lists
WHERE id = NEW.list_id;
IF NOT FOUND THEN
RAISE EXCEPTION 'ID % does not exist in lists', NEW.list_id;
END IF;
ELSIF TG_OP = 'UPDATE' THEN
-- Only update list_uuid if list_id changes
IF NEW.list_id IS DISTINCT FROM OLD.list_id THEN
SELECT uuid INTO NEW.list_uuid
FROM lists
WHERE id = NEW.list_id;
IF NOT FOUND THEN
RAISE EXCEPTION 'ID % does not exist in lists', NEW.list_id;
END IF;
END IF;
END IF;
RETURN NEW;
END;
$$ LANGUAGE plpgsql;
CREATE TRIGGER update_uuid_column
BEFORE INSERT OR UPDATE ON todos
FOR EACH ROW
EXECUTE FUNCTION func_update_uuid_column();
```
We now have triggers in place that will handle the mapping for our updated schema and
can move on to updating the Sync Rules to use the UUID column instead of the integer ID.
# Update Sync Rules
As sequential IDs can only be created on the backend database, we need to use UUIDs in the client. This can be done by updating both the `parameters` and `data` queries to use the new `uuid` columns.
The `parameters` query is updated by removing the `list_id` alias (this is removed to avoid any confusion between the `list_id` column in the `todos` table), and
the `data` query is updated to use the `uuid` column as the `id` column for the `lists` and `todos` tables. We also explicitly define which columns to select, as `list_id` is no longer required in the client.
```yaml sync_rules.yaml {4, 7-8}
bucket_definitions:
user_lists:
# Separate bucket per todo list
parameters: select id from lists where owner_id = request.user_id()
data:
# Explicitly define all the columns
- select uuid as id, created_at, name, owner_id from lists where id = bucket.id
- select uuid as id, created_at, completed_at, description, completed, created_by, list_uuid from todos where list_id = bucket.id
```
With the Sync Rules updated, we can now move on to updating the client to use UUIDs.
# Update Client to Use UUIDs
With our Sync Rules updated, we no longer have the `list_id` column in the `todos` table.
We start by updating `AppSchema.ts` and replacing `list_id` with `list_uuid` in the `todos` table.
```typescript AppSchema.ts {3, 11}
const todos = new Table(
{
list_uuid: column.text,
created_at: column.text,
completed_at: column.text,
description: column.text,
created_by: column.text,
completed_by: column.text,
completed: column.integer
},
{ indexes: { list: ['list_uuid'] } }
);
```
The `uploadData` function in `SupabaseConnector.ts` needs to be updated to use the new `uuid` column in both tables.
```typescript SupabaseConnector.ts {13, 17, 20}
export class SupabaseConnector extends BaseObserver implements PowerSyncBackendConnector {
// other code
async uploadData(database: AbstractPowerSyncDatabase): Promise {
// other code
try {
for (const op of transaction.crud) {
lastOp = op;
const table = this.client.from(op.table);
let result: any;
switch (op.op) {
case UpdateType.PUT:
const record = { ...op.opData, uuid: op.id };
result = await table.upsert(record);
break;
case UpdateType.PATCH:
result = await table.update(op.opData).eq('uuid', op.id);
break;
case UpdateType.DELETE:
result = await table.delete().eq('uuid', op.id);
break;
}
}
} catch (ex: any) {
// other code
}
}
}
```
For the remaining files, we simply need to replace any reference to `list_id` with `list_uuid`.
```typescript fts_setup.ts {3}
export async function configureFts(): Promise {
await createFtsTable('lists', ['name'], 'porter unicode61');
await createFtsTable('todos', ['description', 'list_uuid']);
}
```
```tsx page.tsx {4, 14}
const TodoEditSection = () => {
// code
const { data: todos } = useQuery(
`SELECT * FROM ${TODOS_TABLE} WHERE list_uuid=? ORDER BY created_at DESC, id`,
[listID]
);
// code
const createNewTodo = async (description: string) => {
// other code
await powerSync.execute(
`INSERT INTO
${TODOS_TABLE}
(id, created_at, created_by, description, list_uuid)
VALUES
(uuid(), datetime(), ?, ?, ?)`,
[userID, description, listID!]
);
}
}
```
```tsx TodoListWidget.tsx {10, 18}
export function TodoListsWidget(props: TodoListsWidgetProps) {
// hooks and navigation
const { data: listRecords, isLoading } = useQuery(`
SELECT
${LISTS_TABLE}.*, COUNT(${TODOS_TABLE}.id) AS total_tasks, SUM(CASE WHEN ${TODOS_TABLE}.completed = true THEN 1 ELSE 0 END) as completed_tasks
FROM
${LISTS_TABLE}
LEFT JOIN ${TODOS_TABLE}
ON ${LISTS_TABLE}.id = ${TODOS_TABLE}.list_uuid
GROUP BY
${LISTS_TABLE}.id;
`);
const deleteList = async (id: string) => {
await powerSync.writeTransaction(async (tx) => {
// Delete associated todos
await tx.execute(`DELETE FROM ${TODOS_TABLE} WHERE list_uuid = ?`, [id]);
// Delete list record
await tx.execute(`DELETE FROM ${LISTS_TABLE} WHERE id = ?`, [id]);
});
};
}
```
```tsx SearchBarWidget.tsx {8, 19}
export const SearchBarWidget: React.FC = () => {
const handleInputChange = async (value: string) => {
if (value.length !== 0) {
let listsSearchResults: any[] = [];
const todoItemsSearchResults = await searchTable(value, 'todos');
for (let i = 0; i < todoItemsSearchResults.length; i++) {
const res = await powersync.get(`SELECT * FROM ${LISTS_TABLE} WHERE id = ?`, [
todoItemsSearchResults[i]['list_uuid']
]);
todoItemsSearchResults[i]['list_name'] = res.name;
}
if (!todoItemsSearchResults.length) {
listsSearchResults = await searchTable(value, 'lists');
}
const formattedListResults: SearchResult[] = listsSearchResults.map(
(result) => new SearchResult(result['id'], result['name'])
);
const formattedTodoItemsResults: SearchResult[] = todoItemsSearchResults.map((result) => {
return new SearchResult(result['list_uuid'], result['list_name'] ?? '', result['description']);
});
setSearchResults([...formattedTodoItemsResults, ...formattedListResults]);
}
};
}
```
# Overview
Source: https://docs.powersync.com/tutorials/client/overview
A collection of tutorials for client-side use cases.
# Overview
Source: https://docs.powersync.com/tutorials/client/performance/overview
A collection of tutorials exploring performance strategies.
# Improve Supabase Connector
Source: https://docs.powersync.com/tutorials/client/performance/supabase-connector-performance
In this tutorial we will show you how to improve the performance of the Supabase Connector for the [React Native To-Do List demo app](https://github.com/powersync-ja/powersync-js/tree/main/demos/react-native-supabase-todolist).
# Background
The demos in the [powersync-js](https://github.com/powersync-ja/powersync-js/tree/main/demos) monorepo provide a minimal working example that illustrate the use of PowerSync with different frameworks.
The demos are therefore not necessarily optimized for performance and can therefore be improved.
This tutorial demonstrates how to improve the Supabase Connector's performance by implementing two batching strategies that reduce the number of database operations.
# Batching Strategies
The two batching strategies that will be implemented are:
1. Sequential Merge Strategy, and
2. Pre-sorted Batch Strategy
Overview:
* Merge adjacent `PUT` and `DELETE` operations for the same table
* Limit the number of operations that are merged into a single API request to Supabase
Shoutout to @christoffer\_configura for the original implementation of this optimization.
```typescript {6-12, 15, 17-19, 21, 23-24, 28-40, 43, 47-60, 63-64, 79}
async uploadData(database: AbstractPowerSyncDatabase): Promise {
const transaction = await database.getNextCrudTransaction();
if (!transaction) {
return;
}
/**
* Maximum number of PUT or DELETE operations that are merged into a single API request to Supabase.
* Larger numbers can speed up the sync process considerably, but watch out for possible payload size limitations.
* A value of 1 or below disables merging.
*/
const MERGE_BATCH_LIMIT = 100;
let batchedOps: CrudEntry[] = [];
try {
console.log(`Processing transaction with ${transaction.crud.length} operations`);
for (let i = 0; i < transaction.crud.length; i++) {
const cruds = transaction.crud;
const op = cruds[i];
const table = this.client.from(op.table);
batchedOps.push(op);
let result: any;
let batched = 1;
switch (op.op) {
case UpdateType.PUT:
const records = [{ ...cruds[i].opData, id: cruds[i].id }];
while (
i + 1 < cruds.length &&
cruds[i + 1].op === op.op &&
cruds[i + 1].table === op.table &&
batched < MERGE_BATCH_LIMIT
) {
i++;
records.push({ ...cruds[i].opData, id: cruds[i].id });
batchedOps.push(cruds[i]);
batched++;
}
result = await table.upsert(records);
break;
case UpdateType.PATCH:
batchedOps = [op];
result = await table.update(op.opData).eq('id', op.id);
break;
case UpdateType.DELETE:
batchedOps = [op];
const ids = [op.id];
while (
i + 1 < cruds.length &&
cruds[i + 1].op === op.op &&
cruds[i + 1].table === op.table &&
batched < MERGE_BATCH_LIMIT
) {
i++;
ids.push(cruds[i].id);
batchedOps.push(cruds[i]);
batched++;
}
result = await table.delete().in('id', ids);
break;
}
if (batched > 1) {
console.log(`Merged ${batched} ${op.op} operations for table ${op.table}`);
}
}
await transaction.complete();
} catch (ex: any) {
console.debug(ex);
if (typeof ex.code == 'string' && FATAL_RESPONSE_CODES.some((regex) => regex.test(ex.code))) {
/**
* Instead of blocking the queue with these errors,
* discard the (rest of the) transaction.
*
* Note that these errors typically indicate a bug in the application.
* If protecting against data loss is important, save the failing records
* elsewhere instead of discarding, and/or notify the user.
*/
console.error('Data upload error - discarding:', ex);
await transaction.complete();
} else {
// Error may be retryable - e.g. network error or temporary server error.
// Throwing an error here causes this call to be retried after a delay.
throw ex;
}
}
}
```
Overview:
* Create three collections to group operations by type:
* `putOps`: For `PUT` operations, organized by table name
* `deleteOps`: For `DELETE` operations, organized by table name
* `patchOps`: For `PATCH` operations (partial updates)
* Loop through all operations, sort them into the three collections, and then process all operations in batches.
```typescript {8-11, 17-20, 23, 26-29, 32-53, 56, 72}
async uploadData(database: AbstractPowerSyncDatabase): Promise {
const transaction = await database.getNextCrudTransaction();
if (!transaction) {
return;
}
try {
// Group operations by type and table
const putOps: { [table: string]: any[] } = {};
const deleteOps: { [table: string]: string[] } = {};
let patchOps: CrudEntry[] = [];
// Organize operations
for (const op of transaction.crud) {
switch (op.op) {
case UpdateType.PUT:
if (!putOps[op.table]) {
putOps[op.table] = [];
}
putOps[op.table].push({ ...op.opData, id: op.id });
break;
case UpdateType.PATCH:
patchOps.push(op);
break;
case UpdateType.DELETE:
if (!deleteOps[op.table]) {
deleteOps[op.table] = [];
}
deleteOps[op.table].push(op.id);
break;
}
}
// Execute bulk operations
for (const table of Object.keys(putOps)) {
const result = await this.client.from(table).upsert(putOps[table]);
if (result.error) {
console.error(result.error);
throw new Error(`Could not bulk PUT data to Supabase table ${table}: ${JSON.stringify(result)}`);
}
}
for (const table of Object.keys(deleteOps)) {
const result = await this.client.from(table).delete().in('id', deleteOps[table]);
if (result.error) {
console.error(result.error);
throw new Error(`Could not bulk DELETE data from Supabase table ${table}: ${JSON.stringify(result)}`);
}
}
// Execute PATCH operations individually since they can't be easily batched
for (const op of patchOps) {
const result = await this.client.from(op.table).update(op.opData).eq('id', op.id);
if (result.error) {
console.error(result.error);
throw new Error(`Could not PATCH data in Supabase: ${JSON.stringify(result)}`);
}
}
await transaction.complete();
} catch (ex: any) {
console.debug(ex);
if (typeof ex.code == 'string' && FATAL_RESPONSE_CODES.some((regex) => regex.test(ex.code))) {
/**
* Instead of blocking the queue with these errors,
* discard the (rest of the) transaction.
*
* Note that these errors typically indicate a bug in the application.
* If protecting against data loss is important, save the failing records
* elsewhere instead of discarding, and/or notify the user.
*/
console.error('Data upload error - discarding transaction:', ex);
await transaction.complete();
} else {
// Error may be retryable - e.g. network error or temporary server error.
// Throwing an error here causes this call to be retried after a delay.
throw ex;
}
}
}
```
# Differences
### Sequential merge strategy
```typescript
const MERGE_BATCH_LIMIT = 100;
let batchedOps: CrudEntry[] = [];
```
* Pre-sorts all operations by type and table
* Processes each type in bulk after grouping
### Pre-sorted batch strategy
```typescript
const putOps: { [table: string]: any[] } = {};
const deleteOps: { [table: string]: string[] } = {};
let patchOps: CrudEntry[] = [];
```
* Processes operations sequentially
* Merges consecutive operations of the same type up to a batch limit
* More dynamic/streaming approach
### Sequential merge strategy
* Uses a sliding window approach with `MERGE_BATCH_LIMIT`
* Merges consecutive operations up to the limit
* More granular control over batch sizes
* Better for mixed operation types
### Pre-sorted batch strategy
* Groups ALL operations of the same type together
* Executes one bulk operation per type per table
* Better for large numbers of similar operations
## Key similarities and differences
Handling of CRUD operations (PUT, PATCH, DELETE) to sync local changes to Supabase
Transaction management with `getNextCrudTransaction()`
Implement similar error handling for fatal and retryable errors
Complete the transaction after successful processing
Operation grouping strategy
Batching methodology
# Use cases
You need more granular control over batch sizes
You want more detailed operation logging
You need to handle mixed operation types more efficiently
**Best for**: Mixed operation types
**Optimizes for**: Memory efficiency
**Trade-off**: Potentially more network requests
You have a large number of similar operations.
You want to minimize the number of network requests.
**Best for**: Large volumes of similar operations
**Optimizes for**: Minimal network requests
**Trade-off**: Higher memory usage
# Next.js + PowerSync
Source: https://docs.powersync.com/tutorials/client/sdks/web/next-js
A guide for creating a new Next.js application with PowerSync for offline/local first functionality
## Introduction
In this tutorial, we’ll explore how to enhance a Next.js application with offline-first capabilities using PowerSync. In the following sections, we’ll walk through the process of integrating PowerSync into a Next.js application, setting up local-first storage, and handling synchronization efficiently.
At present PowerSync will not work with SSR enabled with Next.js and in this guide we disable SSR across the entire app. However, it is possible to have other pages, which do not require authentication for example, to still be rendered server-side. This can be done by only using the DynamicSystemProvider (covered further down in the guide) for specific pages. This means you can still have full SSR on other page which do not require PowerSync.
## Setup
### Next.js Project Setup
Let's start by bootstrapping a new Next.js application using [`create-next-app`](https://nextjs.org/docs/app/api-reference/cli/create-next-app).
```shell npm
npx create-next-app@latest my-powersync-app
```
```shell yarn
yarn create next-app my-powersync-app
```
```shell pnpm
pnpm create next-app my-powersync-app
```
When running this command you'll be presented with a few options. The PowerSync suggested selection for the setup options Next.js offers are:
```shell
Would you like to use TypeScript? Yes
Would you like to use ESLint? Yes
Would you like to use Tailwind CSS? Yes
Would you like your code inside a `src/` directory? Yes
Would you like to use App Router? (recommended) Yes
Would you like to use Turbopack for `next dev`? No
Would you like to customize the import alias (`@/*` by default)? Yes
```
Do not use Turbopack when setting up a new Next.js project as we’ll be updating the `next.config.ts` to use Webpack. This is done because we need to enable:
1. asyncWebAssembly
2. topLevelWait
### Install PowerSync Dependencies
Using PowerSync in a Next.js application will require the use of the [PowerSync Web SDK](https://www.npmjs.com/package/@powersync/web) and it's peer dependencies.
In addition to this we'll also install [`@powersync/react`](https://www.npmjs.com/package/@powersync/react), which provides several hooks and providers for easier integration.
```shell npm
npm install @powersync/web @journeyapps/wa-sqlite @powersync/react
```
```shell yarn
yarn add @powersync/web @journeyapps/wa-sqlite @powersync/react
```
```shell pnpm
pnpm install @powersync/web @journeyapps/wa-sqlite @powersync/react
```
This SDK currently requires [@journeyapps/wa-sqlite](https://www.npmjs.com/package/@journeyapps/wa-sqlite) as a peer dependency.
## Next.js Config Setup
In order for PowerSync to work with the Next.js we'll need to modify the default `next.config.ts` to support PowerSync.
```typescript next.config.ts
module.exports = {
experimental: {
turbo: false,
},
webpack: (config: any, isServer: any) => {
config.experiments = {
...config.experiments,
asyncWebAssembly: true, // Enable WebAssembly in Webpack
topLevelAwait: true,
};
// For Web Workers, ensure proper file handling
if (!isServer) {
config.module.rules.push({
test: /\.wasm$/,
type: "asset/resource", // Adds WebAssembly files to the static assets
});
}
return config;
}
}
```
Some important notes here, we have to enable `asyncWebAssemply` in Webpack, `topLevelAwait` is required and for Web Workers, ensure proper file handling.
It's also important to add web assembly files to static assets for the site. We will not be using SSR because PowerSync does not support it.
Run `pnpm dev` to start the development server and check that everything compiles correctly, before moving onto the next section.
## Configure a PowerSync Instance
Now that we've got our project setup, let's create a new PowerSync Cloud instance and connect our client to it.
For the purposes of this demo, we'll be using Supabase as the source backend database that PowerSync will connect to.
To set up a new PowerSync instance, follow the steps covered in the [Installation - Database Connection](/installation/database-connection) docs page.
## Configure PowerSync in your project
### Add core PowerSync files
Start by adding a new directory in `./src/lib` named `powersync`.
#### `AppSchema`
Create a new file called `AppSchema.ts` in the newly created `powersync` directory and add your App Schema to the file. Here is an example of this.
```typescript lib/powersync/AppSchema.ts
import { column, Schema, Table } from '@powersync/web';
const lists = new Table({
created_at: column.text,
name: column.text,
owner_id: column.text
});
const todos = new Table(
{
list_id: column.text,
created_at: column.text,
completed_at: column.text,
description: column.text,
created_by: column.text,
completed_by: column.text,
completed: column.integer
},
{ indexes: { list: ['list_id'] } }
);
export const AppSchema = new Schema({
todos,
lists
});
// For types
export type Database = (typeof AppSchema)['types'];
export type TodoRecord = Database['todos'];
// OR:
// export type Todo = RowType;
export type ListRecord = Database['lists'];
```
This defines the local SQLite database schema and PowerSync will hydrate the tables once the SDK connects to the PowerSync instance.
#### `BackendConnector`
Create a new file called `BackendConnector.ts` in the `powersync` directory and add the following to the file.
```typescript lib/powersync/BackendConnector.ts
import { AbstractPowerSyncDatabase, PowerSyncBackendConnector, UpdateType } from '@powersync/web';
export class BackendConnector implements PowerSyncBackendConnector {
private powersyncUrl: string | undefined;
private powersyncToken: string | undefined;
constructor() {
this.powersyncUrl = process.env.NEXT_PUBLIC_POWERSYNC_URL;
// This token is for development only.
// For production applications, integrate with an auth provider or custom auth.
this.powersyncToken = process.env.NEXT_PUBLIC_POWERSYNC_TOKEN;
}
async fetchCredentials() {
// TODO: Use an authentication service or custom implementation here.
if (this.powersyncToken == null || this.powersyncUrl == null) {
return null;
}
return {
endpoint: this.powersyncUrl,
token: this.powersyncToken
};
}
async uploadData(database: AbstractPowerSyncDatabase): Promise {
const transaction = await database.getNextCrudTransaction();
if (!transaction) {
return;
}
try {
for (const op of transaction.crud) {
// The data that needs to be changed in the remote db
const record = { ...op.opData, id: op.id };
switch (op.op) {
case UpdateType.PUT:
// TODO: Instruct your backend API to CREATE a record
break;
case UpdateType.PATCH:
// TODO: Instruct your backend API to PATCH a record
break;
case UpdateType.DELETE:
//TODO: Instruct your backend API to DELETE a record
break;
}
}
await transaction.complete();
} catch (error: any) {
console.error(`Data upload error - discarding`, error);
await transaction.complete();
}
}
}
```
There are two core functions to this file:
* `fetchCredentials()` - Used to return a JWT token to the PowerSync service for authentication.
* `uploadData()` - Used to upload changes captured in the local SQLite database that need to be sent to the source backend database, in this case Supabase. We'll get back to this further down.
You'll notice that we need to add a `.env` file to our project which will contain two variables:
* `NEXT_PUBLIC_POWERSYNC_URL` - This is the PowerSync instance url. You can grab this from the PowerSync Cloud dashboard.
* `NEXT_PUBLIC_POWERSYNC_TOKEN` - For development purposes we'll be using a development token. To generate one, please follow the steps outlined in [Development Token](/installation/authentication-setup/development-tokens) from our installation docs.
### Create Providers
Create a new directory in `./src/app/components` named `providers`
#### `SystemProvider`
Add a new file in the newly created `providers` directory called `SystemProvider.tsx`.
```typescript components/providers/SystemProvider.tsx
'use client';
import { AppSchema } from '@/lib/powersync/AppSchema';
import { BackendConnector } from '@/lib/powersync/BackendConnector';
import { PowerSyncContext } from '@powersync/react';
import { PowerSyncDatabase, WASQLiteOpenFactory, WASQLiteVFS, createBaseLogger, LogLevel } from '@powersync/web';
import React, { Suspense } from 'react';
const logger = createBaseLogger();
logger.useDefaults();
logger.setLevel(LogLevel.DEBUG);
export const db = new PowerSyncDatabase({
schema: AppSchema,
database: new WASQLiteOpenFactory({
dbFilename: 'exampleVFS.db',
vfs: WASQLiteVFS.OPFSCoopSyncVFS,
flags: {
enableMultiTabs: typeof SharedWorker !== 'undefined',
ssrMode: false
}
}),
flags: {
enableMultiTabs: typeof SharedWorker !== 'undefined',
}
});
const connector = new BackendConnector();
db.connect(connector);
export const SystemProvider = ({ children }: { children: React.ReactNode }) => {
return (
{children}
);
};
export default SystemProvider;
```
The `SystemProvider` will be responsible for initializing the `PowerSyncDatabase`. Here we supply a few arguments, such as the AppSchema we defined earlier along with very important properties such as `ssrMode: false`.
PowerSync will not work when rendered server side, so we need to explicitly disable SSR.
We also instantiate our `BackendConnector` and pass an instance of that to `db.connect()`. This will connect to the PowerSync instance, validate the token supplied in the `fetchCredentials` function and then start syncing with the PowerSync service.
#### DynamicSystemProvider.tsx
Add a new file in the newly created `providers` directory called `DynamicSystemProvider.tsx`.
```typescript components/providers/DynamicSystemProvider.tsx
'use client';
import dynamic from 'next/dynamic';
export const DynamicSystemProvider = dynamic(() => import('./SystemProvider'), {
ssr: false
});
```
We can only use PowerSync in client side rendering, so here we're setting `ssr:false`
#### Update `layout.tsx`
In our main `layout.tsx` we'll update the `RootLayout` function to use the `DynamicSystemProvider` created in the last step.
```typescript app/layout.tsx
import { Geist, Geist_Mono } from "next/font/google";
import "./globals.css";
import { DynamicSystemProvider } from '@/app/components/providers/DynamicSystemProvider';
const geistSans = Geist({
variable: "--font-geist-sans",
subsets: ["latin"],
});
const geistMono = Geist_Mono({
variable: "--font-geist-mono",
subsets: ["latin"],
});
export default function RootLayout({
children,
}: Readonly<{
children: React.ReactNode;
}>) {
return (
{children}
);
}
```
#### Use PowerSync
##### Reading Data
In our `page.tsx` we can now use the `useQuery` hook or other PowerSync functions to read data from the SQLite database and render the results in our application.
```typescript app/page.tsx
'use client';
import { useState, useEffect } from 'react';
import { useQuery, useStatus, usePowerSync } from '@powersync/react';
export default function Page() {
// Hook
const powersync = usePowerSync();
// Get database status information e.g. downloading, uploading and lastSycned dates
const status = useStatus();
// Example 1: Reactive Query
const { data: lists } = useQuery("SELECT * FROM lists");
// Example 2: Standard query
const [lists, setLists] = useState([]);
useEffect(() => {
powersync.getAll('SELECT * from lists').then(setLists)
}, []);
return (
{lists.map(list => {list.name} )}
)
}
```
##### Writing Data
Using the `execute` function we can also write data into our local SQLite database.
```typescript
await powersync.execute("INSERT INTO lists (id, created_at, name, owner_id) VALUES (?, ?, ?, ?)", [uuid(), new Date(), "Test", user_id]);
```
Changes made against the local data will be stored in the upload queue and will be processed by the `uploadData` in the BackendConnector class.
# Tutorials
Source: https://docs.powersync.com/tutorials/overview
A collection of tutorials showcasing solutions to common use cases across the PowerSync stack.
## Overview
Here you can learn how to approach various use cases and solve specific challenges when integrating PowerSync in your project.
We are constantly expanding our list of tutorials. If you'd like to see a solution to a use case that is not currently available, [let us know on Discord](https://discord.gg/powersync).
Our tutorials are currently organized into the following categories:
## Notable Community Tutorials
* Building an Offline-First Chat App Using PowerSync and Supabase
* Postgres (Supabase) + React Native + Expo + Tamagui
* [https://bndkt.com/blog/2023/building-an-offline-first-chat-app-using-powersync-and-supabase](https://bndkt.com/blog/2023/building-an-offline-first-chat-app-using-powersync-and-supabase)
* Building an Offline-First Mobile App with PowerSync
* Postgres + Flutter + Nest.js + Prisma ORM + Firebase Auth
* [https://blog.stackademic.com/building-an-offline-first-mobile-app-with-powersync-40674d8b7ea1](https://blog.stackademic.com/building-an-offline-first-mobile-app-with-powersync-40674d8b7ea1)
* Implementing Local-First Architecture: A Guide to MongoDB Cluster and PowerSync Integration
* MongoDB Atlas + Next.js
* [https://blog.stackademic.com/implementing-local-first-architecture-a-guide-to-mongodb-cluster-and-powersync-integration-6b21fa8059a1](https://blog.stackademic.com/implementing-local-first-architecture-a-guide-to-mongodb-cluster-and-powersync-integration-6b21fa8059a1)
## Additional Resources
Haven't found what you're looking for?
* Additional tutorial-style technical posts can be found on the [PowerSync Blog](https://www.powersync.com/blog). Popular pages include:
* [Migrating a MongoDB Atlas Device Sync App to PowerSync](https://www.powersync.com/blog/migrating-a-mongodb-atlas-device-sync-app-to-powersync)
* [PowerSync and Supabase: Just the Basics](https://www.powersync.com/blog/powersync-and-supabase-just-the-basics)
* [Flutter Tutorial: building an offline-first chat app with Supabase and PowerSync](https://www.powersync.com/blog/flutter-tutorial-building-an-offline-first-chat-app-with-supabase-and-powersync)
* See our [Use Case Examples](/usage/use-case-examples) for details about common use cases.
* See [Demo Apps / Example Projects](/resources/demo-apps-example-projects) for working implementations of PowerSync.
# Generate a Development Token
Source: https://docs.powersync.com/tutorials/self-host/generate-dev-token
In this tutorial we will show you how to generate a development token for the self-hosted [PowerSync Service](https://powersync.mintlify.app/architecture/powersync-service#powersync-service).
# Introduction
Development tokens are useful for:
* getting started quickly without implementing full auth config
* sanity checking your sync rules config (were they applied correctly)
* temporarily impersonating a specific user to debug specific issues
# Use Case
Development tokens can be used either with the
* [test-client](https://github.com/powersync-ja/powersync-service/tree/main/test-client), or
* [the diagnostics app](/resources/troubleshooting#diagnostics-app)
# Generate a Development Token
Development tokens can be generated via either
* [PowerSync Cloud](/installation/authentication-setup/development-tokens/#PowerSync-Cloud-Dashboard), or
* locally with a self-hosted setup (described in this tutorial)
To generate a SharedSecret, you can use this [Online JWS key generator](https://8gwifi.org/jwsgen.jsp):
You don't need to edit the default payload in the [Online JWS key generator](https://8gwifi.org/jwsgen.jsp).
You simply need to obtain the generated `SharedSecret` value.
* Click `Generate JWS Keys`
* Copy the `SharedSecret` value
Using an online key generator for secrets in a production environment is not recommended.
Update the `k` value in the jwks keys in your `powersync.yaml` config file with the `SharedSecret` value copied in the previous step:
```yaml powersync.yaml {8}
# Client (application end user) authentication settings
client_auth:
# JWKS URIs can be specified here
jwks_uri: !env PS_JWKS_URL
jwks:
keys:
- kty: 'oct'
k: 'YOUR_GENERATED_SHARED_SECRET'
alg: 'HS256'
```
1. If you have not done so already, clone the [powersync-service repo](https://github.com/powersync-ja/powersync-service/tree/main)
2. Install the dependencies
* In the project root, run the following commands:
```bash
pnpm install
pnpm build:packages
```
* In the `test-client` directory, run the following commands:
```bash
pnpm build
```
3. Generate a new token by running the following command in the `test-client` directory with your updated `powersync.yaml` config file:
```bash
node dist/bin.js generate-token --config path/to/powersync.yaml --sub test-user
```
You should see an output similar to the following:
# Overview
Source: https://docs.powersync.com/tutorials/self-host/overview
A collection of tutorials related to self-hosting.
# Lifecycle / Maintenance
Source: https://docs.powersync.com/usage/lifecycle-maintenance
This section covers use cases that will arise throughout the lifetime of your application as you add new features, refactor tech debt into oblivion, and upgrade dependencies.
# Compacting Buckets
Source: https://docs.powersync.com/usage/lifecycle-maintenance/compacting-buckets
[Buckets](/usage/sync-rules/organize-data-into-buckets) store data as a history of changes, not only the current state.
This allows clients to download incremental changes efficiently — only changed rows have to be downloaded. However, over time this history can grow large, causing new clients to potentially take a long time to download the initial set of data. To handle this, we compact the history of each bucket.
## Compacting
### PowerSync Cloud
The cloud-hosted version of PowerSync will automatically compact all buckets once per day.
Support to manually trigger compacting is available in the [Dashboard](/usage/tools/powersync-dashboard): Right-click on an instance, or search for the action using the [Command Palette](/usage/tools/powersync-dashboard#the-command-palette). Support to trigger compacting from the [CLI](/usage/tools/cli) will be added soon.
[Defragmenting](/usage/lifecycle-maintenance/compacting-buckets#defragmenting) may still be required.
### Self-hosted PowerSync
For self-hosted setups (PowerSync Open Edition & PowerSync Enterprise Self-Hosted Edition), the `compact` command in the Docker image can be used to compact all buckets. This can be run manually, or on a regular schedule using Kubernetes [CronJob](https://kubernetes.io/docs/concepts/workloads/controllers/cron-jobs/) or similar scheduling functionality.
[Defragmenting](/usage/lifecycle-maintenance/compacting-buckets#defragmenting) may still be required.
## Background
### Bucket operations
Each bucket is an ordered list of `PUT`, `REMOVE`, `MOVE` and `CLEAR` operations. In normal operation, only `PUT` and `REMOVE` operations are created.
A simplified view of a bucket may look like this:
```bash
(1, PUT, row1, )
(2, PUT, row2, )
(3, PUT, row1, )
(4, REMOVE, row2)
```
### Compacting step 1 - MOVE operations
The first step of compacting involves `MOVE` operations. This just indicates that an operation is not needed anymore, since a later `PUT` or `REMOVE` operation replaces the row.
After this compact step, the bucket may look like this:
```bash
(1, MOVE)
(2, MOVE)
(3, PUT, row1, )
(4, REMOVE, row2)
```
This does not reduce the number of operations to download, but can reduce the amount of data to download.
### Compacting step 2 - CLEAR operations
The second step of compacting takes a sequence of `CLEAR`, `MOVE` and/or `REMOVE` operations at the start of the bucket, and replaces them all with a single `CLEAR` operation. The `CLEAR` operation indicates to the client that "this is the start of the bucket, delete any prior operations that you may have".
After this compacting step, the bucket may look like this:
```bash
(2, CLEAR)
(3, PUT, row1, )
(4, REMOVE, row2)
```
This reduces the number of operations for new clients to download in some cases.
The `CLEAR` operation can only remove operations at the start of the bucket, not in the middle of the bucket, which leads us to the next step.
### Defragmenting
There are cases that the above compacting steps cannot optimize efficiently. The key factor is that the oldest PUT operation in a bucket determines how much of the history can be compacted. This means:
1. If a row has never been updated since its initial creation, its original PUT operation remains at the start of the bucket
2. All operations that come after this oldest PUT cannot be fully compacted
3. This is particularly problematic when you have:
* A small number of rarely-changed rows in the same bucket as frequently-updated rows
* The rarely-changed rows' original PUT operations "block" compacting of the entire bucket
* The frequently-updated rows continue to accumulate operations that can't be fully compacted
For example, imagine this sequence of statements:
```sql
-- Insert a single row that rarely changes
INSERT INTO lists(name) VALUES('a');
-- Insert 50k rows that change frequently
INSERT INTO lists (name) SELECT 'b' FROM generate_series(1, 50000);
-- Delete those 50k rows, but keep 'a'
DELETE FROM lists WHERE name = 'b';
```
After compacting, the bucket looks like this:
```bash
(1, PUT, row_1, ) -- This original PUT blocks further compacting
(2, MOVE)
(3, MOVE)
...
(50001, MOVE)
(50002, REMOVE, row2)
(50003, REMOVE, row3)
...
(100001, REMOVE, row50000)
```
This is inefficient because:
1. The original PUT operation for row 'a' remains at the start
2. All subsequent operations can't be fully compacted
3. We end up with over 100k operations for what should be a simple bucket
To handle this case, we "defragment" the bucket by updating existing rows in the source database. This creates new PUT operations at the end of the bucket, allowing the compact steps to efficiently compact the entire history:
```sql
-- Touch all rows to create new PUT operations
UPDATE lists SET name = name;
-- OR touch specific rows at the start of the bucket
UPDATE lists SET name = name WHERE name = 'a';
```
After defragmenting and compacting, the bucket looks like this:
```bash
(100001, CLEAR)
(100002, PUT, row_1, )
```
The bucket is now back to two operations, allowing new clients to sync efficiently.
Note: All rows in the bucket must be updated for this to be effective. If some rows are never updated, they will continue to block compacting of the entire bucket.
**Bucket Design Tip**: If you have a mix of frequently-updated and rarely-changed rows, consider splitting them into separate buckets. This prevents the rarely-changed rows from blocking compacting of the frequently-updated ones.
### When to Defragment
You should consider defragmenting your buckets when:
1. **High Operations-to-Rows Ratio**: If you notice that the number of operations significantly exceeds the number of rows in a bucket. You can inspect this using the [Diagnostics app](https://github.com/powersync-ja/powersync-js/tree/main/tools/diagnostics-app).
2. **Frequent Updates**: Tables that are frequently updated (e.g., status fields, counters, or audit logs)
3. **Large Data Churn**: Tables where you frequently insert and delete many rows
### Defragmenting Strategies
There are manual and automated approaches to defragmenting:
1. **Manual Defragmentation**
* Use the PowerSync Dashboard to manually trigger defragmentation
* Right-click on an instance and select "Compact Buckets" with the "Defragment" checkbox selected
* Best for one-time cleanup or after major data changes
2. **Scheduled Defragmentation**
* Set up a cron job to regularly update rows
* Recommended for frequently updated tables or tables with large churn
* Example using pg\_cron:
```sql
-- Daily defragmentation for high-churn tables
UPDATE audit_logs SET last_updated = now()
WHERE last_updated < now() - interval '1 day';
-- Weekly defragmentation for other tables
UPDATE users SET last_updated = now()
WHERE last_updated < now() - interval '1 week';
```
* This will cause clients to re-sync each updated row, while preventing the number of operations from growing indefinitely. Depending on how often rows in the bucket are modified, the interval can be increased or decreased.
### Defragmenting Trade-offs
Defragmenting + compacting as described above can significantly reduce the number of operations in a bucket, at the cost of existing clients needing to re-sync that data. When and how to do this depends on the specific use-case and data update patterns.
Key considerations:
1. **Frequency**: More frequent defragmentation means fewer operations per sync but more frequent re-syncs
2. **Scope**: Defragmenting all rows at once is more efficient but causes a larger sync cycle
3. **Monitoring**: Use the [Diagnostics app](https://github.com/powersync-ja/powersync-js/tree/main/tools/diagnostics-app) to track operations-to-rows ratio
## Sync Rule deployments
Whenever modifications to [Sync Rules](/usage/sync-rules) are deployed, all buckets are re-created from scratch. This has a similar effect to fully defragmenting and compacting all buckets. This was recommended as a workaround before explicit compacting became available ([released July 26, 2024](https://releases.powersync.com/announcements/bucket-compacting)).
In the future, we may use [incremental sync rule reprocessing](https://roadmap.powersync.com/c/85-more-efficient-sync-reprocessing) to process changed bucket definitions only.
## Technical details
See the [documentation](https://github.com/powersync-ja/powersync-service/blob/main/docs/compacting-operations.md) in the `powersync-service` repo for more technical details on compacting.
# Deploying Schema Changes
Source: https://docs.powersync.com/usage/lifecycle-maintenance/deploying-schema-changes
The deploy process for schema or [Sync Rule](../sync-rules) updates depends on the type of change.
See the appropriate subsections below for details on the various scenarios.
# Additive Changes
Source: https://docs.powersync.com/usage/lifecycle-maintenance/deploying-schema-changes/additive-changes
Example: Add a new table that a new version of the app depends on, or add a new column to an existing table.
1. Apply source schema changes (i.e. in Postgres database) (often as a pre-deploy step as part of 2)
2. Deploy backend application changes
3. Deploy [Sync Rule](/usage/sync-rules) changes
4. Wait for Sync Rule reprocessing to complete
5. Publish the app (may be deployed with delayed publishing at any prior point)
# Changing a Column Type
Source: https://docs.powersync.com/usage/lifecycle-maintenance/deploying-schema-changes/changing-a-column-type
If the column types have the same representation in Sync Rules, the type can be changed freely without issues (for example changing between `VARCHAR` and `TEXT`).
Other type changes, for example changing between `INT` and `TEXT`, require more care.
To change the type, it is usually best to create a new column with the new type, then remove the old column once nothing uses it anymore.
When changing the type of a column without renaming, use a column type mapping to still use the old type for existing client applications.
# Renaming a Column on the Client
Source: https://docs.powersync.com/usage/lifecycle-maintenance/deploying-schema-changes/renaming-a-column-on-the-client
Use the same approach as for renaming tables:
# Renaming a Column on the Server
Source: https://docs.powersync.com/usage/lifecycle-maintenance/deploying-schema-changes/renaming-a-column-on-the-server
Use the `ifnull` function in Sync Rules to output whichever column is available. This would handle both the old and new schema versions:
```sql
SELECT IFNULL(description_new, description_old) AS description FROM assets
```
This may produce a validation error because of a missing column, but PowerSync will still allow the deploy.
Once the changes have been deployed and replicated, the old reference can be removed from the Sync Rules:
```sql
SELECT description_new AS description FROM assets
```
# Renaming a Table on Both Server and Client
Source: https://docs.powersync.com/usage/lifecycle-maintenance/deploying-schema-changes/renaming-a-table-on-both-server-and-client
Treat this as two separate steps and follow the process for both [server](/usage/lifecycle-maintenance/deploying-schema-changes/renaming-a-table-on-the-server) and [client](/usage/lifecycle-maintenance/deploying-schema-changes/renaming-a-table-on-the-client).
# Renaming a Table on the Client
Source: https://docs.powersync.com/usage/lifecycle-maintenance/deploying-schema-changes/renaming-a-table-on-the-client
Pass in a "`schema_version`" or similar parameter from the client, and use this in Sync Rules to use either the old or new table name in the data queries.
See this section for details:
[Multiple Client Versions](/usage/sync-rules/advanced-topics/multiple-client-versions)
# Renaming a Table on the Server
Source: https://docs.powersync.com/usage/lifecycle-maintenance/deploying-schema-changes/renaming-a-table-on-the-server
The approach here is to have the Sync Rules handle both the old and the new table name during the migration period.
Using maintenance mode on the backend here for simplicity. Other processes may be used to avoid maintenance mode, but that doesn't affect PowerSync system.
1. Deploy Sync Rules containing both the old and the new table name, with a mapping (alias) from the new name to the old one (so that both end up with the old name on the client). This will cause validation errors because of a missing table, but PowerSync will still allow the deploy.
2. Wait for Sync Rule reprocessing to complete.
3. Put the backend in maintenance mode.
1. i.e. Backend needs to be made unavailable to avoid breaking things during migrations.
4. Apply the source schema changes (i.e. in Postgres database)
5. Deploy backend changes and re-activate backend.
6. Remove the old table from Sync Rules, then deploy and activate the Sync Rules.
# Handling Update Conflicts
Source: https://docs.powersync.com/usage/lifecycle-maintenance/handling-update-conflicts
What happens when two users update the same records while offline?
**The default behavior is essentially "last write wins", but this can be** [**customized by the developer**](/usage/lifecycle-maintenance/handling-update-conflicts/custom-conflict-resolution)**.**
The upload queue on the client stores three types of operations:
1. PUT / Create new row — contains the value for each non-null column
2. PATCH / Update existing row — contains the ID, and value of each changed column
3. DELETE / Delete existing row — contains the ID
It is [up to your app backend](/installation/app-backend-setup/writing-client-changes) to implement these operations and associated conflict handling.
The operations must be idempotent — i.e. the backend may receive the same operation multiple times in some scenarios, and must handle that appropriately.
* A per-client incrementing operation ID is included with each operation that can be used to deduplicate operations, and/or the backend can implement the operations in an idempotent way (e.g. ignore DELETE on a row that is already deleted).
A conflict may arise when two clients update the same record before seeing the other client’s update, or one client deletes the record while the other updates it.
Typically, the backend should be implemented to handle writes as follows:
1. Deletes always win: If one client deletes a row, any future updates to that row are ignored. The row may be created again with the same ID.
2. For multiple concurrent updates, the last update (as received by the server) to each individual field wins.
1. If you require different behavior to "last write wins", implement [custom conflict resolution](/usage/lifecycle-maintenance/handling-update-conflicts/custom-conflict-resolution).
The server could implement some validations. For example, the server could have a record of orders, and once an order is marked as "completed", reject any further updates to the order.
Future versions may include support for custom operations, e.g. "increment column by 1".
### Using CRDTs to Merge Updates Automatically
CRDT data structures such as [Yjs](https://github.com/yjs/yjs) can be stored and synced using PowerSync, allowing you to build collaborative apps that merge users' updates automatically.
See the [CRDTs](/usage/use-case-examples/crdts) section for more detail.
Built-in support for CRDT operations in PowerSync may also be added in the future.
# Custom Conflict Resolution
Source: https://docs.powersync.com/usage/lifecycle-maintenance/handling-update-conflicts/custom-conflict-resolution
You can build custom conflict resolution into your app.
If you would like to allow for manual conflict resolution by a user, typically this would be implemented separately for each table where manual conflict resolution is required, since the UI to resolve the conflicts would be custom for each.
## Option 1: Record write conflicts server-side
* Create a table to record write conflicts.
* When the server encounters a conflict, write it to this table, and use appropriate sync rules to sync the data back to the client app.
* The client app can then display these conflicts to the user, and provide an option to resolve the conflicts.
## Option 2: Record changes as individual rows client-side
* Create a separate table that records individual changes to rows.
* The client updates the original table optimistically, in addition to creating a new change row.
* The server ignores updates to the original table, and only processes the change rows. Each can be marked as "pending" / "processed" / "failed", with this status being synced back to the client. The client can then display this status for each change to the user if desired, with appropriate logic to manually resolve failed updates.
## Using CRDTs to Merge Updates Automatically
CRDT data structures such as [Yjs](https://github.com/yjs/yjs) can be stored and synced using PowerSync, allowing you to build collaborative apps that merge users' updates automatically.
See the [CRDTs](/usage/use-case-examples/crdts) section for more detail.
## See Also
* [Consistency → Validation and conflict handling](/architecture/consistency#validation-and-conflict-handling)
* [CRDTs](/usage/use-case-examples/crdts)
# Handling Write / Validation Errors
Source: https://docs.powersync.com/usage/lifecycle-maintenance/handling-write-validation-errors
The general approach is that for transient errors (e.g. server or database unavailable), the changes are kept in the client-side upload queue, and retried at 5 second intervals, keeping the original order. In the future it will be possible to control the retry behavior.
For validation errors or write conflicts (see the definition of this below in [Technical Details](/usage/lifecycle-maintenance/handling-write-validation-errors#additional-technical-details)), changes are automatically rolled back on the client.
Custom logic can be implemented to propagate validation failures back to clients asynchronously. For additional details on how to do that, see the section on [Custom Conflict Resolution.](/usage/lifecycle-maintenance/handling-update-conflicts/custom-conflict-resolution)
## Additional Technical Details
For each change (or batch of changes), some possible scenarios are:
1. Change failed, for example due to network or temporary server error. The change is kept in the queue.
2. Change acknowledged and applied on the server. The client syncs back the change, which would match what the client already had.
3. Change acknowledged but rejected (e.g. validation error). The client rolls back the change.
4. Change acknowledged and partially applied or otherwise alternated. The client syncs back the state as applied on the server.
In all cases, PowerSync ensures that the client state is fully consistent with the server state, once the queue is empty.
### Backend implementation recommendations
The backend should respond with "success" (HTTP 2xx) even in the case of write conflicts or validation failures, unless developer intervention is desired.
Error responses should be reserved for:
1. Network errors.
2. Temporary server errors (e.g. high load, or database unavailable).
3. Unexpected bugs or schema mismatches, where the change should stay in the client-side queue.
If a bug triggers an error, it has to be fixed before the changes from the client can be processed. It is recommended to use an error reporting service on both the server and the client to be alerted of cases like this.
To propagate validation failures or write conflicts back to the client, either:
1. Include error details the body of a success response (HTTP 2xx).
2. Write the details to a different table, asynchronously synchronized back to the client.
For more details on strategies, see:
#### Dead-letter queue
Optionally, the server can implement a "dead-letter queue":
* If a change cannot be processed due to a conflict, schema mismatch and/or bug, the change can be persisted in a separate queue on the backend.
* This can then be manually inspected and processed by the developer or administrator, instead of blocking the client.
* Note that this could result in out-of-order updates if the client continues sending updates, despite earlier updates being persisted in the dead-letter queue.
While the client could implement a dead-letter queue, this is not recommended, since this cannot easily be inspected by the developer. The information is also often not sufficient to present to the user in a friendly way or to allow manual conflict resolution.
## How changes are rolled back
There is no explicit "roll-back" operation on the client — but a similar effect is achieved by the internals of PowerSync. The core principle is that when the client completes a sync with an empty upload queue, the local database will be consistent with the server-side database.
This is achieved as follows:
1. The client keeps a copy of the data as synced from the server, and continuously updates this.
2. Once all the changes from the client are uploaded, and the local "server state" is up to date, it updates the local database with the local server state.
3. If the local change was applied by the server, it will be synced back and included in the local "server state".
4. If the local change was discarded by the server, the server state will not change, and the client will revert to the last known state.
5. If another conflicting write "won", that write will be present in the server state, and will overwrite the local changes.
# Implementing Schema Changes
Source: https://docs.powersync.com/usage/lifecycle-maintenance/implementing-schema-changes
## Introduction
The [PowerSync protocol](/architecture/powersync-protocol) is schemaless, and not directly affected by schema changes.
Replicating data from the source database to [sync buckets](/usage/sync-rules) may be affected by server-side changes to the schema (in the case of Postgres), and may need [reprocessing](/usage/lifecycle-maintenance/compacting-buckets) in some cases.
The [client-side schema](/installation/client-side-setup/define-your-schema) is just a view on top of the schemaless data. Updating this client-side schema is immediate when the new version of the app runs, with no client-side migrations required.
The developer is responsible for keeping client-side schema changes backwards-compatible with older versions of client apps. PowerSync has some functionality to assist with this:
1. [Different Sync Rules](/usage/sync-rules/advanced-topics/multiple-client-versions) can be applied based on [parameters](/usage/sync-rules/advanced-topics/client-parameters) such as client version.
2. Sync Rules can apply simple [data transformations](/usage/sync-rules/data-queries) to keep data in a format compatible with older clients.
## Client-Side Impact of Schema and Sync Rule Changes
As mentioned above, the PowerSync system itself is schemaless — the client syncs any data as received, in JSON format, regardless of the data model on the client.
The schema as supplied on the client is only a view on top of the schemaless data.
1. If tables/collections not described by the client-side schema are synced, it is stored internally, but not accessible.
2. Same applies for columns/field not described by the client-side schema.
3. When there is a type mismatch, SQLite's `CAST` functionality is used to cast to the type described by the schema.
1. Data is internally stored as JSON.
2. SQLite's `CAST` is used to cast values to `TEXT`, `INTEGER` or `REAL`.
3. Casting between types should never error, but it may not fully represent the original data. For example, casting an arbitrary string to `INTEGER` will likely result in a "0" value.
4. Full rules for casting between types are described [in the SQLite documentation here](https://www.sqlite.org/lang_expr.html#castexpr).
4. Removing a table/collection is handled on the client as if the table exists with no data.
5. Removing a column/field is handled on the client as if the values are `undefined`.
Nothing in PowerSync will fail hard if there are incompatible schema changes. But depending on how the app uses the data, app logic may break. For example, removing a table/collection that the app actively uses may break workflows in the app.
To avoid certain types of breaking changes on older clients, Sync Rule [transformations](/usage/sync-rules/data-queries) may be used.
## Postgres Specifics
PowerSync keeps the [sync buckets](/usage/sync-rules/organize-data-into-buckets) up to date with any incremental data changes, as recorded in the Postgres [WAL](https://www.postgresql.org/docs/8.0/wal.html) / received in the logical replication stream. This is also referred to as DML (Data Manipulation Language) queries.
However, this does not include DDL (Data Definition Language), which includes:
1. Creating, dropping or renaming tables.
2. Changing replica identity of a table.
3. Adding, dropping or renaming columns.
4. Changing the type of a column.
### Postgres schema changes affecting Sync Rules
#### DROP table
Dropping a table is not directly detected by PowerSync, and previous data may be preserved. To make sure the data is removed, `TRUNCATE` the table before dropping, or remove the table from [Sync Rules](/usage/sync-rules).
#### CREATE table
The new table is detected as soon as data is inserted.
#### DROP and re-CREATE table
This is a special case of combining `DROP` and `CREATE`. If a dropped table is created again, *and* data is inserted into the new table, the schema change is detected by PowerSync. PowerSync will delete the old data in this case, as if `TRUNCATE` was called before dropping.
#### RENAME table
A renamed table is handled similarly to dropping the old table, and creating a new table with the new name.
The rename is only detected when data is inserted, updated or deleted to the new table. At this point, PowerSync effectively does a `TRUNCATE` of the old table, and replicates the new table.
This may be a slow operation if the table is large, and all other replication will be blocked until the new table is replicated.
#### Change REPLICA IDENTITY
The replica identity of a table is considered changed if either:
1. The type of replica identity changes (`DEFAULT`, `INDEX`, `FULL`, `NOTHING`).
2. The name or type of columns part of the replica identity changes.
The latter can happen if:
1. Using `REPLICA IDENTITY FULL`, and any column is added, removed, renamed, or the type changed.
2. Using `REPLICA IDENTITY DEFAULT`, and the type of any column in the primary key is changed.
3. Using `REPLICA IDENTITY INDEX`, and the type of any column in the replica index is changed.
4. The primary key or replica index is removed or changed.
When the replica identity changes, the entire table is re-replicated again. This may be a slow operation if the table is large, and all other replication will be blocked until the table is replicated again.
Sync rules affected by schema changes will fail "soft" — an alert would be generated, but the system will continue processing changes.
#### Column changes
Column changes such as adding, dropping, renaming columns, or changing column types, are not automatically detected by PowerSync (unless it affects the replica identity as described above).
Adding a column with a `NULL` default value will generally not cause issues. Existing records will have a missing value instead of `NULL` value, but those are generally treated the same on the client.
Adding a column with a different default value, whether it's a static or computed value, will not have this default automatically replicated for existing rows. To propagate this value, make an update to every existing row.
Removing a column will not have the values automatically removed for existing rows on PowerSync. To propagate the change, make an update to every existing row.
Changing a column type, and/or changing the value of a column using an `ALTER TABLE` statement, will not be automatically replicated to PowerSync. In some cases, the change will have no effect on PowerSync (for example changing between `VARCHAR` and `TEXT` types). When the values are expected to change, make an update to every existing row to propagate the changes.
#### Publication changes
A table is not replicated unless it is part of the [powersync publication](/installation/database-setup).
If a table is added to the publication, it is treated the same as a new table, and any existing data is replicated. This may be a slow operation if the table is large, and all other replication will be blocked until the new table is replicated.
There are additional changes that can be made to a table in a publication:
1. Which operations are replicated (insert, update, delete and truncate).
2. Which rows are replicated (row filters).
Those changes are not automatically picked up by PowerSync during replication, and can cause PowerSync to miss changes if the changes are filtered out. PowerSync will not automatically recover the data when for example removing a row filter. Use these with caution.
## MongoDB Specifics
Since MongoDB is schemaless, schema changes generally do not impact PowerSync. However, adding, dropping, and renaming collections require special consideration.
### Adding Collections
Sync Rules can include collections that do not yet exist in the source database. These collections will be created in MongoDB when data is first inserted. PowerSync will begin replicating changes as they occur in the source database.
### Dropping Collections
Due to a limitation in the replication process, dropping a collection does not immediately propagate to synced clients. To ensure the change is reflected, any additional `insert`, `update`, `replace`, or `delete` operation must be performed in any collection within a synced database.
### Renaming Collections
Renaming a synced collection to a name that *is not included* in the Sync Rules has the same effect as dropping the collection.
Renaming an unsynced collection to a name that is included in the Sync Rules triggers an initial snapshot replication. The time required for this process depends on the collection size.
Circular renames (e.g., renaming `todos` → `todos_old` → `todos`) are not directly supported. To reprocess the database after such changes, a Sync Rules update must be deployed.
## MySQL (Alpha) Specifics
This section is a work in progress. More details for MySQL connections are coming soon. In the meantime, ask on our [Discord server](https://discord.gg/powersync) if you have any questions.
## See Also
* [Custom Types, Arrays and JSON](/usage/use-case-examples/custom-types-arrays-and-json)
* [Deploying Schema Changes](/usage/lifecycle-maintenance/deploying-schema-changes)
# Postgres Maintenance
Source: https://docs.powersync.com/usage/lifecycle-maintenance/postgres-maintenance
## Logical Replication Slots
Postgres logical replication slots are used to keep track of replication progress (recorded as a [LSN](https://www.postgresql.org/docs/current/datatype-pg-lsn.html)). Every time a new version of sync rules are deployed, PowerSync creates a new replication slot, then switches over and deletes the old replication slot when done.
The replication slots can be viewed using this query:
Copy
```
select slot_name, confirmed_flush_lsn, active, pg_size_pretty(pg_wal_lsn_diff(pg_current_wal_lsn(), restart_lsn)) as lag from pg_replication_slots;
```
| slot\_name | confirmed\_flush\_lsn | active | lag |
| ---------------------- | --------------------- | ------ | -------- |
| powersync\_1\_c3c8cf21 | 0/70D8240 | 1 | 56 bytes |
| powersync\_2\_e62d7e0f | 0/70D8240 | 1 | 56 bytes |
In some cases, a replication slot may remain without being used. In this case, the slot prevents Postgres from deleting older WAL entries. One such example is when a PowerSync instance has been deprovisioned.
While this is desired behavior for slot replication downtime, it could result in excessive disk usage if the slot is not used anymore.
Inactive slots can be dropped using:
```bash
select slot_name, pg_drop_replication_slot(slot_name) from pg_replication_slots where active = false;
```
Postgres prevents active slots from being dropped. If it does happen (e.g. while a PowerSync instance is disconnected), PowerSync would automatically re-create the slot, and restart replication.
### Maximum Replication Slots
Postgres is configured with a maximum number of replication slots. Since each instance uses one replication slot for replication and an additional one while deploying, the maximum number of PowerSync instances per Postgres database is equal to the maximum number of replication slots, minus 1.
If other clients are also using replication slots, this number is reduced further.
The maximum number of slots can configured by setting `max_replication_slots` (not all hosting providers expose this), and checked using `select current_setting('max_replication_slots')`.
If this number is exceeded, you'll see an error such as "all replication slots are in use".
### TLS
PowerSync supports TLS version 1.2 and 1.3. Plain-text connections are not supported on our cloud version.
The server certificates are always validated, using one of these two modes are supported:
1. `verify-full` - This verifies the certificate, and checks that the hostname matches. By default, we include CA certificates for AWS RDS, Azure and Supabase. Alternatively, CA certificates to trust can be explicitly specified (any number of certificates in PEM format).
2. `verify-ca` - This verifies the certificate, but does not check the hostname. Because of this, public certificate authorities are not supported - an explicit CA must be specified. This mode can be used with self-signed certificates.
In some cases, the "Test Connection" button in the Dashboard will automatically retrieve the certificate for `verify-ca` mode.
Once deployed, the current connections and TLS versions can be viewed using this query:
```sql
select
usename,
ssl,
version,
client_addr,
application_name,
backend_type
from
pg_stat_ssl
join pg_stat_activity on pg_stat_ssl.pid = pg_stat_activity.pid
where
ssl = true;
```
# Upgrading the Client SDK
Source: https://docs.powersync.com/usage/lifecycle-maintenance/upgrading-the-client-sdk
## Flutter
In order to upgrade to a newer version of the PowerSync package, first check the [changelog](https://pub.dev/packages/powersync/changelog) for any breaking changes.
Then, run the below command in your project folder:
```bash
flutter pub upgrade powersync
```
## React Native & Expo
Run the below command in your project folder:
```bash
npm upgrade @powersync/react-native @journeyapps/react-native-quick-sqlite
```
```bash
yarn upgrade @powersync/react-native @journeyapps/react-native-quick-sqlite
```
```bash
pnpm upgrade @powersync/react-native @journeyapps/react-native-quick-sqlite
```
## JavaScript Web
Run the below command in your project folder:
```bash
npm upgrade @powersync/web @journeyapps/wa-sqlite
```
```bash
yarn upgrade @powersync/web @journeyapps/wa-sqlite
```
```bash
pnpm upgrade @powersync/web @journeyapps/wa-sqlite
```
## Node.js (alpha)
Run the below command in your project folder:
```bash
npm upgrade @powersync/node
```
```bash
yarn upgrade @powersync/node
```
```bash
pnpm upgrade @powersync/node
```
## Kotlin Multiplatform
Update your project's Gradle file (`build.gradle.kts`) with the latest version of the [SDK](https://central.sonatype.com/artifact/com.powersync/core).
## Swift
Update the version number in `Package.swift` or via Xcode Package Dependencies as documented in the SDK's installation instructions: [Installation](/client-sdk-references/swift#installation)
# Sync Rules
Source: https://docs.powersync.com/usage/sync-rules
PowerSync Sync Rules allow developers to control which data gets synchronized to which devices (i.e. they enable *dynamic partial replication*).
## Introduction
We recommend starting with our [Sync Rules from First Principles](https://www.powersync.com/blog/sync-rules-from-first-principles-partial-replication-to-sqlite) blog post, which explains on a high-level what Sync Rules are, why they exist and how to implement them.
The remainder of these docs dive further into the details.
## Defining Sync Rules
Each [PowerSync Service](/architecture/powersync-service) instance has a Sync Rules configuration where Sync Rules are defined using SQL-like queries (limitations and more info [here](/usage/sync-rules/operators-and-functions)) combined together in a YAML file.
This SQL-like syntax is used when connecting to either Postgres, MongoDB or MySQL as the backend source database.
The [PowerSync Service](/architecture/powersync-service) uses these SQL-like queries to group data into "sync buckets" when replicating data to client devices.
Functionality includes:
* Selecting tables/collections and columns/fields to sync.
* Filtering data according to user ID.
* Filter data with static conditions.
* Filter data with custom parameters (from [the JWT](/installation/authentication-setup) or [from clients directly](/usage/sync-rules/advanced-topics/client-parameters))
* Transforming column/field values.
## Replication Into Sync Buckets
PowerSync replicates and transforms relevant data from the backend source database according to Sync Rules.
Data from this step is persisted in separate sync buckets on the PowerSync Service. Data is incrementally updated so that sync buckets always contain current state data as well as a full history of changes.
## Client Database Hydration
PowerSync asynchronously hydrates local SQLite databases embedded in the PowerSync Client SDK based on data in sync buckets.
# Advanced Topics
Source: https://docs.powersync.com/usage/sync-rules/advanced-topics
Advanced topics relating to Sync Rules.
# Client Parameters
Source: https://docs.powersync.com/usage/sync-rules/advanced-topics/client-parameters
Pass parameters from the client directly for use in Sync Rules.
Use client parameters with caution. Please make sure to read the [Security consideration](#security-consideration) section below.
Client parameters are parameters that are passed to the PowerSync Service instance from the client SDK, and can be used in Sync Rules' [parameter queries](/usage/sync-rules/parameter-queries) to further filter data.
PowerSync already supports using **token parameters** in parameter queries. An example of a token parameter is a user ID, and this is commonly used to filter synced data by the user. These parameters are embedded in the JWT [authentication token](/installation/authentication-setup/custom), and therefore can be considered trusted and can be used for access control purposes.
**Client parameters** are specified directly by the client (i.e. not through the JWT authentication token). The advantage of client parameters is that they give client-side control over what data to sync, and can therefore be used to further filter or limit synced data. A common use case is [lazy-loading](/usage/use-case-examples/infinite-scrolling#2-control-data-sync-using-client-parameters), where data is split into pages and a client parameter can be used to specify which page(s) to sync to a user, and this can update dynamically as the user paginates (or reaches the end of an infinite-scrolling feed).
### Usage
Client parameters are defined when [instantiating the PowerSync database](/installation/client-side-setup/instantiate-powersync-database), within the options of PowerSync's `connect()` method:
```js
const connector = new DemoConnector();
const powerSync = db;
function connectPowerSync() {
powerSync.connect(connector, {
params: { "current_page": } // Specify client parameters here
});
}
```
The parameter is then available in [Sync Rules](/usage/sync-rules) under `request.parameters` (alongside the already supported `request.user_id`).
In this example, only 'posts' from the user's current page are synced:
```yaml
# sync-rules.yaml
bucket_definitions:
shared_posts:
parameters: SELECT (request.parameters() ->> 'current_page') as page_number
data:
- SELECT * FROM posts WHERE page_number = bucket.page_number
```
### Security consideration
An important consideration with client parameters is that a client can pass any value, and sync data accordingly. Hence, client parameters should always be treated with care, and should not be used for access control purposes. Where permissions are required, use token parameters (`request.jwt()`) instead, or use token parameters in combination with client parameters.
The following examples show **secure** vs. **insecure** ways of using client and token parameters:
#### Secure (using a token parameter only):
```yaml
# sync-rules.yaml
bucket_definitions:
selected_projects:
# Sync projects based on org_id from the JWT
# Since these parameters are embedded in the JWT (authentication token)
# they can be considered trusted
parameters: SELECT id as project_id FROM projects WHERE org_id IN request.jwt() ->> 'app_metadata.org_id'
data:
- ...
```
#### Insecure (using a client parameter only):
```yaml
# sync-rules.yaml
bucket_definitions:
selected_projects:
# Do NOT do this: Sync projects based on a client parameter
# request.parameters() are specified by the client directly
# Because the client can send any value for these parameters
# it's not a good place to do authorization
parameters: SELECT id as project_id FROM projects WHERE id in request.parameters() ->> 'selected_projects'
data:
- ...
```
#### Secure (using a token parameter combined with a client parameter):
```yaml
# sync-rules.yaml
bucket_definitions:
selected_projects:
# Sync projects based on org_id from the JWT, and additionally sync archived projects
# only when specifically requested by the client
# The JWT is a Supabase specific example with a
# custom field set in app_metadata
parameters: SELECT id as project_id FROM projects WHERE org_id IN request.jwt() ->> 'app_metadata.org_id' AND archived = true AND request.parameters() ->> 'include_archived'
data:
- ...
```
### Warning on potentially dangerous queries
Based on the above security consideration, the [PowerSync Dashboard](/usage/tools/powersync-dashboard) will warn developers when client parameters are being used in sync rules in an insecure way (i.e. where the query does not also include a parameter from `request.jwt()`).
The below sync rules will display the warning:
> Potentially dangerous query based on parameters set by the client. The client can send any value for these parameters so it's not a good place to do authorization.
```yaml
# sync-rules.yaml
bucket_definitions:
selected_projects:
parameters: SELECT request.parameters() ->> 'project_id' as project_id
data:
- ...
```
This warning can be disabled by specifying `accept_potentially_dangerous_queries: true` in the bucket definition:
```yaml
# sync-rules.yaml
bucket_definitions:
selected_projects:
accept_potentially_dangerous_queries: true
parameters: SELECT request.parameters() ->> 'project_id' as project_id
data:
- ...
```
# Multiple Client Versions
Source: https://docs.powersync.com/usage/sync-rules/advanced-topics/multiple-client-versions
In some cases, different client versions may need different output schemas.
When schema changes are additive, old clients would just ignore the new tables and columns, and no special handling is required. However, in some cases, the schema changes may be more drastic and may need separate Sync Rules based on the client version.
To distinguish between client versions, we can pass in an additional[ client parameter](/usage/sync-rules/advanced-topics/client-parameters) from the client to the PowerSync Service instance. These parameters could be used to implement different logic based on the client version.
Example to use different table names based on the client's `schema_version`:
```yaml
# Client passes in: "params": {"schema_version": }
assets_v1:
parameters: SELECT request.user_id() AS user_id
WHERE request.parameters() ->> 'schema_version' = '1'
data:
- SELECT * FROM assets AS assets_v1 WHERE user_id = bucket.user_id
assets_v2:
parameters: SELECT request.user_id() AS user_id
WHERE request.parameters() ->> 'schema_version' = '2'
data:
- SELECT * FROM assets AS assets_v2 WHERE user_id = bucket.user_id
```
Handle queries based on parameters set by the client with care. The client can send any value for these parameters, so it's not a good place to do authorization. If the parameter must be authenticated, use parameters from the JWT instead. Read more: [Security consideration](/usage/sync-rules/advanced-topics/client-parameters#security-consideration)
# Partitioned Tables (Postgres)
Source: https://docs.powersync.com/usage/sync-rules/advanced-topics/partitioned-tables
Partitioned tables and wildcard table name matching
For partitioned tables in Postgres, each individual partition is replicated and processed using Sync Rules.
To use the same queries and same output table name for each partition, use `%` for wildcard suffix matching of the table name:
```yaml
by_user:
# Use wildcard in a parameter query
parameters: SELECT id AS user_id FROM "users_%"
data:
# Use wildcard in a data query
- SELECT * FROM "todos_%" AS todos WHERE user_id = bucket.user_id
```
The wildcard character can only be used as the last character in the table name.
When using wildcard table names, the original table suffix is available in the special `_table_suffix` column:
```sql
SELECT * FROM "todos_%" AS todos WHERE _table_suffix != 'archived'
```
When no table alias is provided, the original table name is preserved.
`publish_via_partition_root` on the publication is not supported — the individual partitions must be published.
# Sharded Databases
Source: https://docs.powersync.com/usage/sync-rules/advanced-topics/sharded-databases
Sharding is often used in backend databases to handle higher data volumes.
In the case of Postgres, PowerSync cannot replicate Postgres [foreign tables](https://www.postgresql.org/docs/current/ddl-foreign-data.html).
However, PowerSync does have options available to support sharded databases in general.
When using MongoDB or MySQL as the backend source database, PowerSync does not currently support connecting to sharded clusters.
The primary options are:
1. Use a separate PowerSync Service instance per database.
2. Add a connection for each database in the same PowerSync Service instance ([planned](https://roadmap.powersync.com/c/84-support-for-sharding-multiple-database-connections); this capability will be available in a future release).
Where feasible, using separate PowerSync Service instances would give better performance and give more control over how changes are rolled out, especially around Sync Rule reprocessing.
Some specific scenarios:
#### 1. Different tables on different databases
This is common when separate "services" use separate databases, but multiple tables across those databases need to be synchronized to the same users.
Use a single PowerSync Service instance, with a separate connection for each source database ([planned](https://roadmap.powersync.com/c/84-support-for-sharding-multiple-database-connections); this capability will be available in a future release). Use a unique [connection tag](/usage/sync-rules/schemas-and-connections) for each source database, allowing them to be distinguished in the Sync Rules.
#### 2a. All data for any single customer is contained in a single shard
This is common when sharding per customer account / organization.
In this case, use a separate PowerSync Service instance for each database.
#### 2b. Most customer data is in a single shard, but some data is in a shared database
If the amount of shared data is small, still use a separate PowerSync Service instance for each database, but also add the shared database connection to each PowerSync Service instance using a separate connection tag ([planned](https://roadmap.powersync.com/c/84-support-for-sharding-multiple-database-connections); this capability will be available in a future release).
#### 3. Only some tables are sharded
In some cases, most tables would be on a shared server, with only a few large tables being sharded.
For this case, use a single PowerSync Service instance. Add each shard as a new connection on this instance ([planned](https://roadmap.powersync.com/c/84-support-for-sharding-multiple-database-connections); this capability will be available in a future release) — all with the same connection tag, so that the same Sync Rules apply to each.
# Case Sensitivity
Source: https://docs.powersync.com/usage/sync-rules/case-sensitivity
For simplicity, we recommend using only lower case identifiers for all table/collection and column/field names used in PowerSync. If you need to use a different case, continue reading.
### Case in Sync Rules
PowerSync converts all table/collection and column/field names to lower-case by default in Sync Rule queries (this is how Postgres also behaves). To preserve the case, surround the names with double quotes, for example:
```sql
SELECT "ID" as id, "Description", "ListID" FROM "TODOs" WHERE "TODOs"."ListID" = bucket.list_id
```
When using `SELECT *`, the original case is preserved for the returned columns/fields.
### Client-Side Case
On the client side, the case of table and column names in the [client-side schema](/installation/client-side-setup/define-your-schema) must match the case produced by Sync Rules exactly. For the above example, use the following in Dart:
```dart
Table('TODOs', [
Column.text('Description'),
Column.text('ListID')
])
```
SQLite itself is case-insensitive. When querying and modifying the data on the client, any case may be used. For example, the above table may be queried using `SELECT description FROM todos WHERE listid = ?`.
Operations (`PUT`/`PATCH`/`DELETE`) are stored in the upload queue using the case as defined in the schema above for table and column names, not the case used in queries.
As another example, in this Sync Rule query:
```sql
SELECT ID, todo_description as Description FROM todo_items as TODOs
```
Each identifier in the example is unquoted and converted to lower case. That means the client-side schema would be:
```dart
Table('todos', [
Column.text('description')
])
```
# Client ID
Source: https://docs.powersync.com/usage/sync-rules/client-id
On the client, PowerSync only supports a single primary key column called `id`, of type `text`.
For tables where the client will create new rows, we recommend using a UUID for the ID. We provide a helper function `uuid()` to generate a random UUID (v4) on the client.
To use a different column/field from the server-side database as the record ID on the client, use a column/field alias in your Sync Rules:
```sql
SELECT client_id as id FROM my_data
```
MongoDB uses `_id` as the name of the ID field in collections. Therefore, PowerSync requires using `SELECT _id as id` in the data queries when [using MongoDB](/installation/database-setup) as the backend source database.
Custom transformations could also be used for the ID, for example:
```sql
-- Concatenate multiple columns into a single id column
SELECT org_id || '.' || record_id as id FROM my_data
```
PowerSync does not perform any validation that IDs are unique. Duplicate IDs on a client could occur in any of these scenarios:
1. A non-unique column is used for the ID.
2. Multiple table partitions are used (Postgres), with the same ID present in different partitions.
3. Multiple data queries returning the same record. This is typically not an issue if the queries return the same values (same transformations used in each query).
We recommend using a unique index on the fields in the source database to ensure uniqueness — this will prevent (1) at least.
If the client does sync multiple records with the same ID, only one will be present in the final database. This would typically be the one modified last, but this is subject to change — do not depend on any specific record being picked.
### Postgres: Strategies for Auto-Incrementing IDs
With auto-incrementing / sequential IDs (e.g. `sequence` type in Postgres), the issue is that the ID can only be generated on the server, and not on the client while offline. If this *must* be used, there are some options, depending on the use case.
#### Option 1: Generate ID when server receives record
If the client does not use the ID as a reference (foreign key) elsewhere, insert any unique value on the client in the `id` field, then generate a new ID when the server receives it.
#### Option 2: Pre-create records on the server
For some use cases, it could work to have the server pre-create a set of e.g. 100 draft records for each user. While offline, the client can populate these records without needing to generate new IDs. This is similar to providing an employee with a paper book of blank invoices — each with an invoice number pre-printed.
This does mean that a user has a limit on how many records can be populated while offline.
Care must be taken if a user can populate the same records from different devices while offline — ideally each device must have a unique set of pre-created records.
#### Option 3: Use an ID mapping
Use UUIDs on the client, then map them to sequential IDs when performing an update on the server. This allows using a sequential primary key for each record, with a UUID as a secondary ID.
This mapping must be performed wherever the UUIDs are referenced, including for every foreign key column.
For more information, have a look at the [Sequential ID Mapping tutorial](/tutorials/client/data/sequential-id-mapping).
# Data Queries
Source: https://docs.powersync.com/usage/sync-rules/data-queries
Data queries select the data that form part of a bucket, using the bucket parameters.
Multiple data queries can be specified for a single bucket definition.
**Data queries are used to group data into buckets, so each data query must use every bucket parameter.**
## Examples
#### Grouping by list\_id
```yaml
bucket_definitions:
owned_lists:
parameters: |
SELECT id as list_id FROM lists WHERE
owner_id = request.user_id()
data:
- SELECT * FROM lists WHERE lists.id = bucket.list_id
- SELECT * FROM todos WHERE todos.list_id = bucket.list_id
```
#### Selecting output columns/fields
When specific columns/fields are selected, only those columns/fields are synced to the client.
This is good practice, to ensure the synced data does not unintentionally change when new columns are added to the schema (in the case of Postgres) or to the data structure (in the case of MongoDB).
Note: An `id` column must always be present, and must have a `text` type. If the primary key is different, use a column alias and/or transformations to output a `text` id column.
```yaml
bucket_definitions:
global:
data:
- SELECT id, name, owner_id FROM lists
```
MongoDB uses `_id` as the name of the ID field in collections. Therefore, PowerSync requires using `SELECT _id as id` in the data queries when [using MongoDB](/installation/database-setup) as the backend source database.
#### Renaming columns/fields
Different names (aliases) may be specified for columns/fields:
```yaml
bucket_definitions:
global:
data:
- SELECT id, name, created_timestamp AS created_at FROM lists
```
#### Transforming columns/fields
A limited set of operators and functions are available to transform the output value of columns/fields.
```yaml
bucket_definitions:
global:
data:
# Cast number to text
- SELECT id, item_number :: text AS item_number FROM todos
# Alternative syntax for the same cast
- SELECT id, CAST(item_number as TEXT) AS item_number FROM todos
# Convert binary data (bytea) to base64
- SELECT id, base64(thumbnail) AS thumbnail_base64 FROM todos
# Extract field from JSON or JSONB column
- SELECT id, metadata_json ->> 'description' AS description FROM todos
# Convert time to epoch number
- SELECT id, unixepoch(created_at) AS created_at FROM todos
```
# Global Data
Source: https://docs.powersync.com/usage/sync-rules/example-global-data
The simplest Sync Rules are for "global" data — synced to all users.
For example, the following Sync Rules sync all `todos` and only unarchived `lists` to all users:
```yaml
bucket_definitions:
global_bucket:
data:
# Sync all todos
- SELECT * FROM todos
# Sync all lists except archived ones
- SELECT * FROM lists WHERE archived = false
```
**Note**: Table names within Sync Rules must match the names defined in the [client-side schema](/installation/client-side-setup/define-your-schema).
# Glossary
Source: https://docs.powersync.com/usage/sync-rules/glossary
A group of rows/documents, from one or more tables/collections.
### Bucket / Bucket instance
Each bucket can be synced by any number of users, as a whole. The [PowerSync protocol](/architecture/powersync-protocol) does not support syncing partial buckets (filtering inside buckets).
Each bucket is defined by its bucket definition name and set of parameter values. Together this forms its ID, for example `by_user["user1","admin"]`.
### Bucket Definition
This is the "[Sync Rule](/usage/sync-rules)" that describes buckets. Specifies the name, parameter query(ies), and data queries.
Each bucket definition describes a set of buckets using SQL-like queries.
### Bucket Parameters
This is the set of parameters that uniquely identifies an individual bucket within a bucket definition. Together with the bucket name, this forms the bucket ID.
The bucket parameters are defined using one or more SQL-like queries in a bucket definition. These queries can return values directly from the user's authentication token (token parameters), and/or select values from a table/collection.
### Token Parameters
This is a set of parameters specified in the user's [authentication token](/installation/authentication-setup) (JWT). This always includes the token subject (the `user_id`), but may include additional and custom parameters.
Token parameters are used to identify the user, and specify permissions for the user.
These parameters are signed as part of the JWT generated [on your app backend](/installation/client-side-setup/integrating-with-your-backend).
### Client Parameters
In addition to token parameters, the client may add parameters to the sync request.
A client can pass any value, and sync data accordingly. Hence, client parameters should always be treated with care, and should not be used for access control purposes.
However, client parameters can be used to filter data for use cases such as:
1. Syncing different buckets based on the client version ([example](/usage/sync-rules/advanced-topics/multiple-client-versions)).
2. Syncing different buckets based on state in the client app, for example only synchronizing data for the customer currently selected.
Learn more here: [Client Parameters](/usage/sync-rules/advanced-topics/client-parameters)
### Global Buckets
Global buckets are buckets with no parameters.
If no parameter query is specified, the bucket is automatically a global bucket.
Parameter queries may still be used to filter buckets for an user, as long as it does not contain any output columns/fields.
# Guide: Many-to-Many and Join Tables
Source: https://docs.powersync.com/usage/sync-rules/guide-many-to-many-and-join-tables
Join tables are often used to implement many-to-many relationships between tables. Join queries are not directly supported in PowerSync Sync Rules, and require some workarounds depending on the use case. This guide contains some recommended strategies.
## Example
As an example, consider a social media application. The app has message boards. Each user can subscribe to boards, make posts, and comment on posts. Posts may also have one or more topics.
```sql
create table users (
id uuid not null default gen_random_uuid (),
name text not null,
last_activity timestamp with time zone,
constraint users_pkey primary key (id)
);
create table boards (
id uuid not null default gen_random_uuid (),
name text not null,
constraint boards_pkey primary key (id)
);
create table posts (
id uuid not null default gen_random_uuid (),
board_id uuid not null,
created_at timestamp with time zone not null default now(),
author_id uuid not null,
title text not null,
body text not null,
constraint posts_pkey primary key (id),
constraint posts_author_id_fkey foreign key (author_id) references users (id),
constraint posts_board_id_fkey foreign key (board_id) references boards (id)
);
create table comments (
id uuid not null default gen_random_uuid (),
post_id uuid not null,
created_at timestamp with time zone not null default now(),
author_id uuid not null,
body text not null,
constraint comments_pkey primary key (id),
constraint comments_author_id_fkey foreign key (author_id) references users (id),
constraint comments_post_id_fkey foreign key (post_id) references posts (id)
);
create table board_subscriptions (
id uuid not null default gen_random_uuid (),
user_id uuid not null,
board_id uuid not null,
constraint board_subscriptions_pkey primary key (id),
constraint board_subscriptions_board_id_fkey foreign key (board_id) references boards (id),
constraint board_subscriptions_user_id_fkey foreign key (user_id) references users (id)
);
create table topics (
id uuid not null default gen_random_uuid (),
label text not null
);
create table post_topics (
id uuid not null default gen_random_uuid (),
board_id uuid not null,
post_id uuid not null,
topic_id uuid not null,
constraint post_topics_pkey primary key (id),
constraint post_topics_board_id_fkey foreign key (board_id) references boards (id),
constraint post_topics_post_id_fkey foreign key (post_id) references posts (id),
constraint post_topics_topic_id_fkey foreign key (topic_id) references topics (id)
);
```
### Many-to-many: Bucket parameters
For this app, we generally want to sync all posts in boards that users have subscribed to. To simplify these examples, we assume a user has to be subscribed to a board to post.
Boards make a nice grouping of data for Sync Rules: We sync the boards that a user has subscribed to, and the same board data is synced to all users subscribed to that board.
The relationship between users and boards is a many-to-many, specified via the `board_subscriptions` table.
To start with, in our PowerSync Sync Rules, we define a [bucket](/usage/sync-rules/organize-data-into-buckets) and sync the posts. The [parameter query](/usage/sync-rules/parameter-queries) is defined using the `board_subscriptions` table:
```yaml
board_data:
parameters: select board_id from board_subscriptions where user_id = request.user_id()
data:
- select * from posts where board_id = bucket.board_id
```
### Avoiding joins in data queries: Denormalize relationships (comments)
Next, we also want to sync comments for those boards. There is a one-to-many relationship between boards and comments, via the `posts` table. This means conceptually we can add comments to the same board bucket. With general SQL, the query could be:
```sql
SELECT comments.* FROM comments
JOIN posts ON posts.id = comments.post_id
WHERE board_id = bucket.board_id
```
Unfortunately, joins are not supported in PowerSync's Sync Rules. Instead, we denormalize the data to add a direct foreign key relationship between comments and boards: (Postgres example)
```sql
ALTER TABLE comments ADD COLUMN board_id uuid;
ALTER TABLE comments ADD CONSTRAINT comments_board_id_fkey FOREIGN KEY (board_id) REFERENCES boards (id);
```
Now we can add it to the bucket definition in our Sync Rules:
```yaml
board_data:
parameters: select board_id from board_subscriptions where user_id = request.user_id()
data:
- select * from posts where board_id = bucket.board_id
# Add comments:
- select * from comments where board_id = bucket.board_id
```
Now we want to sync topics of posts. In this case we added `board_id` from the start, so `post_topics` is simple in our Sync Rules:
```yaml
board_data:
parameters: select board_id from board_subscriptions where user_id = request.user_id()
data:
- select * from posts where board_id = bucket.board_id
- select * from comments where board_id = bucket.board_id
# Add post_topics:
- select * from post_topics where board_id = bucket.board_id
```
### Many-to-many strategy: Sync everything (topics)
Now we need access to sync the topics for all posts synced to the device. There is a many-to-many relationship between posts and topics, and by extension boards to topics. This means there is no simple direct way to partition topics into buckets — the same topics be used on any number of boards.
If the topics table is limited in size (say 1,000 or less), the simplest solution is to just sync all topics in our Sync Rules:
```yaml
global_topics:
data:
- select * from topics where board_id = bucket.board_id
```
### Many-to-many strategy: Denormalize data (topics, user names)
If there are many thousands of topics, we may want to avoid syncing everything. One option is to denormalize the data by copying the topic label over to `post_topics`: (Postgres example)
```sql
ALTER TABLE post_topics ADD COLUMN topic_label text not null;
```
Now we don't need to sync the `topics` table itself, as everything is included in `post_topics`. Assuming the topic label never or rarely changes, this could be a good solution.
Next up, we want to sync the relevant user profiles, so we can show it together with comments and posts. For simplicity, we sync profiles for all users subscribed to a board.
One option is to add the author name to each board subscription, similar to what we've done for `topics`: (Postgres example)
```sql
ALTER TABLE board_subscriptions ADD COLUMN user_name text;
```
Sync Rules:
```yaml
board_data:
parameters: select board_id from board_subscriptions where user_id = request.user_id()
data:
- select * from posts where board_id = bucket.board_id
- select * from comments where board_id = bucket.board_id
- select * from post_topics where board_id = bucket.board_id
# Add subscriptions which include the names:
- select * from board_subscriptions where board_id = bucket.board_id
```
### Many-to-many strategy: Array of IDs (user profiles)
If we need to sync more than just the name (let's say we need a last activity date, profile picture and bio text as well), the above approach doesn't scale as well. Instead, we want to sync the `users` table directly. To sync user profiles directly in the bucket for the board, we need a new array.
Adding an array to the schema in Postgres:
```sql
ALTER TABLE users ADD COLUMN subscribed_board_ids uuid[];
```
By using an array instead of or in addition to a join table, we can use it directly in Sync Rules:
```yaml
board_data:
parameters: select board_id from board_subscriptions where user_id = request.user_id()
data:
- select * from posts where board_id = bucket.board_id
- select * from comments where board_id = bucket.board_id
- select * from post_topics where board_id = bucket.board_id
# Add participating users:
- select name, last_activity, profile_picture, bio from users where bucket.board_id in subscribed_board_ids
```
This approach does require some extra effort to keep the array up to date. One option is to use a trigger in the case of Postgres:
```sql
CREATE OR REPLACE FUNCTION recalculate_subscribed_boards()
RETURNS TRIGGER AS $$
BEGIN
-- Recalculate subscribed_board_ids for the affected user
UPDATE users
SET subscribed_board_ids = (
SELECT array_agg(board_id)
FROM board_subscriptions
WHERE user_id = COALESCE(NEW.user_id, OLD.user_id)
)
WHERE id = COALESCE(NEW.user_id, OLD.user_id);
RETURN NULL;
END;
$$ LANGUAGE plpgsql;
CREATE TRIGGER trg_board_subscriptions_change
AFTER INSERT OR UPDATE OR DELETE ON board_subscriptions
FOR EACH ROW
EXECUTE FUNCTION recalculate_subscribed_boards();
```
Note that this approach does have scaling limitations. When the number of board subscriptions per user becomes large (say over 100 rows per user), then:
1. Updating the `subscribed_board_ids` array in Postgres becomes slower.
2. The overhead is even more pronounced on PowerSync, since PowerSync maintains a separate copy of the data in each bucket.
In those cases, another approach may be more suitable.
# Operators and Functions
Source: https://docs.powersync.com/usage/sync-rules/operators-and-functions
Operators and functions can be used to transform columns/fields before being synced to a client.
When filtering on parameters (token or [client parameters](/usage/sync-rules/advanced-topics/client-parameters) in the case of [parameter queries](/usage/sync-rules/parameter-queries), and bucket parameters in the case of [data queries](/usage/sync-rules/data-queries)), operators can only be used in a limited way. Typically only `=` , `IN` and `IS NULL` are allowed on the parameters, and special limits apply when combining clauses with `AND`, `OR` or `NOT`.
When transforming output columns/fields, or filtering on row/document values, those restrictions do not apply.
If a specific operator or function is needed, please [contact us](/resources/contact-us) so that we can consider inclusion in our roadmap.
Some fundamental restrictions on these operators and functions are:
1. It must be deterministic — no random or time-based functions.
2. No external state can be used.
3. It must operate on data available within a single row/document. For example, no aggregation functions allowed.
### Operators
| Operator | Notes |
| --------------------------------------------------- | ----------------------------------------------------------------------------------------------------------------------------------------------------------------------------------------------------------------------------------------------------------------------------------------------------------------- |
| Comparison: `= != < > <= >=` | If either parameter is null, this evaluates to null. |
| Null: `IS NULL`, `IS NOT NULL` | |
| Mathematical: `+ - * /` | |
| Logical: `AND`, `OR`, `NOT` | |
| Cast: `CAST(x AS type)` `x :: type` | Cast to text, numeric, integer, real or blob. |
| JSON: `json -> 'path'` `json ->> 'path'` | `->` Returns the value as a JSON string. `->>` Returns the extracted value. |
| Text concatenation: `\|\|` | Joins two text values together. |
| Arrays: ` IN ` | Returns true if the `left` value is present in the `right` JSON array. In data queries, only the `left` value may be a bucket parameter. In parameter queries, the `left` or `right` value may be a bucket parameter. Differs from the SQLite operator in that it can be used directly on a JSON array. |
### Functions
| Function | Description |
| ------------------------------------------------------------------------------ | ------------------------------------------------------------------------------------------------------------------------------------------------------------------------------------------------------------------------------------------------------------------------------------------------------------------------------------------------------------------------------------------------ |
| [upper(text)](https://www.sqlite.org/lang_corefunc.html#upper) | Convert text to upper case. |
| [lower(text)](https://www.sqlite.org/lang_corefunc.html#lower) | Convert text to lower case. |
| [substring(text, start, length)](https://sqlite.org/lang_corefunc.html#substr) | Extracts a portion of a string based on specified start index and length. Start index is 1-based. Example: `substring(created_at, 1, 10)` returns the date portion of the timestamp. |
| [hex(data)](https://www.sqlite.org/lang_corefunc.html#hex) | Convert blob or text data to hexadecimal text. |
| base64(data) | Convert blob or text data to base64 text. |
| [length(data)](https://www.sqlite.org/lang_corefunc.html#length) | For text, return the number of characters. For blob, return the number of bytes. For null, return null. For integer and real, convert to text and return the number of characters. |
| [typeof(data)](https://www.sqlite.org/lang_corefunc.html#typeof) | text, integer, real, blob or null |
| [json\_each(data)](https://www.sqlite.org/json1.html#jeach) | Expands a JSON array or object from a request or token parameter into a set of parameter rows. Example: `SELECT value as project_id FROM json_each(request.jwt() -> 'project_ids'` |
| [json\_extract(data, path)](https://www.sqlite.org/json1.html#jex) | Same as `->>` operator, but the path must start with `$.` |
| [json\_array\_length(data)](https://www.sqlite.org/json1.html#jarraylen) | Given a JSON array (as text), returns the length of the array. If data is null, returns null. If the value is not a JSON array, returns 0. |
| [json\_valid(data)](https://www.sqlite.org/json1.html#jvalid) | Returns 1 if the data can be parsed as JSON, 0 otherwise. |
| json\_keys(data) | Returns the set of keys of a JSON object as a JSON array. Example: `select * from items where bucket.user_id in json_keys(permissions_json)` |
| [ifnull(x,y)](https://www.sqlite.org/lang_corefunc.html#ifnull) | Returns x if non-null, otherwise returns y. |
| [iif(x,y,z)](https://www.sqlite.org/lang_corefunc.html#iif) | Returns y if x is true, otherwise returns z. |
| [uuid\_blob(id)](https://sqlite.org/src/file/ext/misc/uuid.c) | Convert a UUID string to bytes. |
| [unixepoch(datetime, \[modifier\])](https://www.sqlite.org/lang_datefunc.html) | Returns a datetime as Unix timestamp. If modifier is "subsec", the result is a floating point number, with milliseconds including in the fraction. The datetime argument is required - this function cannot be used to get the current time. |
| [datetime(datetime, \[modifier\])](https://www.sqlite.org/lang_datefunc.html) | Returns a datetime as a datetime string, in the format YYYY-MM-DD HH:MM:SS. If the specifier is "subsec", milliseconds are also included. If the modifier is "unixepoch", the argument is interpreted as a unix timestamp. Both modifiers can be included: datetime(timestamp, 'unixepoch', 'subsec'). The datetime argument is required - this function cannot be used to get the current time. |
| [ST\_AsGeoJSON(geometry)](https://postgis.net/docs/ST_AsGeoJSON.html) | Convert [PostGIS](https://postgis.net/) (in Postgres) geometry from WKB to GeoJSON. Combine with JSON operators to extract specific fields. |
| [ST\_AsText(geometry)](https://postgis.net/docs/ST_AsText.html) | Convert [PostGIS](https://postgis.net/) (in Postgres) geometry from WKB to Well-Known Text (WKT). |
| [ST\_X(point)](https://postgis.net/docs/ST_X.html) | Get the X coordinate of a [PostGIS](https://postgis.net/) point (in Postgres) |
| [ST\_Y(point)](https://postgis.net/docs/ST_Y.html) | Get the Y coordinate of a [PostGIS](https://postgis.net/) point (in Postgres) |
Most of these functions are based on the [built-in SQLite functions](https://www.sqlite.org/lang_corefunc.html) and [SQLite JSON functions](https://www.sqlite.org/json1.html).
# Organize Data Into Buckets
Source: https://docs.powersync.com/usage/sync-rules/organize-data-into-buckets
To sync different sets of data to each user, data is organized into buckets.
Each user can sync a number of buckets (up to 1,000), and each bucket defines a set of tables/collections and rows/documents to sync.
This is defined using two queries:
1. Select bucket parameters from a user ID and/or other parameters ([parameter queries](/usage/sync-rules/parameter-queries))
2. Select data in the bucket using the bucket parameters ([data queries](/usage/sync-rules/data-queries))
When designing your buckets, it is recommended, but not required, to group all data in a bucket where the same parameters apply.
An example:
```yaml
bucket_definitions:
user_lists:
# Optionally define the priority of the bucket to sync certain buckets before others
priority: 1 # See https://docs.powersync.com/usage/use-case-examples/prioritized-sync
# Select parameters for the bucket, using the current user_id
parameters: SELECT request.user_id() as user_id # (request.user_id() comes from the JWT token)
data:
# Select data rows/documents using the parameters above
- SELECT * FROM lists WHERE owner_id = bucket.user_id
```
**Note**:
* Table names within Sync Rules must match the names defined in the [client-side schema](/installation/client-side-setup/define-your-schema).
# Parameter Queries
Source: https://docs.powersync.com/usage/sync-rules/parameter-queries
Parameter queries allow parameters to be defined on a bucket to group data. These queries can use parameters from the JWT (we loosely refer to these as token parameters), such as a `user_id`, or [parameters from clients](/usage/sync-rules/advanced-topics/client-parameters) directly.
```yaml
bucket_definitions:
# Bucket Name
user_lists:
# Parameter Query
parameters: SELECT request.user_id() as user_id
# Data Query
data:
- SELECT * FROM lists WHERE lists.owner_id = bucket.user_id
user_lists_table:
# Similar query, but using a table
# Access can instantly be revoked by deleting the user row/document
parameters: SELECT id as user_id FROM users WHERE users.id = request.user_id()
data:
- SELECT * FROM lists WHERE lists.user_id = bucket.user_id
```
Available functions in sync rules are:
1. `request.user_id()`: Returns the JWT subject, same as `request.jwt() ->> 'sub'`
2. `request.jwt()`: Returns the entire (signed) JWT payload as a JSON string.
3. `request.parameters()`: Returns [client parameters](/usage/sync-rules/advanced-topics/client-parameters) as a JSON string.
Example usage:
```sql
request.user_id()
request.jwt() ->> 'sub' -- Same as `request.user_id()
request.parameters() ->> 'param' -- Client parameters
-- Some Supabase-specific examples below. These can be used with standard Supabase tokens,
-- for use cases which previously required custom tokens
request.jwt() ->> 'role' -- 'authenticated' or 'anonymous'
request.jwt() ->> 'email' -- automatic email field
request.jwt() ->> 'app_metadata.custom_field' -- custom field added by a service account (authenticated)
```
A previous syntax for parameter queries used `token_parameters`. Expand the below for details on how to migrate to the recommended syntax above.
The previous syntax for parameter queries used `token_parameters.user_id` to return the JWT subject. Example:
```yaml
bucket_definitions:
by_user_parameter:
parameters: SELECT token_parameters.user_id as user_id
data:
- SELECT * FROM lists WHERE lists.owner_id = bucket.user_id
```
### Migrate to Recommended Syntax
The new functions available in sync rules are:
1. `request.jwt()`: Returns the entire (signed) JWT payload as a JSON string.
2. `request.parameters()`: Returns [client parameters](/usage/sync-rules/advanced-topics/client-parameters) as a JSON string.
3. `request.user_id()`: Returns the token subject, same as `request.jwt() ->> 'sub'` and also the same as `token_parameters.user_id` in the previous syntax.
The major difference from the previous `token_parameters` is that all payloads are preserved as-is, which can make usage a little more intuitive. This also includes JWT payload fields that were not previously accessible.
Migrating to the new syntax:
1. `token_parameters.user_id` references can simply be updated to `request.user_id()`
2. Custom parameters can be updated from `token_parameters.my_custom_field` to `request.jwt() ->> 'parameters.my_custom_field'`
1. This example applies if you keep your existing custom JWT as is.
2. Supabase users can now make use of [Supabase's standard JWT structure](https://supabase.com/docs/guides/auth/jwts#jwts-in-supabase) and reference `app_metadata.my_custom_field` directly.
Example:
```yaml
bucket_definitions:
by_user_parameter:
# request.user_id() is the same as the previous token_parameter.user_id
parameters: SELECT request.user_id() as user_id
data:
- SELECT * FROM lists WHERE lists.owner_id = bucket.user_id
```
#### Filter on additional columns
```yaml
bucket_definitions:
admin_users:
parameters: |
SELECT id as user_id FROM users WHERE
users.id = request.user_id() AND
users.is_admin = true
data:
- SELECT * FROM lists WHERE lists.owner_id = bucket.user_id
```
#### Group according to different columns
```yaml
bucket_definitions:
primary_list:
parameters: |
SELECT primary_list_id FROM users WHERE
users.id = request.user_id()
data:
- SELECT * FROM todos WHERE todos.list_id = bucket.primary_list_id
```
#### Using different tables for parameters
```yaml
bucket_definitions:
owned_lists:
parameters: |
SELECT id as list_id FROM lists WHERE
owner_id = request.user_id()
data:
- SELECT * FROM lists WHERE lists.id = bucket.list_id
- SELECT * FROM todos WHERE todos.list_id = bucket.list_id
```
#### Using a join table
In this example, a single query can return multiple sets of bucket parameters for a single user.
Keep in mind that the total number of buckets per user should remain limited (\< 1,000), so don't make buckets too granular.
```yaml
bucket_definitions:
user_lists:
parameters: |
SELECT list_id FROM user_lists WHERE
user_lists.user_id = request.user_id()
data:
- SELECT * FROM lists WHERE lists.id = bucket.list_id
- SELECT * FROM todos WHERE todos.list_id = bucket.list_id
```
#### Multiple bucket parameters
Parameter queries may return multiple bucket parameters.
**Note that every bucket parameter must be used in every data query.**
```yaml
bucket_definitions:
owned_org_lists:
parameters: |
SELECT id as list_id, org_id FROM lists WHERE
owner_id = request.user_id()
data:
- SELECT * FROM lists WHERE lists.id = bucket.list_id and lists.org_id = bucket.org_id
- SELECT * FROM todos WHERE todos.list_id = bucket.list_id and todos.org_id = bucket.org_id
```
#### Using multiple parameter queries
Multiple parameter queries can be used in the same bucket definition.
It is important in this case that the output columns are exactly the same for each query in the bucket definition, as these define the bucket parameters.
```yaml
bucket_definitions:
user_lists:
parameters:
- SELECT id as list_id FROM lists WHERE owner_id = request.user_id()
- SELECT list_id FROM user_lists WHERE user_lists.user_id = request.user_id()
data:
- SELECT * FROM lists WHERE lists.id = bucket.list_id
- SELECT * FROM todos WHERE todos.list_id = bucket.list_id
```
Keep in mind that the total number of buckets per user should remain limited (\< 1,000), so don't make buckets too granular.
#### Pass parameters from clients
It is possible to pass parameters from clients directly. See [client parameters](/usage/sync-rules/advanced-topics/client-parameters) to learn more.
#### Global buckets
Global buckets are buckets with no bucket parameters. This means there is a single bucket for the bucket definition.
When no parameter query is specified, it is automatically a global bucket.
Alternatively, a parameter query with no output columns may be specified to only sync the bucket to a subset of users.
```yaml
bucket_definitions:
global_admins:
parameters: |
SELECT FROM users WHERE
users.id = request.user_id() AND
users.is_admin = true
data:
- SELECT * FROM admin_settings
```
## Restrictions
Parameter queries are not run directly on a database. Instead, the queries are used to pre-process rows/documents as they are replicated, and index them for efficient use in the sync process.
The supported SQL is based on a small subset of the SQL standard syntax.
Notable features and restrictions:
1. Only simple `SELECT` statements are supported.
2. No `JOIN`, `GROUP BY` or other aggregation, `ORDER BY`, `LIMIT`, or subqueries are supported.
3. For token parameters, only `=` operators are supported, and `IN` to a limited extent.
4. A limited set of operators and functions are supported — see [Operators and Functions](/usage/sync-rules/operators-and-functions).
# Schemas and Connections
Source: https://docs.powersync.com/usage/sync-rules/schemas-and-connections
## Schemas (Postgres)
When no schema is specified, the Postgres `public` schema is used for every query. A different schema can be specified as a prefix:
```sql
-- Note: the schema must be in double quotes
SELECT * FROM "other"."assets"
```
## High Availability / Replicated Databases (Postgres)
When the source Postgres database is replicated, for example with Amazon RDS Multi-AZ deployments, specify a single connection with multiple host endpoints. Each host endpoint will be tried in sequence, with the first available primary connection being used.
For this, each endpoint must point to the same physical database, with the same replication slots. This is the case when block-level replication is used between the databases, but not when streaming physical or logical replication is used. In those cases, replication slots are unique on each host, and all data would be re-synced in a fail-over event.
## Multiple Separate Database Connections (Planned)
This feature will be available in a future release. See this [item on our roadmap](https://roadmap.powersync.com/c/84-support-for-sharding-multiple-database-connections).
In the future, it will be possible to configure PowerSync with multiple separate backend database connections, where each connection is concurrently replicated.
You should not add multiple connections to multiple replicas of the same database — this would cause data duplication. Only use this when the data on each connection does not overlap.
It will be possible for each connection to be configured with a "tag", to distinguish these connections in Sync Rules. The same tag may be used for multiple connections (if the schema is the same in each).
By default, queries will reference the "default" tag. To use a different connection or connections, assign a different tag, and specify it in the query as a schema prefix. In this case, the schema itself must also be specified.
```sql
-- Note the usage of quotes here
SELECT * FROM "secondconnection.public"."assets"
```
# Types
Source: https://docs.powersync.com/usage/sync-rules/types
PowerSync's Sync Rules use the [SQLite type system](https://www.sqlite.org/datatype3.html).
The supported client-side SQLite types are:
1. `null`
2. `integer`: a 64-bit signed integer
3. `real`: a 64-bit floating point number
4. `text`: An UTF-8 text string
5. `blob`: Binary data
## Postgres Type Mapping
Binary data in Postgres can be accessed in Sync Rules, but cannot be synced directly to clients (it needs to be converted to hex or base64 first — see below), and cannot be used as bucket parameters.
Postgres values are mapped according to this table:
| Postgres Data Type | PowerSync / SQLite Column Type | Notes |
| ------------------ | ------------------------------ | --------------------------------------------------------------------------------------------------------------------------------------------------------------------------------------------------------------------------------------- |
| text, varchar | text | |
| int2, int4, int8 | integer | |
| numeric / decimal | text | These types have arbitrary precision in Postgres, so can only be represented accurately as text in SQLite |
| bool | integer | 1 for true, 0 for false |
| float4, float8 | real | |
| enum | text | |
| uuid | text | |
| timestamptz | text | Format: `YYYY-MM-DD hh:mm:ss.sssZ`. This is compatible with ISO8601 and SQLite's functions. Precision matches the precision used in Postgres. `-infinity` becomes `0000-01-01 00:00:00Z` and `infinity` becomes `9999-12-31 23:59:59Z`. |
| timestamp | text | Format: `YYYY-MM-DD hh:mm:ss.sss`. In most cases, timestamptz should be used instead. `-infinity` becomes `0000-01-01 00:00:00` and `infinity` becomes `9999-12-31 23:59:59`. |
| date, time | text | |
| json, jsonb | text | There is no dedicated JSON type — JSON functions operate directly on text values. |
| interval | text | |
| macaddr | text | |
| inet | text | |
| bytea | blob | Cannot sync directly to client — convert to hex or base64 first. See [Operators & Functions](/usage/sync-rules/operators-and-functions). |
| geometry (PostGIS) | text | hex string of the binary data Use the [ST functions](/usage/sync-rules/operators-and-functions#functions) to convert to other formats |
There is no dedicated boolean data type. Boolean values are represented as `1` (true) or `0` (false).
`json` and `jsonb` values are treated as `text` values in their serialized representation. JSON functions and operators operate directly on these `text` values.
## MongoDB Type Mapping
| BSON Type | PowerSync / SQLite Column Type | Notes |
| ------------------ | ------------------------------ | ---------------------------------------------------------------------------------------------------------------------------------------- |
| String | text | |
| Int, Long | integer | |
| Double | real | |
| Decimal128 | text | |
| Object | text | Converted to a JSON string |
| Array | text | Converted to a JSON string |
| ObjectId | text | Lower-case hex string |
| UUID | text | Lower-case hex string |
| Boolean | integer | 1 for true, 0 for false |
| Date | text | Format: `YYYY-MM-DD hh:mm:ss.sss` |
| Null | null | |
| Binary | blob | Cannot sync directly to client — convert to hex or base64 first. See [Operators & Functions](/usage/sync-rules/operators-and-functions). |
| Regular Expression | text | JSON text in the format `{"pattern":"...","options":"..."}` |
| Timestamp | integer | Converted to a 64-bit integer |
| Undefined | null | |
| DBPointer | text | JSON text in the format `{"collection":"...","oid":"...","db":"...","fields":...}` |
| JavaScript | text | JSON text in the format `{"code": "...", "scope": ...}` |
| Symbol | text | |
| MinKey, MaxKey | null | |
* Data is converted to a flat list of columns, one column per top-level field in the MongoDB document.
* Special BSON types are converted to plain SQLite alternatives.
* For example, `ObjectId`, `Date`, `UUID` are all converted to a plain `TEXT` column.
* Nested objects and arrays are converted to JSON arrays, and JSON operators can be used to query them (in the Sync Rules and/or on the client-side).
* Binary data nested in objects or arrays is not supported.
## MySQL (Alpha) Type Mapping
This section is a work in progress. More details for MySQL connections are coming soon. In the meantime, ask on our [Discord server](https://discord.gg/powersync) if you have any questions.
# Tools
Source: https://docs.powersync.com/usage/tools
# CLI (Beta)
Source: https://docs.powersync.com/usage/tools/cli
Manage your PowerSync Cloud environment programmatically
You can use the [PowerSync CLI](https://www.npmjs.com/package/powersync) to manage your PowerSync Cloud instances from your machine. Specifically, you can:
* Manage your [PowerSync instances ](/architecture/powersync-service)(PowerSync Cloud)
* Validate and deploy [sync rules](/usage/sync-rules) to an instance from a local file
* Generate the [client-side schema](/installation/client-side-setup/define-your-schema)
The PowerSync CLI is not yet compatible with managing [self-hosted](/self-hosting/getting-started) PowerSync instances (PowerSync Open Edition and PowerSync Enterprise Self-Hosted Edition). This is on our roadmap.
### Getting started
To begin, initialize the CLI via `npx`:
```bash
npx powersync init
```
### Personal Access Token
```bash
npx powersync init
? Enter your API token: [hidden]
```
You need to provide an access (API) token to initialize the CLI. These can be created in the [Dashboard](/usage/tools/powersync-dashboard), using the **Create Personal Access Token** action (search for it using the [command palette](/usage/tools/powersync-dashboard#the-command-palette)).
Use the **Revoke Personal Access Token** action to revoke access.
### Usage
For more information on the available commands, please refer to:
npm
### Known issues and limitations
* When deploying sync rules from the CLI, the `sync-rules.yaml` file shown in the [PowerSync Dashboard](/usage/tools/powersync-dashboard) could be out of date. You can run the **Compare deployed sync rules** [action](/usage/tools/powersync-dashboard#actions) in the Dashboard to review the latest deployed sync rules.
* Certificates cannot currently be managed from the CLI.
* The PowerSync CLI is not yet compatible with managing [self-hosted](/self-hosting/getting-started) PowerSync instances (PowerSync Open Edition and PowerSync Enterprise Self-Hosted Edition). This is on our roadmap.
# CloudCode (for MongoDB Backend Functionality)
Source: https://docs.powersync.com/usage/tools/cloudcode
As of January 2025, we've started adding optional backend functionality for PowerSync that handles writing to a backend database (with initial support for MongoDB) and generating JWTs.
This makes PowerSync easier to implement for developers who prefer not having to maintain their own backend code and infrastructure (PowerSync's [usual architecture](/installation/app-backend-setup) is to use your own backend to process writes and generate JWTs).
We are approaching this in phases, and phase 1 allows using the CloudCode feature of JourneyApps Platform, a [sibling product](https://www.powersync.com/company) of PowerSync. [CloudCode](https://docs.journeyapps.com/reference/cloudcode/cloudcode-overview) is a serverless cloud functions engine based on Node.js and AWS Lambda. It's provided as a fully-managed service running on the same cloud infrastructure as the rest of PowerSync Cloud. PowerSync and JourneyApps Platform share the same login system, so you don’t need to create a separate account to use CloudCode.
We are currently making JourneyApps Platform CloudCode available for free to all our customers who use PowerSync with MongoDB. It does require a bit of "white glove" onboarding from our team. [Contact us](/resources/contact-us) if you want to use this functionality.
Phase 2 on our roadmap involves fully integrating CloudCode into the PowerSync Cloud environment. For more details, see [this post on our blog](https://www.powersync.com/blog/turnkey-backend-functionality-conflict-resolution-for-powersync).
# Using CloudCode in JourneyApps Platform for MongoDB Backend Functionality
There is a MongoDB template available in CloudCode that provides the backend functionality needed for a PowerSync MongoDB implementation. Here is how to use it:
## Create a new JourneyApps Platform project
To create a new JourneyApps Platform project in order to use CloudCode:
Navigate to the [JourneyApps Admin Portal](https://accounts.journeyapps.com/portal/admin). You should see a list of your projects if you've created any.
Select **Create Project** at the top right of the screen.
Select **JourneyApps Platform Project** and click **Next**.
Enter a project name and click **Next**.
There are options available for managing version control for the project. For simplicity we recommend selecting **Basic (Revisions)** and **JourneyApps** as the Git provider.
Select **TypeScript** as your template language, and `MongoDB CRUD & Auth Backend` as your template. Then click **Create App**.
## Overview of the CloudCode tasks created from the template
To view the CloudCode tasks that were created in the new project using this template, select **CloudCode** at the top of the IDE:
Here you will find four CloudCode tasks:
Here's the purpose of each task:
1. `generate_keys` - This is a task that can be used to generate a private/public key pair which the `jwks` and `token` tasks (see below) require.
The `generate_keys` task does not expose an HTTP endpoint and should only be used for development and getting started.
2. `jwks` - This task [exposes an HTTP endpoint](https://docs.journeyapps.com/reference/cloudcode/triggering-a-cloudcode-task/trigger-cc-via-http) which has a `GET` function which returns the public [JWKS](https://stytch.com/blog/understanding-jwks/) details.
3. `token` - This task exposes an HTTP endpoint which has a `GET` function. The task is used by a PowerSync client to generate a token to validate against the PowerSync Service.
For more information about custom authentication setups for PowerSync, please [see here](https://docs.powersync.com/installation/authentication-setup/custom).
4. `upload` - This task exposes an HTTP endpoint which has a `POST` function which is used to process the write events from a PowerSync client and writes it back to the source MongoDB database.
## Setup
### 1. Generate key pair
Before using the CloudCode tasks, you need to generate a public/private key pair. Do the following to generate the key pair:
1. Open the `generate_keys` CloudCode task.
2. Select the **Test CloudCode Task** button at the top right. This will print the public and private key in the task logs window.
3. Copy and paste the `POWERSYNC_PUBLIC_KEY` and `POWERSYNC_PRIVATE_KEY` to a file — we'll need this in the next step.
This step is only meant for testing and development because the keys are shown in the log files.
For production, [generate a key pair locally](https://github.com/powersync-ja/powersync-jwks-example?tab=readme-ov-file#1-generate-a-key-pair) and move onto step 2 and 3.
### 2. Configure a deployment
Before using the tasks, we need to configure a "deployment".
1. At the top of the IDE, select **Deployments**.
2. Create a new deployment by using the **+** button at the top right, *or* use the default `Testing` deployment. You can configure different deployments for different environments (e.g. staging, production)
3. Now select the **Deployment settings** button for the instance.
4. In the **Deployment settings** - **General** tab, capture a **Domain** value in the text field. This domain name determines where the HTTP endpoints exposed by these CloudCode tasks can be accessed. The application will validate the domain name to make sure it's available.
5. Select **Save**.
6. Deploy the deployment: you can do so by selecting the **Deploy app** button, which can be found on the far right for each of the deployments you have configured. After the deployment is completed, it will take a few minutes for the domain to be available.
7. Your new domain will be available at `.poweredbyjourney.com`. Open the browser and navigate to the new domain. You should be presented with `Cannot GET /`, because there is no index route.
### 3. Configure environment variables
To wrap up the deployment, we need to configure some environment variables. The following variables need to be set on the deployment:
* `POWERSYNC_PUBLIC_KEY` - This is the `POWERSYNC_PUBLIC_KEY` from the values generated in step 1.
* `POWERSYNC_PRIVATE_KEY` - This is the `POWERSYNC_PRIVATE_KEY` from the values generated in step 1.
* `MONGO_URI` - This is the MongoDB URI e.g. `mongodb+srv://:@/`
* `POWERSYNC_URL` - This is the public PowerSync URL that is provided after creating a new PowerSync instance.
To add environment variables, do the following:
1. Head over to the **Deployment settings** option again.
2. Select the **Environment Variables** tab.
3. Capture the variable name in the **Name** text field.
4. Capture the variable value in the **Value** text field.
5. (Suggested) Check the **Masked** checkbox to obfuscate the variable value for security purposes.
6. Repeat until all the variables are added.
To finalize the setup, do the following:
1. Select the **Save** button. This is important, otherwise the variables will not save.
2. Deploy the deployment: you can do so by selecting the **Deploy app** button.
### 4. Test
Open your browser and navigate to `.poweredbyjourney.com/jwks`.
If the setup was successful, the `jwks` task will render the keys in JSON format. Make sure the format of your JWKS keys matches the format [in this example](https://hlstmcktecziostiaplz.supabase.co/functions/v1/powersync-jwks) JWKS endpoint.
## Usage
Make sure you've configured a deployment and set up environment variables as described in the **Setup** steps above before using the HTTP API endpoints exposed by the CloudCode tasks:
### Token
You would call the `token` HTTP API endpoint when you [implement](/installation/client-side-setup/integrating-with-your-backend) the `fetchCredentials()` function on the client application.
Send an HTTP GET request to `.poweredbyjourney.com/token?user_id=` to fetch a JWT for a user. You must provide a `user_id` in the query string of the request, as this is included in the JWT that is generated.
The response of the request would look like this:
```json
{"token":"..."}
```
### JWKS
The `jwks` HTTP API endpoint is used by PowerSync to validate the token returned from the `.poweredbyjourney.com/token` endpoint. This URL must be set in the configuration of your PowerSync instance.
Send an HTTP GET request to `.poweredbyjourney.com/jwks`.
An example of the response format can be found using [this link](https://hlstmcktecziostiaplz.supabase.co/functions/v1/powersync-jwks).
### Upload
You would call the `upload` HTTP API endpoint when you [implement](/installation/client-side-setup/integrating-with-your-backend) the `uploadData()` function on the client application.
Send an HTTP POST request to `.poweredbyjourney.com/upload`.
The body of the request payload should look like this:
```json
{
"batch": [{
"op": "PUT",
"table": "lists",
"id": "61d19021-0565-4686-acc4-3ea4f8c48839",
"data": {
"created_at": "2024-10-31 10:33:24",
"name": "Name",
"owner_id": "8ea4310a-b7c0-4dd7-ae54-51d6e1596b83"
}
}]
}
```
* `batch` should be an array of operations from the PowerSync client SDK.
* `op` refers to the type of each operation recorded by the PowerSync client SDK (`PUT`, `PATCH` or `DELETE`). Refer to [Writing Client Changes](/installation/app-backend-setup/writing-client-changes) for details.
* `table` refers to the table in SQLite where the operation originates from, and should match the name of a collection in MongoDB.
The API will respond with HTTP status `200` if the write was successful.
## Customization
You can make changes to the way the `upload` task writes data to the source MongoDB database.
Here is how:
1. Go to **CloudCode** at the top of the IDE in your JourneyApps Platform project
2. Select and expand the `upload` task in the panel on the left.
3. The `index.ts` contains the entry point function that accepts the HTTP request and has a `MongoDBStorage` class which interacts with the MongoDB database to perform inserts, updates and deletes. To adjust how updates are performed, take a look at the `updateBatch` function.
## Production considerations
Before going into production with this solution, you will need to set up authentication on the HTTP endpoints exposed by the CloudCode tasks.
If you need more data validations and/or authorization than what is provided by the template, that will need to be customized too. Consider introducing schema validation of the data being written to the source MongoDB database. You should use a [purpose-built](https://json-schema.org/tools?query=\&sortBy=name\&sortOrder=ascending\&groupBy=toolingTypes\&licenses=\&languages=\&drafts=\&toolingTypes=\&environments=\&showObsolete=false) library for this, and use [MongoDB Schema Validation](https://www.mongodb.com/docs/manual/core/schema-validation/) to enforce the types in the database.
Please [contact us](/resources/contact-us) for assistance on any of the above.
# Diagnostics App
Source: https://docs.powersync.com/usage/tools/diagnostic-app
# Monitoring and Alerting
Source: https://docs.powersync.com/usage/tools/monitoring-and-alerting
Overview of monitoring and alerting functionality for PowerSync Cloud instances
You can monitor activity and alert on issues and usage for your PowerSync Cloud instance(s):
* **Monitor Usage**: View time-series and aggregated usage data with [Usage Metrics](#usage-metrics)
* **Monitor Service and Replication Activity**: Track your PowerSync Service and replication logs with [Instance Logs](#instance-logs)
* **Configure Alerts**: Set up alerts for replication issues or usage activity \*
* Includes [Issue Alerts](#issue-alerts) and/or [Usage Alerts](#usage-alerts)
* **Alert Notifications**: Set up [Email notifications](#email-notifications) or [Webhooks](#webhooks) to report events (like issue or usage alerts) to external systems \*
These features can assist with troubleshooting common issues (e.g. replication errors due to a logical replication slot problem), investigating usage spikes, or being notified when usage exceeds a specific threshold.
\* The availability of these features depends on your PowerSync Cloud plan. See the table below for a summary. More details are provided further below.
### Summary of Feature Availability (by PowerSync Cloud Plan)
Monitoring and alerting functionality varies by [PowerSync Cloud plan](https://www.powersync.com/pricing). This table provides a summary of availability:
| Feature | Free | Pro | Team & Enterprise |
| ------------------------ | ------------- | ------------------------ | ------------------------ |
| **Usage Metrics** | Available | Available | Available |
| **Instance Logs** | Available | Available | Available |
| **Log retention period** | 24 hours | 7 days | 30 days |
| **Issue Alerts** | Available | Available | Available |
| **Usage Alerts** | Not available | Not available | Available |
| **Alert Notifications** | - Email | - Email - Webhooks | - Email - Webhooks |
**Self-hosting PowerSync**
Similar monitoring and alerting functionality is planned for PowerSync Open Edition users and Enterprise Self-Hosted customers.
For Open Edition users, alerting APIs are currently available in an early access release. For Enterprise Self-Hosted customers we are planning a full alerting service that includes customizable alerts and webhook integrations.
Until this is available, please chat to us on our [Discord](https://discord.gg/powersync) to discuss your use case or any questions.
## Usage Metrics
View time-series and aggregated usage data for your PowerSync instance(s), including storage size, concurrent connections, and synced data and operations. This data lets you monitor activity, spot patterns or spikes, and budget while tracking your position within our [Cloud pricing plans](https://www.powersync.com/pricing).
### View Usage Metrics
Access usage metrics in the [Dashboard](/usage/tools/powersync-dashboard), in the **Metrics** workspace:
You have following options:
* **Filter options**: data by time range.
* **Granularity**: See data in a daily or hourly granularity.
* **Aggregates**: View and copy aggregates for each usage metric.
* **CSV**: Download data as CSV for custom calculations.
This usage data is also available programmatically via APIs in an early access release. Chat to us on our [Discord](https://discord.gg/powersync) if you require details.
## Instance Logs
You can review logs for your PowerSync instance(s) to troubleshoot replication or sync service issues. Logs capture activity from the PowerSync Service and Replicator processes.
* **Service logs**: Reflect sync processes from the PowerSync Service to clients.
* **Replicator logs**: Reflect replication activity from your source database to the PowerSync Service.
**Availability**
The log retention period varies by plan:
* **Free** plan: Logs from the last 24 hours
* **Pro** plan: Logs from the last 7 days
* **Team & Enterprise** plans: Logs from the last 30 days
### View Instance Logs
Access instance logs through the [Dashboard](/usage/tools/powersync-dashboard), in the **Instance logs** workspace (or by searching for the panel using the [command palette](/usage/tools/powersync-dashboard#the-command-palette)):
You can manage logs with the following options:
* **Filter Options**: Filter logs by level (`Note`, `Error`, `Warning`, `Debug`) and by date range.
* **Sorting**: Sort logs by newest or oldest first.
* **Service Logs Metadata**: Include metadata like `user_id` and `user_agent` in the logs if available.
* **View Mode**: Tail logs in real-time or view them statically.
* **Stack Traces**: Option to show or hide stack traces for errors.
## Issue Alerts
Issue alerts capture potential problems with your instance, such as connection or sync issues.
**Availability**
* Issue alerts are available on all Cloud plans.
### Configure Issue Alerts
Issue alerts are set up per instance. To set up a new alert, navigate to your **PowerSync Project tree**, right-click on the "Issue Alerts" option under the selected instance, and follow the prompts.
You can set up alerts that trigger under certain conditions:
* **Connection Issues**: Trigger when there is a connection problem
* **Replication/Sync Issues**: Trigger when there is an issue with a replication or sync process
#### Severity Level
You also have the option to set the severity level of the alerts. For example, you can configure alerts to trigger only for `warning` and/or `fatal` issues. Free and Pro plan customers can only configure `fatal` alerts.
### View Issue Alerts
Once you have created an alert, you can right-click on it to open the alert logs. The logs panel includes the option to filter alerts by date range.
This command and other configuration options are also available from the [command palette](/usage/tools/powersync-dashboard#the-command-palette) (SHIFT+SHIFT):
### **Configure Notifications**
See [Alert Notifications](#alert-notifications) below to be notified when an issue alert is triggered.
## Usage Alerts
Usage alerts trigger when specific usage metrics exceed a defined threshold. This helps with troubleshooting usage spikes, or unexpected usage activity.
**Availability**
Usage alerts are available on **Team** and **Enterprise** plans.
### Configure Usage Alerts
Usage alerts are set up per instance. Navigate to your **PowerSync Project** tree, and click on the plus icon for the **Usage Alerts** option under your selected instance to create a new alert.
Usage alerts have the following configuration options:
* **Alert Name**: A descriptive name for your alert to help identify it
* **Metric**: Select from the following usage metrics to monitor:
* Data Synced
* Data Replicated
* Operations Synced
* Operations Replicated
* Peak Concurrent Connections
* Storage Size
These metrics correspond to the data shown in the [Usage Metrics](#view-usage-metrics) workspace and align with the PowerSync Service parameters outlined in our [pricing](https://www.powersync.com/pricing).
* **Window (minutes)**: The number of minutes to look back when evaluating usage. All usage data points within this time window are included when determining if the configured threshold has been crossed
* **Calculation**: Choose how to aggregate all data points within the window before comparing to the threshold:
* **Average over window**: Calculate the average of all values
* **Max over window**: Use the highest value
* **Min over window**: Use the lowest value
* **Threshold Condition**: Set whether the alert triggers when usage goes **Above** or **Below** the specified value
* **Threshold Value**: The numeric limit for the selected metric (in bytes for size-based metrics; count for all others)
### View Usage Alert Logs
Once you have created an alert, you can right-click on it to open the alert logs. The logs panel includes the option to filter alerts by date range.
This command and other configuration options are also available from the [command palette](/usage/tools/powersync-dashboard#the-command-palette) (SHIFT+SHIFT):
### **Configure Notifications**
See [Alert Notifications](#alert-notifications) below to be notified when a usage alert is triggered.
## Alert Notifications
You can set up notifications to be informed of issue or metric alerts, as well as deploy state changes. PowerSync provides multiple notification methods that trigger both when an alert becomes active and when it returns to normal (indicating the monitored conditions are back within acceptable thresholds).
* **Email Notifications**: Send alerts directly to your email address
* **Webhooks**: Notify external systems and services
**Availability**
* **Email notifications**: Available on all plans (**Free**, **Pro**, **Team** and **Enterprise**)
* **Webhooks**: Available on **Pro**, **Team** and **Enterprise** plans
### Email Notifications
Email notifications allow you to receive alerts directly to your email address when specific events occur in PowerSync.
#### Set Up Email Notifications
Navigate to the **Email Rules** section in your **PowerSync Project** tree, and click on the plus icon to create a new email rule for your project.
Accounts on the Free plan are restricted to a single email rule; customers on paid plans can create an unlimited number of email rules.
#### Configuration
* **Email Address**: Specify the email address that will receive the notifications
* **Event Triggers**: Select one or more of the following events to trigger the email notification:
* Issue alert state change
* Usage alert state change (Team & Enterprise plan only)
* Deploy state change
* **Enable/Disable**: Control whether the email rule is active
### Webhooks
Webhooks enable you to notify external systems when specific events occur in PowerSync.
#### Set Up Webhooks
Navigate to the **Webhooks** section in your **PowerSync Project** tree, and click on the plus icon to create a new webhook for your project.
#### Webhook Configuration
* **Specify Webhook Endpoint**: Define the endpoint that will receive the webhook request (starting with `https://`).
* **Event Triggers**: Select one or more of the following events to trigger the webhook:
* Issue alert state change
* Usage alert state change (Team & Enterprise plan only)
* Deploy state change
You can control how webhooks operate:
* Enable, disable, or pause a webhook
* If paused, invocations can still be generated and queued, but they won't be processed
* If disabled, invocations won't be generated
* Choose sequential or concurrent execution
* If concurrent, you can set the maximum number of concurrent invocations
* Configure retry attempts for failed webhook deliveries
#### Webhook Secret
After creating a webhook, a secret is automatically generated and copied to your clipboard. Store this secret since you'll need it to verify the webhook request signature. See [Webhook Signature Verification](#webhook-signature-verification)
#### Test Webhooks
A test webhook can be sent to your specified endpoint to verify your setup. Right-click on a webhook in the **PowerSync project** tree and select the **Test Webhook** option:
#### Webhook Signature Verification
Every webhook request contains an `x-journey-signature` header, which is a base64-encoded HMAC (Hash-based Message Authentication Code). To verify the request, you need to compute the HMAC using the shared secret that was generated when you created the webhook, and compare it to the value in the `x-journey-signature` header.
**JavaScript Example**
```javascript
import { createHmac } from 'crypto';
// Extract the signature from the request headers
const signature = request.headers['x-journey-signature'];
// Create an HMAC using your webhook secret and the request body
let verify = createHmac('sha256', '') // The secret provided during webhook setup
.update(Buffer.from(request.rawBody, 'utf-8'))
.digest('base64');
// Compare the computed HMAC with the signature from the request
if (signature === verify) {
console.log("success");
} else {
console.log("verification failed");
}
```
#### Regenerate Secret
You can regenerate the secret used to validate the webhook signature. Right-click on a webhook in the PowerSync project tree and select the **Regenerate secret** option.
#### View Webhook Invocation Logs
You can review webhook invocation logs in the Dashboard and filter them by date. Right-click on a webhook in the **PowerSync project** tree and select the **View webhook invocation logs** option.
# PowerSync Dashboard
Source: https://docs.powersync.com/usage/tools/powersync-dashboard
Introduction to and overview of the PowerSync Dashboard and Admin Portal
The PowerSync Dashboard is available in [PowerSync Cloud](https://www.powersync.com/pricing) (our cloud-hosted offering) and provides an interface for developers to:
* Manage PowerSync projects
* Manage PowerSync instances
* Write, validate and deploy [sync rules](/usage/sync-rules)
* Generate the [client-side schema](/installation/client-side-setup/define-your-schema)
* Generate [development tokens](/installation/authentication-setup/development-tokens)
* Monitor usage and configure alerts - see [Monitoring and Alerting](/usage/tools/monitoring-and-alerting)
* Review instance logs - see [Monitoring and Alerting](/usage/tools/monitoring-and-alerting)
The dashboard is available here: [https://powersync.journeyapps.com/](https://powersync.journeyapps.com/)
### Hierarchy: Organization, project, instance
* After successfully [signing up](https://accounts.journeyapps.com/portal/powersync-signup?s=docs) for PowerSync Cloud, your PowerSync account is created.
* Your account is assigned an **organization** on the [Free pricing plan](https://www.powersync.com/pricing).
* A sample PowerSync **project** (named "PowerSync Project") is automatically created in this organization, and this project is your starting point after completing sign-up. It is opened by default in the dashboard:

* Within a project, you can create and manage one or more PowerSync **instances** for your project (typically developers maintain a staging and production instance). An instance runs a copy of the [PowerSync Service](/architecture/powersync-service) and connects to your [backend database](/installation/database-connection).
Here is an example of how this hierarchy might be used by a customer:
* **Organization**: Wanderlust Inc.
* **Project**: Wanderlust Tracker
* **Instance**: Staging
* **Instance**: Production
### Dashboard layout
The Dashboard layout is similar to that of an IDE and includes the following main components:
* [Workspaces](/usage/tools/powersync-dashboard#workspaces)
* [Editor Panes, Panels and Files](/usage/tools/powersync-dashboard#editor-panes-panels-and-files)
* [The Command Palette](/usage/tools/powersync-dashboard#the-command-palette)
* [Actions](/usage/tools/powersync-dashboard#actions)

#### Workspaces
Workspaces are a pre-configured logical collection of editor panes and panels that are designed to make working on a specific part of your project as easy as possible.
The dashboard comes with four workspaces by default: **Overview**, **Manage instances**, **Usage metrics** and **Instance logs**.
* The **Overview** workspace displays a summary of your PowerSync instances, or guides you through creating your first instance.
* The **Manage instances** workspace is allows you to create, view and update PowerSync instances, validate and deploy sync rules, and view deploy logs for each instance.
* The **Usage metrics** workspace displays your project's usage metrics by instance.
* The **Instance logs** workspace displays replication and service logs by instance.
You can customize any of these workspaces (changes save automatically) and/or create new workspaces.
To reset all workspaces to their original layout, run the **Reset workspaces** action (see *Command Palette* and *Actions* below for how to run actions).
#### Editor Panes, Panels and Files
Editor Panes are used to interact with your project's files (e.g. `sync-rules.yaml`) and Panels display information about your project in components that can be positioned and resized.
#### The Command Palette
Open the Command Palette using the keyboard shortcut `CTRL/CMD+SHIFT+P` or `SHIFT+SHIFT`, and access just about anything you need to do in your project.
#### Actions
The various actions available in your project are accessible via the Command Palette, by right-clicking on certain items, and via buttons. These are a few of the most common actions you might need during the lifecycle of your PowerSync project (you can search them via the Command Palette):
* **Generate development token** -> Generate a [development token](/installation/authentication-setup/development-tokens) for authentication
* **Generate client-side schema** -> Generate the [client-side schema](/installation/client-side-setup/define-your-schema) for an instance based off your [sync rules](/usage/sync-rules).
* **Validate sync rules** -> Validate the [sync rules](/usage/sync-rules) defined in your `sync-rules.yaml` against an instance.
* **Deploy sync rules** -> Deploy [sync rules](/usage/sync-rules) as defined in your `sync-rules.yaml` file to an instance.
* **Compare deployed sync rules** -> Compare the [sync rules](/usage/sync-rules) as defined in your `sync-rules.yaml` file with those deployed to an instance.
* **Save changes** -> Save changes to files as a revision when in **Basic Revisions** version control mode (see *Version Control* below)
* Or **Commit changes** -> Commit changes to files when in **Advanced Git** version control mode.
* **Create Personal Access Token** -> Create an access token scoped to your user, which is needed for the [CLI](/usage/tools/cli).
* **Rename project** -> Rename your PowerSync project.
### Dashboard Settings
To customize your dashboard experience, access the **IDE Settings** panel through the Command Palette or by clicking the gear icon located in the top-right corner of the dashboard. This panel allows you to modify core preferences, including the dashboard's theme and the display format for dates and times.
### Version Control
Your PowerSync projects come with version control built-in. This is useful when working with your project's sync rules file (`sync-rules.yaml`). The default mode is **Basic Revisions**, which allows you to save, view and revert to revisions of your sync rules file. Another mode is **Advanced Git**, which enables a git-based workflow, including commits, branching, and merging. The modes can be toggled for your projects in the Admin Portal (see [below](/usage/tools/powersync-dashboard#admin-portal)).
#### Saving/committing changes
Open the **Changes** panel (find it via the Command Palette) to review any changes and save, or revert to a specific revision/commit.
#### GitHub / Azure Repos integration
The default git provider for projects is our own "JourneyApps" system which does not require any configuration from the developer. It is also possible to use either GitHub or Azure DevOps as your git provider. For this to work, an integration must be added to your organization via the Admin Portal. Read on to learn more.
### Advanced: Service Version Locking
Customers on our [Team and Enterprise plans](https://www.powersync.com/pricing) can lock their PowerSync Cloud instances to a specific version of the PowerSync Service. This option is available under your instance settings.
Versions are specified as `major.minor.patch`. When locked, only new `.patch` releases will automatically be applied to the instance.
**Downgrade limitations:** Not all downgrade paths are available automatically. If you need to downgrade to an older version, please [contact our team](/resources/contact-us) for assistance.
### Admin Portal
In the Admin Portal you can [manage your PowerSync projects](/usage/tools/powersync-dashboard#manage-powersync-projects), [users](/usage/tools/powersync-dashboard#manage-users) and [integrations](/usage/tools/powersync-dashboard#manage-integrations).
It is available here:
[https://accounts.journeyapps.com/portal/admin/](https://accounts.journeyapps.com/portal/admin/)
When in the PowerSync Dashboard, you can also click on the PowerSync icon in the top-left corner to navigate to the Admin Portal.

**Advanced permissions**: Several functions in the Admin Portal require advanced permissions that you do not have by default after signing up. Please [contact us](/resources/contact-us) to request these permissions. This is a temporary limitation that will be removed in a future release.
#### Manage PowerSync projects
In the "Projects" tab, new projects can be created, existing projects can be deleted, and the [version control](/usage/tools/powersync-dashboard#version-control) mode can be changed for a project. If your project uses the **Advanced Git** version control mode, the git provider can also be configured here.
#### Manage users
Select the "Developers" tab to invite team members to your organization or remove their access. Only users with the **Owner** role can manage users.
#### Manage integrations
In the "Integrations" tab, [GitHub or Azure DevOps integrations](/usage/tools/powersync-dashboard#github-azure-repos-integration) can be added in order to configure them as git providers for your project(s).
#### Update organization settings
In the "Settings" tab, you can rename your organization.
#### Update billing details
In the "Billing" tab, you can update your billing details and manage payment cards.
**View subscriptions**
In the "Subscriptions" tab, you can view your active subscription and usage.
See [Pricing](https://www.powersync.co/pricing) for available subscription plans.
# Use Case Examples
Source: https://docs.powersync.com/usage/use-case-examples
Learn how to use PowerSync in common use cases
The following examples are available to help you get started with specific use cases for PowerSync:
## Additional Resources
A growing collection of demo apps and tutorials are also available, showcasing working example implementations and solutions to additional use cases:
# Attachments / Files
Source: https://docs.powersync.com/usage/use-case-examples/attachments-files
Syncing large attachments/files directly using PowerSync is not recommended.
Smaller files can be stored as base64-encoded data, but syncing many larger files using database rows may cause performance degradation.
On the other hand, PowerSync works well for syncing the attachment metadata, which could include the file path, name, size, and type. The client may then download the file from the storage provider, such as Supabase Storage or AWS S3.
### Helper Packages
We currently have these helper packages available to manage attachments:
| SDK | Attachments Helper Package | Example Implementation |
| ----------------------------- | ------------------------------------------------------------------------------------------------------------------------------ | ------------------------------------------------------------------------------------------------------------------ |
| **React Native / JavaScript** | [powersync/attachments](https://www.npmjs.com/package/@powersync/attachments) | [To-Do List demo app](https://github.com/powersync-ja/powersync-js/tree/main/demos/react-native-supabase-todolist) |
| **Flutter** | [powersync\_attachments\_helper](https://pub.dev/packages/powersync_attachments_helper) | [To-Do List demo app](https://github.com/powersync-ja/powersync.dart/tree/main/demos/supabase-todolist) |
| **Kotlin** | [attachments](https://github.com/powersync-ja/powersync-kotlin/tree/main/core/src/commonMain/kotlin/com/powersync/attachments) | [To-Do List demo app](https://github.com/powersync-ja/powersync-kotlin/tree/main/demos/android-supabase-todolist) |
| **Swift** | [attachments](https://github.com/powersync-ja/powersync-swift/blob/main/Sources/PowerSync/attachments/README.md) | [To-Do List demo app](https://github.com/powersync-ja/powersync-swift/tree/main/Demo) |
The example implementations above use [Supabase Storage](https://supabase.com/docs/guides/storage) as storage provider.
* For more information on the use of Supabase as the storage provider, refer to [Handling Attachments](/integration-guides/supabase-+-powersync/handling-attachments)
* To learn how to adapt the implementations to use AWS S3 as the storage provider, see [this tutorial](/tutorials/client/attachments-and-files/aws-s3-storage-adapter)
# Background Syncing
Source: https://docs.powersync.com/usage/use-case-examples/background-syncing
Run PowerSync operations while your app is inactive or in the background
Applications often need to sync data when they're not in active use. This document explains background syncing implementations with PowerSync.
## Platform Support
Background syncing has been tested in:
* **Flutter** - Using [workmanager](https://github.com/fluttercommunity/flutter_workmanager/)
* **Kotlin Multiplatform - Android** - Implementation details in the [Supabase To-Do List demo](https://github.com/powersync-ja/powersync-kotlin/blob/main/demos/supabase-todolist/docs/BackgroundSync.md)
These examples can be adapted for other frameworks like React Native. For implementation questions or assistance, chat to us on [Discord](https://discord.gg/powersync).
## Flutter Implementation Guide
### Prerequisites
1. Complete the [workmanager platform setup](https://github.com/fluttercommunity/flutter_workmanager/#platform-setup)
2. Review the [Supabase To-Do List Demo](https://github.com/powersync-ja/powersync.dart/tree/main/demos/supabase-todolist) for context
### Configure the Background Task
In `main.dart`:
```dart
void main() async {
// ... existing setup code ...
const simpleTaskKey = "com.domain.myapp.taskId";
// Mandatory if the App is obfuscated or using Flutter 3.1+
@pragma('vm:entry-point')
void callbackDispatcher() {
Workmanager().executeTask((task, inputData) async {
switch (task) {
case simpleTaskKey:
// Initialize PowerSync database and connection
final currentConnector = await openDatabase();
db.connect(connector: currentConnector!);
// Perform database operations
await TodoList.create('New background task item');
await currentConnector.uploadData(db);
await TodoList.create('testing1111');
await currentConnector.uploadData(db);
// print("$simpleTaskKey was executed. inputData = $inputData");
break;
}
// Close database when done
await db.close();
return Future.value(true);
});
}
// Initialize the workmanager with your callback
Workmanager().initialize(
callbackDispatcher,
// Shows notifications during task execution (useful for debugging)
isInDebugMode: true
);
// ... rest of your app initialization ...
}
```
Note specifically in the switch statement:
```dart
// currentConnector is the connector to the remote DB
// openDatabase sets the db variable to the PowerSync database
final currentConnector = await openDatabase();
// connect PowerSync to the remote database
db.connect(connector: currentConnector!);
// a database write operation
await TodoList.create('Buy new shoes');
// Sync with the remote database
await currentConnector.uploadData(db);
```
1. Since WorkManager executes in a new process, you need to set up the PowerSync local database and connect to the remote database using your connector.
2. Run a write (in the case of this demo app, we create a 'todo list')
3. Make sure to run `currentConnector.uploadData(db);` so that the local write is uploaded to the remote database.
### Testing
Add a test button:
```dart
ElevatedButton(
title: const Text("Start the Flutter background service"),
onTap: () async {
await Workmanager().cancelAll();
// print("RUN BACKGROUND TASK");
await Workmanager().registerOneOffTask(
simpleTaskKey,
simpleTaskKey,
initialDelay: Duration(seconds: 10),
inputData: {
int': 1,
},
);
},
),
```
Press the button, background the app, wait 10 seconds, then verify new records in the remote database.
### Platform Compatibility
#### Android
* Implementation works as expected.
#### iOS
* At the time of last testing this (January 2024), we were only able to get part of this to work using the branch for [this PR](https://github.com/fluttercommunity/flutter_workmanager/pull/511) into workmanager.
* While testing we were not able to get iOS background fetching to work, however this is most likely an
[issue](https://github.com/fluttercommunity/flutter_workmanager/issues/515) with the package.
# CRDTs
Source: https://docs.powersync.com/usage/use-case-examples/crdts
While PowerSync does not use [CRDTs](https://en.wikipedia.org/wiki/Conflict-free_replicated_data_type) directly as part of its sync or conflict resolution process, CRDT data (from a library such as [Yjs](https://github.com/yjs/yjs) or y-crdt) may be persisted and synced using PowerSync.
This may be useful for cases such as document editing, where last-write-wins is not sufficient for conflict resolution. PowerSync becomes the provider for CRDT data — both for local storage and for propagating changes to other clients.
### Example Implementations
For an example implementation, refer to the following demo built using the PowerSync Web SDK:
* [Yjs Document Collaboration Demo](https://github.com/powersync-ja/powersync-js/tree/main/demos/yjs-react-supabase-text-collab)
# Custom Types, Arrays and JSON
Source: https://docs.powersync.com/usage/use-case-examples/custom-types-arrays-and-json
PowerSync is compatible with more advanced types such as arrays and JSON.
PowerSync is compatible with advanced Postgres types, including arrays and JSON/JSONB. These types are represented as text columns in the client-side schema. When updating client data, you have the option to replace the entire column value with a string or enable advanced schema features to track more granular changes and include custom metadata.
## Advanced Schema Options to Process Writes
With arrays and JSON fields, it's common for only part of the value to change during an update. To make handling these writes easier, you can enable advanced schema options that let you track exactly what changed in each row—not just the new state.
* `trackPreviousValues` (or `trackPrevious` in our JS SDKs): Access previous values for diffing custom types, arrays, or JSON fields. Accessible later via `CrudEntry.previousValues`.
* `trackMetadata`: Adds a `_metadata` column for storing custom metadata. Value of the column is accessible later via `CrudEntry.metadata`.
* `ignoreEmptyUpdates`: Skips updates when no data has actually changed.
These advanced schema options are available in the following SDK versions: Flutter v1.13.0, React Native v1.20.1, JavaScript/Web v1.20.1, Kotlin Multiplatform v1.1.0, Swift v1.1.0, and Node.js v0.4.0.
## Custom Types
PowerSync serializes custom types as text. For details, see [types in sync rules](/usage/sync-rules/types).
### Postgres
Postgres allows developers to create custom data types for columns. For example:
```sql
create type location_address AS (
street text,
city text,
state text,
zip numeric
);
```
### Sync Rules
Custom type columns are converted to text by the PowerSync Service. A column of type `location_address`, as defined above, would be synced to clients as the following string:
`("1000 S Colorado Blvd.",Denver,CO,80211)`
It is not currently possible to extract fields from custom types in Sync Rules, so the entire column must be synced as text.
### Client SDK
**Schema**
Add your custom type column as a `text` column in your client-side schema definition. For advanced update tracking, see [Advanced Schema Options](#advanced-schema-options).
```javascript
const todos = new Table(
{
location: column.text,
// ... other columns ...
},
{
// Optionally, enable advanced update tracking options:
trackPrevious: true,
trackMetadata: true,
ignoreEmptyUpdates: true,
}
);
```
```dart
Table(
name: 'todos',
columns: [
Column.text('location'),
// ... other columns ...
],
// Optionally, enable advanced update tracking options:
trackPreviousValues: true,
trackMetadata: true,
ignoreEmptyUpdates: true,
)
```
**Writing Changes**
You can write the entire updated column value as a string, or, with `trackPreviousValues` enabled, compare the previous and new values to process only the changes you care about:
```javascript
// Full replacement (basic):
await db.execute(
'UPDATE todos set location = ?, _metadata = ? WHERE id = ?',
['("1234 Update Street",Denver,CO,80212)', 'op-metadata-example', 'faffcf7a-75f9-40b9-8c5d-67097c6b1c3b']
);
// Diffing custom types in uploadData (advanced):
if (op.op === UpdateType.PUT && op.previousValues) {
const oldCustomType = op.previousValues['location'] ?? 'null';
const newCustomType = op.opData['location'] ?? 'null';
const metadata = op.metadata; // Access metadata here
// Compare oldCustomType and newCustomType to determine what changed
// Use metadata as needed as you process the upload
}
```
```dart
// Full replacement (basic):
await db.execute('UPDATE todos set location = ?, _metadata = ? WHERE id = ?', [
'("1234 Update Street",Denver,CO,80212)',
'op-metadata-example', // Example metadata value
'faffcf7a-75f9-40b9-8c5d-67097c6b1c3b'
]);
// Diffing custom types in uploadData (advanced):
if (op.op == UpdateType.put && op.previousValues != null) {
final oldCustomType = op.previousValues['location'] ?? 'null';
final newCustomType = op.opData['location'] ?? 'null';
final metadata = op.metadata; // Access metadata here
// Compare oldCustomType and newCustomType to determine what changed
// Use metadata as needed as you process the upload
}
```
## Arrays
PowerSync treats array columns as JSON text. This means that the SQLite JSON operators can be used on any array columns.
Additionally, some helper methods such as array membership are available in Sync Rules.
**Note:** Native Postgres arrays, JSON arrays, and JSONB arrays are effectively all equivalent in PowerSync.
### Postgres
Array columns are defined in Postgres using the following syntax:
```sql
ALTER TABLE todos
ADD COLUMN unique_identifiers text[];
```
### Sync Rules
Array columns are converted to text by the PowerSync Service. A text array as defined above would be synced to clients as the following string:
`["00000000-0000-0000-0000-000000000000", "12345678-1234-1234-1234-123456789012"]`
**Array Membership**
It's possible to sync rows dynamically based on the contents of array columns using the `IN` operator. For example:
```yaml
bucket_definitions:
custom_todos:
# Separate bucket per To-Do list
parameters: SELECT id AS list_id FROM lists WHERE owner_id = request.user_id()
data:
- SELECT * FROM todos WHERE bucket.list_id IN unique_identifiers
```
See these additional details when using the `IN` operator: [Operators](/usage/sync-rules/operators-and-functions#operators)
### Client SDK
**Schema**
Add your array column as a `text` column in your client-side schema definition. For advanced update tracking, see [Advanced Schema Options](#advanced-schema-options).
```javascript
const todos = new Table(
{
unique_identifiers: column.text,
// ... other columns ...
},
{
// Optionally, enable advanced update tracking options:
trackPrevious: true,
trackMetadata: true,
ignoreEmptyUpdates: true,
}
);
```
```dart
Table(
name: 'todos',
columns: [
Column.text('unique_identifiers'),
// ... other columns ...
],
// Optionally, enable advanced update tracking options:
trackPreviousValues: true,
trackMetadata: true,
ignoreEmptyUpdates: true,
)
```
**Writing Changes**
You can write the entire updated column value as a string, or, with `trackPreviousValues` enabled, compare the previous and new values to process only the changes you care about:
```javascript
// Full replacement (basic):
await db.execute(
'UPDATE todos set unique_identifiers = ?, _metadata = ? WHERE id = ?',
['["DEADBEEF-DEAD-BEEF-DEAD-BEEFDEADBEEF", "ABCDEFAB-ABCD-ABCD-ABCD-ABCDEFABCDEF"]', 'op-metadata-example', '00000000-0000-0000-0000-000000000000']
);
// Diffing custom types in uploadData (advanced):
if (op.op === UpdateType.PUT && op.previousValues) {
const oldArray = JSON.parse(op.previousValues['unique_identifiers'] ?? '[]');
const newArray = JSON.parse(op.opData['unique_identifiers'] ?? '[]');
const metadata = op.metadata; // Access metadata here
// Compare oldArray and newArray to determine what changed
// Use metadata as needed as you process the upload
}
```
```dart
// Full replacement (basic):
await db.execute('UPDATE todos set unique_identifiers = ?, _metadata = ? WHERE id = ?', [
'["DEADBEEF-DEAD-BEEF-DEAD-BEEFDEADBEEF", "ABCDEFAB-ABCD-ABCD-ABCD-ABCDEFABCDEF"]',
'op-metadata-example', // Example metadata value
'00000000-0000-0000-0000-000000000000'
]);
// Diffing custom types in uploadData (advanced):
if (op.op == UpdateType.put && op.previousValues != null) {
final oldArray = jsonDecode(op.previousValues['unique_identifiers'] ?? '[]');
final newArray = jsonDecode(op.opData['unique_identifiers'] ?? '[]');
final metadata = op.metadata; // Access metadata here
// Compare oldArray and newArray to determine what changed
// Use metadata as needed as you process the upload
}
```
**Attention Supabase users:** Supabase can handle writes with arrays, but you must convert from string to array using `jsonDecode` in the connector's `uploadData` function. The default implementation of `uploadData` does not handle complex types like arrays automatically.
## JSON and JSONB
The PowerSync Service treats JSON and JSONB columns as text and provides many helpers for working with JSON in Sync Rules.
**Note:** Native Postgres arrays, JSON arrays, and JSONB arrays are effectively all equivalent in PowerSync.
### Postgres
JSON columns are represented as:
```sql
ALTER TABLE todos
ADD COLUMN custom_payload json;
```
### Sync Rules
PowerSync treats JSON columns as text and provides transformation functions in Sync Rules such as `json_extract()`.
```yaml
bucket_definitions:
my_json_todos:
# Separate bucket per To-Do list
parameters: SELECT id AS list_id FROM lists WHERE owner_id = request.user_id()
data:
- SELECT * FROM todos WHERE json_extract(custom_payload, '$.json_list') = bucket.list_id
```
### Client SDK
**Schema**
Add your JSON column as a `text` column in your client-side schema definition. For advanced update tracking, see [Advanced Schema Options](#advanced-schema-options).
```dart
Table(
name: 'todos',
columns: [
Column.text('custom_payload'),
// ... other columns ...
],
// Optionally, enable advanced update tracking options:
trackPreviousValues: true,
trackMetadata: true,
ignoreEmptyUpdates: true,
)
```
```javascript
const todos = new Table(
{
custom_payload: column.text,
// ... other columns ...
},
{
// Optionally, enable advanced update tracking options:
trackPrevious: true,
trackMetadata: true,
ignoreEmptyUpdates: true,
}
);
```
**Writing Changes**
You can write the entire updated column value as a string, or, with `trackPreviousValues` enabled, compare the previous and new values to process only the changes you care about:
```dart
// Full replacement (basic):
await db.execute('UPDATE todos set custom_payload = ?, _metadata = ? WHERE id = ?', [
'{"foo": "bar", "baz": 123}',
'op-metadata-example', // Example metadata value
'00000000-0000-0000-0000-000000000000'
]);
// Diffing custom types in uploadData (advanced):
import 'dart:convert';
if (op.op == UpdateType.put && op.previousValues != null) {
var oldJson = jsonDecode(op.previousValues['custom_payload'] ?? '{}');
var newJson = jsonDecode(op.opData['custom_payload'] ?? '{}');
var metadata = op.metadata; // Access metadata here
// Compare oldJson and newJson to determine what changed
// Use metadata as needed as you process the upload
}
```
```javascript
// Full replacement (basic):
await db.execute(
'UPDATE todos set custom_payload = ?, _metadata = ? WHERE id = ?',
['{"foo": "bar", "baz": 123}', 'op-metadata-example', '00000000-0000-0000-0000-000000000000']
);
// Diffing custom types in uploadData (advanced):
if (op.op === UpdateType.PUT && op.previousValues) {
const oldJson = JSON.parse(op.previousValues['custom_payload'] ?? '{}');
const newJson = JSON.parse(op.opData['custom_payload'] ?? '{}');
const metadata = op.metadata; // Access metadata here
// Compare oldJson and newJson to determine what changed
// Use metadata as needed as you process the upload
}
```
## Bonus: Mashup
What if we had a column defined as an array of custom types, where a field in the custom type was JSON? Consider the following Postgres schema:
```sql
-- define custom type
CREATE TYPE extended_location AS (
address_label text,
json_address json
);
-- add column
ALTER TABLE todos
ADD COLUMN custom_locations extended_location[];
```
# Data Pipelines
Source: https://docs.powersync.com/usage/use-case-examples/custom-write-checkpoints
Use Custom Write Checkpoints to handle asynchronous data uploads, as in chained data pipelines.
**Availability**:
Custom Write Checkpoints are available for customers on our [Team and Enterprise](https://www.powersync.com/pricing) plans.
To ensure [consistency](/architecture/consistency), PowerSync relies on Write Checkpoints. These checkpoints ensure that clients have uploaded their own local changes/mutations to the server before applying downloaded data from the server to the local database.
The essential requirement is that the client must get a Write Checkpoint after uploading its last write/mutation. Then, when downloading data from the server, the client checks whether the Write Checkpoint is part of the largest [sync checkpoint](https://github.com/powersync-ja/powersync-service/blob/main/docs/sync-protocol.md) received from the server (i.e. from the PowerSync Service). If it is, the client applies the server-side state to the local database.
The default Write Checkpoints implementation relies on uploads being acknowledged *synchronously*, i.e. the change persists in the source database (to which PowerSync is connected) before the [`uploadData` call](/installation/client-side-setup/integrating-with-your-backend) completes.
Problems occur if the persistence in the source database happens *asynchronously*. If the client's upload is meant to mutate the source database (and eventually does), but this is delayed, it will effectively seem as if the client's uploaded changes were reverted on the server, and then applied again thereafter.
Chained *data pipelines* are a common example of asynchronous uploads -- e.g. data uploads are first written to a different upstream database, or a separate queue for processing, and then finally replicated to the 'source database' (to which PowerSync is connected).
For example, consider the following data pipeline:
1. The client makes a change locally and the local database is updated.
2. The client uploads this change to the server.
3. The server resolves the request and writes the change into an intermediate database (not the source database yet).
4. The client thinks the upload is complete (i.e. persisted into the source database). It requests a Write Checkpoint from the PowerSync Service.
5. The PowerSync Service increments the replication `HEAD` in the source database, and creates a Write Checkpoint for the client. The Write Checkpoint number is returned and recorded in the client.
6. The PowerSync Service replicates past the previous replication `HEAD` (but the changes are still not present in the source database).
7. It should be fine for the client to apply the state of the server to the local database. But the server state does not include the client's uploaded changes mentioned in #2. This is the same as if the client's uploaded changes were rejected (not applied) by the server. This results in the client reverting the changes in its local database.
8. Eventually the change is written to the source database, and increments the replication `HEAD`.
9. The PowerSync Service replicates this change and sends it to the client. The client then reapplies the changes to its local database.
In the above case, the client may see the Write Checkpoint before the data has been replicated. This will cause the client to revert its changes, then apply them again later when it has actually replicated, causing data to "flicker" in the app.
For these use cases, Custom Write Checkpoints should be implemented.
## Custom Write Checkpoints
*Custom Write Checkpoints* allow the developer to define Write Checkpoints and insert them into the replication stream directly, instead of relying on the PowerSync Service to create and return them. An example of this is having the backend persist Write Checkpoints to a dedicated table which is processed as part of the replication stream.
The PowerSync Service then needs to process the (ordered) replication events and correlate the checkpoint table changes to Write Checkpoint events.
## Example Implementation
A self-hosted Node.js demo with Postgres is available here:
## Implementation Details
This outlines what a Custom Write Checkpoints implementation entails.
### Custom Write Checkpoint Table
Create a dedicated `checkpoints` table, which should contain the following checkpoint payload information in some form:
```TypeScript
export type CheckpointPayload = {
/**
* The user account id
*/
user_id: string;
/**
* The client id relating to the user account.
* A single user can have multiple clients.
* A client is analogous to a device session.
* Checkpoints are tracked separately for each `user_id` + `client_id`.
*/
client_id: string;
/**
* A strictly increasing Write Checkpoint identifier.
* This number is generated by the application backend.
*/
checkpoint: bigint;
}
```
### Replication Requirements
Replication events for the Custom Write Checkpoint table (`checkpoints` in this example) need to enabled.
For Postgres, this involves adding the table to the [PowerSync logical replication publication](/installation/database-setup), for example:
```SQL
create publication powersync for table public.lists, public.todos, public.checkpoints;
```
### Sync Rules Requirements
You need to enable the `write_checkpoints` sync event in your Sync Rules configuration. This event should map the rows from the `checkpoints` table to the `CheckpointPayload` payload.
```YAML
# sync-rules.yaml
# Register the custom write_checkpoints event
event_definitions:
write_checkpoints:
payloads:
# This defines where the replicated Custom Write Checkpoints should be extracted from
- SELECT user_id, checkpoint, client_id FROM checkpoints
# Define Sync Rules as usual
bucket_definitions:
global:
data:
...
```
### Application
Your application should handle Custom Write Checkpoints on both the frontend and backend.
#### Frontend
Your client backend connector should make a call to the application backend to create a Custom Write Checkpoint record after uploading items in the `uploadData` method. The Write Checkpoint number should be supplied to the CRUD transactions' `complete` method.
```TypeScript
async function uploadData(database: AbstractPowerSyncDatabase): Promise {
const transaction = await database.getNextCrudTransaction();
// Get the unique client ID from the PowerSync Database SQLite storage
const clientId = await db.getClientId();
for (const operation of transaction.crud) {
// Upload the items to application backend
// ....
}
await transaction.complete(await getCheckpoint(clientId));
}
async function getCheckpoint(clientId: string): string {
/**
* Should perform a request to the application backend which should create the
* Write Checkpoint record and return the corresponding checkpoint number.
*/
return "the Write Checkpoint number from the request";
}
```
#### Backend
The backend should create a Write Checkpoint record when the client requests it. The record should automatically increment the Write Checkpoint number for the associated `user_id` and `client_id`.
#### Postgres Example
With the following table defined in the database...
```SQL
CREATE TABLE checkpoints (
user_id VARCHAR(255),
client_id VARCHAR(255),
checkpoint INTEGER,
PRIMARY KEY (user_id, client_id)
);
```
...the backend should have a route which creates `checkpoints` records:
```TypeScript
router.put('/checkpoint', async (req, res) => {
if (!req.body) {
res.status(400).send({
message: 'Invalid body provided'
});
return;
}
const client = await pool.connect();
// These could be obtained from the session
const { user_id = 'UserID', client_id = '1' } = req.body;
const response = await client.query(
`
INSERT
INTO
checkpoints
(user_id, client_id, checkpoint)
VALUES
($1, $2, '1')
ON
CONFLICT (user_id, client_id)
DO
UPDATE
SET checkpoint = checkpoints.checkpoint + 1
RETURNING checkpoint;
`,
[user_id, client_id]
);
client.release();
// Return the Write Checkpoint number
res.status(200).send({
checkpoint: response.rows[0].checkpoint
});
});
```
An example implementation can be seen in the [Node.js backend demo](https://github.com/powersync-ja/powersync-nodejs-backend-todolist-demo/blob/main/src/api/data.js), including examples for [MongoDB](https://github.com/powersync-ja/powersync-nodejs-backend-todolist-demo/blob/main/src/persistance/mongo/mongo-persistance.js) and [MySQL](https://github.com/powersync-ja/powersync-nodejs-backend-todolist-demo/blob/main/src/persistance/mysql/mysql-persistance.js).
# Data Encryption
Source: https://docs.powersync.com/usage/use-case-examples/data-encryption
### In Transit Encryption
Data is always encrypted in transit using TLS — both between the client and PowerSync, and between PowerSync [and the source database](/usage/lifecycle-maintenance/postgres-maintenance#tls).
### At Rest Encryption
The client-side database can be encrypted at rest. This is currently available for:
[SQLCipher](https://www.zetetic.net/sqlcipher/) support is available for Flutter through the `powersync_sqlcipher` SDK. See usage details in the package README:
[SQLCipher](https://www.zetetic.net/sqlcipher/) support is available for PowerSync's React Native SDK through the `@powersync/op-sqlite` package. See usage details in the package README:
The Web SDK uses the [ChaCha20 cipher algorithm by default](https://utelle.github.io/SQLite3MultipleCiphers/docs/ciphers/cipher_chacha20/). See usage details in the package README:
Additionally, a minimal example demonstrating encryption of the web database is available [here](https://github.com/powersync-ja/powersync-js/tree/main/demos/example-vite-encryption).
Support for encryption on other platforms is planned. In the meantime, let us know your needs and use cases on [Discord](https://discord.gg/powersync).
### End-to-end Encryption
For end-to-end encryption, the encrypted data can be synced using PowerSync. The data can then either be encrypted and decrypted directly in memory by the application, or a separate local-only table can be used to persist the decrypted data — allowing querying the data directly.
## See Also
* Database Setup → [Security & IP Filtering](/installation/database-setup/security-and-ip-filtering)
* Resources → [Security](/resources/security)
# Full-Text Search
Source: https://docs.powersync.com/usage/use-case-examples/full-text-search
Client-side full-text search (FTS) is available using the [SQLite FTS5 extension](https://www.sqlite.org/fts5.html).
This requires creating a separate FTS5 table(s) to index the data, and updating the table(s) using SQLite triggers.
Note that the availability of FTS is dependent on the underlying `sqlite` package used, as it is an extension that must first be enabled in the package.
Full-text search is currently available in the following client SDKs, and we plan to extend support to all SDKs in the near future:
* [**Flutter SDK**](/client-sdk-references/flutter): Uses the [sqlite\_async](https://pub.dev/documentation/sqlite_async/latest/) package for migrations
* [**JavaScript Web SDK**](/client-sdk-references/javascript-web): Requires version 0.5.0 or greater (including [wa-sqlite](https://github.com/powersync-ja/wa-sqlite) 0.2.0+)
* [**React Native SDK**](/client-sdk-references/react-native-and-expo): Requires version 1.16.0 or greater (including [@powersync/react-native-quick-sqlite](https://github.com/powersync-ja/react-native-quick-sqlite) 2.2.1+)
## Example Implementations
FTS is implemented in the following demo apps:
* [Flutter To-Do List App](https://github.com/powersync-ja/powersync.dart/tree/master/demos/supabase-todolist)
* [React To-Do List App](https://github.com/powersync-ja/powersync-js/tree/main/demos/react-supabase-todolist)
* [React Native To-Do List App](https://github.com/powersync-ja/powersync-js/tree/main/demos/react-native-supabase-todolist)
We explain these implementations in more detail below. Example code is shown mainly in Dart, but references to the React or React Native equivalents are included where relevant, so you should be able to cross-reference.
## Walkthrough: Full-text search in the To-Do List Demo App
### Setup
FTS tables are created when instantiating the client-side PowerSync database (DB).
```dart
// https://github.com/powersync-ja/powersync.dart/blob/master/demos/supabase-todolist/lib/powersync.dart#L186
Future openDatabase() async {
...
await configureFts(db);
}
```
```ts
// https://github.com/powersync-ja/powersync-js/blob/main/demos/react-supabase-todolist/src/components/providers/SystemProvider.tsx#L41
SystemProvider = ({ children }: { children: React.ReactNode }) => {
...
React.useEffect(() => {
...
configureFts();
})
}
```
```ts
// https://github.com/powersync-ja/powersync-js/blob/main/demos/react-native-supabase-todolist/library/powersync/system.ts#L75
export class System {
...
powersync: PowerSyncDatabase;
...
async init() {
...
await configureFts(this.powersync);
}
}
```
First, we need to set up the FTS tables to match the `lists` and `todos` tables already created in this demo app. Don't worry if you already have data in the tables, as it will be copied into the new FTS tables.
To simplify implementation these examples make use of SQLite migrations. The migrations are run in [migrations/fts\_setup.dart](https://github.com/powersync-ja/powersync.dart/blob/master/demos/supabase-todolist/lib/migrations/fts_setup.dart) in the Flutter implementation. Here we use the [sqlite\_async](https://pub.dev/documentation/sqlite_async/latest/) Dart package to generate the migrations.
Note: The Web and React Native implementations do not use migrations. It creates the FTS tables separately, see for example [utils/fts\_setup.ts](https://github.com/powersync-ja/powersync-js/blob/main/demos/react-supabase-todolist/src/app/utils/fts_setup.ts) (Web) and [library/fts/fts\_setup.ts](https://github.com/powersync-ja/powersync-js/blob/main/demos/react-native-supabase-todolist/library/fts/fts_setup.ts) (React Native).
**Dart example:**
```dart
// migrations/fts_setup.dart
/// This is where you can add more migrations to generate FTS tables
/// that correspond to the tables in your schema and populate them
/// with the data you would like to search on
Future configureFts(PowerSyncDatabase db) async {
migrations
..add(createFtsMigration(
migrationVersion: 1,
tableName: 'lists',
columns: ['name'],
tokenizationMethod: 'porter unicode61'))
..add(createFtsMigration(
migrationVersion: 2,
tableName: 'todos',
columns: ['description', 'list_id'],
));
await migrations.migrate(db);
}
```
The `createFtsMigration` function is key and corresponds to the below (Dart example):
```dart
// migrations/fts_setup.dart
/// Create a Full Text Search table for the given table and columns
/// with an option to use a different tokenizer otherwise it defaults
/// to unicode61. It also creates the triggers that keep the FTS table
/// and the PowerSync table in sync.
SqliteMigration createFtsMigration(
{required int migrationVersion,
required String tableName,
required List columns,
String tokenizationMethod = 'unicode61'}) {
String internalName =
schema.tables.firstWhere((table) => table.name == tableName).internalName;
String stringColumns = columns.join(', ');
return SqliteMigration(migrationVersion, (tx) async {
// Add FTS table
await tx.execute('''
CREATE VIRTUAL TABLE IF NOT EXISTS fts_$tableName
USING fts5(id UNINDEXED, $stringColumns, tokenize='$tokenizationMethod');
''');
// Copy over records already in table
await tx.execute('''
INSERT INTO fts_$tableName(rowid, id, $stringColumns)
SELECT rowid, id, ${generateJsonExtracts(ExtractType.columnOnly, 'data', columns)}
FROM $internalName;
''');
// Add INSERT, UPDATE and DELETE and triggers to keep fts table in sync with table
await tx.execute('''
CREATE TRIGGER IF NOT EXISTS fts_insert_trigger_$tableName AFTER INSERT
ON $internalName
BEGIN
INSERT INTO fts_$tableName(rowid, id, $stringColumns)
VALUES (
NEW.rowid,
NEW.id,
${generateJsonExtracts(ExtractType.columnOnly, 'NEW.data', columns)}
);
END;
''');
await tx.execute('''
CREATE TRIGGER IF NOT EXISTS fts_update_trigger_$tableName AFTER UPDATE
ON $internalName BEGIN
UPDATE fts_$tableName
SET ${generateJsonExtracts(ExtractType.columnInOperation, 'NEW.data', columns)}
WHERE rowid = NEW.rowid;
END;
''');
await tx.execute('''
CREATE TRIGGER IF NOT EXISTS fts_delete_trigger_$tableName AFTER DELETE
ON $internalName BEGIN
DELETE FROM fts_$tableName WHERE rowid = OLD.rowid;
END;
''');
});
}
```
After this is run, you should have the following tables and triggers in your SQLite DB:
### FTS Search Delegate
To show off this new functionality, we have incorporated FTS into the search button at the top of the screen in the To-Do List demo app:
Clicking on the search icon will open a search bar which will allow you to search for `lists` or `todos` that you have generated.
It uses a custom search delegate widget found in [widgets/fts\_search\_delegate.dart](https://github.com/powersync-ja/powersync.dart/blob/master/demos/supabase-todolist/lib/widgets/fts_search_delegate.dart) (Flutter) and [widgets/SearchBarWidget.tsx](https://github.com/powersync-ja/powersync-js/blob/main/demos/react-supabase-todolist/src/components/widgets/SearchBarWidget.tsx) (Web) to display the search results.
### FTS Helper
We added a helper in [lib/fts\_helpers.dart](https://github.com/powersync-ja/powersync.dart/blob/master/demos/supabase-todolist/lib/fts_helpers.dart) (Flutter) and [utils/fts\_helpers](https://github.com/powersync-ja/powersync-js/blob/main/demos/react-supabase-todolist/src/app/utils/fts_helpers.ts)[.ts](https://github.com/powersync-ja/powersync-js/blob/main/demos/react-supabase-todolist/src/app/utils/fts_helpers.ts) (Web) that allows you to add additional search functionality which can be found in the [SQLite FTS5 extension](https://www.sqlite.org/fts5.html) documentation.
**Dart example:**
```dart
// lib/fts_helpers.dart
String _createSearchTermWithOptions(String searchTerm) {
// adding * to the end of the search term will match any word that starts with the search term
// e.g. searching bl will match blue, black, etc.
// consult FTS5 Full-text Query Syntax documentation for more options
String searchTermWithOptions = '$searchTerm*';
return searchTermWithOptions;
}
/// Search the FTS table for the given searchTerm and return results ordered by the
/// rank of their relevance
Future search(String searchTerm, String tableName) async {
String searchTermWithOptions = _createSearchTermWithOptions(searchTerm);
return await db.execute(
'SELECT * FROM fts_$tableName WHERE fts_$tableName MATCH ? ORDER BY rank',
[searchTermWithOptions]);
}
```
# Infinite Scrolling
Source: https://docs.powersync.com/usage/use-case-examples/infinite-scrolling
Infinite scrolling is a software design technique that loads content continuously as the user scrolls down the page/screen.
There are a few ways to accomplish infinite scrolling with PowerSync, either by querying data from the local SQLite database, or by [lazy-loading](https://en.wikipedia.org/wiki/Lazy_loading) or lazy-syncing data from your backend.
Here is an overview of the different options with pros and cons:
### 1) Pre-sync all data and query the local database
PowerSync currently [performs well](/resources/performance-and-limits) with syncing up to 100,000 rows per client, with plans to scale to over 1,000,000 rows per client soon.
This means that in many cases, you can sync a sufficient amount of data to let a user keep scrolling a list or feed that basically feels "infinite" to them.
| Pros | Cons |
| ----------------------------------------------------------------------------------------------------------------------------------------------------------------------------------------------------- | ------------------------------------------------------------------------------------------------------------------------------------------------------------------------------------------------------------------------------------------------------------------------------------------------------------------------------------------------------------------------------------------------------ |
| It works offline and is low-latency (data loads quickly from the local database). We don't need to load data from the backend via the network when the user reaches the bottom of the page/feed/list. | There will be cases where this approach won't work because the total volume of data might become too large for the local database - for example, when there's a wide range of tables that the user needs to be able to infinite scroll. Your app allows the user to apply filters to the displayed data, which results in fewer pages displayed from a large dataset, and therefore limited scrolling. |
### 2) Control data sync using client parameters
PowerSync supports the use of [client parameters](/usage/sync-rules/advanced-topics/client-parameters) which are specified directly by the client (i.e. not only through the [authentication token](/installation/authentication-setup/custom)). The app can dynamically change these parameters on the client-side and they can be accessed in sync rules on the server-side. The developer can use these parameters to limit/control which data is synced, but since they are not trusted (because they are not passed via the JWT authentication token) they should not be used for access control. You should still filter data by e.g. user ID for access control purposes (using [token parameters](/usage/sync-rules/parameter-queries) from the JWT).
Usage example: To lazy-load/lazy-sync data for infinite scrolling, you could split your data into 'pages' and use a client parameter to specify which pages to sync to a user.
| Pros | Cons |
| --------------------------------------------------------------------------------------------------------------- | ------------------------------------------------------------------------------------------------------------------------------------- |
| Does not require updating flags in your backend database. Enables client-side control over what data is synced. | We can only sync additional data when the user is online. There will be latency while the user waits for the additional data to sync. |
### 3) Sync limited data and then load more data from an API
In this scenario we can sync a smaller number of rows to the user initially. If the user reaches the end of the page/feed/list, we make an online API call to load additional data from the backend to display to the user.
| Pros | Cons |
| ---------------------------------------------------------------------------------------------- | ----------------------------------------------------------------------------------------------------------------------------------------------------------------------------------------------------------------------------------------------------------------------------------------------------------- |
| This requires syncing less data to each user, which will result in a faster initial sync time. | We can only load additional data when the user is online. There will be some latency to load the additional data (similar to a cloud-first app making API calls). In your app code, records loaded from the API will have to be treated differently from the records loaded from the local SQLite database. |
### 4) Client-side triggers a server-side function to flag data to sync
You could add a flag to certain records in your backend database which are used by your [Sync Rules](/usage/sync-rules) to determine which records to sync to specific users. Then your app could make an API call which triggers a function that updates the flags on certain records, causing more records to be synced to the user.
| Pros | Cons |
| ---------------------------------------------------------------------------------------------- | -------------------------------------------------------------------------------------------------------------------------------------------------------------------------------------------------------------------------------------------------------------------------------------------------------------------------- |
| This requires syncing less data to each user, which will result in a faster initial sync time. | We can only perform the trigger and sync additional data when the user is online. There will be higher latency: Both for the API call to update the flags, and for syncing the additional data. We do not necessarily recommend going this route: There's higher latency and it's not a particularly elegant architecture. |
## Questions, Comments, Suggestions?
[Let us know on Discord](https://discord.gg/powersync).
# Local-only Usage
Source: https://docs.powersync.com/usage/use-case-examples/offline-only-usage
Some use cases require data persistence before the user has registered or signed in.
In some of those cases, the user may want to register and start syncing data with other devices or users at a later point, while other users may keep on using the app without ever registering or going online."
PowerSync supports these scenarios. By default, all local changes will be stored in the upload queue, and will be uploaded to the backend server if the user registers at a later point.
A caveat is that if the user never registers, this queue will keep on growing in size indefinitely. For many applications this should be small enough to not be significant, but some data-intensive applications may want to avoid the indefinite queue growth.
There are two general approaches we recommend for this:
### 1. Local-only tables
```dart
final table = Table.localOnly(
...
)
```
```js
const lists = new Table({
...
}, {
localOnly: true
});
```
```kotlin
val Table = Table(
...
localOnly = true
)
```
```swift
let table = Table(
...
localOnly: true
)
```
Use local-only tables until the user has registered or signed in. This would not store any data in the upload queue, avoiding any overhead or growth in database size.
Once the user registers, move the data over to synced tables, at which point the data would be placed in the upload queue.
The following example implementations are available:
| Client framework | Link |
| -------------------------------------- | ------------------------------------------------------------------------------------------------------------------------------------------- |
| Flutter To-Do List App (with Supabase) | [supabase-todolist-optional-sync](https://github.com/powersync-ja/powersync.dart/tree/main/demos/supabase-todolist-optional-sync) |
| React To-Do List App (with Supabase) | [react-supabase-todolist-optional-sync](https://github.com/powersync-ja/powersync-js/tree/main/demos/react-supabase-todolist-optional-sync) |
### 2. Clearing the upload queue
The upload queue can be cleared periodically (for example on every app start-up), avoiding the growth in database size over time. This can be done using:
```sql
DELETE FROM ps_crud
```
It is up to the application to then re-create the queue when the user registers, or upload data directly from the existing tables instead.
A small amount of metadata per row is also stored in the `ps_oplog` table. We do not recommend deleting this data, as it can cause or hide consistency issues when later uploading the data. If the overhead in `ps_oplog` is too much, rather use the local-only tables approach.
# PostGIS
Source: https://docs.powersync.com/usage/use-case-examples/postgis
Custom types, arrays and [PostGIS](https://postgis.net/) are frequently presented together since geospatial data is often complex and multidimensional.
## Overview
It's therefore recommend to first quickly scan the content in [Custom Types, Arrays and JSON](/usage/use-case-examples/custom-types-arrays-and-json)
PowerSync integrates well with PostGIS and provides tools for working with geo data.
### PostGIS
In Supabase, the PostGIS extension needs to be added to your project to use this type. Run the following command in the SQL editor to include the PostGIS extension:
```sql
CREATE extension IF NOT EXISTS postgis;
```
The `geography` and `geometry` types are now available in your Postgres.
## Supabase Configuration Example:
This example builds on the To-Do List demo app in our [Supabase integration guide](/integration-guides/supabase-+-powersync).
### Add custom type, array and PostGIS columns to the `todos` table
```sql
--SQL command to update the todos table with 3 additional columns:
ALTER TABLE todos
ADD COLUMN address location_address null,
ADD COLUMN contact_numbers text [] null,
ADD COLUMN location geography (point) null
```
### Insert a row of data into the table
```sql
-- Grab the id of a list object and a user id and create a new todos
INSERT INTO public.todos(description, list_id, created_by, address, location, contact_numbers) VALUES ('Bread', 'list_id', 'user_id', '("1000 S Colorado Blvd.","Denver","CO",80211)', st_point(39.742043, -104.991531), '{000-000-0000, 000-000-0000, 000-000-0000}');
```
Note the following:
**Custom type**: Specify the value for the `address` column by wrapping the value in single quotes and comma separate the different location\_address properties.
* `'("1000 S Colorado Blvd.","Denver","CO",80211)'`
**Array**: Specify the value of the `contact_numbers` column, by surrounding the comma-separated array items in curly braces.
* `'{000-000-0000, 000-000-0000, 000-000-0000}'`
**PostGIS**: Specify the value of the `location` column by using the `st_point` function and pass in the latitude and longitude
* `st_point(39.742043, -104.991531)`
### What this data looks like when querying from the PowerSync Dashboard
These data types show up as follows when querying from the [PowerSync Dashboard](https://powersync.journeyapps.com/)'s SQL Query editor:
```sql
SELECT * from todos WHERE location IS NOT NULL
```
| location |
| -------------------------------------------------- |
| 0101000020E6100000E59CD843FBDE4340E9818FC18AC052C0 |
This is Postgres' internal binary representation of the PostGIS type.
## On the Client
### AppSchema example
```js
export const AppSchema = new Schema([
new Table({
name: 'todos',
columns: [
new Column({ name: 'list_id', type: ColumnType.TEXT }),
new Column({ name: 'created_at', type: ColumnType.TEXT }),
new Column({ name: 'completed_at', type: ColumnType.TEXT }),
new Column({ name: 'description', type: ColumnType.TEXT }),
new Column({ name: 'completed', type: ColumnType.INTEGER }),
new Column({ name: 'created_by', type: ColumnType.TEXT }),
new Column({ name: 'completed_by', type: ColumnType.TEXT }),
new Column({name: 'address', type: ColumnType.TEXT}),
new Column({name: 'contact_numbers', type: ColumnType.TEXT})
new Column({name: 'location', type: ColumnType.TEXT}),
],
indexes: [new Index({ name: 'list', columns: [new IndexedColumn({ name: 'list_id' })] })]
}),
new Table({
name: 'lists',
columns: [
new Column({ name: 'created_at', type: ColumnType.TEXT }),
new Column({ name: 'name', type: ColumnType.TEXT }),
new Column({ name: 'owner_id', type: ColumnType.TEXT })
]
})
]);
```
Note:
* The custom type, array and PostGIS type have been defined as `TEXT` in the AppSchema. The Postgres PostGIS capabilities are not available because the PowerSync SDK uses SQLite, which only has a limited number of types. This means that everything is replicated into the SQLite database as TEXT values.
* Depending on your application, you may need to implement functions in the client to parse the values and then other functions to write them back to the Postgres database.
### What does the data look like in SQLite?
The data looks exactly how it’s stored in the Postgres database i.e.
1. **Custom Type**: It has the same format as if you inserted it using a SQL statement, i.e.
1. `(1000 S Colorado Blvd.,Denver,CO,80211)`
2. **Array**: Array types act similar in that it shows the data in the same way it was inserted e.g
1. `{000-000-0000, 000-000-0000, 000-000-0000}`
3. **PostGIS**: The `geography` type is transformed into an encoded form of the value.
1. If you insert coordinates as `st_point(39.742043, -104.991531)` then it is shown as `0101000020E6100000E59CD843FBDE4340E9818FC18AC052C0`
## Sync Rules
### PostGIS
Example use case: Extract x (long) and y (lat) values from a PostGIS type, to use these values independently in an application.
Currently, PowerSync supports the following functions that can be used when selecting data in your sync rules: [Operators and Functions](/usage/sync-rules/operators-and-functions)
1. `ST_AsGeoJSON`
2. `ST_AsText`
3. `ST_X`
4. `ST_Y`
IMPORTANT NOTE: These functions will only work if your Postgres instance has the PostGIS extension installed and you’re storing values as type `geography` or `geometry`.
```yaml
# sync-rules.yaml
bucket_definitions:
global:
data:
- SELECT * FROM lists
- SELECT *, st_x(location) as longitude, st_y(location) as latitude from todos
```
# Prioritized Sync
Source: https://docs.powersync.com/usage/use-case-examples/prioritized-sync
In some scenarios, you may want to sync tables using different priorities. For example, you may want to sync a subset of all tables first to log a user in as fast as possible, then sync the remaining tables in the background.
# Overview
PowerSync supports defining [Sync Bucket](/usage/sync-rules/organize-data-into-buckets) Priorities, which allows you to control the sync order for different data sets. This is particularly useful when certain data should be available sooner than others.
**Availability**
This feature is available in all PowerSync Cloud instances, and was released in version **1.7.1** of the [PowerSync Service](https://hub.docker.com/r/journeyapps/powersync-service) for self-hosted deployments.
It is available in all client SDKs: [Flutter v1.12.0](/client-sdk-references/flutter), [React Native v1.18.1](/client-sdk-references/react-native-and-expo), [JavaScript Web v1.24.2](/client-sdk-references/javascript-web), [Kotlin Multiplatform v1.0.0-BETA26](/client-sdk-references/kotlin-multiplatform) and [Swift v1.0.0-Beta.8](/client-sdk-references/swift).
# Why Use Sync Bucket Priorities?
PowerSync's standard sync protocol ensures that:
* The local data view is only updated when a fully consistent checkpoint is available.
* All pending local changes must be uploaded, acknowledged, and synced back before new data is applied.
While this guarantees consistency, it can lead to delays, especially for large datasets or continuous client-side updates. Sync Bucket Priorities provide a way to speed up syncing of high-priority data while still maintaining overall integrity.
# How It Works
Each sync bucket is assigned a priority value between 0 and 3, where:
* 0 is the highest priority and has special behavior (detailed below).
* 3 is the default and lowest priority.
* Lower numbers indicate higher priority.
Buckets with higher priorities sync first, and lower-priority buckets sync later. It's worth noting that if you only use a single priority, there is no difference between priorities 1-3. The difference only comes in if you use multiple different priorities.
# Syntax and Configuration
Priorities can be defined for a bucket using the `priority` YAML key, or with the `_priority` attribute inside parameter queries:
```yaml
bucket_definitions:
# Using the `priority` YAML key
user_data:
priority: 1
parameters: SELECT request.user_id() as id where...;
data:
# ...
# Using the `_priority` attribute
project_data:
parameters: select id as project_id, 2 as _priority from projects where ...; # This approach is useful when you have multiple parameter queries with different priorities.
data:
# ...
```
Note:
* Priorities must be static and cannot depend on row values within a parameter query.
Your Sync Rules file in the PowerSync Dashboard may show a "must NOT have additional properties" error which can safely be ignored. Your Sync Rules should still pass validation. We will improve this error in a future release.
# Example: Syncing Lists Before Todos
Consider a scenario where you want to display lists immediately while loading todos in the background. This approach allows users to view and interact with lists right away without waiting for todos to sync. Here's how to configure sync priorities in your Sync Rules to achieve this:
```yaml
bucket_definitions:
user_lists:
# Sync the user's lists with a higher priority
priority: 1
parameters: select id as list_id from lists where user_id = request.user_id()
data:
- select * from lists where id = bucket.list_id
user_todos:
# Sync the user's todos with a lower priority
priority: 3
parameters: select id as todo_id from todos where list_id in (select id from lists where user_id = request.user_id())
data:
- select * from todos where list_id = bucket.todo_id
```
In this configuration:
The `lists` bucket has the default priority of 1, meaning it syncs first.
The `todos` bucket is assigned a priority of 2, meaning it may sync only after the lists have been synced.
# Behavioral Considerations
* **Interruption for Higher Priority Data**: Syncing lower-priority buckets *may* be interrupted if new data for higher-priority buckets arrives.
* **Local Changes & Consistency**: If local writes fail due to validation or permission issues, they are only reverted after *all* buckets sync.
* **Deleted Data**: Deleted data may only be removed after *all* buckets have synced. Future updates may improve this behavior.
* **Data Ordering**: Data in lower-priority buckets will never appear before higher-priority data.
## Special Case: Priority 0
Priority 0 buckets sync regardless of pending uploads.
For example, in a collaborative document editing app (e.g., using Yjs), each change is stored as a separate row. Since out-of-order updates don’t affect document integrity, Priority 0 can ensure immediate availability of updates.
Caution: If misused, Priority 0 may cause flickering or inconsistencies, as updates could arrive out of order.
# Consistency Considerations
PowerSync's full consistency guarantees only apply once all buckets have completed syncing.
When higher-priority buckets are synced, all inserts and updates within the buckets for the specific priority will be consistent. However, deletes are only applied when the full sync completes, so you may still have some stale data within those buckets.
Consider the following example:
Imagine a task management app where users create lists and todos. Some users have millions of todos. To improve first-load speed:
* Lists are assigned Priority 1, syncing first to allow UI rendering.
* Todos are assigned Priority 2, loading in the background.
Now, if another user adds new todos, it’s possible for the list count (synced at Priority 1) to temporarily not match the actual todos (synced at Priority 2). If real-time accuracy is required, both lists and todos should use the same priority.
# Client-Side Considerations
PowerSync's client SDKs provide APIs to allow applications to track sync status at different priority levels. Developers can leverage these to ensure critical data is available before proceeding with UI updates or background processing. This includes:
1. `waitForFirstSync(priority: int)`. When passing the optional `priority` parameter to this method, it will wait for specific priority level to complete syncing.
2. `SyncStatus.priorityStatusEntries()` A list containing sync information for each priority that was seen by the PowerSync Service.
3. `SyncStatus.statusForPriority(priority: int)` This method takes a fixed priority and returns the sync state for that priority by looking it up in `priorityStatusEntries`.
## Example
Using the above we can render a lists component only once the user's lists (with priority 1) have completed syncing, else display a message indicating that the sync is still in progress:
```dart
// Define the priority level of the lists bucket
static final _listsPriority = BucketPriority(1);
@override
Widget build(BuildContext context) {
// Use FutureBuilder to wait for the first sync of the specified priority to complete
return FutureBuilder(
future: db.waitForFirstSync(priority: _listsPriority),
builder: (context, snapshot) {
if (snapshot.connectionState == ConnectionState.done) {
// Use StreamBuilder to render the lists once the sync completes
return StreamBuilder(
stream: TodoList.watchListsWithStats(),
builder: (context, snapshot) {
if (snapshot.data case final todoLists?) {
return ListView(
padding: const EdgeInsets.symmetric(vertical: 8.0),
children: todoLists.map((list) {
return ListItemWidget(list: list);
}).toList(),
);
} else {
return const CircularProgressIndicator();
}
},
);
} else {
return const Text('Busy with sync...');
}
},
);
}
```
Example implementations of prioritized sync are also available in the following apps:
* Flutter: [Supabase To-Do List](https://github.com/powersync-ja/powersync.dart/tree/main/demos/supabase-todolist)
* Kotlin Multiplatform:
* [Supabase To-Do List (KMP)](https://github.com/powersync-ja/powersync-kotlin/blob/main/demos/supabase-todolist/shared/src/commonMain/kotlin/com/powersync/demos/App.kt#L46)
* [Supabase To-Do List (Android)](https://github.com/powersync-ja/powersync-kotlin/blob/main/demos/android-supabase-todolist/app/src/main/java/com/powersync/androidexample/screens/HomeScreen.kt#L69)
* Swift: [Supabase To-Do List](https://github.com/powersync-ja/powersync-swift/tree/main/Demo)
# Raw SQLite Tables to Bypass JSON View Limitations
Source: https://docs.powersync.com/usage/use-case-examples/raw-tables
Use raw tables for native SQLite functionality and improved performance.
Raw tables are an experimental feature. We're actively seeking feedback on:
* API design and developer experience
* Additional features or optimizations needed
Join our [Discord community](https://discord.gg/powersync) to share your experience and get help.
By default, PowerSync uses a [JSON-based view system](/architecture/client-architecture#schema) where data is stored schemalessly in JSON format and then presented through SQLite views based on the client-side schema. Raw tables allow you to define native SQLite tables in the client-side schema, bypassing this.
This eliminates overhead associated with extracting values from the JSON data and provides access to advanced SQLite features like foreign key constraints and custom indexes.
**Availability**
Raw tables were introduced in the following versions of our client SDKs:
* **JavaScript** (Node: `0.8.0`, React-Native: `1.23.0`, Web: `1.24.0`)
* **Dart**: Version 1.15.0 of `package:powersync`.
* **Kotlin**: Version 1.3.0
* **Swift**: Version 1.3.0
Also note that raw tables are only supported by the new [Rust-based sync client](https://releases.powersync.com/announcements/improved-sync-performance-in-our-client-sdks), which is currently opt-in.
## When to Use Raw Tables
Consider raw tables when you need:
* **Advanced SQLite features** like `FOREIGN KEY` and `ON DELETE CASCADE` constraints
* **Indexes** - PowerSync's default schema has basic support for indexes on columns, while raw tables give you complete control to create indexes on expressions, use `GENERATED` columns, etc
* **Improved performance** for complex queries (e.g., `SELECT SUM(value) FROM transactions`) - raw tables more efficiently get these values directly from the SQLite column, instead of extracting the value from the JSON object on every row
* **Reduced storage overhead** - eliminate JSON object overhead for each row in `ps_data__.data` column
* **To manually create tables** - Sometimes you need full control over table creation, for example when implementing custom triggers
## How Raw Tables Work
### Current JSON-Based System
Currently the sync system involves two general steps:
1. Download sync bucket operations from the PowerSync Service
2. Once the client has a complete checkpoint and no pending local changes in the upload queue, sync the local database with the bucket operations
The bucket operations use JSON to store the individual operation data. The local database uses tables with a simple schemaless `ps_data__` structure containing only an `id` (TEXT) and `data` (JSON) column.
PowerSync automatically creates views on that table that extract JSON fields to resemble standard tables reflecting your schema.
### Raw Tables Approach
When opting in to raw tables, you are responsible for creating the tables before using them - PowerSync will no longer create them automatically.
Because PowerSync takes no control over raw tables, you need to manually:
1. Tell PowerSync how to map the [schemaless protocol](/architecture/powersync-protocol#protocol) to your raw tables when syncing data.
2. Configure custom triggers to forward local writes to PowerSync.
For the purpose of this example, consider a simple table like this:
```sql
CREATE TABLE todo_lists (
id TEXT NOT NULL PRIMARY KEY,
created_by TEXT NOT NULL,
title TEXT NOT NULL,
content TEXT
) STRICT;
```
#### Syncing into raw tables
To sync into the raw `todo_lists` table instead of `ps_data__`, PowerSync needs the SQL statements extracting
columns from the untyped JSON protocol used during syncing.
This involves specifying two SQL statements:
1. A `put` SQL statement for upserts, responsible for creating a `todo_list` row or updating it based on its `id` and data columns.
2. A `delete` SQL statement responsible for deletions.
The PowerSync client as part of our SDKs will automatically run these statements in response to sync lines being sent from the PowerSync Service.
To reference the ID or extract values, prepared statements with parameters are used. `delete` statements can reference the id of the affected row, while `put` statements can also reference individual column values.
Declaring these statements and parameters happens as part of the schema passed to PowerSync databases:
Raw tables are not included in the regular `Schema()` object. Instead, add them afterwards using `withRawTables`.
For each raw table, specify the `put` and `delete` statement. The values of parameters are described as a JSON
array either containing:
* the string `Id` to reference the id of the affected row.
* the object `{ Column: name }` to reference the value of the column `name`.
```JavaScript
const mySchema = new Schema({
// Define your PowerSync-managed schema here
// ...
});
mySchema.withRawTables({
// The name here doesn't have to match the name of the table in SQL. Instead, it's used to match
// the table name from the backend database as sent by the PowerSync service.
todo_lists: {
put: {
sql: 'INSERT OR REPLACE INTO todo_lists (id, created_by, title, content) VALUES (?, ?, ?, ?)',
params: ['Id', { Column: 'created_by' }, { Column: 'title' }, { Column: 'content' }]
},
delete: {
sql: 'DELETE FROM lists WHERE id = ?',
params: ['Id']
}
}
});
```
We will simplify this API after understanding the use-cases for raw tables better.
Raw tables are not part of the regular tables list and can be defined with the optional `rawTables` parameter.
```dart
final schema = Schema(const [], rawTables: const [
RawTable(
// The name here doesn't have to match the name of the table in SQL. Instead, it's used to match
// the table name from the backend database as sent by the PowerSync service.
name: 'todo_lists',
put: PendingStatement(
sql: 'INSERT OR REPLACE INTO todo_lists (id, created_by, title, content) VALUES (?, ?, ?, ?)',
params: [
PendingStatementValue.id(),
PendingStatementValue.column('created_by'),
PendingStatementValue.column('title'),
PendingStatementValue.column('content'),
],
),
delete: PendingStatement(
sql: 'DELETE FROM todo_lists WHERE id = ?',
params: [
PendingStatementValue.id(),
],
),
),
]);
```
To define a raw table, include it in the list of tables passed to the `Schema`:
```Kotlin
val schema = Schema(listOf(
RawTable(
// The name here doesn't have to match the name of the table in SQL. Instead, it's used to match
// the table name from the backend database as sent by the PowerSync service.
name = "todo_lists",
put = PendingStatement(
"INSERT OR REPLACE INTO todo_lists (id, created_by, title, content) VALUES (?, ?, ?, ?)",
listOf(
PendingStatementParameter.Id,
PendingStatementParameter.Column("created_by"),
PendingStatementParameter.Column("title"),
PendingStatementParameter.Column("content")
)
),
delete = PendingStatement(
"DELETE FROM todo_lists WHERE id = ?", listOf(PendingStatementParameter.Id)
)
)
))
```
To define a raw table, include it in the list of tables passed to the `Schema`:
```Swift
let lists = RawTable(
name: "todo_lists",
put: PendingStatement(
sql: "INSERT OR REPLACE INTO todo_lists (id, created_by, title, content) VALUES (?, ?, ?, ?)",
parameters: [.id, .column("created_by"), .column("title"), .column("content")]
),
delete: PendingStatement(
sql: "DELETE FROM todo_lists WHERE id = ?",
parameters: [.id],
),
)
let schema = Schema(lists)
```
Unfortunately, raw tables are not available in the .NET SDK yet.
***
After adding raw tables to the schema, you're also responsible for creating them by executing the
corresponding `CREATE TABLE` statement before `connect()`-ing the database.
#### Collecting local writes on raw tables
PowerSync uses an internal SQLite table to collect local writes. For PowerSync-managed views, a trigger for
insertions, updates and deletions automatically forwards local mutations into this table.
When using raw tables, defining those triggers is your responsibility.
The [PowerSync SQLite extension](https://github.com/powersync-ja/powersync-sqlite-core) creates an insert-only virtual table named `powersync_crud` with these columns:
```SQL
CREATE VIRTUAL TABLE powersync_crud(
-- The type of operation: 'PUT' or 'DELETE'
op TEXT,
-- The id of the affected row
id TEXT,
type TEXT,
-- optional (not set on deletes): The column values for the row
data TEXT,
-- optional: Previous column values to include in a CRUD entry
old_values TEXT,
-- optional: Metadata for the write to include in a CRUD entry
metadata TEXT,
);
```
The virtual table associates local mutations with the current transaction and ensures writes made during the sync
process (applying server-side changes) don't count as local writes.
This means that triggers can be defined on raw tables like so:
```SQL
CREATE TRIGGER todo_lists_insert
AFTER INSERT ON todo_lists
FOR EACH ROW
BEGIN
INSERT INTO powersync_crud (op, id, type, data) VALUES ('PUT', NEW.id, 'todo_lists', json_object(
'created_by', NEW.created_by,
'title', NEW.title,
'content', NEW.content
));
END;
CREATE TRIGGER todo_lists_update
AFTER INSERT ON todo_lists
FOR EACH ROW
BEGIN
INSERT INTO powersync_crud (op, id, type, data) VALUES ('PUT', NEW.id, 'todo_lists', json_object(
'created_by', NEW.created_by,
'title', NEW.title,
'content', NEW.content
));
END;
CREATE TRIGGER todo_lists_delete
AFTER DELETE ON todo_lists
FOR EACH ROW
BEGIN
INSERT INTO powersync_crud (op, id, type) VALUES ('DELETE', OLD.id, 'todo_lists');
END;
```
## Migrations
In PowerSync's [JSON-based view system](/architecture/client-architecture#schema) the client-side schema is applied to the schemaless data, meaning no migrations are required. Raw tables however are excluded from this, so it is the developers responsibility to manage migrations for these tables.
### Adding raw tables as a new table
When you're adding new tables to your sync rules, clients will start to sync data on those tables - even if the tables aren't mentioned
in the client's schema yet.
So at the time you're introducing a new raw table to your app, it's possible that PowerSync has already synced some data for that
table, which would be stored in `ps_untyped`. When adding regular tables, PowerSync will automatically extract rows from `ps_untyped`.
With raw tables, that step is your responsibility. To copy data, run these statements in a transaction after creating the table:
```
INSERT INTO my_table (id, my_column, ...)
SELECT id, data ->> 'my_column' FROM ps_untyped WHERE type = 'my_table';
DELETE FROM ps_untyped WHERE type = 'my_table';
```
This does not apply if you've been using the raw table from the beginning (and never called `connect()` without them) - you only
need this for raw tables you already had locally.
Another workaround is to clear PowerSync data when changing raw tables and opt for a full resync.
### Migrating to raw tables
To migrate from PowerSync-managed tables to raw tables, first:
1. Open the database with the new schema mentioning raw tables. PowerSync will copy data from tables previously managed by PowerSync into
`ps_untyped`.
2. Create raw tables.
3. Run the `INSERT FROM SELECT` statement to insert `ps_untyped` data into your raw tables.
### Migrations on raw tables
When adding new columns to raw tables, there currently isn't a way to re-sync that table to add those columns from the server - we are
investigating possible workarounds and encourage users to try out if they need this.
To ensure the column values are accurate, you'd have to delete all data after a migration and wait for the next complete sync.
## Deleting data and raw tables
APIs that clear an entire PowerSync database, like e.g. `disconnectAndClear()`, don't affect raw tables.
This should be kept in mind when you're using those methods - data from raw tables needs to be deleted explicitly.