> ## Documentation Index
> Fetch the complete documentation index at: https://docs.powersync.com/llms.txt
> Use this file to discover all available pages before exploring further.
# Local Development with Supabase and PowerSync
> Set up local development with Supabase and PowerSync.
Developers using [Supabase local dev](https://supabase.com/docs/guides/cli) might prefer being able to develop against PowerSync locally too, for use cases such as running end-to-end integration tests.
Local development is possible with either self-hosted PowerSync or PowerSync Cloud instances. Self-hosting PowerSync for local development is the recommended workflow as it's more user-friendly.
## Self-hosted Supabase & PowerSync (via Docker)
An example implementation and demo is available here:
See the README for instructions.
## Self-hosted Supabase & PowerSync Cloud (via ngrok)
This guide describes an example local dev workflow that uses ngrok and the PowerSync CLI.
This guide assumes that you have both ngrok and the Supabase CLI installed
This guide only covers using ngrok. Other configurations such as an NGINX reverse proxy are also possible.
### Configure Supabase for SSL
```bash theme={null}
# start supabase
supabase start
# get the name of the supabase-db container
docker ps -f name=supabase-db --format '{{.Names}}'
# The rest of the script assumes it's "supabase-db_supabase-test"
# bash in the container
docker exec -it supabase-db_supabase-test /bin/bash
# Now run in the container:
cd /etc/postgresql-custom
# Create a cert
openssl req -days 3650 -new -text -nodes -subj '/C=US/O=Dev/CN=supabase_dev' -keyout server.key -out server.csr
openssl req -days 3650 -x509 -text -in server.csr -key server.key -out server.cert
chown postgres:postgres server.*
# Enable ssl
echo -e '\n\nssl = on\nssl_ciphers = '\''HIGH:MEDIUM:+3DES:!aNULL'\''\nssl_prefer_server_ciphers = on\nssl_cert_file = '\''/etc/postgresql-custom/server.cert'\''\nssl_key_file = '\''/etc/postgresql-custom/server.key'\''' >> supautils.conf
# Now Ctrl+D to exit bash, and restart the container:
docker restart supabase-db_supabase-test
# Check logs for any issues:
docker logs supabase-db_supabase-test
# (optional, for debugging) validate SSL is enabled
psql -d postgres postgres
postgres=> show ssl; # should return "on"
```
### Start ngrok
Here we obtain the local port that supabase is listening on and initialize ngrok using it.
```bash theme={null}
# look for the PORTS value of the supabase-db_supabase-test container
docker ps -f name=supabase-db --format '{{.Ports}}'
# should see something like 0.0.0.0:54322->5432/tcp
# use the first port
ngrok tcp 54322
# should then see something like this:
Forwarding tcp://4.tcp.us-cal-1.ngrok.io:19263 -> localhost:54322
```
Make a note of the hostname (`4.tcp.us-cal-1.ngrok.io` and port number `19263`), your values will differ.
### Connect PowerSync (GUI)
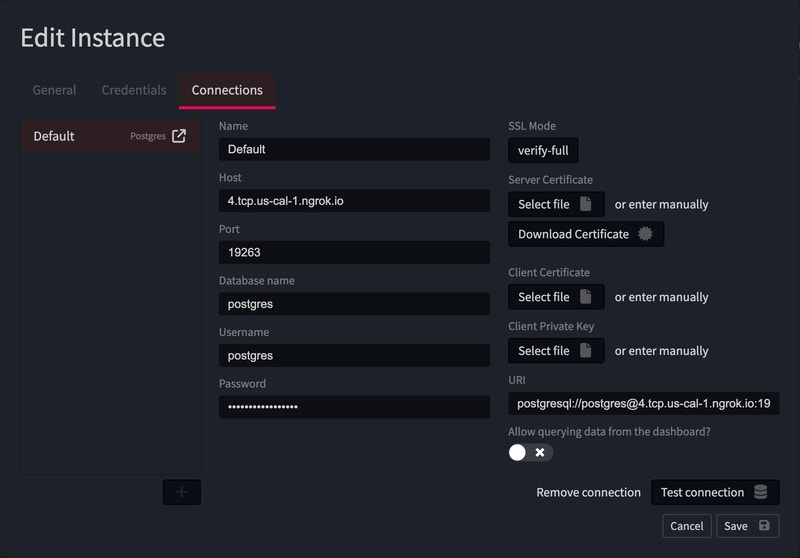
1. Configure your PowerSync instance using the hostname and port number you noted previously. The default postgres password is "postgres", you may want to change this. NOTE: make sure that the `Host` field does not contain the `tcp://` URI Scheme outputted by ngrok
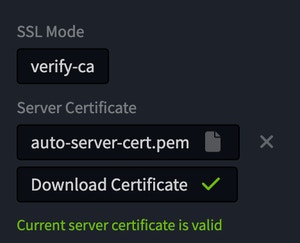
 2. Set the SSL Mode to `verify-ca` and click Download certificate
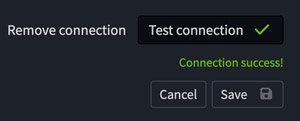
 3. Click "**Test Connection**"
 4. Click "**Save**" to provision your instance
### Connect PowerSync (CLI)
Refer to: [CLI (Beta)](/tools/cli)
### Integration Test Example
Coming soon. Reach us on [Discord](https://discord.gg/powersync) in the meantime if you have any questions about testing.
4. Click "**Save**" to provision your instance
### Connect PowerSync (CLI)
Refer to: [CLI (Beta)](/tools/cli)
### Integration Test Example
Coming soon. Reach us on [Discord](https://discord.gg/powersync) in the meantime if you have any questions about testing.