> ## Documentation Index
> Fetch the complete documentation index at: https://docs.powersync.com/llms.txt
> Use this file to discover all available pages before exploring further.
# Neon + PowerSync
> Build highly responsive, synced apps with Neon and PowerSync using a TypeScript demo app.
Used in conjunction with **Neon**, PowerSync enables developers to build synced, local-first & offline-first apps that are robust in poor network conditions and that have highly responsive frontends while relying on [Neon](https://neon.tech/) for their backend. This guide provides instructions for how to configure PowerSync for use with your Neon project.
Before you proceed, this guide assumes that you have already signed up for free accounts with both Neon and PowerSync Cloud (our cloud-hosted offering). If you haven't signed up for a **PowerSync** (Cloud) account yet, [click here](https://accounts.powersync.com/portal/powersync-signup?s=docs) (and if you haven't signed up for Neon yet, [do so now](https://console.neon.tech/signup)).
For web apps, this guide assumes that you have [pnpm](https://pnpm.io/installation#using-npm) installed.
This guide takes 10-15 minutes to complete.
## Architecture
Upon successful integration of Neon + PowerSync, your system architecture will look like this: (click to enlarge image)
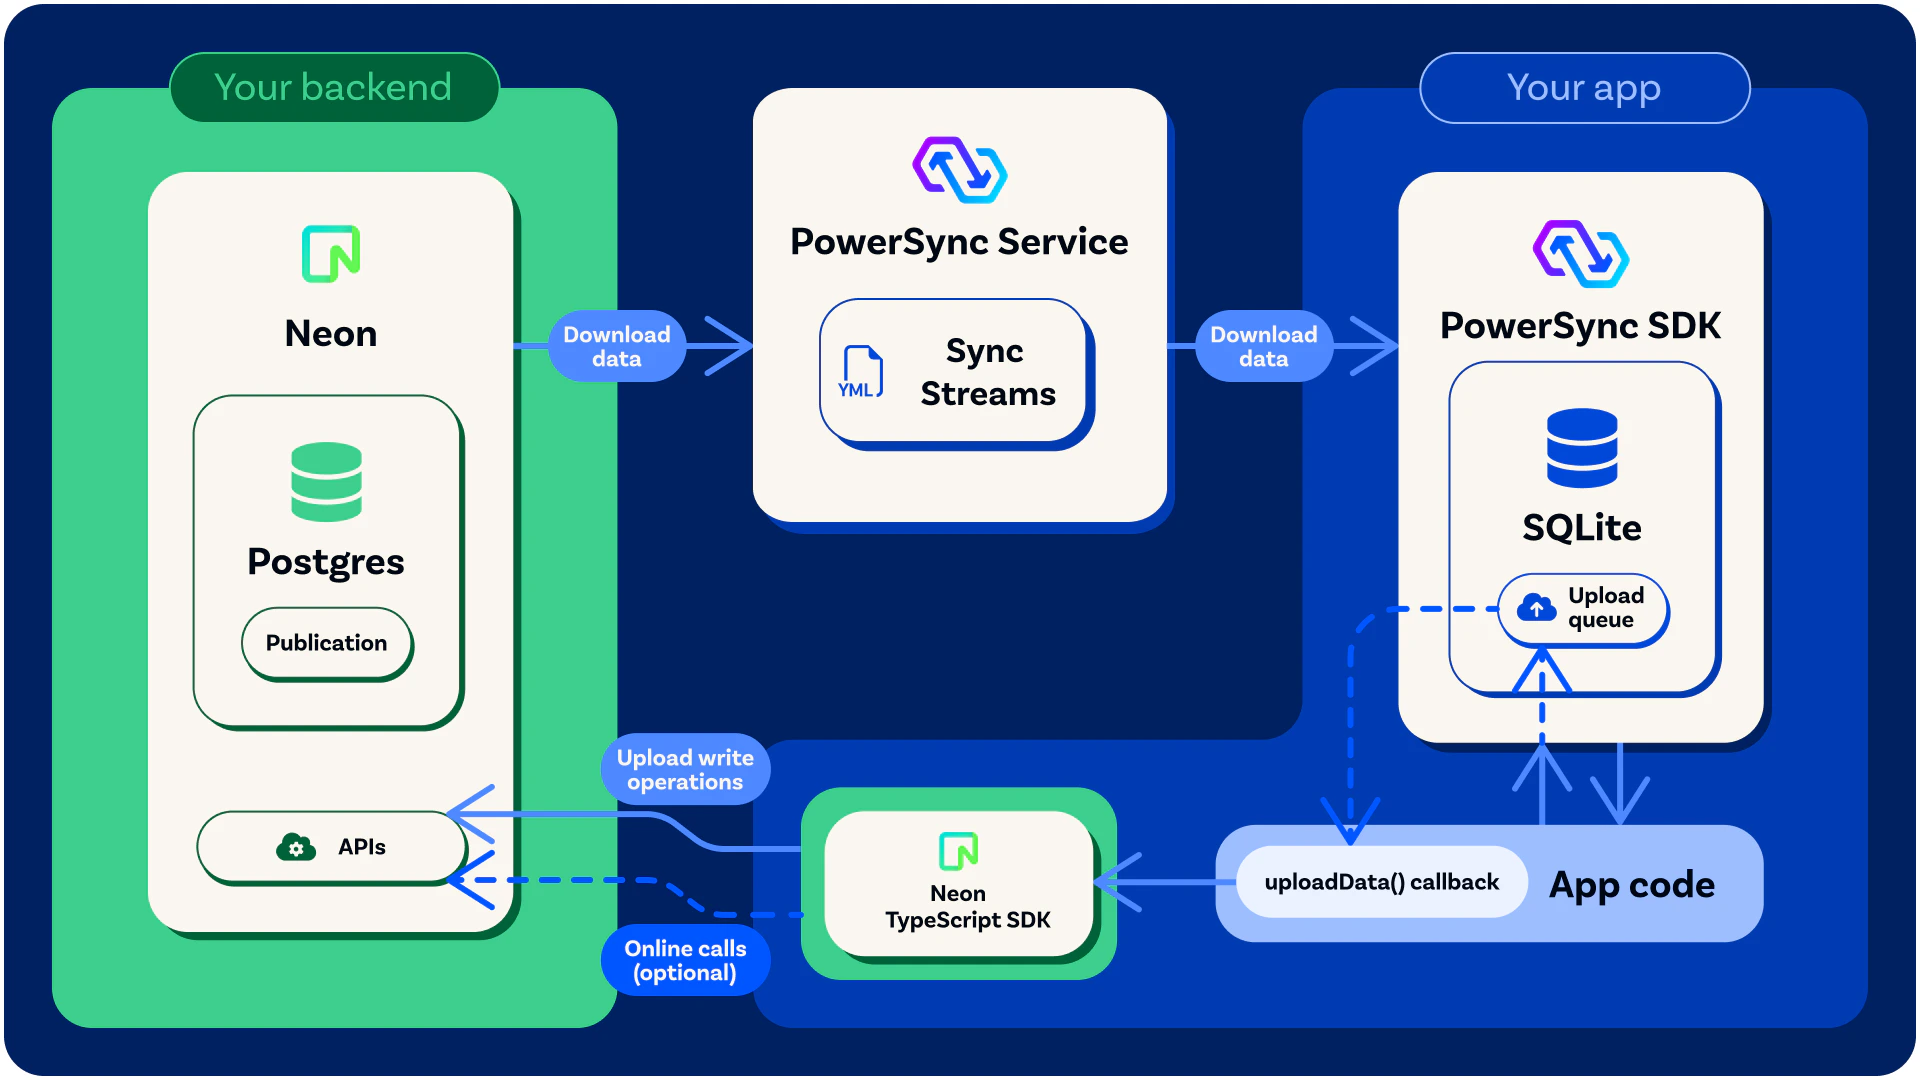 The local SQLite database embedded in the PowerSync SDK is automatically kept in sync with the Neon Postgres database (based on your Sync Streams as you will see later in this guide). Client-side data modifications are persisted in the local SQLite database as well as stored in an upload queue that gets processed via the Neon Data API when network connectivity is available. Therefore reads and writes can happen in the app regardless of whether the user is online or offline, by using the local SQLite database.
For more details on PowerSync's general architecture, [see here](/architecture/architecture-overview).
## Integration Guide/Tutorial Overview
We will follow these steps to get an offline-first 'Notes' demo app up and running:
* Create a Neon project with Auth and Data API
* Set up the database schema
* Configure logical replication
* Create connection to Neon
* Configure authentication
* Configure Sync Streams
Test the configuration using our provided PowerSync-Neon 'Notes' demo app.
## Configure Neon
### Create a Neon Project with Auth and Data API
1. Go to [pg.new](https://pg.new) to create a new Neon project.
2. In the Neon Console, navigate to your project and enable:
* **Neon Auth** — Go to the **Auth** page in the left sidebar and enable it
* **Data API** — Go to the **Data API** page in the left sidebar and enable it
### Set Up the Database
The demo app uses Drizzle ORM for schema management. The schema includes `notes` and `paragraphs` tables with Row Level Security (RLS) policies.
Clone the demo repository and run the migration:
```bash theme={null}
git clone https://github.com/powersync-ja/powersync-js.git
cd powersync-js
pnpm install
pnpm build:packages
cd demos/react-neon-tanstack-query-notes
```
Create a `.env` file in the project root with your database connection string:
```env theme={null}
DATABASE_URL=postgresql://user:password@your-project-id.pooler.region.neon.tech/neondb?sslmode=require
```
Find your connection string in the Neon Console → Dashboard → Connect → Connection string (select "Pooled connection") → Copy snippet.
Run the migration to create the tables and RLS policies:
```bash theme={null}
pnpm db:migrate
```
This creates the following schema:
```sql theme={null}
CREATE TABLE "notes" (
"id" uuid PRIMARY KEY DEFAULT gen_random_uuid() NOT NULL,
"owner_id" text DEFAULT auth.user_id() NOT NULL,
"title" text DEFAULT 'untitled note' NOT NULL,
"created_at" timestamp with time zone DEFAULT now(),
"updated_at" timestamp with time zone DEFAULT now(),
"shared" boolean DEFAULT false
);
CREATE TABLE "paragraphs" (
"id" uuid PRIMARY KEY DEFAULT gen_random_uuid() NOT NULL,
"note_id" uuid REFERENCES notes(id),
"content" text NOT NULL,
"created_at" timestamp with time zone DEFAULT now()
);
```
The migration also sets up RLS policies so users can only access their own notes (and shared notes).
### Configure Logical Replication, User and Publication
PowerSync uses logical replication to sync data from your Neon database.
### 1. Ensure logical replication is enabled
To [ensure logical replication is enabled](https://neon.tech/docs/guides/logical-replication-postgres#prepare-your-source-neon-database):
1. Select your project in the Neon Console.
2. On the Neon Dashboard, select **Settings**.
3. Select **Logical Replication**.
4. Click **Enable** to ensure logical replication is enabled.
### 2. Create a PowerSync database user
```sql theme={null}
-- Create a role/user with replication privileges for PowerSync
CREATE ROLE powersync_role WITH REPLICATION BYPASSRLS LOGIN PASSWORD 'myhighlyrandompassword';
-- Set up permissions for the newly created role
-- Read-only (SELECT) access is required
GRANT SELECT ON ALL TABLES IN SCHEMA public TO powersync_role;
-- Optionally, grant SELECT on all future tables (to cater for schema additions)
ALTER DEFAULT PRIVILEGES IN SCHEMA public GRANT SELECT ON TABLES TO powersync_role;
```
To restrict read access to specific tables, explicitly list allowed tables for both the `SELECT` privilege, and for the publication mentioned in the next step (as well as for any other publications that may exist).
### 3. Create `powersync` publication
```sql theme={null}
-- Create a publication to replicate tables. The publication must be named "powersync"
CREATE PUBLICATION powersync FOR ALL TABLES;
```
Note that the PowerSync Service has to read all updates present in the publication, regardless of whether the table is referenced in your Sync Streams / Sync Rules definitions. This can cause large spikes in memory usage or introduce replication delays, so if you're dealing with large data volumes, you'll want to specify a comma-separated subset of tables to replicate instead of `FOR ALL TABLES`.
The snippet above replicates all tables and is the simplest way to get started in a dev environment.
## Configuring PowerSync
### Create a PowerSync Cloud Instance
When creating a project in the [PowerSync Dashboard](https://dashboard.powersync.com/), *Development* and *Production* instances of the PowerSync Service will be created by default. Select the instance you want to configure.
If you need to create a new instance, follow the steps below.
1. In the dashboard, select your project and open the instance selection dropdown. Click **Add Instance**.
The local SQLite database embedded in the PowerSync SDK is automatically kept in sync with the Neon Postgres database (based on your Sync Streams as you will see later in this guide). Client-side data modifications are persisted in the local SQLite database as well as stored in an upload queue that gets processed via the Neon Data API when network connectivity is available. Therefore reads and writes can happen in the app regardless of whether the user is online or offline, by using the local SQLite database.
For more details on PowerSync's general architecture, [see here](/architecture/architecture-overview).
## Integration Guide/Tutorial Overview
We will follow these steps to get an offline-first 'Notes' demo app up and running:
* Create a Neon project with Auth and Data API
* Set up the database schema
* Configure logical replication
* Create connection to Neon
* Configure authentication
* Configure Sync Streams
Test the configuration using our provided PowerSync-Neon 'Notes' demo app.
## Configure Neon
### Create a Neon Project with Auth and Data API
1. Go to [pg.new](https://pg.new) to create a new Neon project.
2. In the Neon Console, navigate to your project and enable:
* **Neon Auth** — Go to the **Auth** page in the left sidebar and enable it
* **Data API** — Go to the **Data API** page in the left sidebar and enable it
### Set Up the Database
The demo app uses Drizzle ORM for schema management. The schema includes `notes` and `paragraphs` tables with Row Level Security (RLS) policies.
Clone the demo repository and run the migration:
```bash theme={null}
git clone https://github.com/powersync-ja/powersync-js.git
cd powersync-js
pnpm install
pnpm build:packages
cd demos/react-neon-tanstack-query-notes
```
Create a `.env` file in the project root with your database connection string:
```env theme={null}
DATABASE_URL=postgresql://user:password@your-project-id.pooler.region.neon.tech/neondb?sslmode=require
```
Find your connection string in the Neon Console → Dashboard → Connect → Connection string (select "Pooled connection") → Copy snippet.
Run the migration to create the tables and RLS policies:
```bash theme={null}
pnpm db:migrate
```
This creates the following schema:
```sql theme={null}
CREATE TABLE "notes" (
"id" uuid PRIMARY KEY DEFAULT gen_random_uuid() NOT NULL,
"owner_id" text DEFAULT auth.user_id() NOT NULL,
"title" text DEFAULT 'untitled note' NOT NULL,
"created_at" timestamp with time zone DEFAULT now(),
"updated_at" timestamp with time zone DEFAULT now(),
"shared" boolean DEFAULT false
);
CREATE TABLE "paragraphs" (
"id" uuid PRIMARY KEY DEFAULT gen_random_uuid() NOT NULL,
"note_id" uuid REFERENCES notes(id),
"content" text NOT NULL,
"created_at" timestamp with time zone DEFAULT now()
);
```
The migration also sets up RLS policies so users can only access their own notes (and shared notes).
### Configure Logical Replication, User and Publication
PowerSync uses logical replication to sync data from your Neon database.
### 1. Ensure logical replication is enabled
To [ensure logical replication is enabled](https://neon.tech/docs/guides/logical-replication-postgres#prepare-your-source-neon-database):
1. Select your project in the Neon Console.
2. On the Neon Dashboard, select **Settings**.
3. Select **Logical Replication**.
4. Click **Enable** to ensure logical replication is enabled.
### 2. Create a PowerSync database user
```sql theme={null}
-- Create a role/user with replication privileges for PowerSync
CREATE ROLE powersync_role WITH REPLICATION BYPASSRLS LOGIN PASSWORD 'myhighlyrandompassword';
-- Set up permissions for the newly created role
-- Read-only (SELECT) access is required
GRANT SELECT ON ALL TABLES IN SCHEMA public TO powersync_role;
-- Optionally, grant SELECT on all future tables (to cater for schema additions)
ALTER DEFAULT PRIVILEGES IN SCHEMA public GRANT SELECT ON TABLES TO powersync_role;
```
To restrict read access to specific tables, explicitly list allowed tables for both the `SELECT` privilege, and for the publication mentioned in the next step (as well as for any other publications that may exist).
### 3. Create `powersync` publication
```sql theme={null}
-- Create a publication to replicate tables. The publication must be named "powersync"
CREATE PUBLICATION powersync FOR ALL TABLES;
```
Note that the PowerSync Service has to read all updates present in the publication, regardless of whether the table is referenced in your Sync Streams / Sync Rules definitions. This can cause large spikes in memory usage or introduce replication delays, so if you're dealing with large data volumes, you'll want to specify a comma-separated subset of tables to replicate instead of `FOR ALL TABLES`.
The snippet above replicates all tables and is the simplest way to get started in a dev environment.
## Configuring PowerSync
### Create a PowerSync Cloud Instance
When creating a project in the [PowerSync Dashboard](https://dashboard.powersync.com/), *Development* and *Production* instances of the PowerSync Service will be created by default. Select the instance you want to configure.
If you need to create a new instance, follow the steps below.
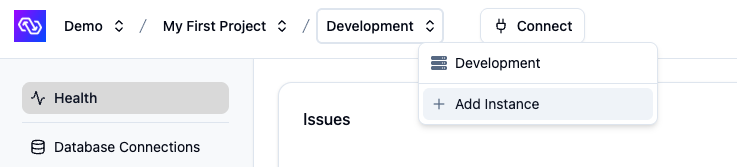
1. In the dashboard, select your project and open the instance selection dropdown. Click **Add Instance**.
 2. Give your instance a name, such as "Production".
3. \[Optional] You can change the default cloud region from US to EU, JP (Japan), AU (Australia) or BR (Brazil) if desired.
* Note: Additional cloud regions will be considered on request, especially for customers on our Enterprise plan. Please [contact us](/resources/contact-us) if you need a different region.
4. Click **Create Instance**.
### Connect PowerSync to Your Neon Database
1. From your Neon Console, select **Connect** in the top navigation bar. Ensure the format is set to "Connection string", and click on "Copy snippet":
2. Give your instance a name, such as "Production".
3. \[Optional] You can change the default cloud region from US to EU, JP (Japan), AU (Australia) or BR (Brazil) if desired.
* Note: Additional cloud regions will be considered on request, especially for customers on our Enterprise plan. Please [contact us](/resources/contact-us) if you need a different region.
4. Click **Create Instance**.
### Connect PowerSync to Your Neon Database
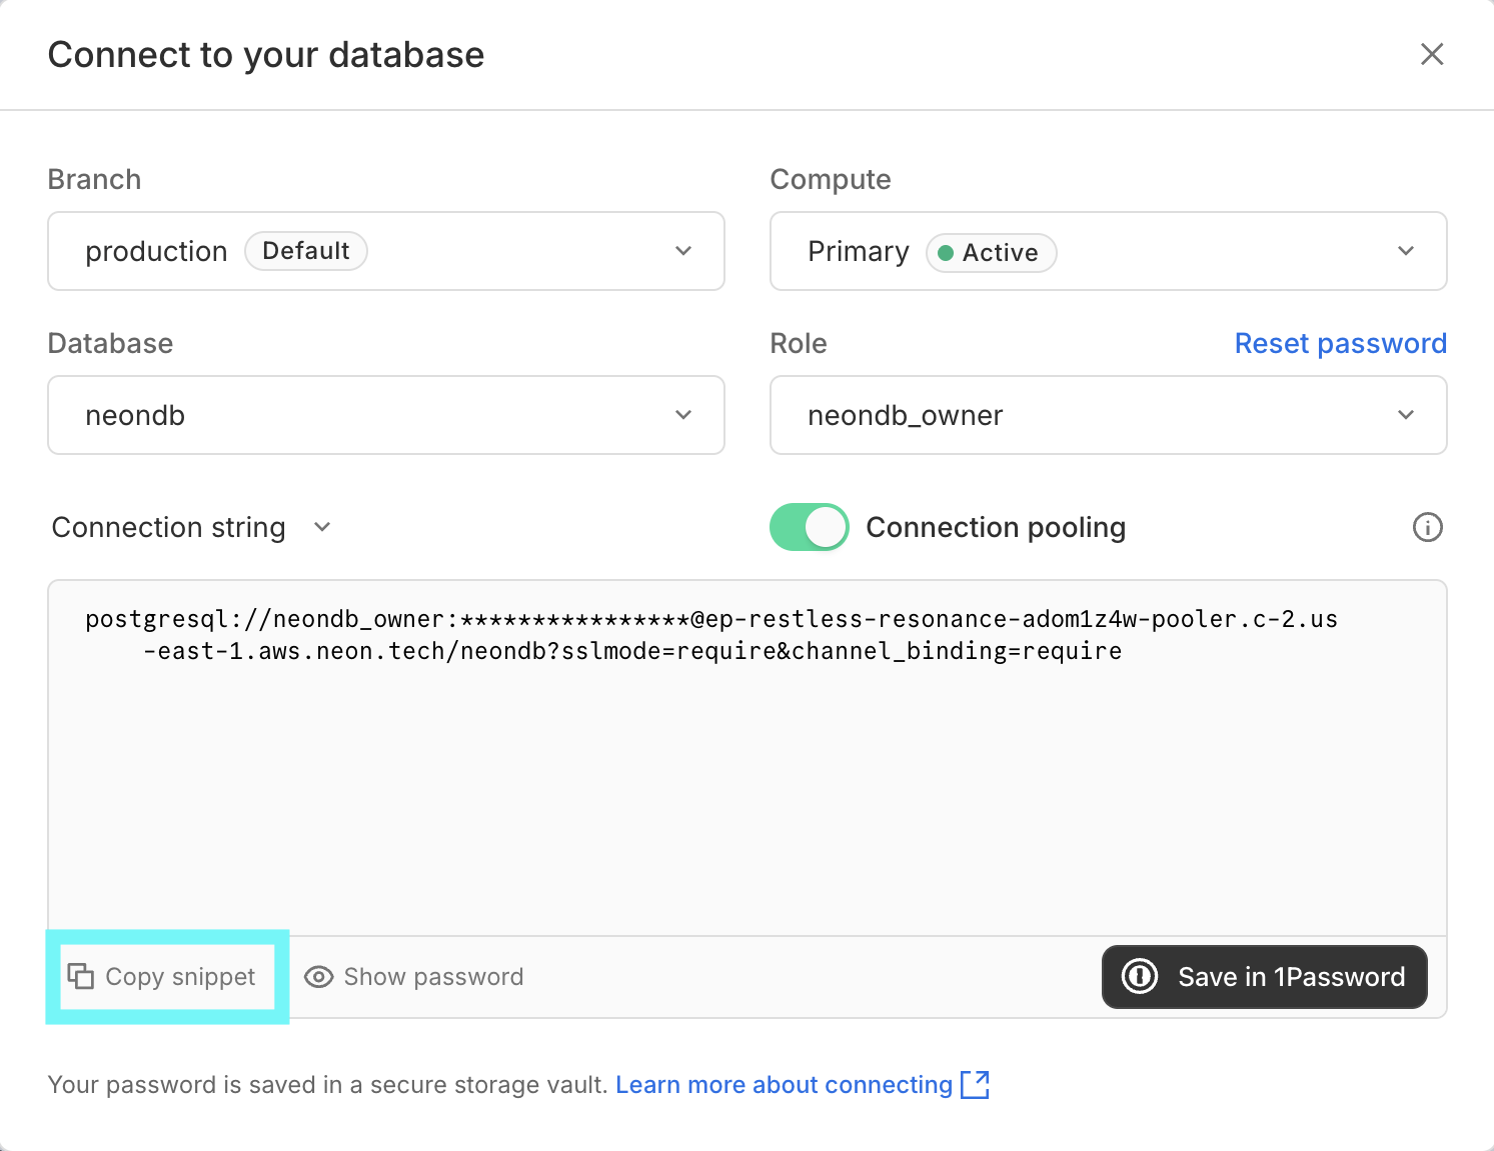
1. From your Neon Console, select **Connect** in the top navigation bar. Ensure the format is set to "Connection string", and click on "Copy snippet":
 2. In the [PowerSync Dashboard](https://dashboard.powersync.com/), select your project and instance and go to the **Database Connections** view.
3. Click **Connect to Source Database** and ensure the "Postgres" tab is selected.
4. Paste the connection string into the **URI** field. PowerSync will automatically parse this URI to populate the database connection details.
5. Update the **Username** and **Password** fields to use the `powersync_role` and password you created when configuring your Neon for PowerSync (see [Source Database Setup](/configuration/source-db/setup#neon)).
6. Note: PowerSync includes Neon's CA certificate by default, so you can use `verify-full` SSL mode without additional configuration.
2. In the [PowerSync Dashboard](https://dashboard.powersync.com/), select your project and instance and go to the **Database Connections** view.
3. Click **Connect to Source Database** and ensure the "Postgres" tab is selected.
4. Paste the connection string into the **URI** field. PowerSync will automatically parse this URI to populate the database connection details.
5. Update the **Username** and **Password** fields to use the `powersync_role` and password you created when configuring your Neon for PowerSync (see [Source Database Setup](/configuration/source-db/setup#neon)).
6. Note: PowerSync includes Neon's CA certificate by default, so you can use `verify-full` SSL mode without additional configuration.
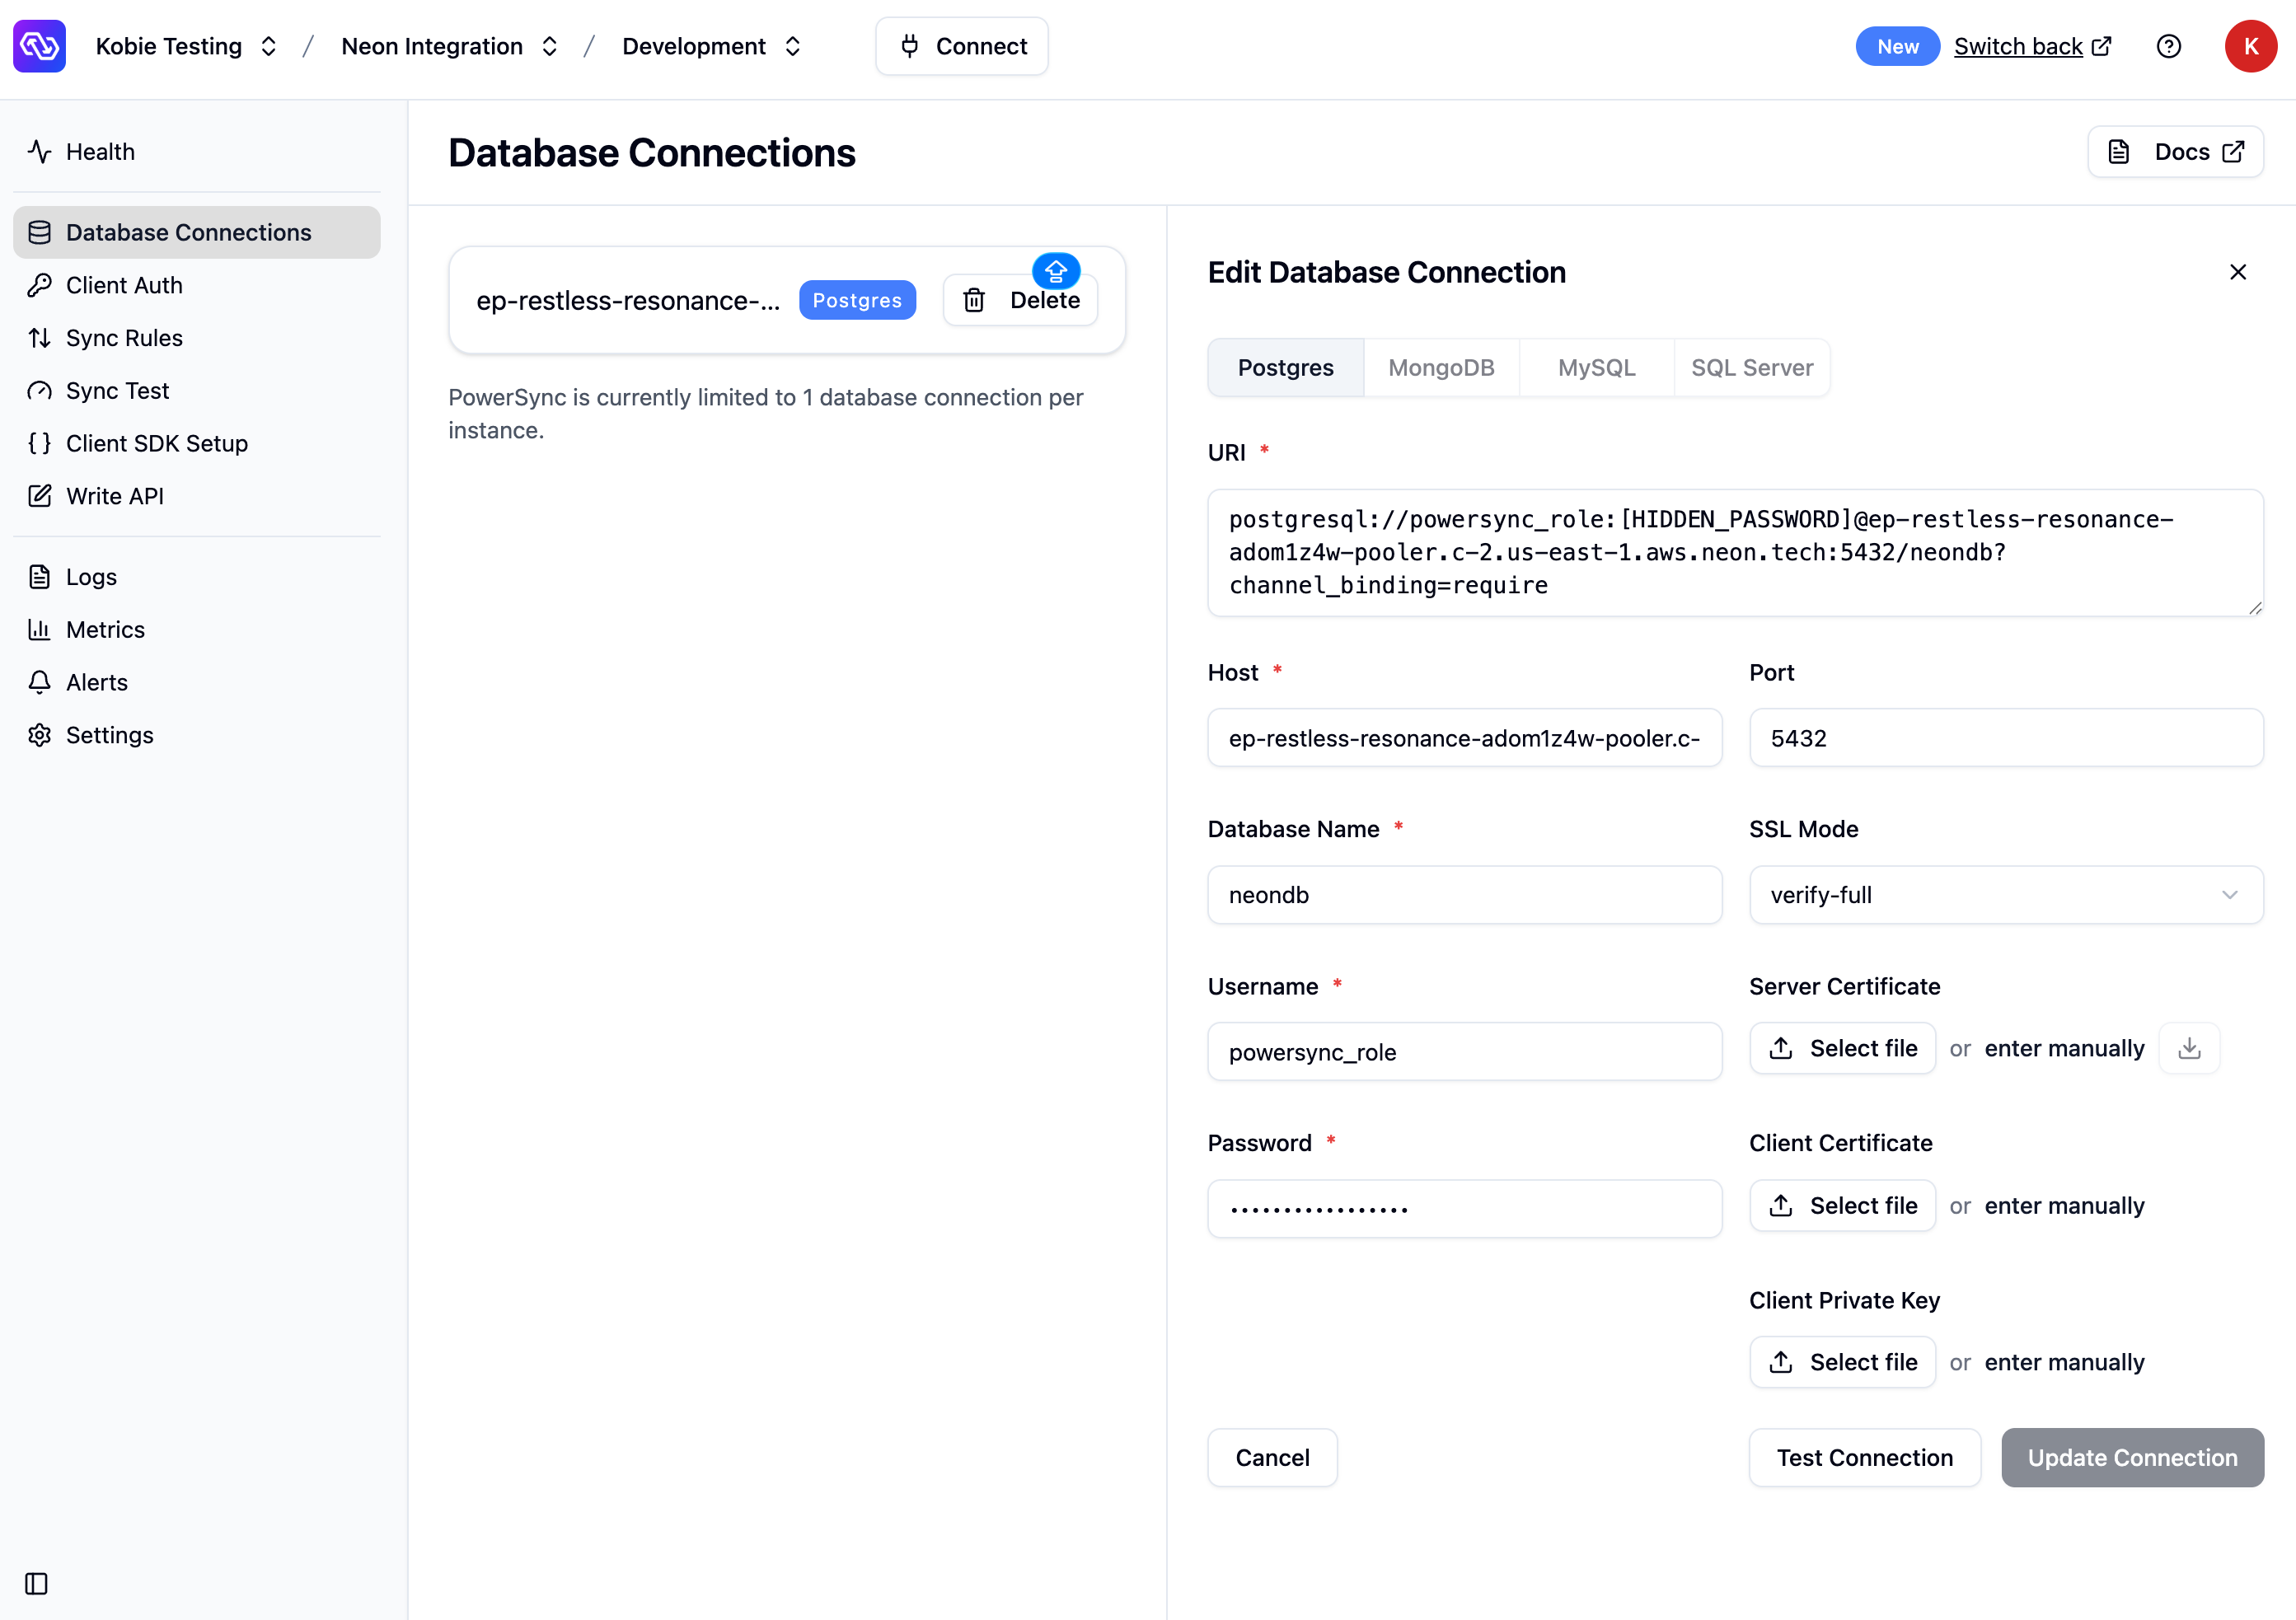 7. Verify your setup by clicking **Test Connection** and resolve any errors.
8. Click **Save Connection**.
PowerSync will now create an isolated cloud environment for your instance. This typically takes a minute or two.
### Configure Neon Auth
After your database connection is configured, enable Neon Auth:
1. In the PowerSync Dashboard, go to the **Client Auth** view.
2. Check the **Development tokens** setting (useful for testing).
3. Populate the **"JWKS URI"** with the value from the **"JWKS URL"** field in the Neon Console → Auth → Configuration page.
4. Populate the **"JWT Audience"** with your Neon Auth project root URL (e.g., `https://ep-restless-resonance-adom1z4w.neonauth.c-2.us-east-1.aws.neon.tech`).
The `aud` field is very sensitive, be sure to enter it exactly as shown above, especially removing the trailing `/` character.
5. Click **Save and Deploy** to apply the changes.
### Configure Sync Streams
[Sync Streams](/sync/streams/overview) (or legacy [Sync Rules](/sync/rules/overview)) allow developers to control which data gets synced to which user devices using a SQL-like syntax in a YAML file. For the demo app, we're going to specify that each user can only see their own notes (plus any shared notes).
1. In the PowerSync Dashboard, select your project and instance and go to the **Sync Streams** view (shown as **Sync Rules** if using legacy Sync Rules).
2. Edit the sync config in the editor and replace the contents with the below:
```yaml theme={null}
config:
edition: 3
streams:
user_notes:
auto_subscribe: true
# Sync notes and paragraphs belonging to the authenticated user
queries:
- SELECT * FROM notes WHERE owner_id = auth.user_id()
- SELECT paragraphs.* FROM paragraphs
INNER JOIN notes ON notes.id = paragraphs.note_id
WHERE notes.owner_id = auth.user_id()
shared_notes:
auto_subscribe: true
# Sync all shared notes to all users (not recommended for production)
queries:
- SELECT * FROM notes WHERE shared = TRUE
- SELECT paragraphs.* FROM paragraphs
INNER JOIN notes ON notes.id = paragraphs.note_id
WHERE notes.shared = TRUE
```
```yaml theme={null}
config:
edition: 2
bucket_definitions:
by_user:
# Only sync rows belonging to the user
parameters: SELECT id as note_id FROM notes WHERE owner_id = request.user_id()
data:
- SELECT * FROM notes WHERE id = bucket.note_id
- SELECT * FROM paragraphs WHERE note_id = bucket.note_id
# Sync all shared notes to all users (not recommended for production)
shared_notes:
parameters: SELECT id as note_id from notes where shared = TRUE
data:
- SELECT * FROM notes WHERE id = bucket.note_id
- SELECT * FROM paragraphs WHERE note_id = bucket.note_id
```
3. Click **"Validate"** and ensure there are no errors. This validates your sync config against your Postgres database.
4. Click **"Deploy"** to deploy your sync config.
* For additional information on PowerSync's Sync Streams, refer to the [Sync Streams](/sync/streams/overview) documentation.
* For legacy Sync Rules, refer to the [Sync Rules](/sync/rules/overview) documentation.
## Test Everything (Using Our Demo App)
In this step you'll test your setup using the 'Notes' demo app. This is a modified version of Neon's demo app.
### Configure Environment Variables
In the demo project directory (`powersync-js/demos/react-neon-notes-tanstack`), update your `.env` file with the following:
```env theme={null}
# Neon Data API URL
# Find this in Neon Console → Data API page → "API URL"
VITE_NEON_DATA_API_URL=https://your-project-id.data-api.neon.tech
# Neon Auth Base URL
# Find this in Neon Console → Auth page → "Auth URL"
VITE_NEON_AUTH_URL=https://your-project-id.auth.neon.tech
# PowerSync instance URL
# Find this in PowerSync Dashboard → Connect button
VITE_POWERSYNC_URL=https://your-instance.powersync.journeyapps.com
```
### Run the App
Start the development server:
```bash theme={null}
pnpm dev
```
Open [http://localhost:5173](http://localhost:5173) in your browser.
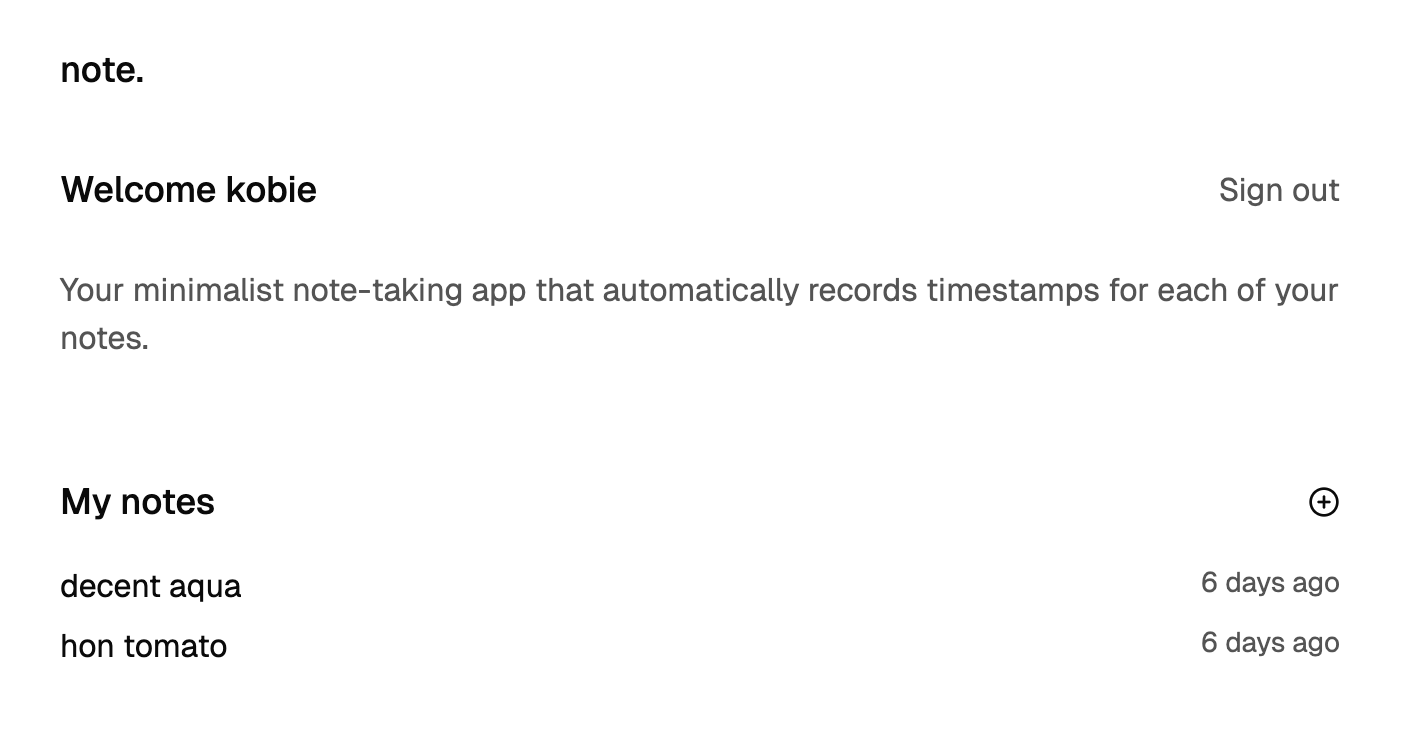
Once signed in to the demo app, you should see a blank list of notes, so go ahead and create a new note. Try disabling wifi on your device to test out the offline capabilities. Once back online, you should see the data automatically sync.
7. Verify your setup by clicking **Test Connection** and resolve any errors.
8. Click **Save Connection**.
PowerSync will now create an isolated cloud environment for your instance. This typically takes a minute or two.
### Configure Neon Auth
After your database connection is configured, enable Neon Auth:
1. In the PowerSync Dashboard, go to the **Client Auth** view.
2. Check the **Development tokens** setting (useful for testing).
3. Populate the **"JWKS URI"** with the value from the **"JWKS URL"** field in the Neon Console → Auth → Configuration page.
4. Populate the **"JWT Audience"** with your Neon Auth project root URL (e.g., `https://ep-restless-resonance-adom1z4w.neonauth.c-2.us-east-1.aws.neon.tech`).
The `aud` field is very sensitive, be sure to enter it exactly as shown above, especially removing the trailing `/` character.
5. Click **Save and Deploy** to apply the changes.
### Configure Sync Streams
[Sync Streams](/sync/streams/overview) (or legacy [Sync Rules](/sync/rules/overview)) allow developers to control which data gets synced to which user devices using a SQL-like syntax in a YAML file. For the demo app, we're going to specify that each user can only see their own notes (plus any shared notes).
1. In the PowerSync Dashboard, select your project and instance and go to the **Sync Streams** view (shown as **Sync Rules** if using legacy Sync Rules).
2. Edit the sync config in the editor and replace the contents with the below:
```yaml theme={null}
config:
edition: 3
streams:
user_notes:
auto_subscribe: true
# Sync notes and paragraphs belonging to the authenticated user
queries:
- SELECT * FROM notes WHERE owner_id = auth.user_id()
- SELECT paragraphs.* FROM paragraphs
INNER JOIN notes ON notes.id = paragraphs.note_id
WHERE notes.owner_id = auth.user_id()
shared_notes:
auto_subscribe: true
# Sync all shared notes to all users (not recommended for production)
queries:
- SELECT * FROM notes WHERE shared = TRUE
- SELECT paragraphs.* FROM paragraphs
INNER JOIN notes ON notes.id = paragraphs.note_id
WHERE notes.shared = TRUE
```
```yaml theme={null}
config:
edition: 2
bucket_definitions:
by_user:
# Only sync rows belonging to the user
parameters: SELECT id as note_id FROM notes WHERE owner_id = request.user_id()
data:
- SELECT * FROM notes WHERE id = bucket.note_id
- SELECT * FROM paragraphs WHERE note_id = bucket.note_id
# Sync all shared notes to all users (not recommended for production)
shared_notes:
parameters: SELECT id as note_id from notes where shared = TRUE
data:
- SELECT * FROM notes WHERE id = bucket.note_id
- SELECT * FROM paragraphs WHERE note_id = bucket.note_id
```
3. Click **"Validate"** and ensure there are no errors. This validates your sync config against your Postgres database.
4. Click **"Deploy"** to deploy your sync config.
* For additional information on PowerSync's Sync Streams, refer to the [Sync Streams](/sync/streams/overview) documentation.
* For legacy Sync Rules, refer to the [Sync Rules](/sync/rules/overview) documentation.
## Test Everything (Using Our Demo App)
In this step you'll test your setup using the 'Notes' demo app. This is a modified version of Neon's demo app.
### Configure Environment Variables
In the demo project directory (`powersync-js/demos/react-neon-notes-tanstack`), update your `.env` file with the following:
```env theme={null}
# Neon Data API URL
# Find this in Neon Console → Data API page → "API URL"
VITE_NEON_DATA_API_URL=https://your-project-id.data-api.neon.tech
# Neon Auth Base URL
# Find this in Neon Console → Auth page → "Auth URL"
VITE_NEON_AUTH_URL=https://your-project-id.auth.neon.tech
# PowerSync instance URL
# Find this in PowerSync Dashboard → Connect button
VITE_POWERSYNC_URL=https://your-instance.powersync.journeyapps.com
```
### Run the App
Start the development server:
```bash theme={null}
pnpm dev
```
Open [http://localhost:5173](http://localhost:5173) in your browser.
Once signed in to the demo app, you should see a blank list of notes, so go ahead and create a new note. Try disabling wifi on your device to test out the offline capabilities. Once back online, you should see the data automatically sync.
 ### Test Sync (Optional)
During development, you can use the **Sync Test** feature in the PowerSync Dashboard to validate your Sync Rules:
1. Click on **"Sync Test"** in the PowerSync Dashboard.
2. Enter the UUID of a user in your Neon Auth database to generate a test JWT.
3. Click **"Launch Sync Diagnostics Client"** to test the Sync Rules.
For more information, explore the [PowerSync docs](/) or join us on [our community Discord](https://discord.gg/powersync) where our team is always available to answer questions.
After deployment, update your Neon Auth settings to allow your Vercel domain. Go to Neon Console → Auth page and add your Vercel URL (e.g., `https://your-project.vercel.app`) to the allowed origins.
### Test Sync (Optional)
During development, you can use the **Sync Test** feature in the PowerSync Dashboard to validate your Sync Rules:
1. Click on **"Sync Test"** in the PowerSync Dashboard.
2. Enter the UUID of a user in your Neon Auth database to generate a test JWT.
3. Click **"Launch Sync Diagnostics Client"** to test the Sync Rules.
For more information, explore the [PowerSync docs](/) or join us on [our community Discord](https://discord.gg/powersync) where our team is always available to answer questions.
After deployment, update your Neon Auth settings to allow your Vercel domain. Go to Neon Console → Auth page and add your Vercel URL (e.g., `https://your-project.vercel.app`) to the allowed origins.