> ## Documentation Index
> Fetch the complete documentation index at: https://docs.powersync.com/llms.txt
> Use this file to discover all available pages before exploring further.
# Source Database Connection
> Connect a PowerSync Cloud instance to your Postgres, MongoDB, MySQL, SQL Server or Convex source database.
Each database provider has their quirks when it comes to specifying connection details, so we have documented database-specific and provider-specific instructions below:
Jump to: [Postgres](#postgres-provider-specifics) | [MongoDB](#mongodb-specifics) | [MySQL](#mysql-specifics) | [SQL Server](#sql-server-specifics) | [Convex](#convex-specifics)
The below instructions are currently written for PowerSync Cloud. For self-hosted PowerSync instances, specify database connection details in the config file as documented [here](/configuration/powersync-service/self-hosted-instances#source-database-connections).
## Postgres Provider Specifics
Select your Postgres hosting provider for steps to connect your newly-created PowerSync instance to your Postgres database:
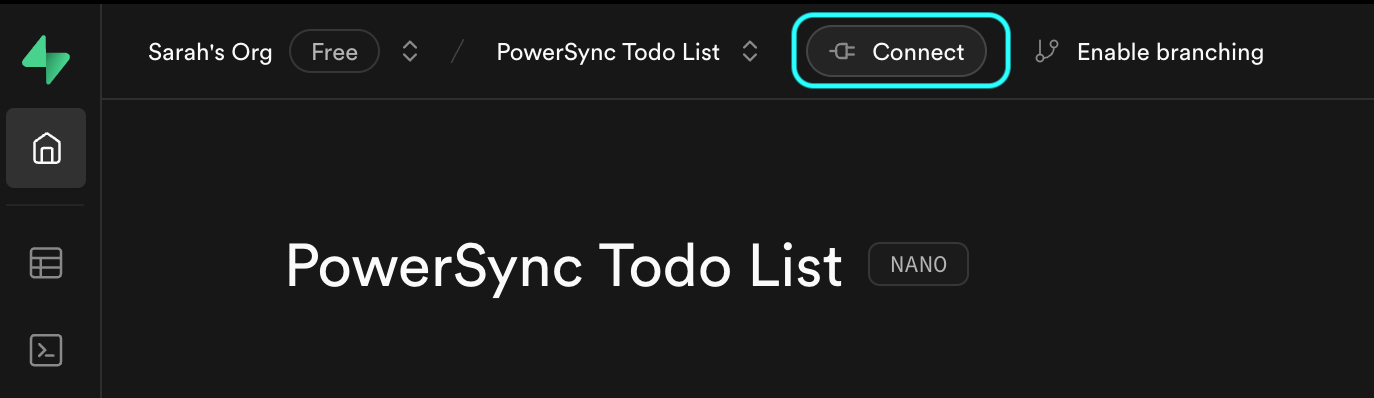
1. From your Supabase Dashboard, select **Connect** in the top navigation bar (or follow this [link](https://supabase.com/dashboard/project/_?showConnect=true)):
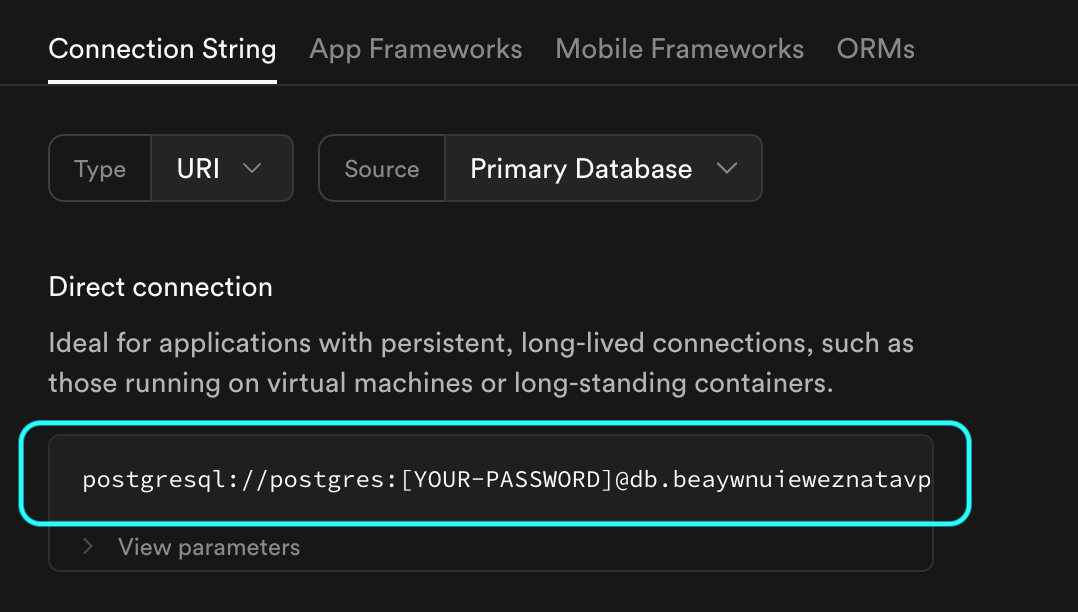
 2. In the **Direct connection** section, copy the complete connection string (including the `[YOUR-PASSWORD]` placeholder):
 3. In the [PowerSync Dashboard](https://dashboard.powersync.com/), select your project and instance and go to **Database Connections**.
4. Click **Connect to Source Database** and ensure the **Postgres** tab is selected.
5. Paste the connection string into the **URI** field. PowerSync will automatically parse this URI to populate the database connection details.
6. Update the **Username** and **Password** fields to use the `powersync_role` and password you created when configuring your Supabase for PowerSync (see [Source Database Setup](/configuration/source-db/setup#supabase)).
7. Note: PowerSync includes Supabase's CA certificate by default, so you can use `verify-full` SSL mode without additional configuration.
3. In the [PowerSync Dashboard](https://dashboard.powersync.com/), select your project and instance and go to **Database Connections**.
4. Click **Connect to Source Database** and ensure the **Postgres** tab is selected.
5. Paste the connection string into the **URI** field. PowerSync will automatically parse this URI to populate the database connection details.
6. Update the **Username** and **Password** fields to use the `powersync_role` and password you created when configuring your Supabase for PowerSync (see [Source Database Setup](/configuration/source-db/setup#supabase)).
7. Note: PowerSync includes Supabase's CA certificate by default, so you can use `verify-full` SSL mode without additional configuration.
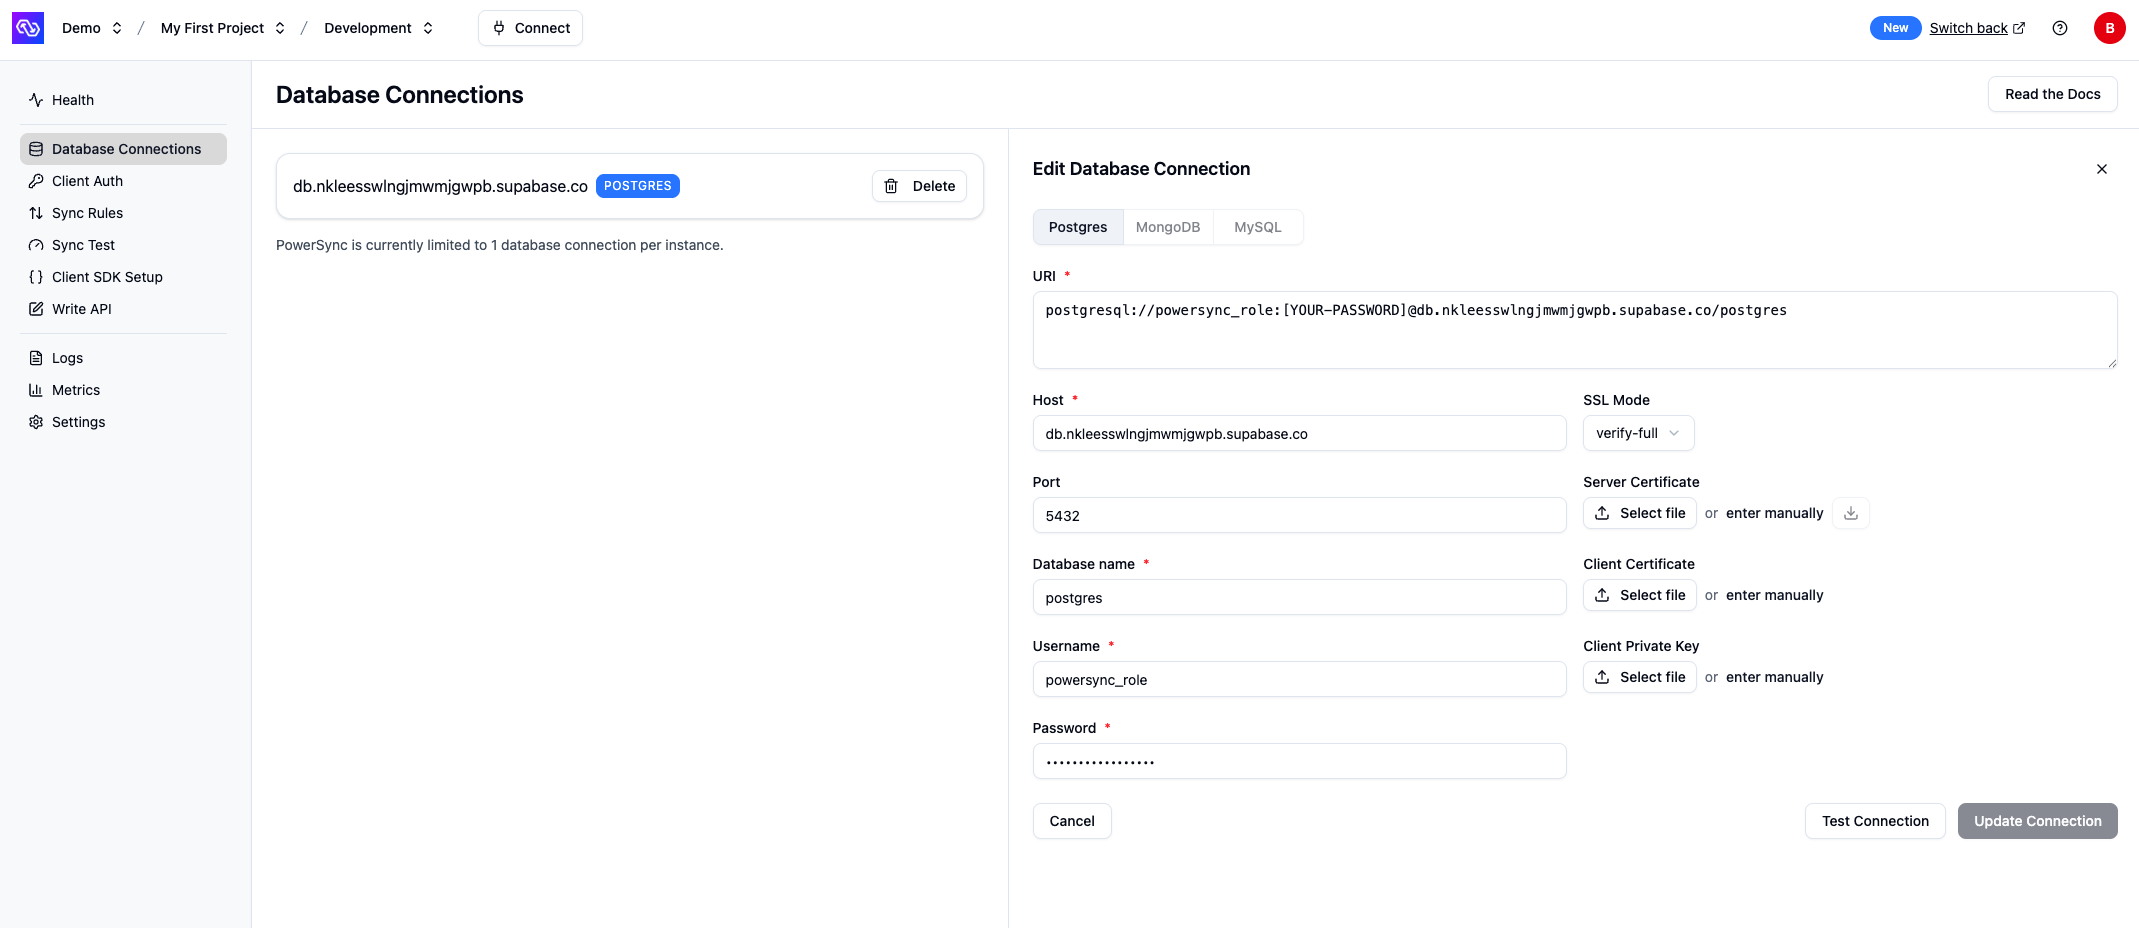 7. Verify your setup by clicking **Test Connection** and resolve any errors.
8. Click **Save Connection**.
PowerSync will now create an isolated cloud environment for your instance. This typically takes a minute or two.
### Enable Supabase Auth
After your database connection is configured, enable Supabase Auth:
1. In the PowerSync Dashboard, go to **Client Auth** for your instance.
2. Enable the **Use Supabase Auth** checkbox.
3. If your Supabase project uses the legacy JWT signing keys, copy your JWT Secret from your Supabase project's settings ([JWT Keys](https://supabase.com/dashboard/project/_/settings/jwt)) and paste the secret into the **Supabase JWT Secret (optional) Legacy** field in the PowerSync Dashboard. If you're using Supabase's new [JWT signing keys](https://supabase.com/blog/jwt-signing-keys), you can leave this field empty (PowerSync will auto-configure the JWKS endpoint for your project).
4. Click **Save and Deploy** to apply the changes.
### Troubleshooting
Supabase is configured with a maximum of 4 logical replication slots, with one often used for Supabase Realtime (unrelated to PowerSync).
It is therefore easy to run out of replication slots, resulting in an error such as "All replication slots are in use" when deploying. To resolve this, delete inactive replication slots by running this query:
```sql theme={null}
select slot_name, pg_drop_replication_slot(slot_name) from pg_replication_slots where active = false;
```
1. In the [PowerSync Dashboard](https://dashboard.powersync.com/), select your project and instance and go to the **Database Connections** view.
2. Click **Connect to Source Database** and ensure the **Postgres** tab is selected.
3. [Locate the connection details from AWS RDS](https://docs.aws.amazon.com/AmazonRDS/latest/UserGuide/USER_ConnectToPostgreSQLInstance.html):
* Copy the **"Endpoint"** value from the AWS Management Console.
* Paste the endpoint into the "**Host**" field in the PowerSync Dashboard.
* Complete the remaining fields: "**Name**", "**Host**", "**Port**", "**Database name**", "**Username**", "**Password**" and "**SSL Mode"** are required. You can paste a connection string into the "**URI**" field to simplify this.
* "**Name**" can be any name for the connection.
* "**Port**" is 5432 for Postgres databases.
* "**Username**" and "**Password**" maps to the `powersync_role` created in [Source Database Setup](/configuration/source-db/setup).
* PowerSync has the AWS RDS CA certificate pre-configured — `verify-full` SSL mode can be used directly, without any additional configuration required.
4. Click **Test Connection** and fix any errors.
5. Click **Save Connection**.
PowerSync deploys and configures an isolated cloud environment for you, which can take a few minutes to complete.
### Troubleshooting
If you get an error such as "IPs in this range are not supported", the instance is likely not configured to be publicly accessible. A DNS lookup on the host should give a public IP, and not for example `10.x.x.x` or `172.31.x.x`.
1. In the [PowerSync Dashboard](https://dashboard.powersync.com/), select your project and instance and go to the **Database Connections** view.
2. Click **Connect to Source Database** and ensure the **Postgres** tab is selected.
3. Fill in your connection details from Azure.
1. "**Name**", "**Host**", "**Port**", "**Database name**", "**Username**", "**Password**" and "**SSL Mode"** are required. You can also paste a connection string into the "**URI**" field to simplify data entry.
2. "**Name**" can be any name for the connection.
3. "**Port**" is 5432 for Postgres databases.
4. "**Username**" and "**Password**" maps to the `powersync_role` created in [Source Database Setup](/configuration/source-db/setup).
5. PowerSync has the Azure CA certificate pre-configured — `verify-full` SSL mode can be used directly, without any additional configuration required.
4. Click **Test Connection** and fix any errors.
* If you encounter the error `"must be superuser or replication role to start walsender"`, ensure that you've followed all the steps for enabling logical replication documented [here](https://learn.microsoft.com/en-us/azure/postgresql/flexible-server/concepts-logical#prerequisites-for-logical-replication-and-logical-decoding).
5. Click **Save Connection**.
PowerSync deploys and configures an isolated cloud environment for you, which can take a few minutes to complete.
1. In the [PowerSync Dashboard](https://dashboard.powersync.com/), select your project and instance and go to the **Database Connections** view.
2. Click **Connect to Source Database** and ensure the **Postgres** tab is selected.
3. Fill in your connection details from Google Cloud SQL.
* "**Name**", "**Host**", "**Port**", "**Database name**", "**Username**", "**Password**" and "**SSL Mode"** are required. You can paste a connection string into the "**URI**" field to simplify data entry.
* "**Name**" can be any name for the connection.
* "**Port**" is 5432 for Postgres databases.
* "**Username**" and "**Password**" maps to the `powersync_role` created in [Source Database Setup](/configuration/source-db/setup).
* The server certificate can be downloaded from Google Cloud SQL.
* If SSL is enforced, a client certificate and key must also be created on Google Cloud SQL, and configured on the PowerSync instance.
4. Click **Test Connection** and fix any errors.
5. Click **Save Connection**.
PowerSync deploys and configures an isolated cloud environment for you, which can take a few minutes to complete.
1. In the [PowerSync Dashboard](https://dashboard.powersync.com/), select your project and instance and go to the **Database Connections** view.
2. Click **Connect to Source Database** and ensure the **Postgres** tab is selected.
3. Fill in your connection details from [Neon](https://neon.tech/).
1. "**Name**", "**Host**", "**Port**", "**Database name**", "**Username**", "**Password**" and "**SSL Mode"** are required. You can paste a connection string into the "**URI**" field to simplify data entry.
2. "**Name**" can be any name for the connection.
3. "**Port**" is 5432 for Postgres databases.
4. "**Username**" and "**Password**" maps to the `powersync_role` created in [Source Database Setup](/configuration/source-db/setup).
5. Note that if you're using a self-signed SSL certificate for your database server, click the **Download Certificate** button to dynamically fetch the recommended certificate directly from your server.
6. Also note if you get any error such as `server certificate not trusted: SELF_SIGNED_CERT_IN_CHAIN`, click **Download Certificate** to attempt automatic resolution.
4. Click **Test Connection** and fix any errors.
5. Click **Save Connection**.
PowerSync deploys and configures an isolated cloud environment for you, which can take a few minutes to complete.
1. In the [PowerSync Dashboard](https://dashboard.powersync.com/), select your project and instance and go to the **Database Connections** view.
2. Click **Connect to Source Database** and ensure the **Postgres** tab is selected.
3. Fill in your connection details from [Fly Postgres](https://fly.io/docs/postgres/).
1. "**Name**", "**Host**", "**Port**", "**Database name**", "**Username**", "**Password**" and "**SSL Mode"** are required. You can paste a connection string into the "**URI**" field to simplify data entry.
2. "**Name**" can be any name for the connection.
3. "**Port**" is 5432 for Postgres databases.
4. "**Username**" and "**Password**" maps to the `powersync_role` created in [Source Database Setup](/configuration/source-db/setup).
5. Note that if you're using a self-signed SSL certificate for your database server, click the **Download Certificate** button to dynamically fetch the recommended certificate directly from your server.
6. Also note if you get any error such as `server certificate not trusted: SELF_SIGNED_CERT_IN_CHAIN`, click **Download Certificate** to attempt automatic resolution.
4. Click **Test Connection** and fix any errors.
5. Click **Save Connection**.
PowerSync deploys and configures an isolated cloud environment for you, which can take a few minutes to complete.
1. In the [PowerSync Dashboard](https://dashboard.powersync.com/), select your project and instance and go to the **Database Connections** view.
2. Click **Connect to Source Database** and ensure the **Postgres** tab is selected.
3. Head to your PlanetScale database dashboard page at `https://app.planetscale.com//` and click on the "Connect" button to get your database connection parameters.
1. In the PowerSync Dashboard, "**Name**", "**Host**", "**Port**", "**Database name**", "**Username**" and "**Password**" are required.
2. "**Name**" can be any name for the connection.
3. "**Host**" is the `host` connection parameter for your database.
4. "**Port**" is 5432 for Postgres databases.
5. "**Username**" and "**Password**" maps to the `powersync_role` created in [Source Database Setup](/configuration/source-db/setup).
1. Important: PlanetScale requires your branch ID to be appended to your username. The username should be `powersync_role.`. Your PlanetScale branch ID can be found on the same connection details page.
6. **SSL Mode** can remain the default `verify-full`.
4. Click **Test Connection** and fix any errors.
5. Click **Save Connection**.
PowerSync deploys and configures an isolated cloud environment for you, which can take a few minutes to complete.
1. In the [PowerSync Dashboard](https://dashboard.powersync.com/), select your project and instance and go to the **Database Connections** view.
2. Click **Connect to Source Database** and ensure the **Postgres** tab is selected.
3. In your Xata dashboard, navigate to Overview -> Connect and copy the connection URI. Alternatively, use the [Xata CLI](https://xata.io/docs/cli) and run `xata branch url` to obtain the URI and copy that.
4. Paste the connection details into the "**URI**" field in the PowerSync Dashboard.
5. Click **Test Connection** and fix any errors.
6. Click **Save Connection**.
PowerSync deploys and configures an isolated cloud environment for you, which can take a few minutes to complete.
For other providers and self-hosted databases:
1. In the [PowerSync Dashboard](https://dashboard.powersync.com/), select your project and instance and go to the **Database Connections** view.
2. Click **Connect to Source Database** and ensure the **Postgres** tab is selected.
3. Fill in your connection details.
4. "**Name**", "**Host**", "**Port**", "**Database name**", "**Username**", "**Password**" and "**SSL Mode"** are required. You can paste a connection string into the "**URI**" field to simplify data entry.
5. "**Name**" can be any name for the connection.
6. "**Port**" is 5432 for Postgres databases.
7. "**Username**" and "**Password**" maps to the `powersync_role` created in [Source Database Setup](/configuration/source-db/setup).
8. Note that if you're using a self-signed SSL certificate for your database server, click the **Download Certificate** button to dynamically fetch the recommended certificate directly from your server.
9. Also note if you get any error such as `server certificate not trusted: SELF_SIGNED_CERT_IN_CHAIN`, click **Download Certificate** to attempt automatic resolution.
10. Click **Test Connection** and fix any errors.
11. Click **Save Connection**.
PowerSync deploys and configures an isolated cloud environment for you, which can take a few minutes to complete.
Make sure that your Postgres database allows access to PowerSync's IPs — see [Security and IP Filtering](/configuration/source-db/security-and-ip-filtering)
Also see:
* [Postgres Source Database Setup](/configuration/source-db/setup#postgres)
* Security & IP Filtering: [TLS with Postgres](/configuration/source-db/security-and-ip-filtering#powersync-cloud:-tls-with-postgres)
## MongoDB Specifics
1. In the [PowerSync Dashboard](https://dashboard.powersync.com/), select your project and instance and go to **Database Connections**.
2. Click **Connect to Source Database** and ensure the **MongoDB** tab is selected.
3. Fill in your connection details from MongoDB:
1. Copy your cluster's connection string from MongoDB and paste it into the **URI** field in the PowerSync Dashboard. PowerSync will automatically parse this URI to populate other connection details.
* The format should be `mongodb+srv://[username:password@]host/[database]`. For example, `mongodb+srv://admin:@cluster0.abcde1.mongodb.net/powersync`
2. Enter your database user's password into the **Password** field. See the necessary permissions in [Source Database Setup](/configuration/source-db/setup#mongodb).
3. "**Database name**" is the database in your cluster to replicate.
4. Click **Test Connection** and fix any errors. If have any issues connecting, reach out to our support engineers on our [Discord server](https://discord.gg/powersync) or otherwise [contact us](/resources/contact-us).
5. Click **Save Connection**.
PowerSync deploys and configures an isolated cloud environment for you, which can take a few minutes to complete.
Make sure that your MongoDB database allows access to PowerSync's IPs — see [Security and IP Filtering](/configuration/source-db/security-and-ip-filtering)
Also see:
* [MongoDB Source Database Setup](/configuration/source-db/setup#mongodb)
* [MongoDB Atlas Device Sync Migration Guide](/migration-guides/atlas-device-sync)
## MySQL Specifics
MySQL support is currently in a [Beta release](/resources/feature-status).
Select your MySQL hosting provider for steps to connect your newly-created PowerSync instance to your MySQL database:
To enable binary logging and GTID replication in AWS Aurora, you need to create a [DB Parameter Group](https://docs.aws.amazon.com/AmazonRDS/latest/AuroraUserGuide/AuroraMySQL.Reference.ParameterGroups.html)
and configure it with the necessary parameters. Follow these steps:
1. Navigate to [Amazon RDS console](https://console.aws.amazon.com/rds/)
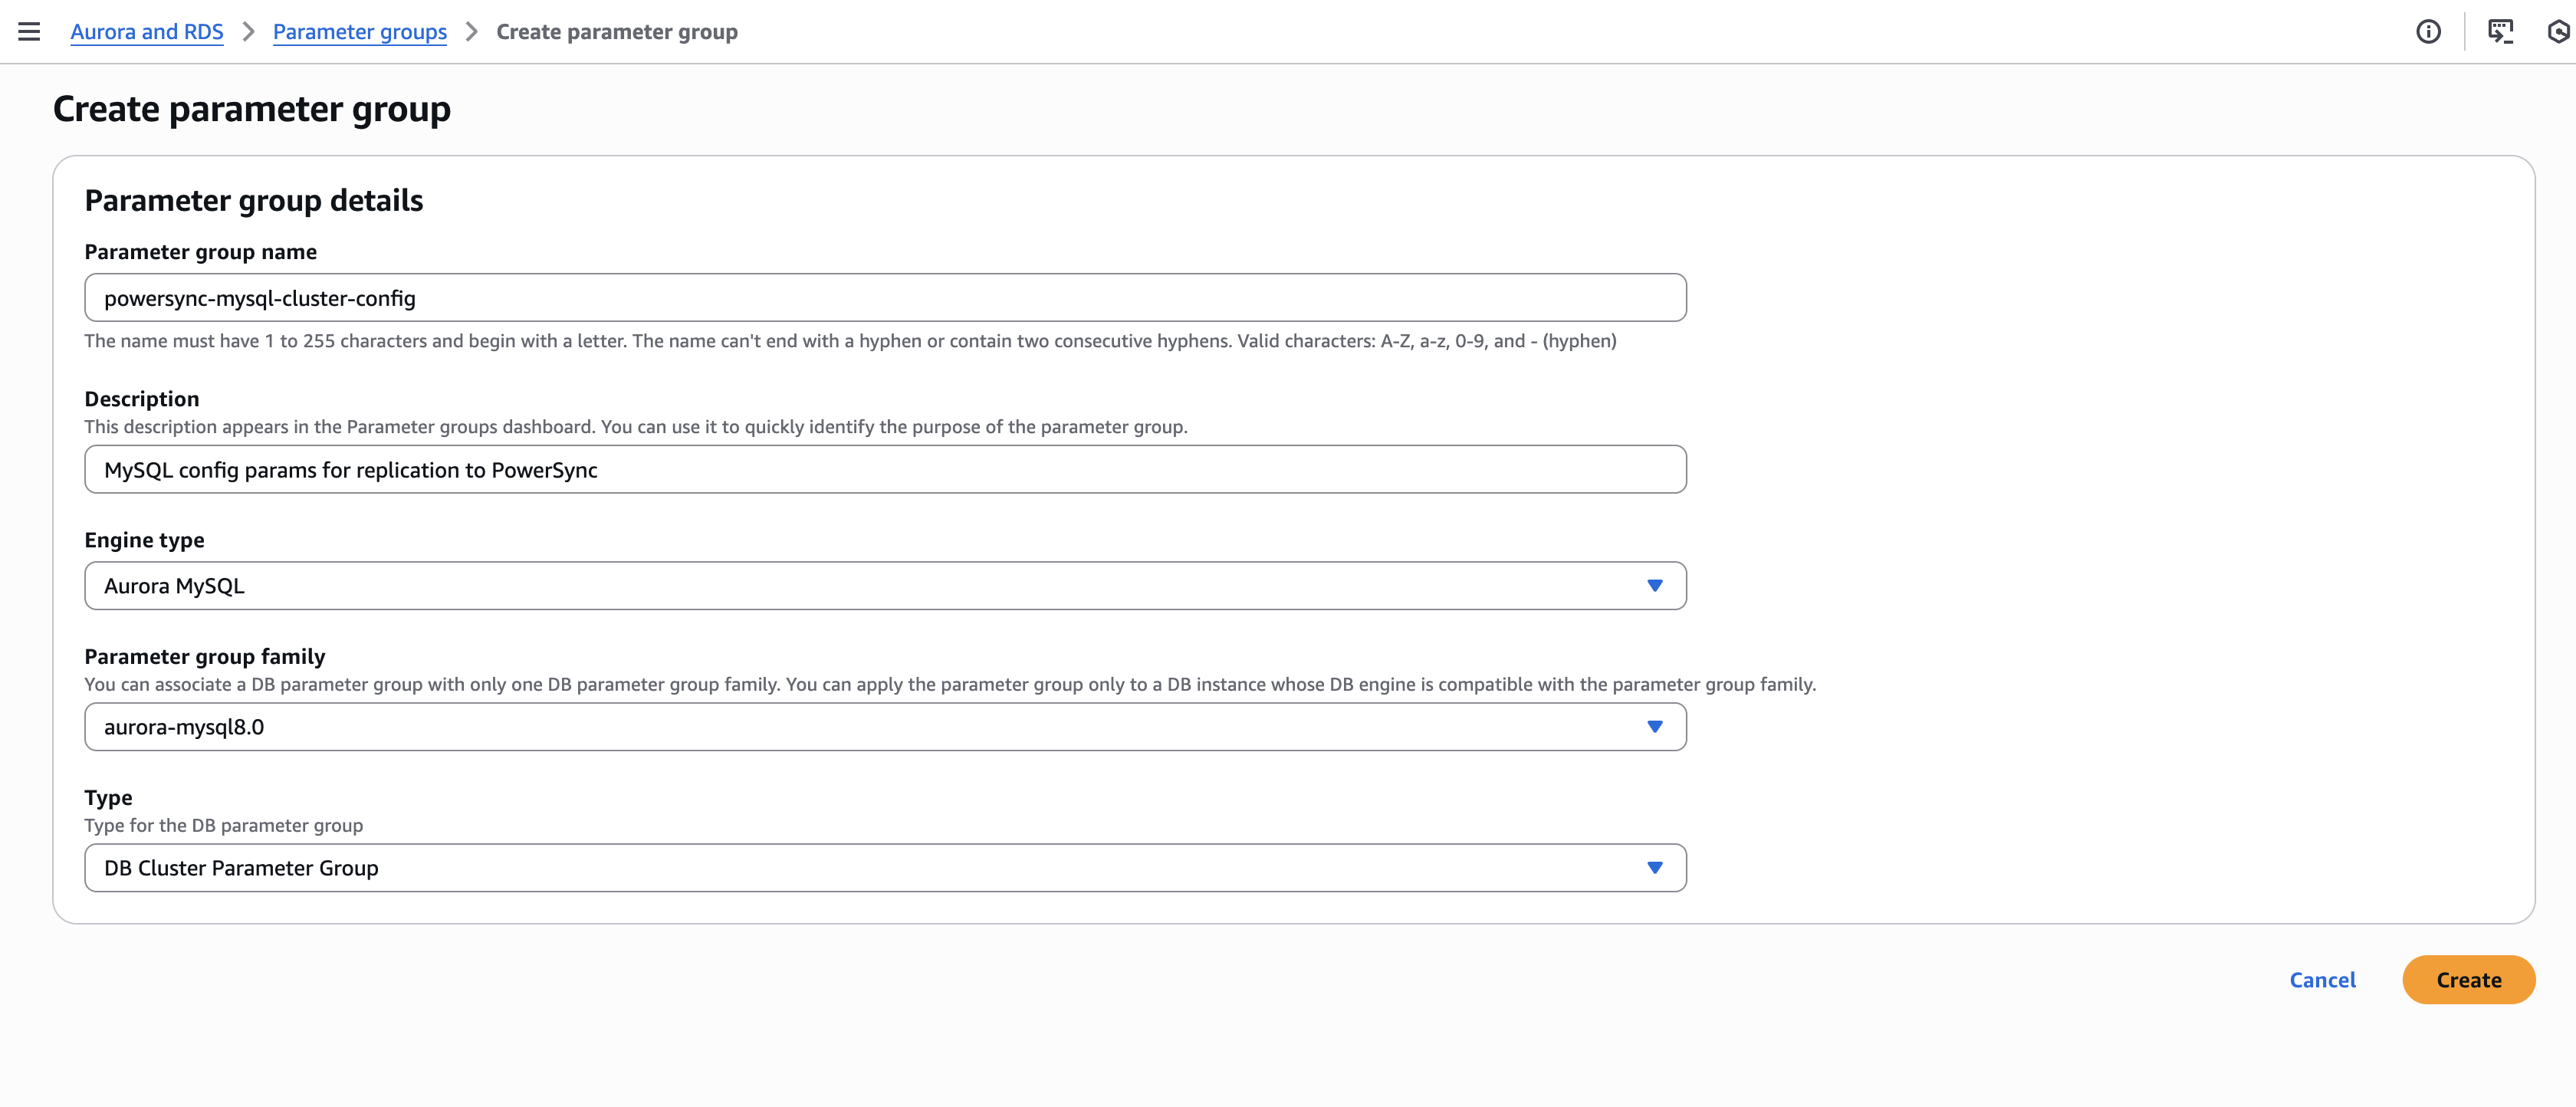
In the navigation pane, select **Parameter groups** and click **Create Parameter Group**:
7. Verify your setup by clicking **Test Connection** and resolve any errors.
8. Click **Save Connection**.
PowerSync will now create an isolated cloud environment for your instance. This typically takes a minute or two.
### Enable Supabase Auth
After your database connection is configured, enable Supabase Auth:
1. In the PowerSync Dashboard, go to **Client Auth** for your instance.
2. Enable the **Use Supabase Auth** checkbox.
3. If your Supabase project uses the legacy JWT signing keys, copy your JWT Secret from your Supabase project's settings ([JWT Keys](https://supabase.com/dashboard/project/_/settings/jwt)) and paste the secret into the **Supabase JWT Secret (optional) Legacy** field in the PowerSync Dashboard. If you're using Supabase's new [JWT signing keys](https://supabase.com/blog/jwt-signing-keys), you can leave this field empty (PowerSync will auto-configure the JWKS endpoint for your project).
4. Click **Save and Deploy** to apply the changes.
### Troubleshooting
Supabase is configured with a maximum of 4 logical replication slots, with one often used for Supabase Realtime (unrelated to PowerSync).
It is therefore easy to run out of replication slots, resulting in an error such as "All replication slots are in use" when deploying. To resolve this, delete inactive replication slots by running this query:
```sql theme={null}
select slot_name, pg_drop_replication_slot(slot_name) from pg_replication_slots where active = false;
```
1. In the [PowerSync Dashboard](https://dashboard.powersync.com/), select your project and instance and go to the **Database Connections** view.
2. Click **Connect to Source Database** and ensure the **Postgres** tab is selected.
3. [Locate the connection details from AWS RDS](https://docs.aws.amazon.com/AmazonRDS/latest/UserGuide/USER_ConnectToPostgreSQLInstance.html):
* Copy the **"Endpoint"** value from the AWS Management Console.
* Paste the endpoint into the "**Host**" field in the PowerSync Dashboard.
* Complete the remaining fields: "**Name**", "**Host**", "**Port**", "**Database name**", "**Username**", "**Password**" and "**SSL Mode"** are required. You can paste a connection string into the "**URI**" field to simplify this.
* "**Name**" can be any name for the connection.
* "**Port**" is 5432 for Postgres databases.
* "**Username**" and "**Password**" maps to the `powersync_role` created in [Source Database Setup](/configuration/source-db/setup).
* PowerSync has the AWS RDS CA certificate pre-configured — `verify-full` SSL mode can be used directly, without any additional configuration required.
4. Click **Test Connection** and fix any errors.
5. Click **Save Connection**.
PowerSync deploys and configures an isolated cloud environment for you, which can take a few minutes to complete.
### Troubleshooting
If you get an error such as "IPs in this range are not supported", the instance is likely not configured to be publicly accessible. A DNS lookup on the host should give a public IP, and not for example `10.x.x.x` or `172.31.x.x`.
1. In the [PowerSync Dashboard](https://dashboard.powersync.com/), select your project and instance and go to the **Database Connections** view.
2. Click **Connect to Source Database** and ensure the **Postgres** tab is selected.
3. Fill in your connection details from Azure.
1. "**Name**", "**Host**", "**Port**", "**Database name**", "**Username**", "**Password**" and "**SSL Mode"** are required. You can also paste a connection string into the "**URI**" field to simplify data entry.
2. "**Name**" can be any name for the connection.
3. "**Port**" is 5432 for Postgres databases.
4. "**Username**" and "**Password**" maps to the `powersync_role` created in [Source Database Setup](/configuration/source-db/setup).
5. PowerSync has the Azure CA certificate pre-configured — `verify-full` SSL mode can be used directly, without any additional configuration required.
4. Click **Test Connection** and fix any errors.
* If you encounter the error `"must be superuser or replication role to start walsender"`, ensure that you've followed all the steps for enabling logical replication documented [here](https://learn.microsoft.com/en-us/azure/postgresql/flexible-server/concepts-logical#prerequisites-for-logical-replication-and-logical-decoding).
5. Click **Save Connection**.
PowerSync deploys and configures an isolated cloud environment for you, which can take a few minutes to complete.
1. In the [PowerSync Dashboard](https://dashboard.powersync.com/), select your project and instance and go to the **Database Connections** view.
2. Click **Connect to Source Database** and ensure the **Postgres** tab is selected.
3. Fill in your connection details from Google Cloud SQL.
* "**Name**", "**Host**", "**Port**", "**Database name**", "**Username**", "**Password**" and "**SSL Mode"** are required. You can paste a connection string into the "**URI**" field to simplify data entry.
* "**Name**" can be any name for the connection.
* "**Port**" is 5432 for Postgres databases.
* "**Username**" and "**Password**" maps to the `powersync_role` created in [Source Database Setup](/configuration/source-db/setup).
* The server certificate can be downloaded from Google Cloud SQL.
* If SSL is enforced, a client certificate and key must also be created on Google Cloud SQL, and configured on the PowerSync instance.
4. Click **Test Connection** and fix any errors.
5. Click **Save Connection**.
PowerSync deploys and configures an isolated cloud environment for you, which can take a few minutes to complete.
1. In the [PowerSync Dashboard](https://dashboard.powersync.com/), select your project and instance and go to the **Database Connections** view.
2. Click **Connect to Source Database** and ensure the **Postgres** tab is selected.
3. Fill in your connection details from [Neon](https://neon.tech/).
1. "**Name**", "**Host**", "**Port**", "**Database name**", "**Username**", "**Password**" and "**SSL Mode"** are required. You can paste a connection string into the "**URI**" field to simplify data entry.
2. "**Name**" can be any name for the connection.
3. "**Port**" is 5432 for Postgres databases.
4. "**Username**" and "**Password**" maps to the `powersync_role` created in [Source Database Setup](/configuration/source-db/setup).
5. Note that if you're using a self-signed SSL certificate for your database server, click the **Download Certificate** button to dynamically fetch the recommended certificate directly from your server.
6. Also note if you get any error such as `server certificate not trusted: SELF_SIGNED_CERT_IN_CHAIN`, click **Download Certificate** to attempt automatic resolution.
4. Click **Test Connection** and fix any errors.
5. Click **Save Connection**.
PowerSync deploys and configures an isolated cloud environment for you, which can take a few minutes to complete.
1. In the [PowerSync Dashboard](https://dashboard.powersync.com/), select your project and instance and go to the **Database Connections** view.
2. Click **Connect to Source Database** and ensure the **Postgres** tab is selected.
3. Fill in your connection details from [Fly Postgres](https://fly.io/docs/postgres/).
1. "**Name**", "**Host**", "**Port**", "**Database name**", "**Username**", "**Password**" and "**SSL Mode"** are required. You can paste a connection string into the "**URI**" field to simplify data entry.
2. "**Name**" can be any name for the connection.
3. "**Port**" is 5432 for Postgres databases.
4. "**Username**" and "**Password**" maps to the `powersync_role` created in [Source Database Setup](/configuration/source-db/setup).
5. Note that if you're using a self-signed SSL certificate for your database server, click the **Download Certificate** button to dynamically fetch the recommended certificate directly from your server.
6. Also note if you get any error such as `server certificate not trusted: SELF_SIGNED_CERT_IN_CHAIN`, click **Download Certificate** to attempt automatic resolution.
4. Click **Test Connection** and fix any errors.
5. Click **Save Connection**.
PowerSync deploys and configures an isolated cloud environment for you, which can take a few minutes to complete.
1. In the [PowerSync Dashboard](https://dashboard.powersync.com/), select your project and instance and go to the **Database Connections** view.
2. Click **Connect to Source Database** and ensure the **Postgres** tab is selected.
3. Head to your PlanetScale database dashboard page at `https://app.planetscale.com//` and click on the "Connect" button to get your database connection parameters.
1. In the PowerSync Dashboard, "**Name**", "**Host**", "**Port**", "**Database name**", "**Username**" and "**Password**" are required.
2. "**Name**" can be any name for the connection.
3. "**Host**" is the `host` connection parameter for your database.
4. "**Port**" is 5432 for Postgres databases.
5. "**Username**" and "**Password**" maps to the `powersync_role` created in [Source Database Setup](/configuration/source-db/setup).
1. Important: PlanetScale requires your branch ID to be appended to your username. The username should be `powersync_role.`. Your PlanetScale branch ID can be found on the same connection details page.
6. **SSL Mode** can remain the default `verify-full`.
4. Click **Test Connection** and fix any errors.
5. Click **Save Connection**.
PowerSync deploys and configures an isolated cloud environment for you, which can take a few minutes to complete.
1. In the [PowerSync Dashboard](https://dashboard.powersync.com/), select your project and instance and go to the **Database Connections** view.
2. Click **Connect to Source Database** and ensure the **Postgres** tab is selected.
3. In your Xata dashboard, navigate to Overview -> Connect and copy the connection URI. Alternatively, use the [Xata CLI](https://xata.io/docs/cli) and run `xata branch url` to obtain the URI and copy that.
4. Paste the connection details into the "**URI**" field in the PowerSync Dashboard.
5. Click **Test Connection** and fix any errors.
6. Click **Save Connection**.
PowerSync deploys and configures an isolated cloud environment for you, which can take a few minutes to complete.
For other providers and self-hosted databases:
1. In the [PowerSync Dashboard](https://dashboard.powersync.com/), select your project and instance and go to the **Database Connections** view.
2. Click **Connect to Source Database** and ensure the **Postgres** tab is selected.
3. Fill in your connection details.
4. "**Name**", "**Host**", "**Port**", "**Database name**", "**Username**", "**Password**" and "**SSL Mode"** are required. You can paste a connection string into the "**URI**" field to simplify data entry.
5. "**Name**" can be any name for the connection.
6. "**Port**" is 5432 for Postgres databases.
7. "**Username**" and "**Password**" maps to the `powersync_role` created in [Source Database Setup](/configuration/source-db/setup).
8. Note that if you're using a self-signed SSL certificate for your database server, click the **Download Certificate** button to dynamically fetch the recommended certificate directly from your server.
9. Also note if you get any error such as `server certificate not trusted: SELF_SIGNED_CERT_IN_CHAIN`, click **Download Certificate** to attempt automatic resolution.
10. Click **Test Connection** and fix any errors.
11. Click **Save Connection**.
PowerSync deploys and configures an isolated cloud environment for you, which can take a few minutes to complete.
Make sure that your Postgres database allows access to PowerSync's IPs — see [Security and IP Filtering](/configuration/source-db/security-and-ip-filtering)
Also see:
* [Postgres Source Database Setup](/configuration/source-db/setup#postgres)
* Security & IP Filtering: [TLS with Postgres](/configuration/source-db/security-and-ip-filtering#powersync-cloud:-tls-with-postgres)
## MongoDB Specifics
1. In the [PowerSync Dashboard](https://dashboard.powersync.com/), select your project and instance and go to **Database Connections**.
2. Click **Connect to Source Database** and ensure the **MongoDB** tab is selected.
3. Fill in your connection details from MongoDB:
1. Copy your cluster's connection string from MongoDB and paste it into the **URI** field in the PowerSync Dashboard. PowerSync will automatically parse this URI to populate other connection details.
* The format should be `mongodb+srv://[username:password@]host/[database]`. For example, `mongodb+srv://admin:@cluster0.abcde1.mongodb.net/powersync`
2. Enter your database user's password into the **Password** field. See the necessary permissions in [Source Database Setup](/configuration/source-db/setup#mongodb).
3. "**Database name**" is the database in your cluster to replicate.
4. Click **Test Connection** and fix any errors. If have any issues connecting, reach out to our support engineers on our [Discord server](https://discord.gg/powersync) or otherwise [contact us](/resources/contact-us).
5. Click **Save Connection**.
PowerSync deploys and configures an isolated cloud environment for you, which can take a few minutes to complete.
Make sure that your MongoDB database allows access to PowerSync's IPs — see [Security and IP Filtering](/configuration/source-db/security-and-ip-filtering)
Also see:
* [MongoDB Source Database Setup](/configuration/source-db/setup#mongodb)
* [MongoDB Atlas Device Sync Migration Guide](/migration-guides/atlas-device-sync)
## MySQL Specifics
MySQL support is currently in a [Beta release](/resources/feature-status).
Select your MySQL hosting provider for steps to connect your newly-created PowerSync instance to your MySQL database:
To enable binary logging and GTID replication in AWS Aurora, you need to create a [DB Parameter Group](https://docs.aws.amazon.com/AmazonRDS/latest/AuroraUserGuide/AuroraMySQL.Reference.ParameterGroups.html)
and configure it with the necessary parameters. Follow these steps:
1. Navigate to [Amazon RDS console](https://console.aws.amazon.com/rds/)
In the navigation pane, select **Parameter groups** and click **Create Parameter Group**:
 2. Add all the required [binlog configuration](/configuration/source-db/setup#binlog-configuration) parameters. For example:
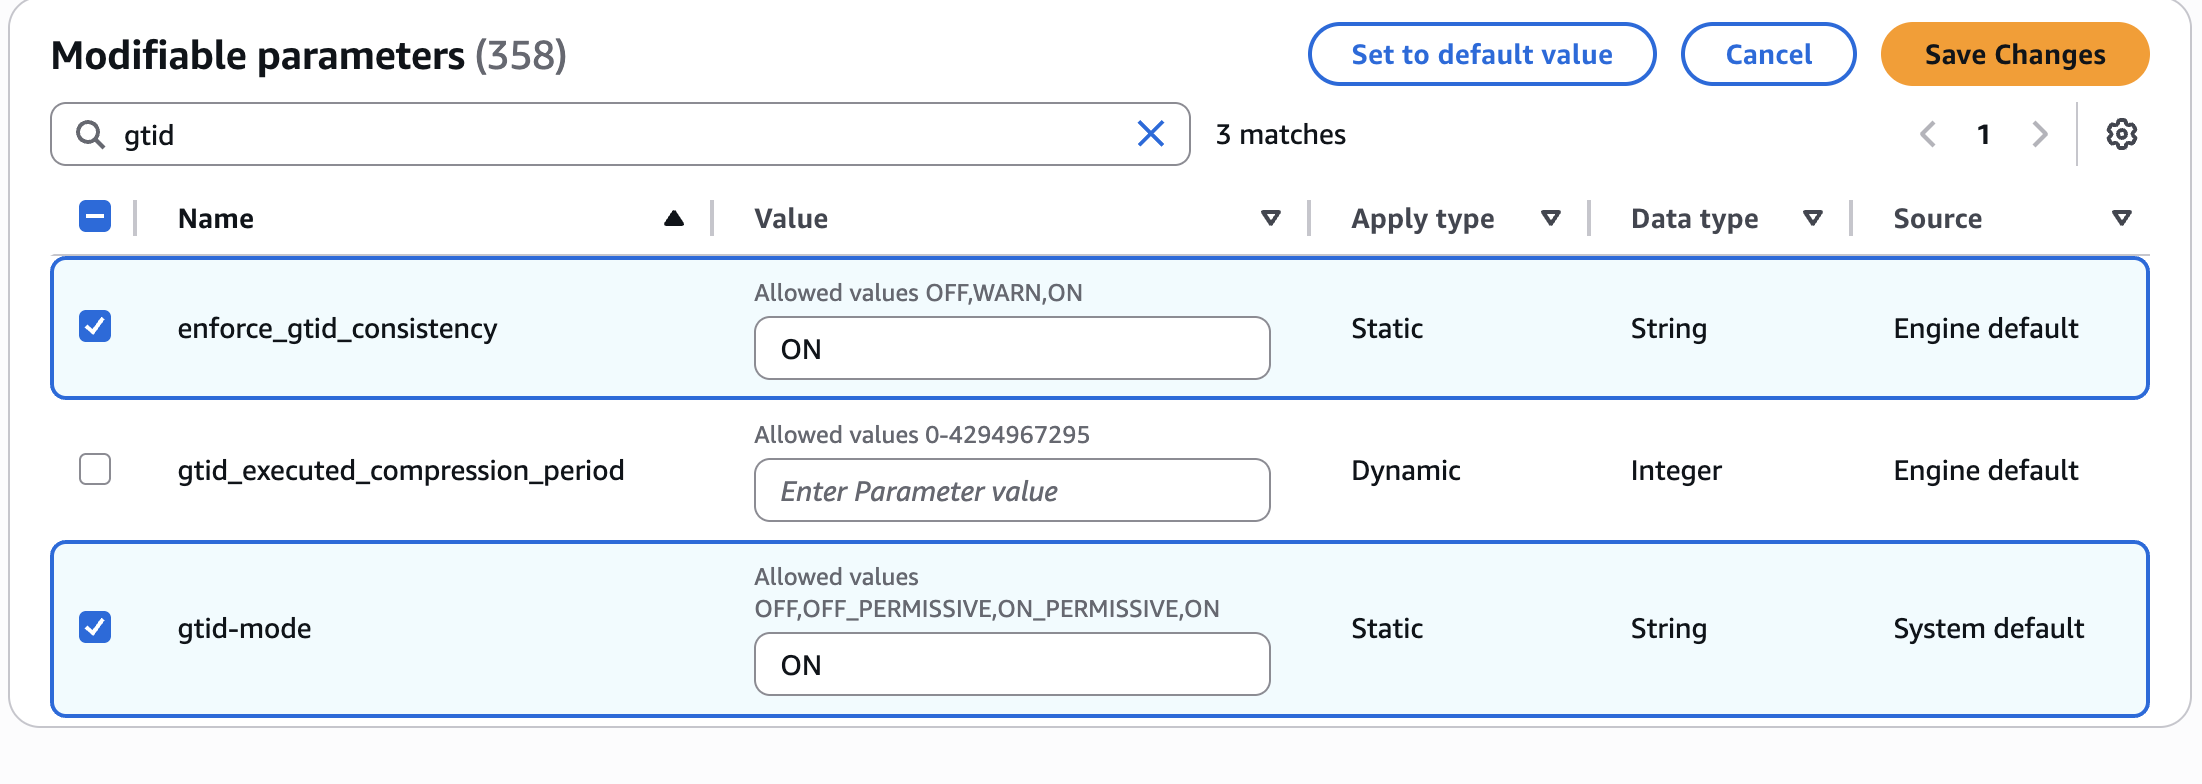 3. Associate your newly created parameter group with your Aurora cluster:
1. In the navigation pane, select **Databases**.
2. Select your Aurora cluster.
3. Select **Modify**.
4. In the **DB Parameter Group** section, select the parameter group you created.
5. Click **Continue** and then **Apply** immediately.
4. Whitelist PowerSync's IPs in your Aurora cluster's security group to allow access. See [Security and IP Filtering](/configuration/source-db/security-and-ip-filtering) for more details.
5. In the [PowerSync Dashboard](https://dashboard.powersync.com/), select your project and instance and go to the **Database Connections** view.
6. Click **Connect to Source Database** and ensure the **MySQL** tab is selected.
7. Fill in your MySQL connection details from AWS Aurora:
1. "**Name**", "**Host**", "**Port**", "**Database name**", "**Username**", "**Password**" are required.
2. "**Name**" can be any name for the connection.
3. "**Host**" is the endpoint for your Aurora cluster.
4. "**Database name**" is the default database to replicate.
5. "**Username**" and "**Password**" maps to your database user.
8. Click **Test Connection** and fix any errors.
9. Click **Save Connection**.
PowerSync deploys and configures an isolated cloud environment for you, which can take a few minutes to complete.
For other providers and self-hosted databases:
1. In the [PowerSync Dashboard](https://dashboard.powersync.com/), select your project and instance and go to the **Database Connections** view.
2. Click **Connect to Source Database** and ensure the **MySQL** tab is selected.
3. Fill in your MySQL connection details:
1. "**Name**", "**Host**", "**Port**", "**Database name**", "**Username**", "**Password**" are required.
2. "**Name**" can be any name for the connection.
3. "**Host**" the endpoint for your database.
4. "**Database name**" is the default database to replicate. Additional databases are derived by qualifying the tables in your Sync Streams/Sync Rules.
5. "**Username**" and "**Password**" maps to your database user.
4. Click **Test Connection** and fix any errors.
5. Click **Save Connection**.
PowerSync deploys and configures an isolated cloud environment for you, which can take a few minutes to complete.
Make sure that your MySQL database allows access to PowerSync's IPs — see [Security and IP Filtering](/configuration/source-db/security-and-ip-filtering)
Also see:
* [MySQL Source Database Setup](/configuration/source-db/setup#mysql)
## SQL Server Specifics
SQL Server support is currently in a [Beta release](/resources/feature-status).
SQL Server support was [introduced](https://releases.powersync.com/announcements/powersync-service) in version 1.18.1 of the PowerSync Service.
1. In the [PowerSync Dashboard](https://dashboard.powersync.com/), select your project and instance and go to the **Database Connections** view.
2. Click **Connect to Source Database** and ensure the **"SQL Server"** tab is selected.
3. Fill in your SQL Server connection details:
1. "**Name**", "**Host**", "**Port**", "**Database name**", "**Username**", "**Password**" are required.
2. "**Name**" can be any name for the connection.
3. "**Host**" is the endpoint for your SQL Server instance.
4. "**Port**" is typically 1433 for SQL Server (default port).
5. "**Database name**" is the database you want to replicate. CDC should be enabled on this database.
6. "**Username**" and "**Password**" maps to the database user created in [Source Database Setup](/configuration/source-db/setup#sql-server) (e.g., `powersync_user`).
4. Click **Test Connection** and fix any errors.
5. Click **Save Connection**.
PowerSync deploys and configures an isolated cloud environment for you, which can take a few minutes to complete.
Make sure that your SQL Server database allows access to PowerSync's IPs — see [Security and IP Filtering](/configuration/source-db/security-and-ip-filtering)
Also see:
* [SQL Server Source Database Setup](/configuration/source-db/setup#sql-server)
## Convex Specifics
The Convex replicator is currently released as an [experimental feature](/resources/feature-status). APIs and
behavior may change, and we can't yet guarantee continued support or long-term stability.
Before connecting PowerSync, add the required `powersync_checkpoints` table and mutation to your Convex deployment. See [Convex Source Database Setup](/configuration/source-db/setup#convex).
1. In the [PowerSync Dashboard](https://dashboard.powersync.com/), select your project and instance and go to **Database Connections**.
2. Click **Connect to Source Database** and ensure the **Convex** tab is selected.
3. Fill in your Convex connection details:
1. **Deployment URL** is your Convex deployment URL, for example `https://.convex.cloud`.
2. **Deploy key** is the deploy key for the Convex deployment. In the Convex Dashboard, go to **Settings** → **General** and generate a deploy key with **Custom permissions** that include `deployment:data:view`. The **Deploy only** option does not work for PowerSync replication.
4. Click **Test Connection** and fix any errors.
5. Click **Save Connection**.
PowerSync deploys and configures an isolated cloud environment for you, which can take a few minutes to complete.
Use a deploy key for the correct environment, grant only the permissions PowerSync needs, store it as a secret, and rotate it if it is exposed.
Also see:
* [Convex Source Database Setup](/configuration/source-db/setup#convex)
* [Type Mapping](/sync/types#convex-type-mapping)
3. Associate your newly created parameter group with your Aurora cluster:
1. In the navigation pane, select **Databases**.
2. Select your Aurora cluster.
3. Select **Modify**.
4. In the **DB Parameter Group** section, select the parameter group you created.
5. Click **Continue** and then **Apply** immediately.
4. Whitelist PowerSync's IPs in your Aurora cluster's security group to allow access. See [Security and IP Filtering](/configuration/source-db/security-and-ip-filtering) for more details.
5. In the [PowerSync Dashboard](https://dashboard.powersync.com/), select your project and instance and go to the **Database Connections** view.
6. Click **Connect to Source Database** and ensure the **MySQL** tab is selected.
7. Fill in your MySQL connection details from AWS Aurora:
1. "**Name**", "**Host**", "**Port**", "**Database name**", "**Username**", "**Password**" are required.
2. "**Name**" can be any name for the connection.
3. "**Host**" is the endpoint for your Aurora cluster.
4. "**Database name**" is the default database to replicate.
5. "**Username**" and "**Password**" maps to your database user.
8. Click **Test Connection** and fix any errors.
9. Click **Save Connection**.
PowerSync deploys and configures an isolated cloud environment for you, which can take a few minutes to complete.
For other providers and self-hosted databases:
1. In the [PowerSync Dashboard](https://dashboard.powersync.com/), select your project and instance and go to the **Database Connections** view.
2. Click **Connect to Source Database** and ensure the **MySQL** tab is selected.
3. Fill in your MySQL connection details:
1. "**Name**", "**Host**", "**Port**", "**Database name**", "**Username**", "**Password**" are required.
2. "**Name**" can be any name for the connection.
3. "**Host**" the endpoint for your database.
4. "**Database name**" is the default database to replicate. Additional databases are derived by qualifying the tables in your Sync Streams/Sync Rules.
5. "**Username**" and "**Password**" maps to your database user.
4. Click **Test Connection** and fix any errors.
5. Click **Save Connection**.
PowerSync deploys and configures an isolated cloud environment for you, which can take a few minutes to complete.
Make sure that your MySQL database allows access to PowerSync's IPs — see [Security and IP Filtering](/configuration/source-db/security-and-ip-filtering)
Also see:
* [MySQL Source Database Setup](/configuration/source-db/setup#mysql)
## SQL Server Specifics
SQL Server support is currently in a [Beta release](/resources/feature-status).
SQL Server support was [introduced](https://releases.powersync.com/announcements/powersync-service) in version 1.18.1 of the PowerSync Service.
1. In the [PowerSync Dashboard](https://dashboard.powersync.com/), select your project and instance and go to the **Database Connections** view.
2. Click **Connect to Source Database** and ensure the **"SQL Server"** tab is selected.
3. Fill in your SQL Server connection details:
1. "**Name**", "**Host**", "**Port**", "**Database name**", "**Username**", "**Password**" are required.
2. "**Name**" can be any name for the connection.
3. "**Host**" is the endpoint for your SQL Server instance.
4. "**Port**" is typically 1433 for SQL Server (default port).
5. "**Database name**" is the database you want to replicate. CDC should be enabled on this database.
6. "**Username**" and "**Password**" maps to the database user created in [Source Database Setup](/configuration/source-db/setup#sql-server) (e.g., `powersync_user`).
4. Click **Test Connection** and fix any errors.
5. Click **Save Connection**.
PowerSync deploys and configures an isolated cloud environment for you, which can take a few minutes to complete.
Make sure that your SQL Server database allows access to PowerSync's IPs — see [Security and IP Filtering](/configuration/source-db/security-and-ip-filtering)
Also see:
* [SQL Server Source Database Setup](/configuration/source-db/setup#sql-server)
## Convex Specifics
The Convex replicator is currently released as an [experimental feature](/resources/feature-status). APIs and
behavior may change, and we can't yet guarantee continued support or long-term stability.
Before connecting PowerSync, add the required `powersync_checkpoints` table and mutation to your Convex deployment. See [Convex Source Database Setup](/configuration/source-db/setup#convex).
1. In the [PowerSync Dashboard](https://dashboard.powersync.com/), select your project and instance and go to **Database Connections**.
2. Click **Connect to Source Database** and ensure the **Convex** tab is selected.
3. Fill in your Convex connection details:
1. **Deployment URL** is your Convex deployment URL, for example `https://.convex.cloud`.
2. **Deploy key** is the deploy key for the Convex deployment. In the Convex Dashboard, go to **Settings** → **General** and generate a deploy key with **Custom permissions** that include `deployment:data:view`. The **Deploy only** option does not work for PowerSync replication.
4. Click **Test Connection** and fix any errors.
5. Click **Save Connection**.
PowerSync deploys and configures an isolated cloud environment for you, which can take a few minutes to complete.
Use a deploy key for the correct environment, grant only the permissions PowerSync needs, store it as a secret, and rotate it if it is exposed.
Also see:
* [Convex Source Database Setup](/configuration/source-db/setup#convex)
* [Type Mapping](/sync/types#convex-type-mapping)