> ## Documentation Index
> Fetch the complete documentation index at: https://docs.powersync.com/llms.txt
> Use this file to discover all available pages before exploring further.
# Custom Authentication
> Implement custom JWT-based authentication for PowerSync using any auth provider.
A quick way to get started during development before implementing custom auth is to use [Development Tokens](/configuration/auth/development-tokens)
When you set up custom authentication, you define the [`fetchCredentials()` function](/configuration/app-backend/client-side-integration) in your *backend connector* to retrieve a JWT from your backend application API, making use of your [existing app-to-backend](/configuration/app-backend/setup) authentication:
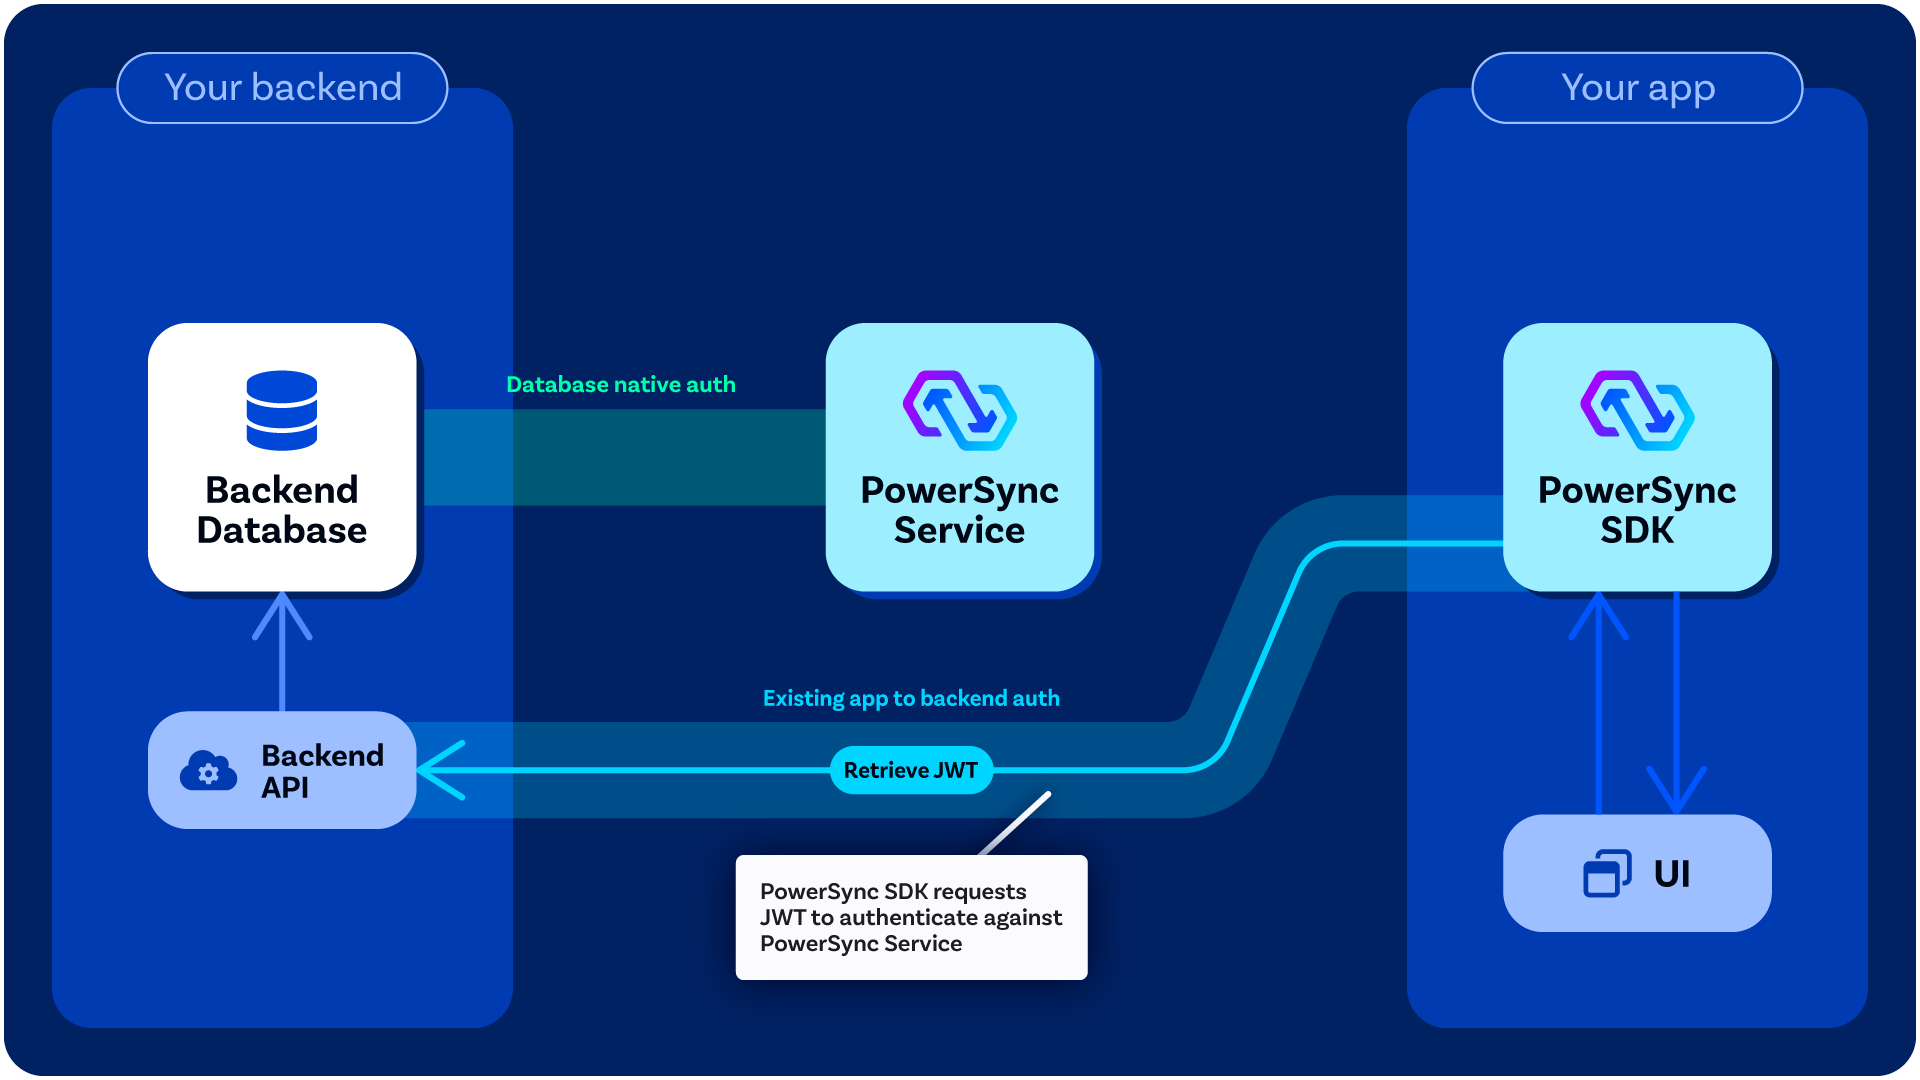 ## Custom Authentication Flow
The process is as follows:
1. Your client app authenticates the user using the app's authentication provider (either a third-party authentication provider or a custom one) and typically gets a session token.
2. The client makes a call to your backend API (authenticated using the above session token), which generates and signs a JWT for PowerSync. (You define the [`fetchCredentials()` function](/configuration/app-backend/client-side-integration) in your *backend connector* so that it makes the API call, and the PowerSync Client SDK automatically invokes `fetchCredentials()` as needed).
1. For example implementations of this backend API endpoint, see [Custom Backend Examples](/intro/examples#backend-examples)
3. The client connects to the PowerSync Service using the above JWT (this is automatically managed by the PowerSync Client SDK).
4. The PowerSync Service verifies the JWT.
## JWT Requirements
Requirements for the signed JWT:
1. The JWT must be signed using a key in the JWKS ([Option 1](#option-1%3A-asymmetric-jwts-—-using-jwks-recommended)) or the HS256 key ([Option 2](#option-2%3A-symmetric-jwts-—-using-hs256))
2. JWT must have a `kid` matching that of the key.
3. The `aud` of the JWT must match the PowerSync instance URL (for Cloud) or one of the audiences configured in `client_auth.audience` (for self-hosted).
1. To get the instance URL when using PowerSync Cloud: In the [PowerSync Dashboard](https://dashboard.powersync.com/), click **Connect** in the top bar and copy the instance URL from the dialog.
2. Alternatively, specify a custom audience in the instance settings (Cloud) or in your config file ([self-hosted](#self-hosted-configuration)).
4. The JWT must expire in 24 hours or less, and 60 minutes or less is recommended. Specifically, both `iat` and `exp` fields must be present, with a difference of 86,400 or less between them.
5. The user ID must be used as the `sub` of the JWT.
6. Additional fields can be added which can be referenced in Sync Streams (as [`auth.parameters()`](/sync/streams/overview#accessing-parameters)) or Sync Rules [parameter queries](/sync/rules/parameter-queries).
## Option 1: Asymmetric JWTs — Using JWKS (Recommended)
This is the recommended approach for production environments. Asymmetric keys provide better security by separating signing (private key) from verification (public key), making key rotation easier and more secure.
A key pair (private + public key) is required to sign and verify JWTs. The private key is used to sign the JWT, and the public key is used to verify it.
PowerSync requires the public key(s) to be specified in [JSON Web Key Set (JWKS)](https://auth0.com/docs/secure/tokens/json-web-tokens/json-web-key-sets) format.
The JWKS can be configured in one of two ways:
* Expose the JWKS on a public URL. PowerSync fetches the keys from this endpoint. We have an example endpoint available [here](https://hlstmcktecziostiaplz.supabase.co/functions/v1/powersync-jwks) — ensure that your response looks similar. This option is useful if you're using an external authentication service with an existing JWKS endpoint and you want to automate key rotation without manual deploys.
* Configure the JWKS directly. Provide the keys directly in your PowerSync instance configuration. This option is useful if you generate tokens yourself and want simpler setup.
Requirements for the public key in the JWKS:
1. Supported signature schemes: RSA, EdDSA and ECDSA.
2. Key type (`kty`): `RSA`, `OKP` (EdDSA) or `EC` (ECDSA).
3. Algorithm (`alg`):
1. `RS256`, `RS384` or `RS512` for RSA
2. `EdDSA` for EdDSA
3. `ES256`, `ES384` or `ES512` for ECDSA
4. Curve (`crv`) - only relevant for EdDSA and ECDSA:
1. `Ed25519` or `Ed448` for EdDSA
2. `P-256`, `P-384` or `P-512` for ECDSA
5. A `kid` must be specified and must match the `kid` in the JWT.
Refer to [this example](https://github.com/powersync-ja/powersync-jwks-example) for creating and verifying JWTs for PowerSync authentication.
Since there is no way to revoke a JWT once issued without rotating the key, we recommend using short expiration periods (e.g. 5 minutes). JWTs older than 60 minutes are not accepted by PowerSync.
### Rotating Keys
If a private key is compromised, rotate the key in the JWKS.
The rotation process differs depending on your JWKS configuration method:
#### JWKS on a Public URL
When using a JWKS exposed on a public URL, PowerSync refreshes the keys from the endpoint every few minutes and will detect new keys immediately.
There is a possibility of false authentication errors until PowerSync refreshes the keys. These errors are typically retried by the client and will have little impact. However, to periodically rotate keys without any authentication failures, follow this process:
1. Add a new key to the JWKS at your endpoint.
2. Wait 5 minutes to ensure PowerSync has fetched the new key.
3. Start signing new JWT tokens using the new key.
4. Wait until all existing tokens have expired.
5. Remove the old key from your JWKS endpoint.
#### Direct JWKS Configuration
When the JWKS is configured directly in PowerSync (not via a public URL), you must deploy configuration changes for PowerSync to use the new key:
1. Add the new key to your JWKS configuration.
2. Deploy the configuration changes (via the **Save and Deploy** button in the PowerSync Dashboard, or restart the PowerSync Service for self-hosted).
3. Start signing new JWT tokens using the new key.
4. Wait until all existing tokens have expired.
5. Remove the old key from the JWKS configuration and deploy again.
### PowerSync Cloud Configuration
1. In the [PowerSync Dashboard](https://dashboard.powersync.com/), select your project and instance and go to the **Client Auth** view.
2. Configure your JWKS and audience settings. You can either configure the JWKS directly in JSON format (use the **JWKS** section), or configure a **JWKS URI**.
3. Click **Save and Deploy** to apply the changes.
### Self-Hosted Configuration
You can configure authentication using either:
* A JWKS URI endpoint
* Static public keys in the configuration file
This can be configured via your [`service.yaml`](/configuration/powersync-service/self-hosted-instances):
```yaml service.yaml theme={null}
client_auth:
# Option 1: JWKS URI endpoint
jwks_uri: http://demo-backend:6060/api/auth/keys
# Option 2: Static collection of public keys for JWT verification
# jwks:
# keys:
# - kty: 'RSA'
# n: '[rsa-modulus]'
# e: '[rsa-exponent]'
# alg: 'RS256'
# kid: '[key-id]'
audience: ['powersync-dev', 'powersync']
```
## Option 2: Symmetric JWTs — Using HS256
Using shared secrets (HS256) for JWT signing is generally not recommended for production environments due to security risks. We recommend using asymmetric keys (Option 1) instead, which provide better security through public/private key separation.
PowerSync supports HS256 symmetric JWTs for development and testing purposes.
### Generating a Shared Secret
You can generate a shared secret in the terminal using the following command:
```bash theme={null}
openssl rand -base64 32
```
### Base64 URL Encode the Shared Secret
Once you've generated the shared secret, you will need to Base64 URL encode it before setting it in the PowerSync instance Client Auth configuration.
You can use the following command to Base64 URL encode the shared secret:
```bash theme={null}
echo -n "your-value-here" | base64 -w 0 | tr '+/' '-_' | tr -d '='
```
### Set the Shared Secret in the PowerSync Instance
1. Go to the [PowerSync Cloud Dashboard](https://dashboard.powersync.com/) and select your project and instance.
2. Go to the **Client Auth** view.
3. Find the section labeled **HS256 Authentication Tokens (ADVANCED)** and click **+** button to add a new token.
4. Set the **KID** to a unique identifier for the token (you'll use the same KID to sign the token). Set the **Shared Secret** to the Base64 URL encoded shared secret.
5. Click **Save and Deploy**.
1. Add the shared secret to your PowerSync Service configuration file, e.g.:
```yaml service.yaml theme={null}
client_auth:
jwks:
keys:
- kty: oct
alg: 'HS256'
kid: '[key-id]'
k: '[base64url-encoded-shared-secret]'
```
2. Restart the PowerSync Service.
### Generate New JWTs Using the KID and Shared Secret
Using your newly-created shared secret, you can generate JWT tokens [in your backend](/configuration/app-backend/setup) using the same KID you set in the PowerSync Service configuration. Here's a example TypeScript function using the [`jose`](https://github.com/panva/jose) library:
```typescript theme={null}
import * as jose from 'jose';
export const generateToken = async (payload: Record, userId: string) => {
return await new jose.SignJWT(payload)
.setProtectedHeader({ alg: 'HS256', kid: 'your-kid' })
.setSubject(userId)
.setIssuer('https://your-domain.com')
.setAudience('https://your-powersync-instance.com')
.setExpirationTime('60m')
// Note: The shared secret should be read from a secure source or environment variable and not hardcoded.
.sign(Buffer.from('your-base64url-encoded-shared-secret', 'base64url'));
};
```
This JWT can then be used to authenticate with the PowerSync Service. In your [`fetchCredentials()` function](/configuration/app-backend/client-side-integration), you will need to retrieve the token from your backend API.
## Custom Authentication Flow
The process is as follows:
1. Your client app authenticates the user using the app's authentication provider (either a third-party authentication provider or a custom one) and typically gets a session token.
2. The client makes a call to your backend API (authenticated using the above session token), which generates and signs a JWT for PowerSync. (You define the [`fetchCredentials()` function](/configuration/app-backend/client-side-integration) in your *backend connector* so that it makes the API call, and the PowerSync Client SDK automatically invokes `fetchCredentials()` as needed).
1. For example implementations of this backend API endpoint, see [Custom Backend Examples](/intro/examples#backend-examples)
3. The client connects to the PowerSync Service using the above JWT (this is automatically managed by the PowerSync Client SDK).
4. The PowerSync Service verifies the JWT.
## JWT Requirements
Requirements for the signed JWT:
1. The JWT must be signed using a key in the JWKS ([Option 1](#option-1%3A-asymmetric-jwts-—-using-jwks-recommended)) or the HS256 key ([Option 2](#option-2%3A-symmetric-jwts-—-using-hs256))
2. JWT must have a `kid` matching that of the key.
3. The `aud` of the JWT must match the PowerSync instance URL (for Cloud) or one of the audiences configured in `client_auth.audience` (for self-hosted).
1. To get the instance URL when using PowerSync Cloud: In the [PowerSync Dashboard](https://dashboard.powersync.com/), click **Connect** in the top bar and copy the instance URL from the dialog.
2. Alternatively, specify a custom audience in the instance settings (Cloud) or in your config file ([self-hosted](#self-hosted-configuration)).
4. The JWT must expire in 24 hours or less, and 60 minutes or less is recommended. Specifically, both `iat` and `exp` fields must be present, with a difference of 86,400 or less between them.
5. The user ID must be used as the `sub` of the JWT.
6. Additional fields can be added which can be referenced in Sync Streams (as [`auth.parameters()`](/sync/streams/overview#accessing-parameters)) or Sync Rules [parameter queries](/sync/rules/parameter-queries).
## Option 1: Asymmetric JWTs — Using JWKS (Recommended)
This is the recommended approach for production environments. Asymmetric keys provide better security by separating signing (private key) from verification (public key), making key rotation easier and more secure.
A key pair (private + public key) is required to sign and verify JWTs. The private key is used to sign the JWT, and the public key is used to verify it.
PowerSync requires the public key(s) to be specified in [JSON Web Key Set (JWKS)](https://auth0.com/docs/secure/tokens/json-web-tokens/json-web-key-sets) format.
The JWKS can be configured in one of two ways:
* Expose the JWKS on a public URL. PowerSync fetches the keys from this endpoint. We have an example endpoint available [here](https://hlstmcktecziostiaplz.supabase.co/functions/v1/powersync-jwks) — ensure that your response looks similar. This option is useful if you're using an external authentication service with an existing JWKS endpoint and you want to automate key rotation without manual deploys.
* Configure the JWKS directly. Provide the keys directly in your PowerSync instance configuration. This option is useful if you generate tokens yourself and want simpler setup.
Requirements for the public key in the JWKS:
1. Supported signature schemes: RSA, EdDSA and ECDSA.
2. Key type (`kty`): `RSA`, `OKP` (EdDSA) or `EC` (ECDSA).
3. Algorithm (`alg`):
1. `RS256`, `RS384` or `RS512` for RSA
2. `EdDSA` for EdDSA
3. `ES256`, `ES384` or `ES512` for ECDSA
4. Curve (`crv`) - only relevant for EdDSA and ECDSA:
1. `Ed25519` or `Ed448` for EdDSA
2. `P-256`, `P-384` or `P-512` for ECDSA
5. A `kid` must be specified and must match the `kid` in the JWT.
Refer to [this example](https://github.com/powersync-ja/powersync-jwks-example) for creating and verifying JWTs for PowerSync authentication.
Since there is no way to revoke a JWT once issued without rotating the key, we recommend using short expiration periods (e.g. 5 minutes). JWTs older than 60 minutes are not accepted by PowerSync.
### Rotating Keys
If a private key is compromised, rotate the key in the JWKS.
The rotation process differs depending on your JWKS configuration method:
#### JWKS on a Public URL
When using a JWKS exposed on a public URL, PowerSync refreshes the keys from the endpoint every few minutes and will detect new keys immediately.
There is a possibility of false authentication errors until PowerSync refreshes the keys. These errors are typically retried by the client and will have little impact. However, to periodically rotate keys without any authentication failures, follow this process:
1. Add a new key to the JWKS at your endpoint.
2. Wait 5 minutes to ensure PowerSync has fetched the new key.
3. Start signing new JWT tokens using the new key.
4. Wait until all existing tokens have expired.
5. Remove the old key from your JWKS endpoint.
#### Direct JWKS Configuration
When the JWKS is configured directly in PowerSync (not via a public URL), you must deploy configuration changes for PowerSync to use the new key:
1. Add the new key to your JWKS configuration.
2. Deploy the configuration changes (via the **Save and Deploy** button in the PowerSync Dashboard, or restart the PowerSync Service for self-hosted).
3. Start signing new JWT tokens using the new key.
4. Wait until all existing tokens have expired.
5. Remove the old key from the JWKS configuration and deploy again.
### PowerSync Cloud Configuration
1. In the [PowerSync Dashboard](https://dashboard.powersync.com/), select your project and instance and go to the **Client Auth** view.
2. Configure your JWKS and audience settings. You can either configure the JWKS directly in JSON format (use the **JWKS** section), or configure a **JWKS URI**.
3. Click **Save and Deploy** to apply the changes.
### Self-Hosted Configuration
You can configure authentication using either:
* A JWKS URI endpoint
* Static public keys in the configuration file
This can be configured via your [`service.yaml`](/configuration/powersync-service/self-hosted-instances):
```yaml service.yaml theme={null}
client_auth:
# Option 1: JWKS URI endpoint
jwks_uri: http://demo-backend:6060/api/auth/keys
# Option 2: Static collection of public keys for JWT verification
# jwks:
# keys:
# - kty: 'RSA'
# n: '[rsa-modulus]'
# e: '[rsa-exponent]'
# alg: 'RS256'
# kid: '[key-id]'
audience: ['powersync-dev', 'powersync']
```
## Option 2: Symmetric JWTs — Using HS256
Using shared secrets (HS256) for JWT signing is generally not recommended for production environments due to security risks. We recommend using asymmetric keys (Option 1) instead, which provide better security through public/private key separation.
PowerSync supports HS256 symmetric JWTs for development and testing purposes.
### Generating a Shared Secret
You can generate a shared secret in the terminal using the following command:
```bash theme={null}
openssl rand -base64 32
```
### Base64 URL Encode the Shared Secret
Once you've generated the shared secret, you will need to Base64 URL encode it before setting it in the PowerSync instance Client Auth configuration.
You can use the following command to Base64 URL encode the shared secret:
```bash theme={null}
echo -n "your-value-here" | base64 -w 0 | tr '+/' '-_' | tr -d '='
```
### Set the Shared Secret in the PowerSync Instance
1. Go to the [PowerSync Cloud Dashboard](https://dashboard.powersync.com/) and select your project and instance.
2. Go to the **Client Auth** view.
3. Find the section labeled **HS256 Authentication Tokens (ADVANCED)** and click **+** button to add a new token.
4. Set the **KID** to a unique identifier for the token (you'll use the same KID to sign the token). Set the **Shared Secret** to the Base64 URL encoded shared secret.
5. Click **Save and Deploy**.
1. Add the shared secret to your PowerSync Service configuration file, e.g.:
```yaml service.yaml theme={null}
client_auth:
jwks:
keys:
- kty: oct
alg: 'HS256'
kid: '[key-id]'
k: '[base64url-encoded-shared-secret]'
```
2. Restart the PowerSync Service.
### Generate New JWTs Using the KID and Shared Secret
Using your newly-created shared secret, you can generate JWT tokens [in your backend](/configuration/app-backend/setup) using the same KID you set in the PowerSync Service configuration. Here's a example TypeScript function using the [`jose`](https://github.com/panva/jose) library:
```typescript theme={null}
import * as jose from 'jose';
export const generateToken = async (payload: Record, userId: string) => {
return await new jose.SignJWT(payload)
.setProtectedHeader({ alg: 'HS256', kid: 'your-kid' })
.setSubject(userId)
.setIssuer('https://your-domain.com')
.setAudience('https://your-powersync-instance.com')
.setExpirationTime('60m')
// Note: The shared secret should be read from a secure source or environment variable and not hardcoded.
.sign(Buffer.from('your-base64url-encoded-shared-secret', 'base64url'));
};
```
This JWT can then be used to authenticate with the PowerSync Service. In your [`fetchCredentials()` function](/configuration/app-backend/client-side-integration), you will need to retrieve the token from your backend API.