> ## Documentation Index
> Fetch the complete documentation index at: https://docs.powersync.com/llms.txt
> Use this file to discover all available pages before exploring further.

# CloudCode for MongoDB backends

> Use JourneyApps CloudCode as a managed backend for PowerSync with MongoDB.

We've made optional functionality available to MongoDB customers that handles the [backend integration](/configuration/app-backend/setup) required by PowerSync.

This makes PowerSync easier to implement for developers migrating from [MongoDB Atlas Device Sync](/migration-guides/atlas-device-sync) who prefer not having to maintain their own backend code and infrastructure (PowerSync's [typical architecture](/configuration/app-backend/setup) is to use your own backend to process mutations uploaded from clients, and to generate JWTs for authentication if needed).

Specifically, you can use the CloudCode feature of JourneyApps Platform, a [sibling product](https://journeyapps.com) of PowerSync. [CloudCode](https://docs.journeyapps.com/reference/cloudcode/cloudcode-overview) is a serverless cloud functions engine based on Node.js and AWS Lambda. It's provided as a fully-managed service running on the same cloud infrastructure as the rest of PowerSync Cloud. PowerSync and JourneyApps Platform share the same accounts backend, so you don’t need to create a separate account to use CloudCode. For further background, see [this post on our blog](https://www.powersync.com/blog/turnkey-backend-functionality-conflict-resolution-for-powersync).

<Note>
  We are currently making JourneyApps Platform CloudCode available for free to all our customers who use PowerSync with MongoDB. It does require a bit of "white glove" onboarding from our team. [Contact us](/resources/contact-us) if you want to use this functionality.
</Note>

# Using CloudCode for MongoDB Backend Functionality

There is a MongoDB template available in CloudCode that provides the backend functionality needed for a PowerSync MongoDB implementation. Here is how to use it:

## Create a New JourneyApps Platform Project

To create a new JourneyApps Platform project in order to use CloudCode:

<Steps>
  <Step>
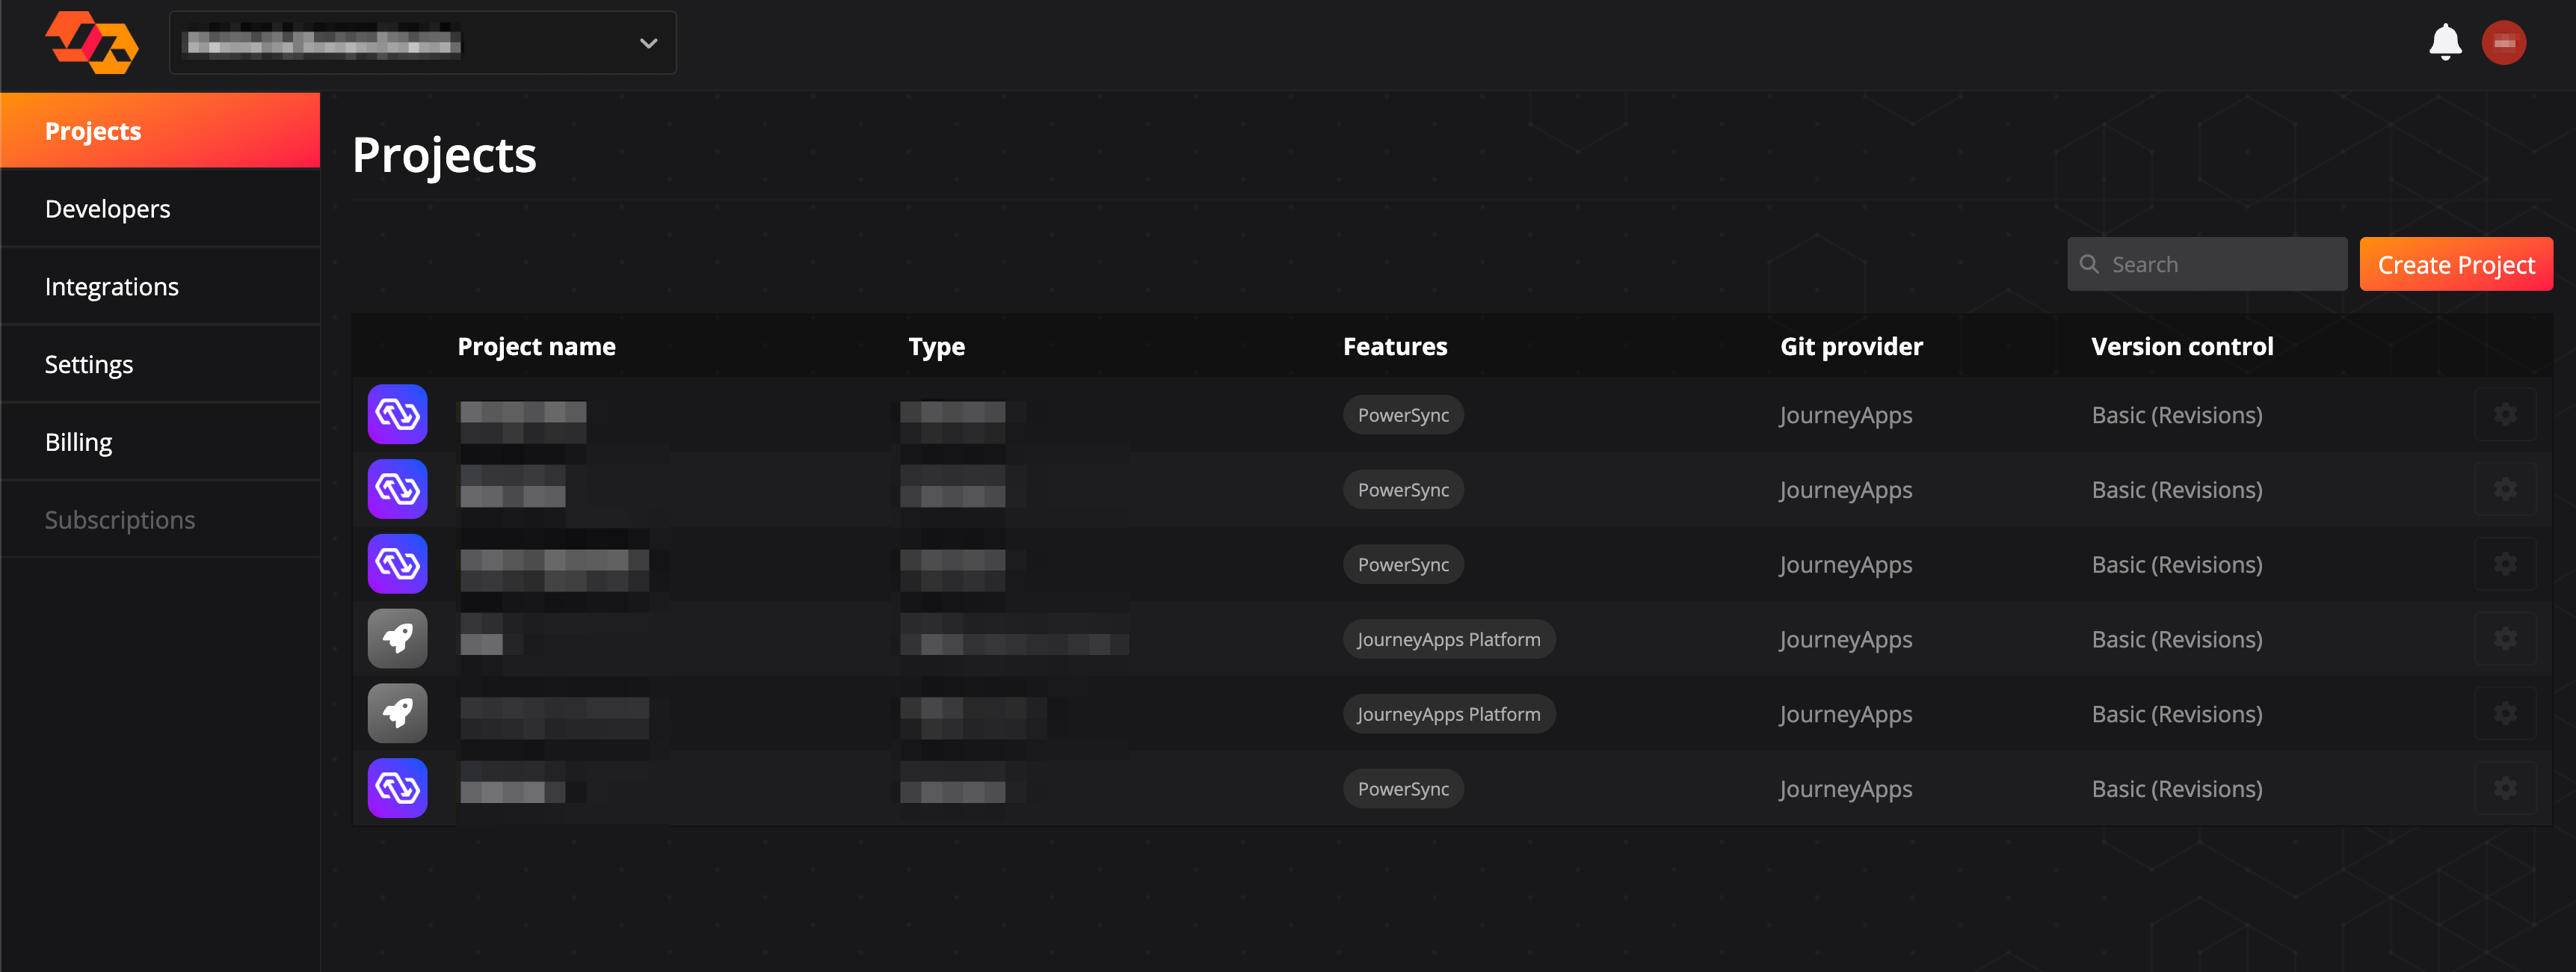
    Navigate to the [JourneyApps Admin Portal](https://accounts.journeyapps.com/portal/admin). The JourneyApps Platform (of which CloudCode is a component) shares an accounts backend with PowerSync, so you can log in using the same username and password that you use for PowerSync. You should see a list of your projects if you've created any.

    <Frame>
      <img src="https://mintcdn.com/powersync/3jDKXjn3LiU68TOx/images/usage/tools/JourneyApps_Project_1.png?fit=max&auto=format&n=3jDKXjn3LiU68TOx&q=85&s=9e2fcecd6af6e451d944c4f26227f04e" width="3446" height="1300" data-path="images/usage/tools/JourneyApps_Project_1.png" />
    </Frame>
  </Step>

  <Step>
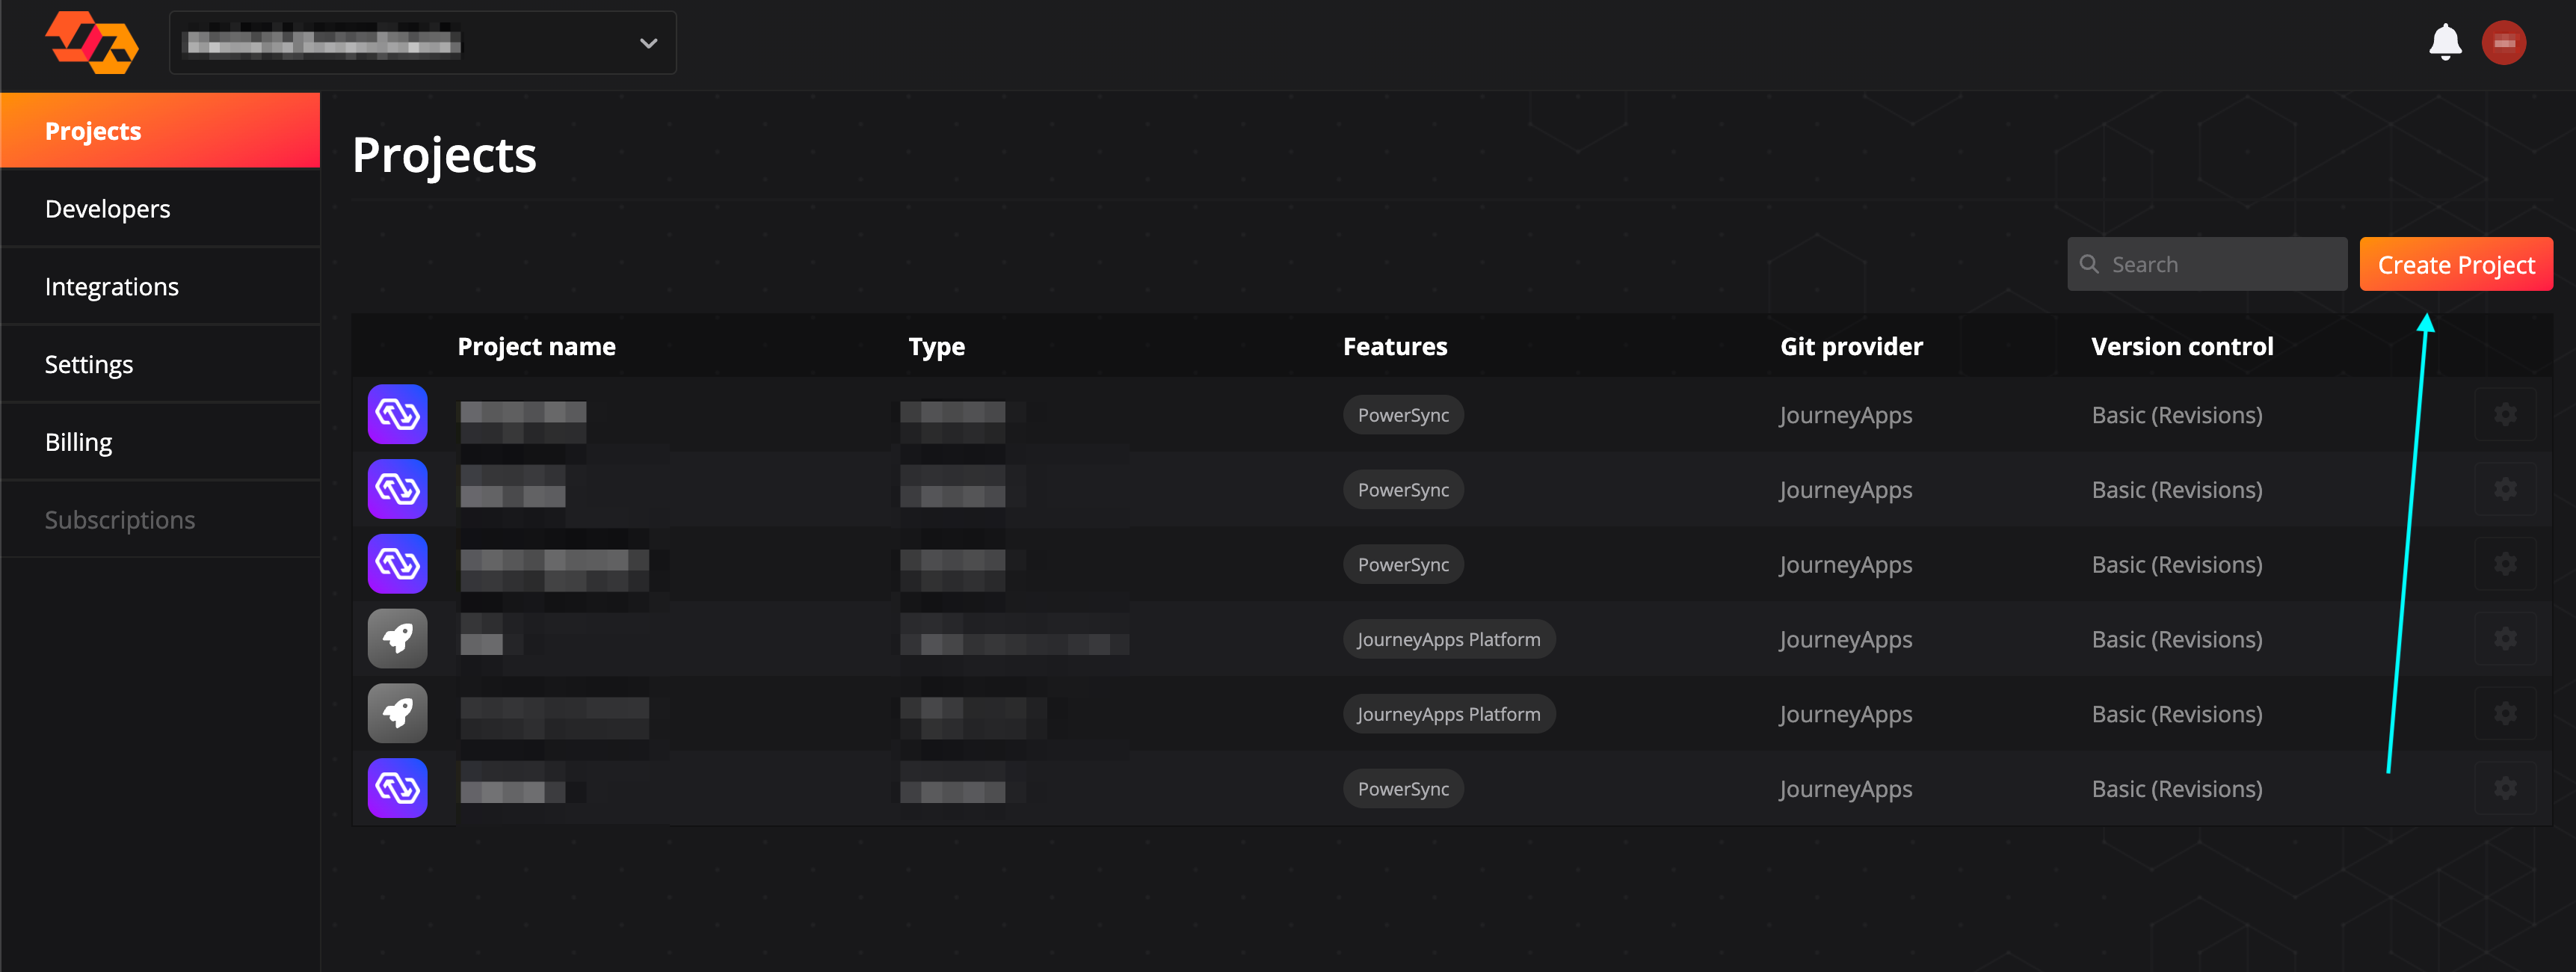
    Select **Create Project** at the top right of the screen.

    <Frame>
      <img src="https://mintcdn.com/powersync/3jDKXjn3LiU68TOx/images/usage/tools/JourneyApps_Project_2.png?fit=max&auto=format&n=3jDKXjn3LiU68TOx&q=85&s=e8301f255d30998d2988ae644cc5e91d" width="3446" height="1300" data-path="images/usage/tools/JourneyApps_Project_2.png" />
    </Frame>
  </Step>

  <Step>
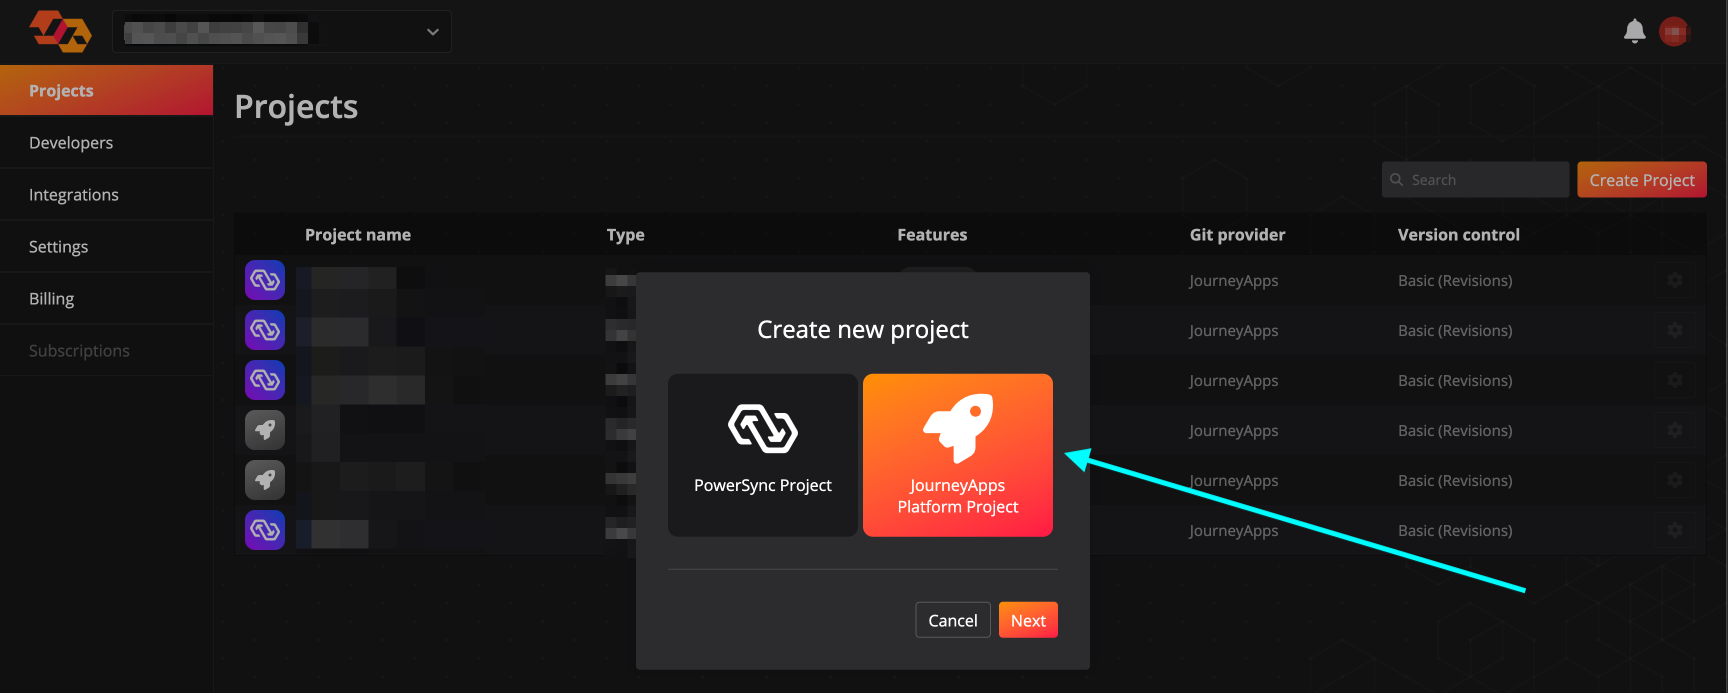
    Select **JourneyApps Platform Project** and click **Next**.

    <Frame>
      <img src="https://mintcdn.com/powersync/3jDKXjn3LiU68TOx/images/usage/tools/JourneyApps_Project_3.png?fit=max&auto=format&n=3jDKXjn3LiU68TOx&q=85&s=e22b9d2cd3fd784584c8f60a71449811" width="1728" height="693" data-path="images/usage/tools/JourneyApps_Project_3.png" />
    </Frame>
  </Step>

  <Step>
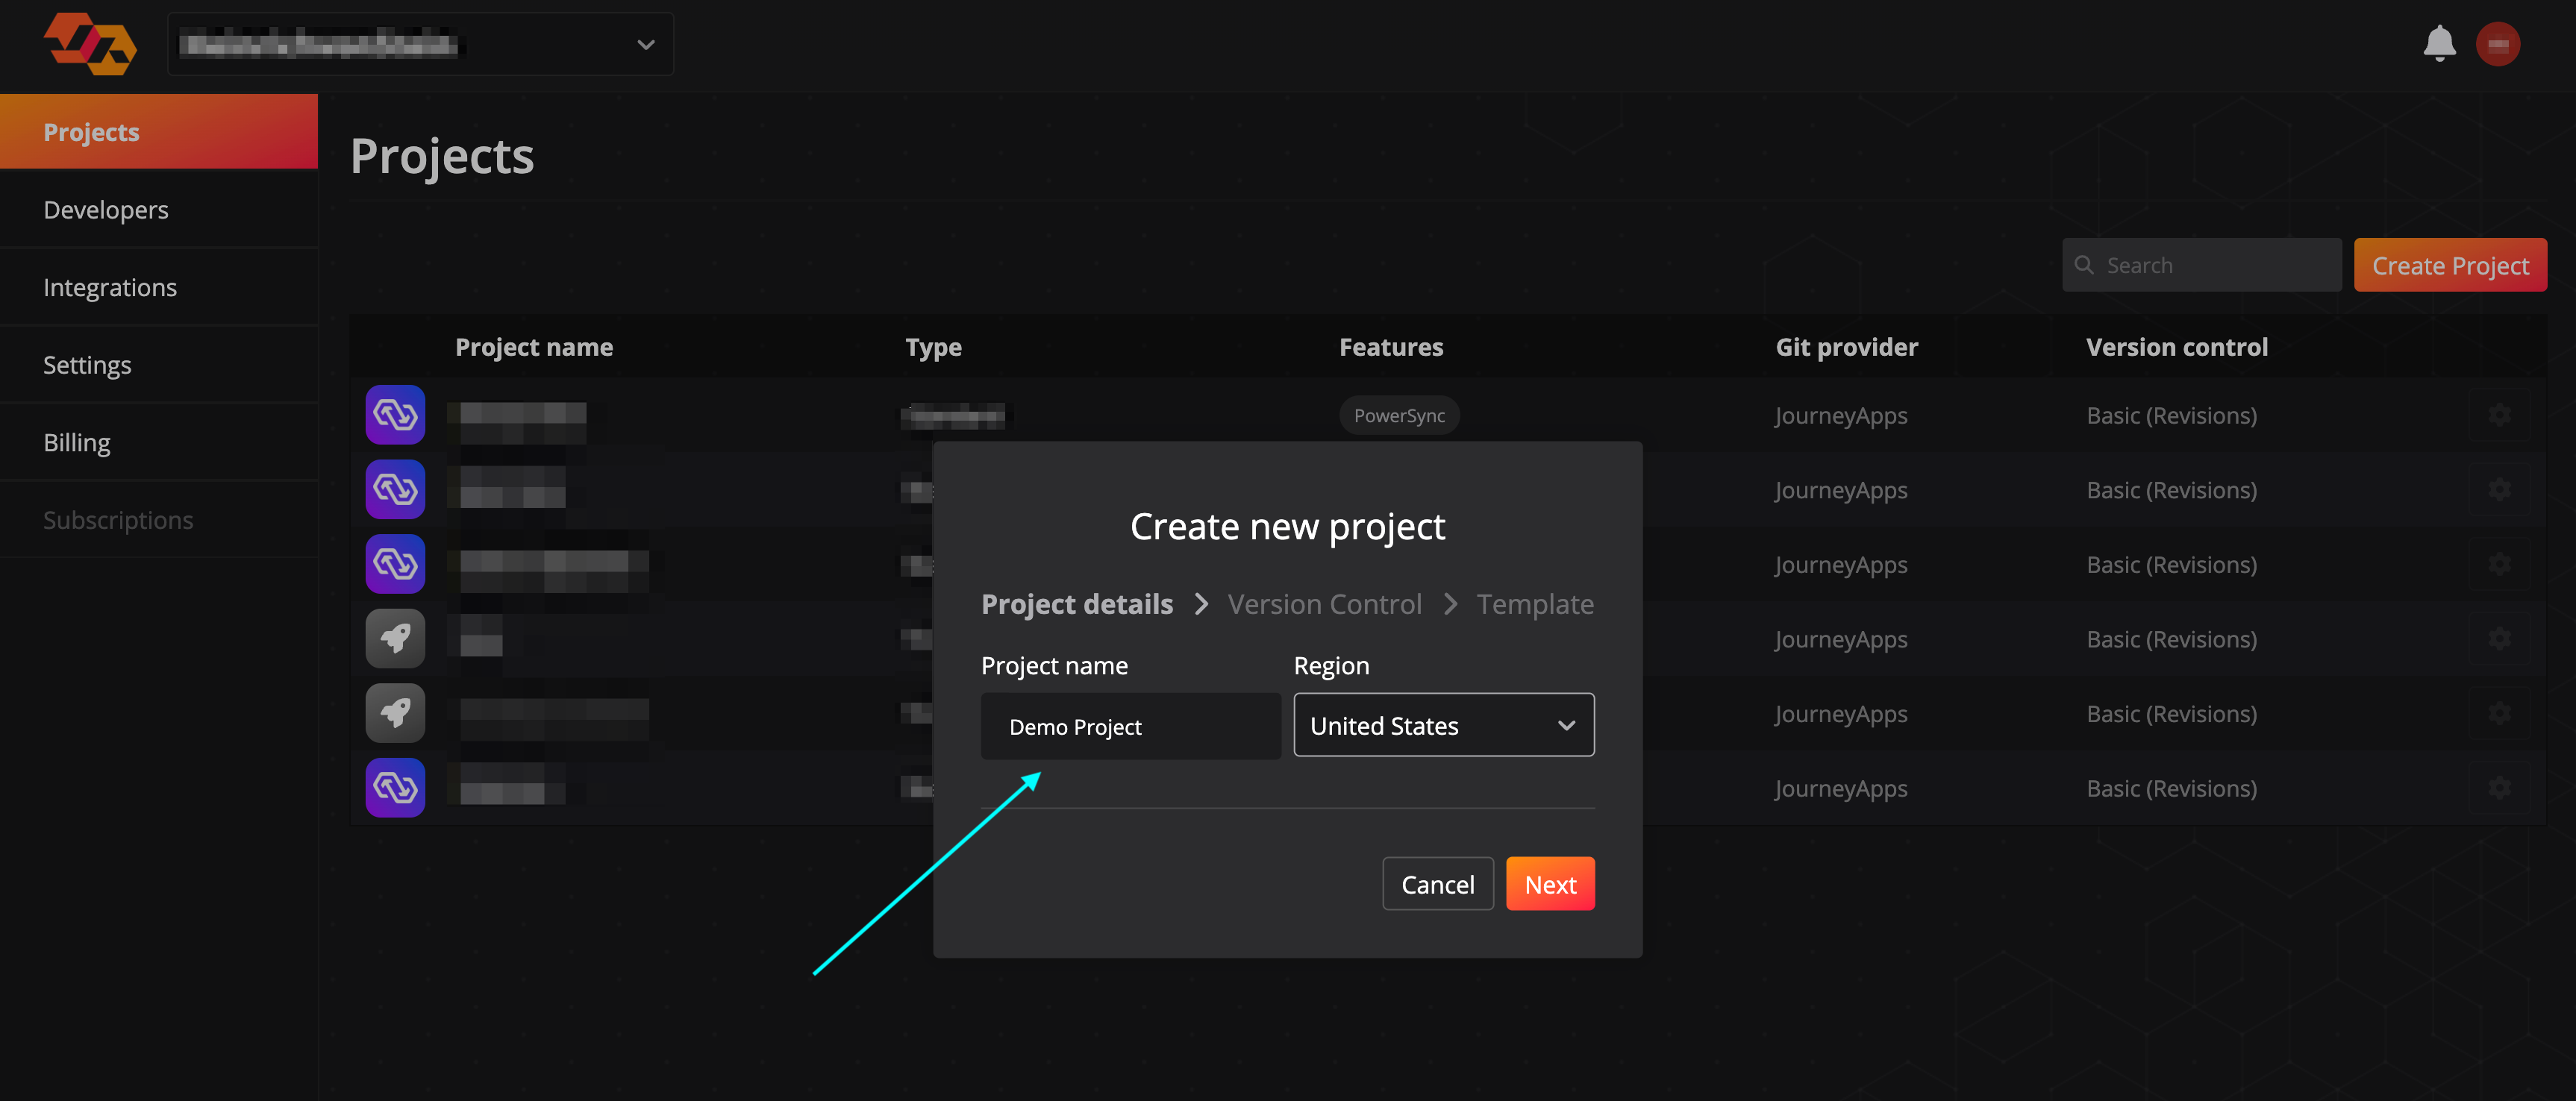
    Enter a project name and click **Next**.

    <Frame>
      <img src="https://mintcdn.com/powersync/3jDKXjn3LiU68TOx/images/usage/tools/JourneyApps_Project_4.png?fit=max&auto=format&n=3jDKXjn3LiU68TOx&q=85&s=5d38667d420a094a5945a2e40bde4dd3" width="3452" height="1476" data-path="images/usage/tools/JourneyApps_Project_4.png" />
    </Frame>
  </Step>

  <Step>
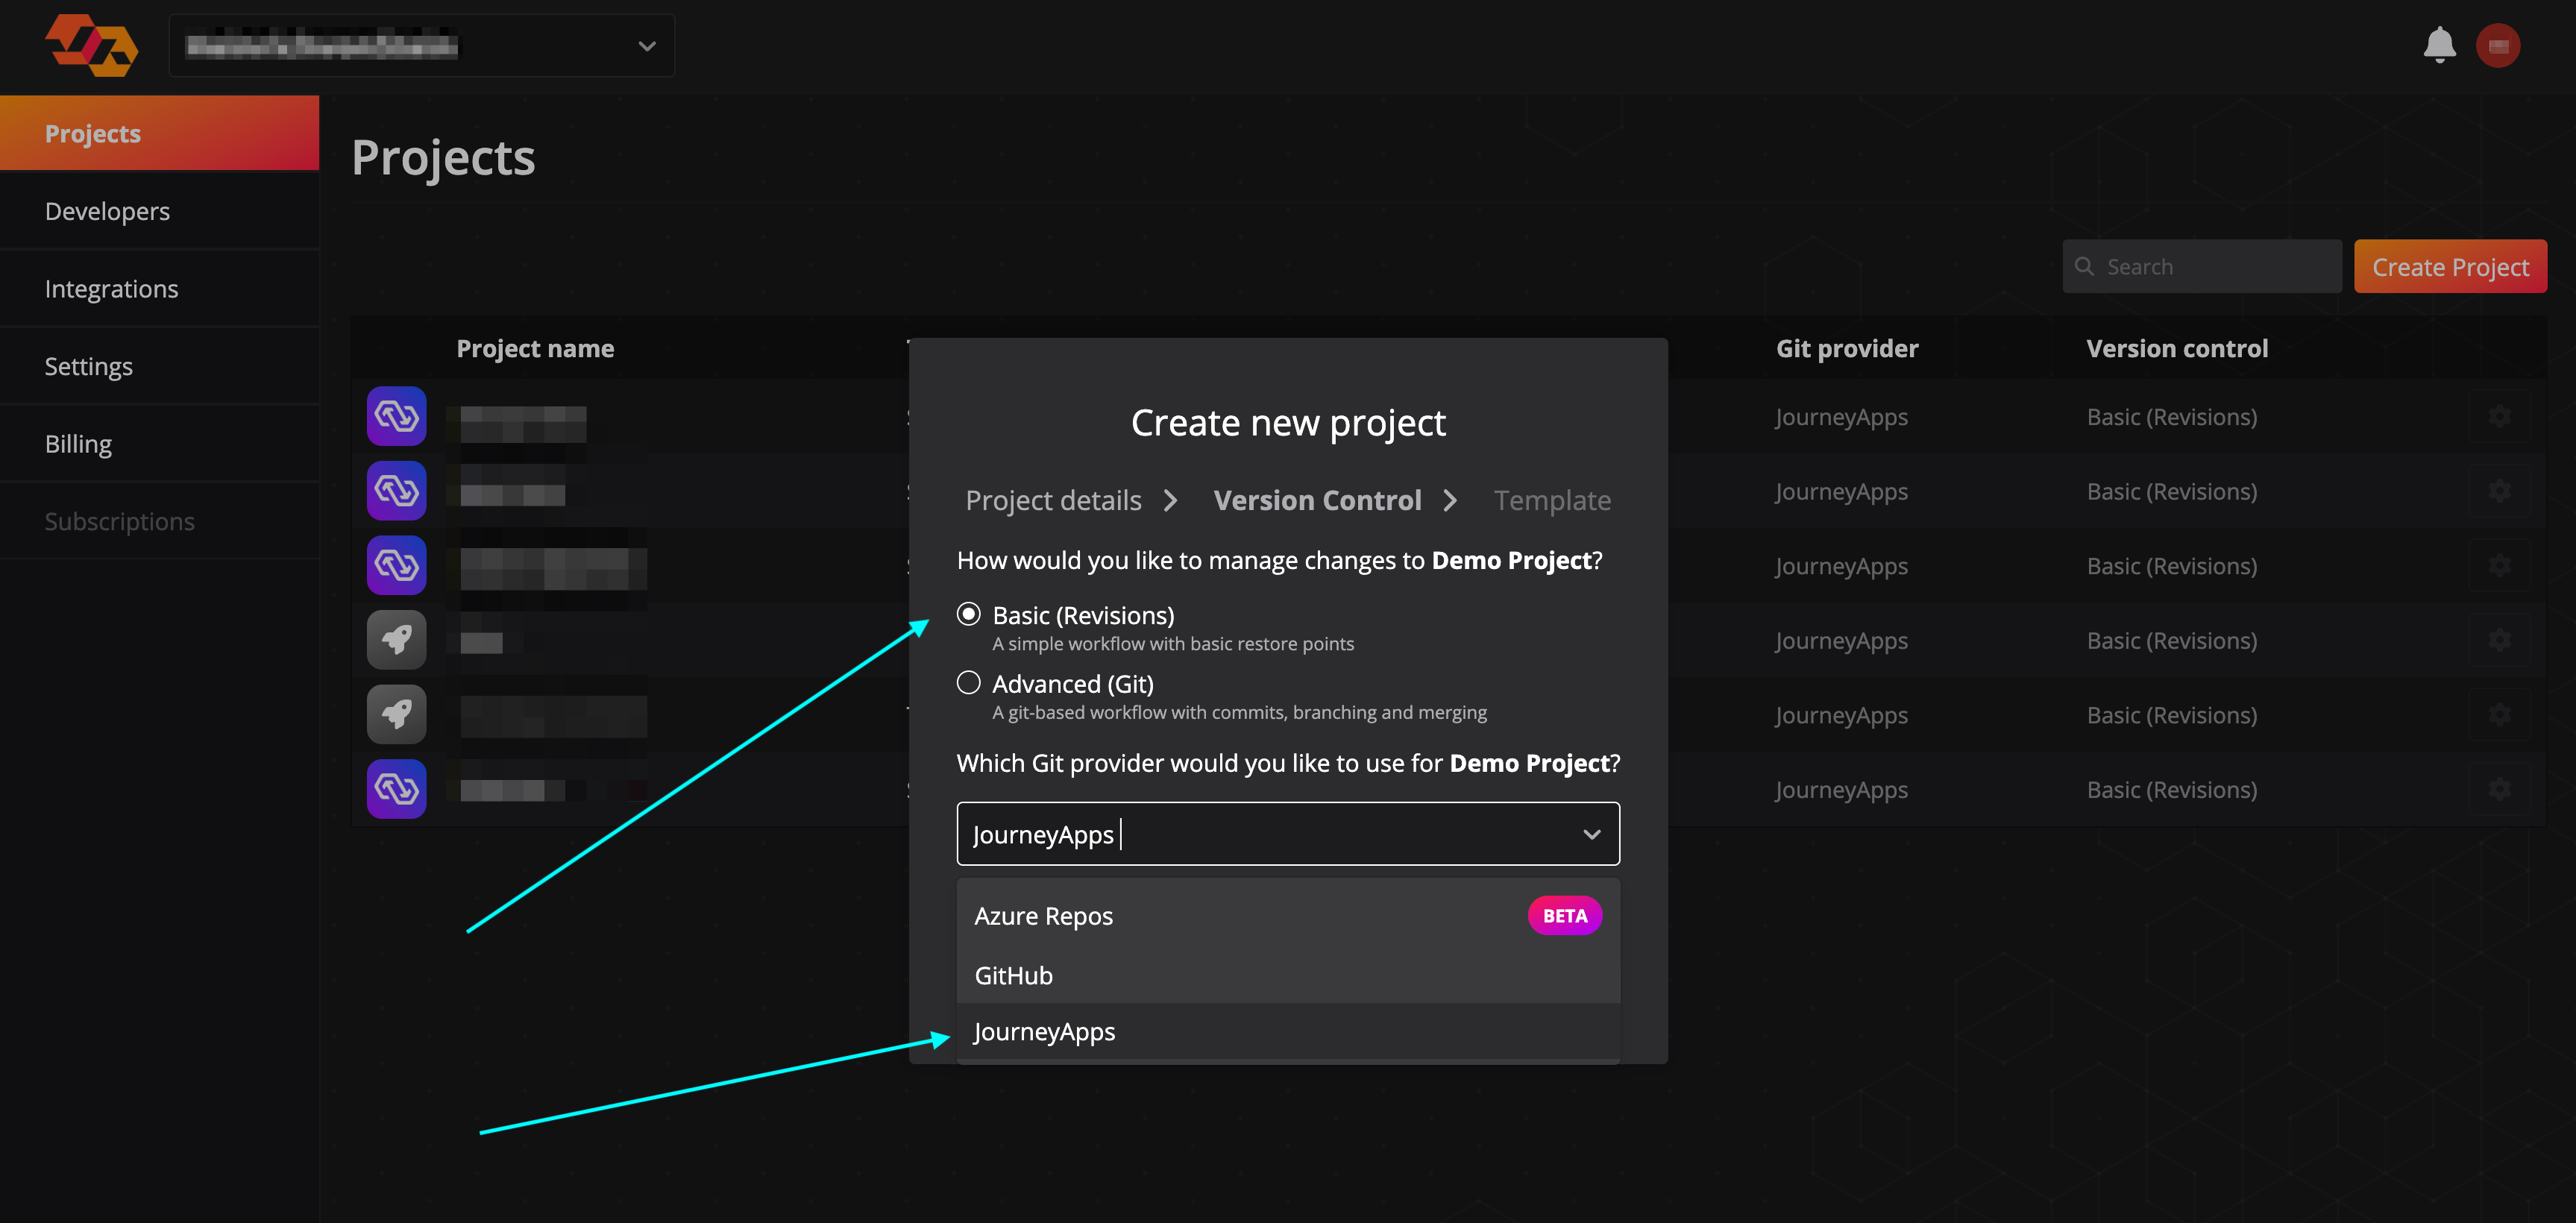
    There are options available for managing version control for the project. For simplicity we recommend selecting **Basic (Revisions)** and **JourneyApps** as the Git provider.

    <Frame>
      <img src="https://mintcdn.com/powersync/3jDKXjn3LiU68TOx/images/usage/tools/JourneyApps_Project_5.png?fit=max&auto=format&n=3jDKXjn3LiU68TOx&q=85&s=60e0ebbf3d6eac64254e92f5378e989c" width="3454" height="1640" data-path="images/usage/tools/JourneyApps_Project_5.png" />
    </Frame>
  </Step>

  <Step>
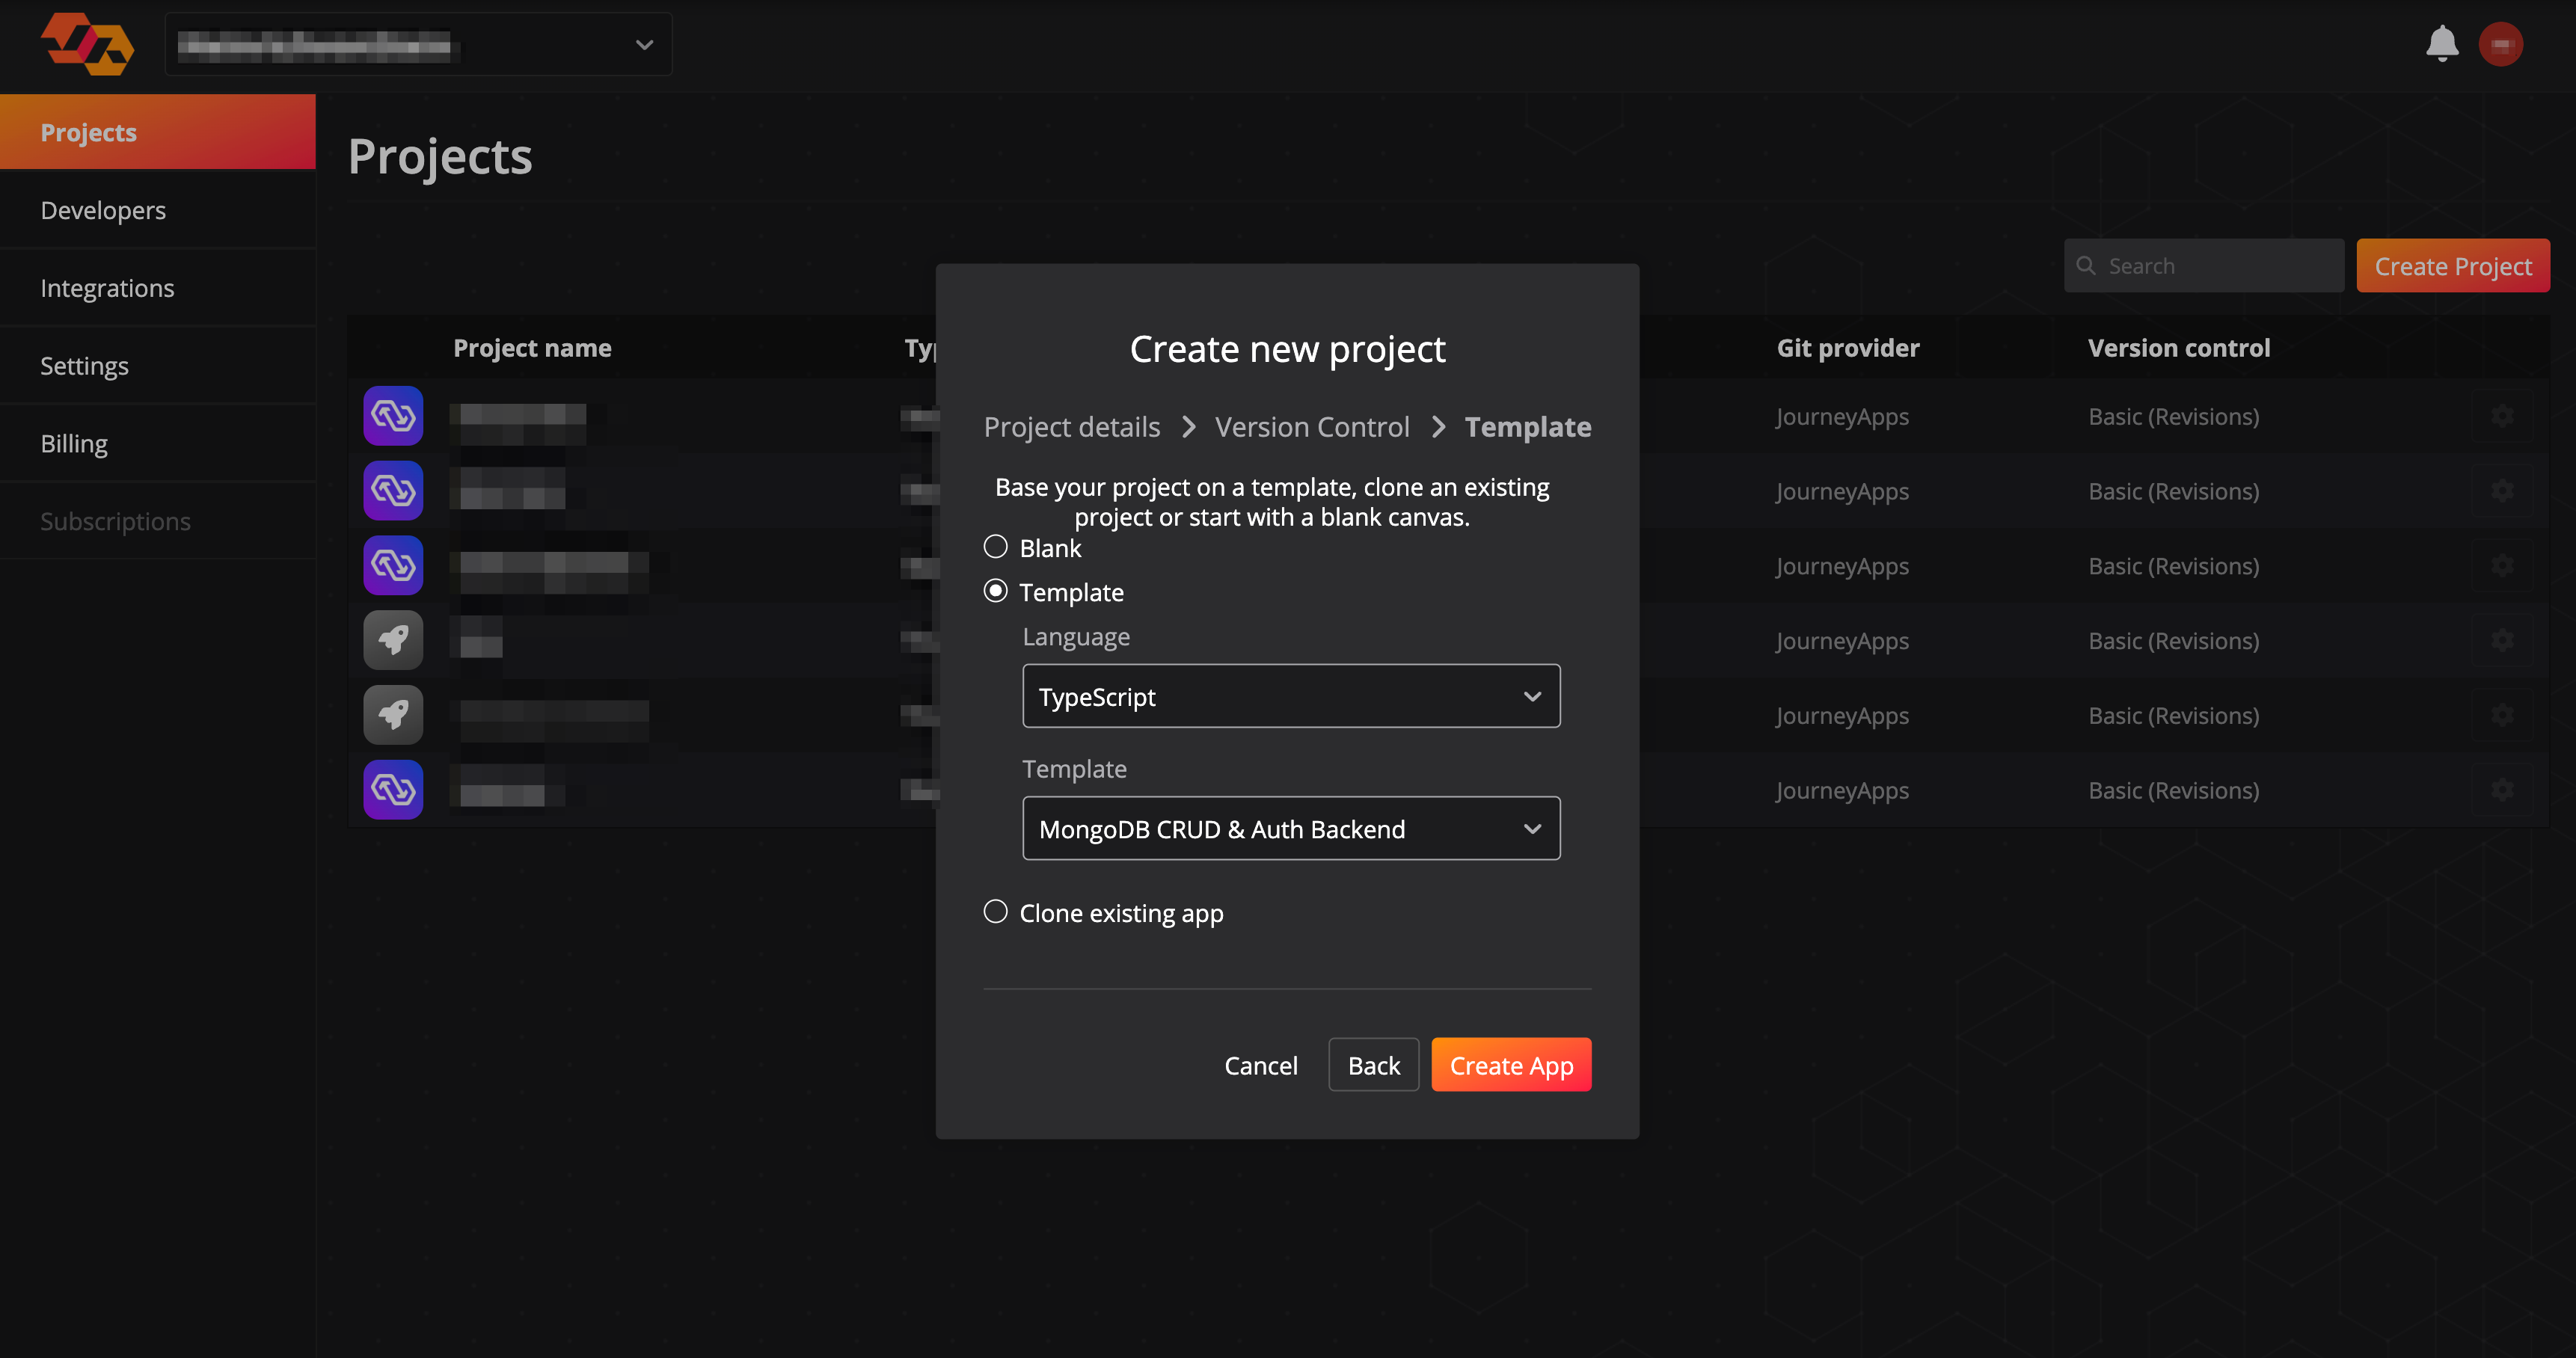
    Select **TypeScript** as your template language, and **MongoDB CRUD & Auth Backend** as your template. Then click **Create App**.

    <Frame>
      <img src="https://mintcdn.com/powersync/3jDKXjn3LiU68TOx/images/usage/tools/JourneyApps_Project_6.png?fit=max&auto=format&n=3jDKXjn3LiU68TOx&q=85&s=31dbd2f9ac9e684c794e86b6f1aeb5b8" width="3444" height="1816" data-path="images/usage/tools/JourneyApps_Project_6.png" />
    </Frame>
  </Step>
</Steps>

## Overview of the CloudCode Tasks Created From the Template

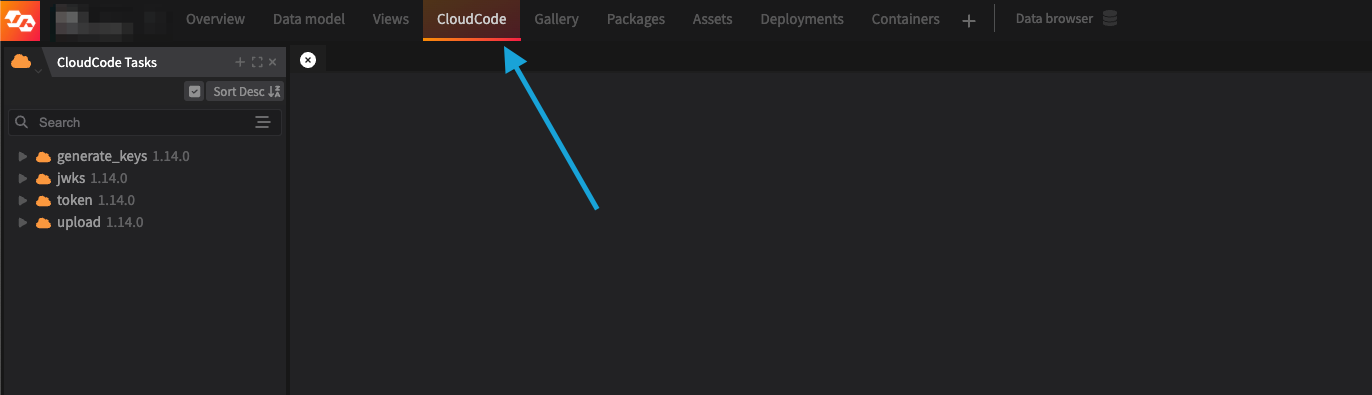
To view the CloudCode tasks that were created in the new project using this template, select **CloudCode** at the top of the IDE:

<Frame>
  <img src="https://mintcdn.com/powersync/3jDKXjn3LiU68TOx/images/usage/tools/CloudCode.png?fit=max&auto=format&n=3jDKXjn3LiU68TOx&q=85&s=dd666e920e0c6065cf6535bfeff1d72a" width="1372" height="395" data-path="images/usage/tools/CloudCode.png" />
</Frame>

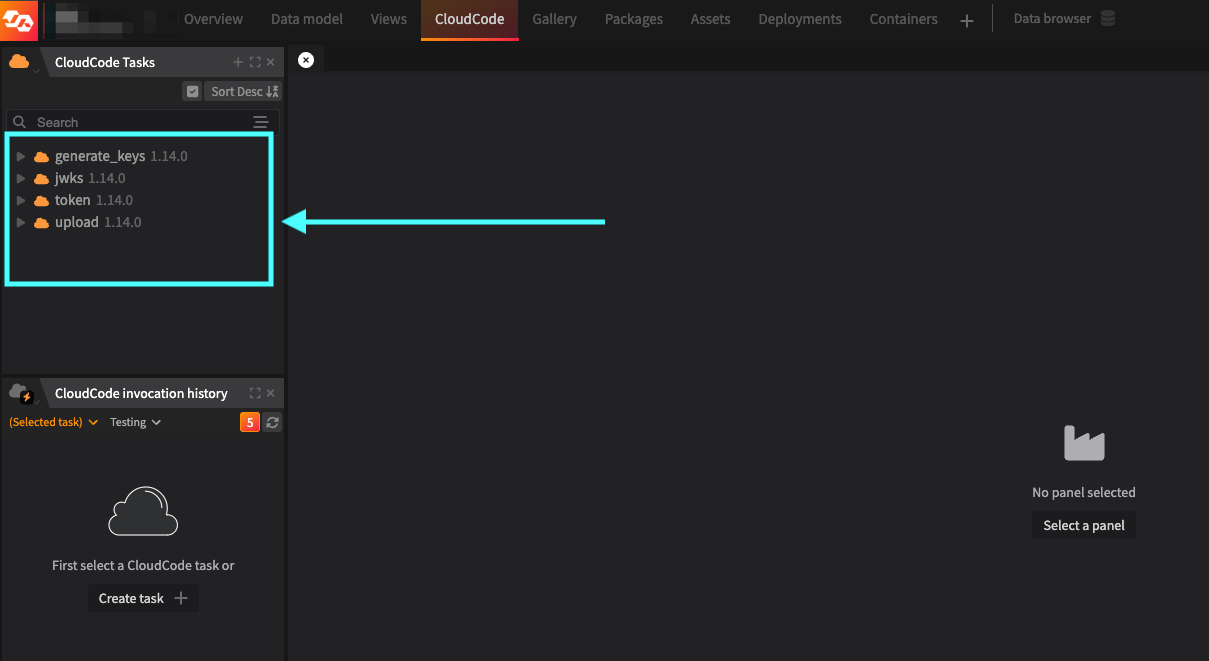
Here you will find four CloudCode tasks:
<Frame>
  <img src="https://mintcdn.com/powersync/3jDKXjn3LiU68TOx/images/usage/tools/CloudCode-tasks.png?fit=max&auto=format&n=3jDKXjn3LiU68TOx&q=85&s=613829f90b3c2895d020c7c48d76394f" width="1209" height="661" data-path="images/usage/tools/CloudCode-tasks.png" />
</Frame>

Here's the purpose of each task:

<table>
  <thead>
    <tr>
      <th>Task</th>
      <th>Used For</th>
      <th>Description</th>
    </tr>
  </thead>

  <tbody>
    <tr>
      <td>`generate_keys`</td>

      <td>
        [Authentication Integration](/configuration/app-backend/setup)
      </td>

      <td>This is a task that can be used to generate a private/public key pair which the `jwks` and `token` tasks (see below) require. This task does **not** expose an HTTP endpoint and should only be used for development and getting started.</td>
    </tr>

    <tr>
      <td>`jwks`</td>

      <td>
        [Authentication Integration](/configuration/app-backend/setup)
      </td>

      <td>This task [exposes an HTTP endpoint](https://docs.journeyapps.com/reference/cloudcode/triggering-a-cloudcode-task/trigger-cc-via-http) which has a `GET` function which returns the public [JWKS](https://stytch.com/blog/understanding-jwks/) details.</td>
    </tr>

    <tr>
      <td>`token`</td>

      <td>
        [Authentication Integration](/configuration/app-backend/setup)
      </td>

      <td>This task exposes an HTTP endpoint which has a `GET` function. The HTTP endpoint can be called by your [`fetchCredentials()` function](/configuration/app-backend/client-side-integration) when implementing the PowerSync Client SDK, to generate a JWT that the Client SDK can use to authenticate against the PowerSync Service.</td>
    </tr>

    <tr>
      <td>`upload`</td>

      <td>
        [Client Mutations](/configuration/app-backend/setup)
      </td>

      <td>This task exposes an HTTP endpoint which has a `POST` function which is used to process uploaded mutations from a PowerSync client and persist it to the source MongoDB database. The HTTP endpoint can be called by your [`uploadData()` function](/configuration/app-backend/client-side-integration) when implementing the PowerSync Client SDK.</td>
    </tr>
  </tbody>
</table>

<Tip>
  If you will not be using [Custom Authentication](/configuration/auth/custom), you do not need the authentication-related tasks. Some [authentication providers](/configuration/auth/overview#common-authentication-providers) (e.g. Auth0, Clerk, Stytch, Keycloak, Azure AD, Google Identity, WorkOS, etc.) already generate JWTs for users which PowerSync can work with directly. If you are *not* using one of those authentication providers, you will need to implement [Custom Authentication](/configuration/auth/custom)
</Tip>

## Setup: Deployment Configuration

Before using the tasks, we need to configure a "deployment".

1. At the top of the IDE, select **Deployments**.
2. Create a new deployment by using the **+** button at the top right, *or* use the default `Testing` deployment. You can configure different deployments for different environments (e.g. staging, production)
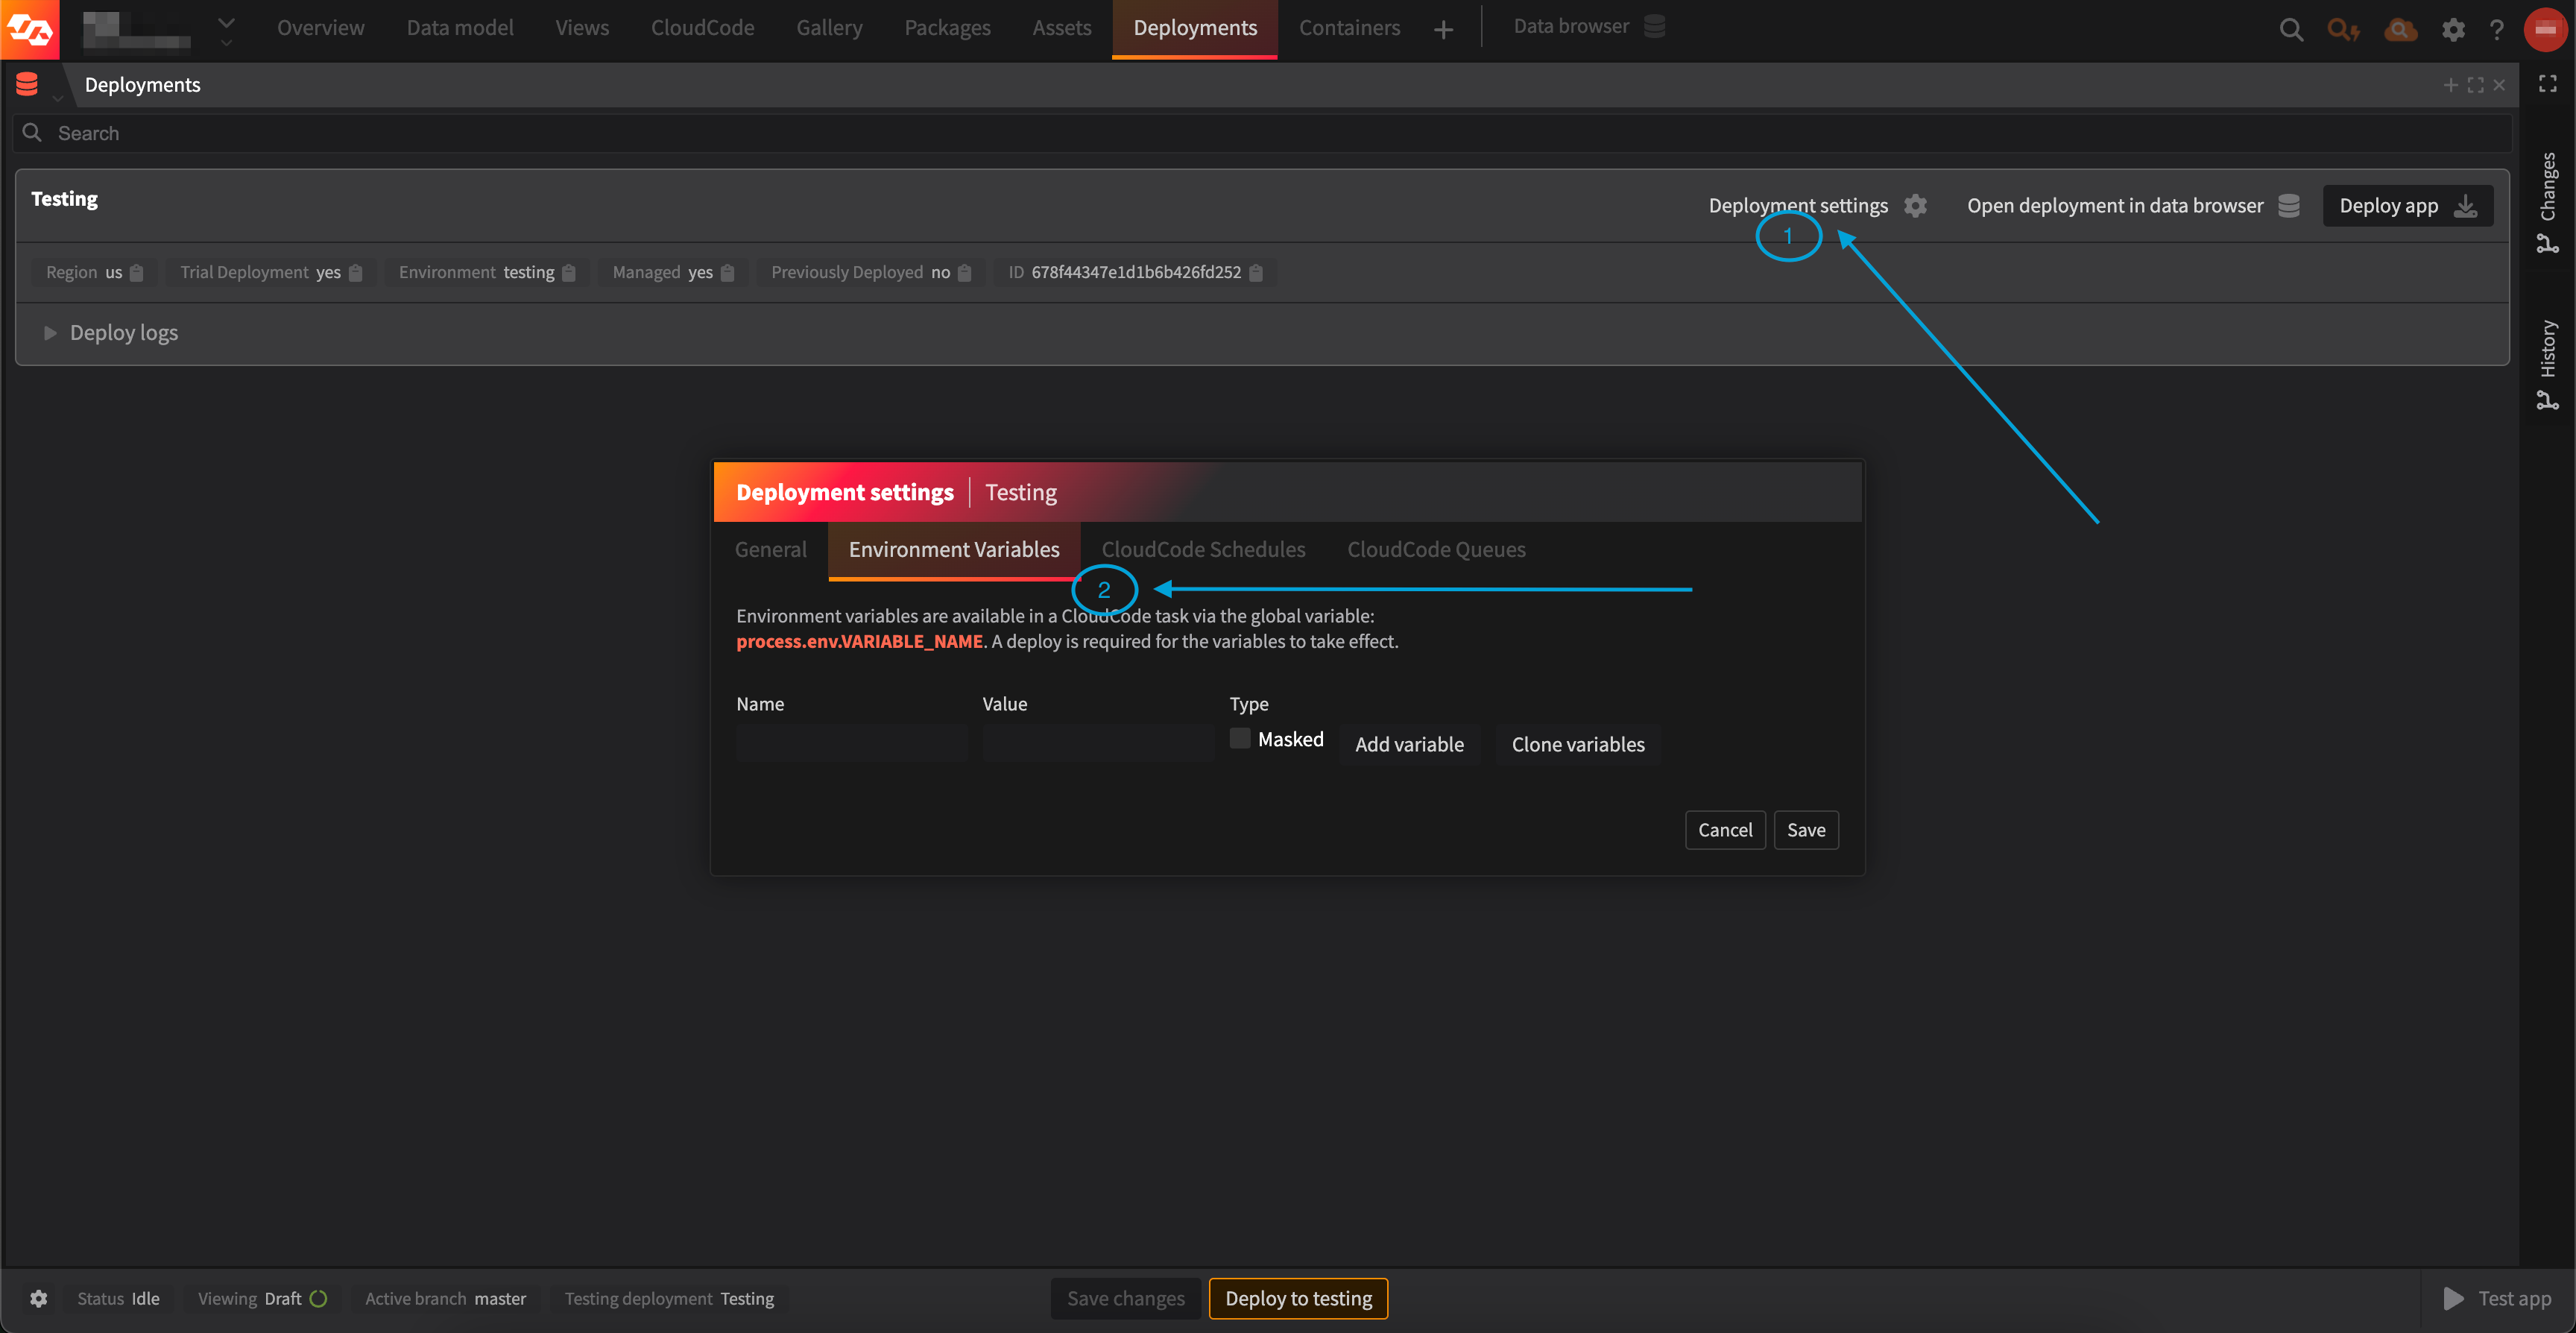
3. Now select the **Deployment settings** button for the deployment.
4. In the **Deployment settings** - **General** tab, capture a **Domain** value in the text field. This domain name determines where the HTTP endpoints exposed by these CloudCode tasks can be accessed. The application will validate the domain name to make sure it's available.
5. Select **Save**.
6. Deploy the deployment: you can do so by selecting the **Deploy app** button, which can be found on the far right for each of the deployments you have configured. After the deployment is completed, it will take a few minutes for the domain to be available.
7. Your new domain will be available at `<domain_name>.poweredbyjourney.com`. Open the browser and navigate to the new domain. You should be presented with `Cannot GET /`, because there is no index route.

## Setup: Authentication Integration (Optional)

<Tip>
  If you will not be using [Custom Authentication](/configuration/auth/custom), you can skip this part. See the explanatory note about authentication above.
</Tip>

### 1. Generate Key Pair

First, you need to generate a public/private key pair. Do the following to generate the key pair:

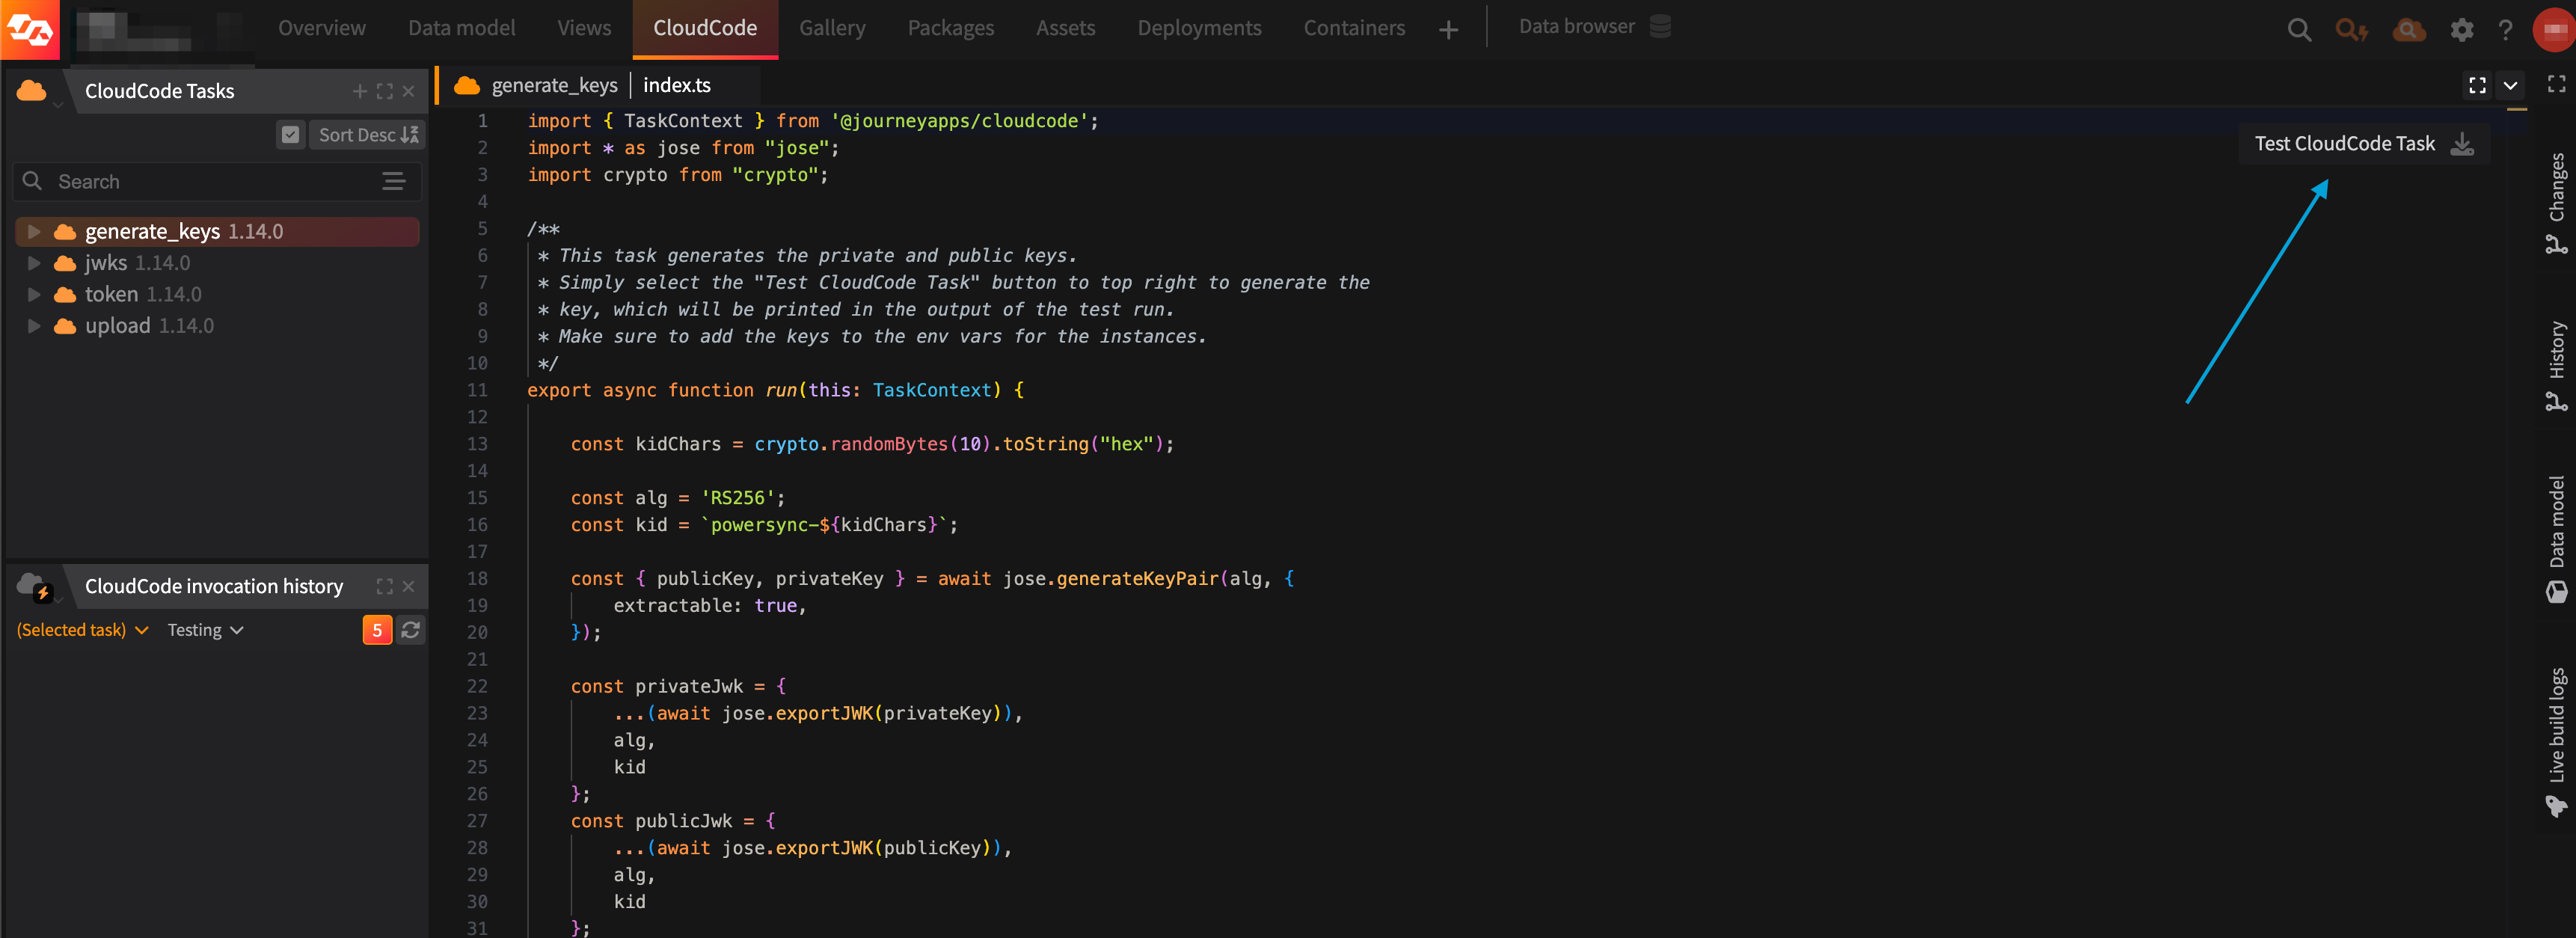
1. Open the `generate_keys` CloudCode task.
2. Select the **Test CloudCode Task** button at the top right. This will print the public and private key in the task logs window.

<Frame>
  <img src="https://mintcdn.com/powersync/3jDKXjn3LiU68TOx/images/usage/tools/test-cloudcode-task.png?fit=max&auto=format&n=3jDKXjn3LiU68TOx&q=85&s=3f528df94bff3e04e3c32469be8a76ba" width="3444" height="1254" data-path="images/usage/tools/test-cloudcode-task.png" />
</Frame>

3. Copy and paste the `POWERSYNC_PUBLIC_KEY` and `POWERSYNC_PRIVATE_KEY` to a file — we'll need this in the next step.
<Note>
  This step is only meant for testing and development because the keys are printed in the log files.
  For production, [generate a key pair locally](https://github.com/powersync-ja/powersync-jwks-example?tab=readme-ov-file#1-generate-a-key-pair) and move onto step 2 and 3.
</Note>

### 2. Configure Environment Variables

The following variables need to be set on the deployment for authentication integration purposes:

* `POWERSYNC_PUBLIC_KEY` - This is the `POWERSYNC_PUBLIC_KEY` from the values generated in step 1.
* `POWERSYNC_PRIVATE_KEY` - This is the `POWERSYNC_PRIVATE_KEY` from the values generated in step 1.
* `POWERSYNC_URL` - This is your PowerSync instance URL that can be found in the [PowerSync Dashboard](https://dashboard.powersync.com/).

See the [How to Set Environment Variables](#how-to-set-environment-variables) section below for instructions.

### 3. Test

Open your browser and navigate to `<domain_name>.poweredbyjourney.com/jwks` (using the domain name you picked in [Setup: Deployment Configuration](#setup:-deployment-configuration))

If the setup was successful, the `jwks` task will render the keys in JSON format. Make sure the format of your JWKS keys matches the format [in this example](https://hlstmcktecziostiaplz.supabase.co/functions/v1/powersync-jwks) JWKS endpoint.

## Setup: Handling Client Mutations

The following variables need to be set on the deployment for the purpose of handling uploaded client mutations:

* `POWERSYNC_URL` - This is your PowerSync instance URL that can be found in the [PowerSync Dashboard](https://dashboard.powersync.com/).
* `MONGO_URI` - This is the URI of your MongoDB source database e.g. `mongodb+srv://<username>:<password>@<database_domain>/<database>`

See the next section for instructions.

## How to Set Environment Variables

To set environment variables, do the following:

1. At the top of the IDE, select **Deployments**.
2. Click on **Deployment settings** for the relevant deployment.
3. Select the **Environment Variables** tab.

<Frame>
  <img src="https://mintcdn.com/powersync/3jDKXjn3LiU68TOx/images/usage/tools/cloudcode-envvar.png?fit=max&auto=format&n=3jDKXjn3LiU68TOx&q=85&s=a029f6888a567cbd64e4d6667a37a94e" width="3456" height="1788" data-path="images/usage/tools/cloudcode-envvar.png" />
</Frame>

4. Capture the variable name in the **Name** text field.
5. Capture the variable value in the **Value** text field.
6. (Suggested) Check the **Masked** checkbox to obfuscate the variable value for security purposes.
7. Repeat until all the variables are added.

To finalize the setup, do the following:

1. Select the **Save** button. This is important, otherwise the variables will not save.
2. Deploy the deployment: you can do so by selecting the **Deploy app** button.

## Usage: Authentication Integration (Optional)

<Note>Make sure you've configured a deployment and set up environment variables as described in the **Setup** steps above before using the HTTP API endpoints exposed by the CloudCode tasks</Note>

### Token

You would call the `token` HTTP API endpoint when you [implement](/configuration/app-backend/client-side-integration) the `fetchCredentials()` function in your client application.

Send an HTTP GET request to `<domain_name>.poweredbyjourney.com/token?user_id=<user_id>` to fetch a JWT for a user. You must provide a `user_id` in the query string of the request, as this is included in the JWT that is generated.

The response of the request will be structured like this:

```json theme={null}
{"token":"..."}
```

### JWKS

The `jwks` HTTP API endpoint is used by PowerSync to validate the token returned from the `<domain_name>.poweredbyjourney.com/token` endpoint. This URL must be set in the configuration of your PowerSync instance.

Send an HTTP GET request to `<domain_name>.poweredbyjourney.com/jwks`.

An example of the response format can be found using [this link](https://hlstmcktecziostiaplz.supabase.co/functions/v1/powersync-jwks).

## Usage: Handling Client Mutations

### Upload

You would call the `upload` HTTP API endpoint when you [implement](/configuration/app-backend/client-side-integration) the `uploadData()` function in your client application.

Send an HTTP POST request to `<domain_name>.poweredbyjourney.com/upload`

The body of the request payload should look like this:

```json theme={null}
{
  "batch": [{
    "op": "PUT",
    "table": "lists",
    "id": "61d19021-0565-4686-acc4-3ea4f8c48839",
    "data": {
      "created_at": "2024-10-31 10:33:24",
      "name": "Name",
      "owner_id": "8ea4310a-b7c0-4dd7-ae54-51d6e1596b83"
    }
  }]
}
```

* `batch` should be an array of mutations from the PowerSync Client SDK.
* `op` refers to the type of each mutation recorded by the PowerSync Client SDK (`PUT`, `PATCH` or `DELETE`). Refer to [Writing Data](/client-sdks/writing-data) and [Writing Client Changes](/handling-writes/writing-client-changes) for details.
* `table` refers to the table in SQLite where the mutation originates from, and should match the name of a collection in MongoDB.

The API will respond with HTTP status `200` if the write was successful.

## Customization: Handling Client Mutations

You can make changes to the way the `upload` task writes data to the source MongoDB database.

Here is how:

1. Go to **CloudCode** at the top of the IDE in your JourneyApps Platform project
2. Select and expand the `upload` task in the panel on the left.
3. The `index.ts` contains the entry point function that accepts the HTTP request and has a `MongoDBStorage` class which interacts with the MongoDB database to perform inserts, updates and deletes. To adjust how mutations are performed, take a look at the `updateBatch` function.

## Production Considerations

Before going into production with this solution, you will need to set up authentication on the HTTP endpoints exposed by the CloudCode tasks.

If you need more data validations and/or authorization than what is provided by the template, that will need to be customized too. Consider introducing schema validation of the data being written to the source MongoDB database. You should use a [purpose-built](https://json-schema.org/tools?query=\&sortBy=name\&sortOrder=ascending\&groupBy=toolingTypes\&licenses=\&languages=\&drafts=\&toolingTypes=\&environments=\&showObsolete=false) library for this, and use [MongoDB Schema Validation](https://www.mongodb.com/docs/manual/core/schema-validation/) to enforce the types in the database.

Please [contact us](/resources/contact-us) for assistance on any of the above.